Tuesday, April 30, 2019

Relax with the Seahorse

I'm joining in with the Just Us Girls challenge today where they have this lovely inspiration photo.
My eye immediately saw the seahorse as I had just purchased Sebastian the Seahorse by Lavinia Stamps and was happy to ink it up!  
I inked Sebastian with Versamark and then sprinkled Wendy Vecchi Embossing powders over the stamping in Fern Green, Cornflower Blue and Red Geranium.  I die cut the panel using Shape Shifters: Ovals and the background panel using Bold Borders: Polka Dots both from PTI.  I added a little piece of sea flora cut using Salt Air Flora Die Collection and the sentiment from Flipping Out both from PTI.

I splattered the oval with blue watercolor ink and then watercolored washed over it with the same blue.  I added 3 enamel dots from Altenew.  The oval and sentiment are popped up on foam dots.

I'm also linking my card to:
Toppings Texture - I added texture with die cuts and wet embossing


I was inspired by the photo


Stamps:  Sebastian the Seahorse - Lavinia Stamps, Flipping Out - PTI
Paper:  white, Enchanted Evening - PTI
Ink:  Versamark, True Black - PTI
Accessories:  Shape Shifters: Oval dies, Bold Borders: Polka Dots, Salt Air Flora Die Collection - PTI, Fern Green, Cornflower Blue, Red Geranium Embossing Powders - Wendy Vecchi/Ranger, enamel dots - Altenew, blue water color paint, paint brush, water, foam dots.

Monday, April 22, 2019

Three Little Notebooks - Eileen Hull's New Sizzix Notebook Die

Today I'm sharing 3 projects I made using Eileen Hull's fun new Sizzix Notebook Die!
It has JUST been released.
I made 3 little Notebooks -  an Address Book, a Travel Book and a Photo Book.  Each theme was inspired by the papers that I bought at Joann when I was shopping for design ideas!

They are easy peasy to assemble once you've decided on the purpose for your notebook!
All of them were made in the same basic way.
Here are a few photos of how I put them together.
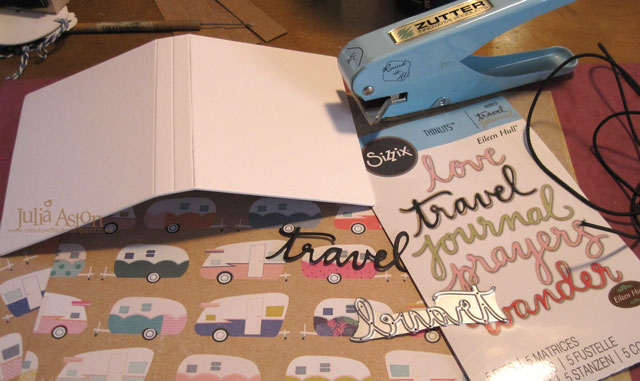
I die cut the Notebook out of matboard and then cut two panels 8" x 5" out of patterned paper to cover the inside and outside of it.  For the pages I cut 15 panels of kraft card, each 7" x  4 3/4" and folded them all in  half to make 3 signatures of 5 pages each. 
(which when folded makes 10 pages in each signature!)
 I glued the paper to the front and back of the Notebook, smoothing the paper over the matboard and then folding them at the binding area and smoothing again where any 'pull aways' might have happened! Sometimes you have to trim a little off the edges after it dries if they don't quite match up!
  I tied 3 pieces of round elastic cord around the middle of the notebook - knotting them on the inside.  I slipped a signature under each of the elastics to hold them in the Notebook.
 Here is how it looks on the outside
 I die cut 26 small tags using Eileen's Credit Card Sleeve and tags die and stamped each one with a letter of the alphabet.
 I adhered one tab to each page. 
 Here's the view from the back.  I added a kraft border piece to the edge of the front and back. 
 Not only is that a design look - but also covers up any white showing if the patterned paper doesn't quite cover the matboard edge!
 I added a piece of white round elastic cord as a closure for the journal - knotting it around the binding cords so it won't fall off when untied!
The next two Notebooks were made pretty much in the same way as the first one above.

I used some fun camper paper (a nod to Eileen's camper Scotty!) for my Travel Notebook. I die cut the word 'travel' from Journaling Words for the cover.
 I cut some credit card pieces from Credit Card Sleeve and tags to use on a couple of the pages (shown below)
 I used two signatures in this Notebook, again using kraft paper cutting 8 pieces 7" x 4 3/4"and folding in half.  Each signature has 8 pages (4 folded in half)
 I again used a piece of white round elastic cord for the closure, knotting it around the bindings.  I added strips of colored cardstock on the edges.
 I slipped an Idea-ology map panel into this Credit Card sleeve (trimmed down) and added an 
Idea-ology 'play' Flashcard to the front.
On another page is a vintage Idea-ology Photo Booth photo slipped into a Credit card sleeve as well as an Idea-ology Pocket Card envelope and Idea-ology 'friend' Flashcard layered on the front.
 My third Notebook is for photos - using this fun camera patterned paper adhered to the inside and outside of the Mini Album die cut out of matboard.
On this album, when I folded it after adhering the pattern paper - the paper split along the binding as I had let it dry too much before bending it at the scoring (just the paper split not the matboard) -  so I  added a piece of black card stock to cover the binding area.  I added this cute photo of my 5 year old grandniece Mila enjoying an ice cream cone last summer framed in a die cut Polaroid Frame. 
I added a black round elastic cord as a closure on this album - knotting it through the binding.
I just added one signature of 4 white pages cut to 7" x 4 3/4" and folded in half - 8 total pages.
 A final view of my 3 little Notebooks! Pretty quick to cut and assemble!
These 3 Notebooks will also fit quite nicely inside of Eileen's new Treasure Box Die - a great way to keep them all together! 

Check out Eileen's blog all month where she is gathering all of the notebook projects created by the Inspiration Team!

I'm linking my Address Book to:


Address Book
Stamps:  Karen Foster Snap Stamps Alphabet - retired
Paper:  matboard, Kraft Paper Stack - Joann's, Ocean Tides - Papertrey Ink, Houses DP American Crafts - Joann's.
Ink:  Archival Jet Black
Accessories:  Mini Album Die, Credit Card Sleeve and Tags Dies - Eileen Hull/Sizzix, round elastic cord - Joann's, Tombow Glue, Word Window Punch - SU, Zutter Corner Rounder.

Travel Notebook
Paper:  matboard, Kraft Paper Stack - Joann's, Hibiscus Burst and True Black - Papertrey Ink, Camper DP American Crafts - Joann's, DP Bitty Big Blueberry Sky - Papertrey Ink.
Accessories:  Mini Album Die, Journaling Words, Credit Card Sleeve and Tags Dies - Eileen Hull/Sizzix,  Photo Booth, Flash Cards, Pocket Cards - Idea-ology, round elastic cord - Joann's, Tombow Glue, Word Window Punch - SU, Zutter Corner Rounder

Photo Notebook
Stamps: Karen Foster Snap Stamps Alphabet - retired
Paper:  matboard, white and True Black - Papertrey Ink, Camera's  DP American Crafts - Joann's.
Ink:  Archival Jet Black
Accessories:  Mini Album - Eileen Hull/Sizzix, Polaroid Photo Frame Die - Jillian Vance, round black elastic cord, Word Window Punch - SU, Tombow Glue, ScorTape, Zutter Corner Rounder.

Thursday, April 18, 2019

CAS Stencil - April Mid-Month Reminder - Embossing Pastes/Gels

I'm here today to remind you there's still time to join in on the April CAS Stencil Card Challenge!
Barb is our hostess this month and she wants us to use Embossing Pastes/Gells with our stencils.
 I made a white on white sympathy card.
I laid the 6"x6" Leaf Burst Stencil from Altenew over a panel of white card stock.  Then I spread Worn Linen Nuvo Expanding Mousse over the stencil with a plastic spatula.
It looks flat and shiny when you remove the stencil although it is raised up because it's thick.
(Wash off your stencil immediately after lifting it off the cardstock).  
If you let the panel dry naturally, it will stay looking like this
 If you dry it by heating it with a heat tool, it will puff up (hence the name 'Expanding Mousse').  
I like this heated look better than letting it dry naturally but you have the option of one or the other.
 Here's a close up where hopefully you can see the 'pouffiness' and a little glimmer.
I cut the stenciled panel right down the middle of the design and then I fussy cut around the petals and adhered half of the stencil onto the left edge of a watercolor paper card base.  It just fit on the
5 1/2" card base height!  I stamped the sentiment from Faithful Flutterings by Catherine Pooler onto a strip of watercolor paper and adhered it over the stencil with foam dots.
 So please join us over at CAS Stencil Card Challenge and show us how you use your stencils with Embossing Pastes or Gels!  Check out all the inspiration from the Design Teams as well as our 
April Guest Designer:  Bobby (Bits & Pieces)
You have until 4/24 to link up your CAS creation!

I'm also linking my card to:


Use a Stencil


Stamps:  Faithful Fluttering - Catherine Pooler
Paper:  Water Color - Canson, white - PTI
Ink:  True Black - PTI
Accessories:  Leaf Burst Stencil - Altenew, Nuvo Expanding Mousse - Worn Linen, Heat Tool, foam dots.

Friday, April 12, 2019

Elves for Christmas

I always get my Christmas cards done early so that I can enjoy the wonderful Christmas season.  
So I'm also always looking for the monthly Christmas blog challenges for inspiration!
Here are two cards I made using the same Elf stamp but with different hats and using different colors and die cuts.   
The stamps are from Jolly Old Elf from Waltzingmouse which unfortunately closed several years ago. 
I used the Pierced Feature Frames:Ovals from PTI for this one and added clear Tiny Twinkles as the berries for the mistletoe on the end of the elf's hat as well as on the sentiment strip.
I actually made the purple card below first - but wasn't completely happy with it - not really sure why - so I then made the green one!  Then I thought, "I guess I do like the purple one too!"  So here they both are!

The elf body and the hats are separate stamps (there's one more hat in the set, more like a Santa hat) so for the purple elf,  I stamped and cut out the hat and adhered it over the Bold Borders Diagonal die from PTI.  I added Cherry Ice Stickles to the boot cuffs, belt and hat for a little sparkle!

 I'm linking my cards to:
anything goes


Stamps:  Jolly Old Elf - Waltzingmouse (retired)
Paper:  white, Limeade Ice - PTI
Ink:  Fern Green - Wendy Vecchi Blendable Die Ink, Plum Pudding - PTI
Accessories:  Pierced Feature Frames: Ovals, Bold Borders: Diagonal Die - PTI, foam dots, Tiny Twinkles - Taylored Expressions, Cherry Ice Stickles.

Thursday, April 11, 2019

Three Giraffes x 2

I am once again attempting to play along with Darnell's Twofer challenge - which this month is Zoo Animals!  These instructions always throw me for a loop!
I used a really funny giraffe stamp from Technique Tuesday called Attitude Giraffes on both cards.

I dropped Glossy Accents on the sunglasses (which you can't see too well here).  The sentiment is from What's Up by Avery Elle.
For my Twofer - I stamped the Attitude Giraffes on patterned paper and die cut it with a Circle Nestability and framed it in a Pinked Edge Nestability.  I added Eerie Eyes from Doodlebug and brushed over all the giraffes with Clear Glitter Wink of Stella (not showing in photo!). The birthday sentiment is from Party Animal by Avery Elle.

To be sure I made each card a different design, I enlisted the help of two sketch challenges!

For my It's Been Too Long card I'm linking to:
I tweaked the sketch a tad since my image was a long rectangle

For my You Party Animal card I'm linking to:
I used the sketch as well as the colors from the photo


It's Been Too Long
Stamps:  Attitude Giraffes - Technique Junkies, What's Up - Avery Elle.
Paper:  White, Kraft, Dark Chocolate - PTI, DP Enchanted - Authentique.
Ink:  Wendy Vecchi Archival Orange Blossom, True Black - PTI
Accessories:  Pierced Feature Frames: Rectangles - PTI, Glossy Accents.

You Party Animal
Stamps:  Attitude Giraffes - Technique Tuesday, Party Animal - Avery Elle.
Paper:  White, New Leaf - PTI, DP Rainbow Bright - Sunny Studio.
Ink:  Hero Hues Black, True Black - PTI
Accessories:  Nestability Circles and Pinked Circles, Clear Glitter Wink of Stella, Eerie Eyes - Doodlebug Designs.