Showing posts with label The Cupcake Challenge. Show all posts

Thursday, March 3, 2022

Sunflowers In Solidarity

 In support of the Ukraine and it's people - I made this card in the colors of their flag and with sunflowers, one of their major exports.

I used the lovely Botanicuts Sunflower die from The Greetery for my blooms.  I took a large panel of watercolor paper and smooshed it onto my craft mat that was inked with Ranger Distress Dried Marigold, Wild Honey and Squeezed Lemonade inks and spritzed with water.   When the panel was dry, I die cut enough layers of petals to create 3 sunflowers.   

The color wasn't as bright as I wanted it so I tapped some Lemon Brushos on the petal pieces and Rustic Brown Brushos on the center pieces and spritzed them with water.  After this was dry, I layered the petals on top of each other and adhered the center pieces.

 The sentiments are from an old retired set called Army from The Greeting Farm.


I'm linking my card to the following challenges:

Cupcake Inspirations.  

Addicted to Stamps and More

Creatalicious Challenges

Anything Goes

Fusion 

Inspired by the 3 blooms photo but made them yellow with a blue background.

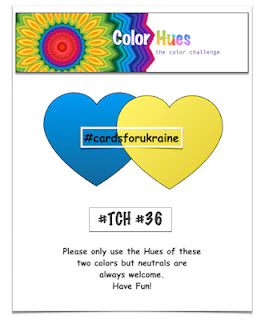
Color Hues


 My thoughts and prayers are with the Ukrainian people during this terrible time.


Stamps: Army - The Greeting Farm (retired)
Ink: Ranger Distress Dried Marigold, Wild Honey, Squeezed Lemonade, Obsidian - Altenew
Paper: Watercolor paper - Canson Cold Press, Harvest Gold - PTI, DP Rainbow Bright 6x6 Paperpad - Sunny Studio.
Accessories: Botanicuts Sunflower Die - The Greetery, Lemon and Rustic Brown Brushos, water mister

Thursday, June 13, 2019

It's All About the Bees!

I'm joining in with Darnell's Twofer Challenge today, but to help me make two cards using the same stamps but with different designs I turned to several other challenges as you will see linked at the bottom of my post!
So here are my twofer's -  both using retired stamp set Honey Bee from PTI. 
For the first card I made an encouragement or Birthday card depending on what I end up stamping inside!  I used the sketch from the Fusion Challenge, the colors from The Color Throwdown Challenge,  I popped up the bee on a folded strip of card for the Cupcake Inspiration - Add a Pop Up Element and The Country View Challenge is Bugs!


I used just the sketch
My flowers are hot pink and orange, the honeycomb stamp is yellow and the stem is green.

Add a Pop Up Element
It's a Bugs Life

For my 2nd card I made a baby card using the CAS Colours and Sketches Sketch
 My card is a 4 1/4" square.

CAS Sketch

So there you have my Twofers for this month - with a little help from my friends!  You'll find the Twofer Card Challenge here.

Stamps:  Honey Bee, Honey Bee Sentiments, Wee Folk - PTI.
Paper:  White, Bright Buttercup, Hawaiian Shores, Happy Spots DP - PTI,
Ink:  True Black, Bright Buttercup, Orange Zest, New Leaf, Berry Sorbet, Classic Kraft, Hawaiian Shores.
Accessories:  Pierced Feature Frames: Rectangles dies, Noted Scalloped Square Die - PTI, half circle die - from China, foam dots, Clear Glitter Wink of Stella, 1" circle punch - SU, enamel dots - Altenew, puffy heart - Michaels

Saturday, February 9, 2019

A Love Pillow

Today I'm joining in with the Card Concept Challenge - they have the perfect image for Valentine inspiration!
I'd say my card design is Clean Layered.
I was inspired by the red love pillow, the stripes in the tan pillow and texture  in the sofa.
I used a red rubber stamp (unknown) for the LOVE, embossing it in white on a red panel.  I added a white die cut heart to the center of the O (in my bits bin left over from a die cut).
I die cut a square out of Soft Stone striped paper and layered it over the red panel with lots of foam dots.  
I embossed a piece of Rustic Cream cardstock with a chevron embossing folder, die cut it with a Wonky Rectangle Nestability (sort of like the pillow shape,  and texture on the sofa), trimmed the outside edges  to fit over my card and layered it on with more foam dots.
This could be a Valentine or an Anniversary card depending on what I stamp inside!

I'm also linking my card to:


Stamps:  Love red rubber stamp - unknown
Paper:  White, Pure Poppy, Rustic Cream, DP Bitty Big Softstone - PTI
Ink:  Versamark
Accessories:  Wow Bright White Embossing Powder, heat tool, Stitched Mats Squares die - Lil Inker Designs, Wonkey Rectangles - Nestabilities/Spellbinders, foam dots, Chevron Embossing Folder - Provocraft.

Thursday, November 1, 2018

CAS Mix Up - November Challenge - Embossing Folders

It's the first of the month and time for the November CAS Mix Up Challenge!   Bonnie is our hostess this month and she wants us to use embossing folders in new and different ways.

Who knew there were so many ways to use an embossing folder?

Dry embossing can add wonderful texture to a background or stamped design, 

but don't stop there.  Check out some or all of the videos over at CAS Mix Up to find 

new and exciting ways to use those folders. 

I was inspired by this embossing folder technique video for my cards today.   I made two similar cards as the technique I used involved sponging over either one or the other insides of the opened embossing folder.

I used an embossing folder, stamps, die cuts, washi tape, little flowers, and a puffy heart!
So this is what happened when I sponged Guacomole Acrylic Paint over the inside of the front panel of Tim Holtz/Sizzix Cracked Embossing Folder, spritzed it liberally with water and pressed a panel of watercolor paper over it, pressing for a bit to allow the watery paint to absorb into the watercolor paper.  
I'd call this one the positive print from the embossing folder.  The green has colored the actual cracks of the design.
Stamps are from Thanksgiving Wishes by Lil' Inker Designs, Die cut frame is Pierced Feature Frames from PTI.
And here is my 2nd card that I used the same technique on but sponged the paint over the inside back panel of the embossing folder - getting what I would call a negative print.  The green has colored the spaces between the cracks of the design.
Stamps are from PTI  Forest Floor: Autumn.  The die cut frame is Pierced Feature Frames from PTI.  
The outside frames are popped up on foam tape.  I added little white flowers to the first card and a puffy heart sticker to the 2nd.  I wrapped a piece of washi tape - Lena's Pattern by Alexandra Renke - around the middle of both cards before adhering the print.

You can also try to get a 2nd print off each side.  Be sure you have your watercolor panels ready to press it right on the folder  -  a 2nd print comes out a little less defined since there is less watery paint on the folder.  Be sure to wash off your folder immediately so the paint doesn't dry on the folder.

I took one photo from my worktable showing the embossing folder, the paint, sponge and the two designs I got - the one on the left resulted from sponging over the inside of the back panel (my 2nd card) and the one of the right resulted from sponging over the inside of the front panel (my first card).
So two rather different looks from one embossing folder - used in a different way -  by sponging acrylic ink over either the front or back, spritzing with water liberally, and pressing watercolor paper over the panel!   Remember to wash your folder immediately so the paint doesn't dry on it!
We hope you'll get out all of those embossing folders you have and try out some of the new ways to use them!

Hop on over to the CAS Mix Up Blog to see how all of the talented Design Team and our wonderful Guest Designer Cornelia (Stempel Spass) have used embossing folders in different ways!  You have until 11/24 to link up your creation!   Remember to keep it CAS!

I'm also linking my card to:
Less is More
Cupcake Inspirations
Theme - Fall


Stamps:  Forest Floor: Autumn - PTI, Thanksgiving Wishes - Lil' Inker Designs.
Paper:  Water color paper - Canson, Vintage Cream - PTI
Ink:  Cocoa Bean - PTI
Accessories:  Guacomole Fresco Finish Chalk Acrylics - Paper Artsy, Pierced Feature Frame Dies - PTI, puffy heart sticker - Michaels, Vanilla flowers - Simon Says Stamp, foam tape, Washi Tape - Lena's Pattern/Alexandra Renke, sponge, water mister, Cracked Embossing Folder - Tim Holtz/Sizzix.

Monday, October 22, 2018

Eileen Hull Sizzix dies for Halloween and Thanksgiving!

This month Eileen Hull's Inspiration Team is creating fall projects using various Sizzix dies designed by Eileen.

Today I have used her Bookmark Tag and Pocket Dies, and Bookplate Hinges and Label Dies 
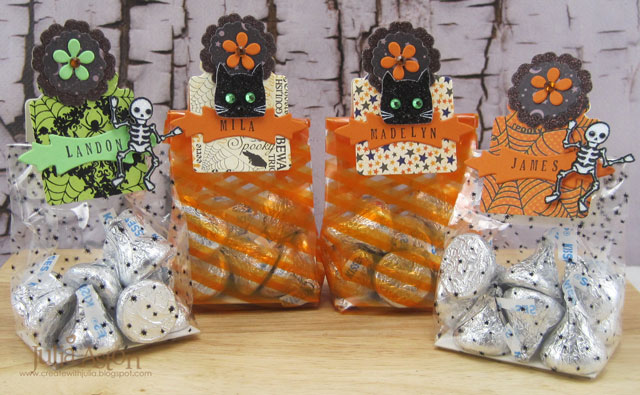
to make treat bag toppers for Halloween. 
The toppers measure 2 1/4" high and 2 1/8" wide (including the points of the name labels).  The bags are 3" tall x 2 1/4" wide folded as shown
 and name place cards for Thanksgiving!
The place cards measure 2 3/4" tall to the top of the leaf and 2 1/4" wide including the point on the name labels - so they are sweet and petite!
For the Halloween Treat Bag Toppers -  I cut out all the pieces from patterned papers.  I used the pattern paper for both front and back of these.  These papers are thick so they are sturdy without having to layer them to card stock.  The labels and smallest flowers are die cut fro card stock.
 I adhered the flower pieces together (the largest one is cut from purple/black glitter paper so it's shiny IRL!)  I stamped the names on the labels (these are Karen Foster Alphabet snap stamps - no longer available).  I glued the backs to the fronts just at the top rounded area.  I added an orange rhinestone to the center of each flower.
 I filled the bags (from a Stampin'Up monthly project box - gifted to me by my blogging friend Mary as she wasn't going to use them, thank you Mary!) with Hershey Kisses, folded down the bags and sealed them with a piece of tape.  Then I put ScorTape along the bottom edge of the front and back of the 'toppers' and adhered them to the bags.
 Those are tiny spiders on the clear bags!  really yucky spooky!  I added a skeleton sticker to the boys bags and a Halloween Kitty to the girls bags (both from Michaels).  They are glittery as well.
It was pretty much the same process for the Thanksgiving Place Cards.
This patterned paper from PTI was thinner and I only used the pattern on the front so I cut 6 out of the patterned paper and 12 out of Vintage Cream card and adhered the patterned paper to the Vintage Cream for sturdiness.  I used Tim Holtz/Sizzix Funky Foliage set for the leaves and acorns which I die cut out of Coredinations Kraft Core Nostalgic Collection papers.
I scored along the inside of the back pieces so they would bend nicely to stand up when I adhered the top section of the fronts to the backs .
I adhered the acorn pieces together as well as the leaves and veins gluing them to the top of the fronts.  The acorns are popped up on a foam dot.  I glued the fronts to the backs just along the top above the score lines and added the name tags to the front. 
I adhered orange rhinestones on each side of the names for a little sparkle.


A side view.


So that's it!  A creative way to use Eileen's Bookmark and Bookplate dies! I hope you have been inspired by my projects today!   
Please check out Eileen's blog for the month of October where she will gather all of the teams projects and post them weekly on her blog!  Lots of fall inspiration for you!!

I'm linking my Place cards to:
Happy Little Stampers

The Cupcake Challenge

Stamps:  Karen Foster Snap Alphabet Stamps - no longer available.
Paper:  Orange Zest, Vintage Jadeite, Vintage Cream, Rustic Cream, Text Style Autumn Abundance - PTI, Core-dinations Kraft Core Nostalgic Collection, Glitter Paper - Michaels, Moonlit Manor Paper Pad - Michaels, Ghosts & Goblins Mat Stack - DCWV.
Ink:  Hero Hues Black.
Accessories:  Bookmark Tag and Pocket Dies, Bookplate Hinges and Label Dies - Eileen Hull/Sizzix,  Funky Foliage Thinlits - Tim Holtz/Sizzix, candy bags - SU October kit, Skeleton and Cat Glitter Embellishments - Michaels, rhinestones - Kaiser Craft, ScorTape, Tombow Glue.