Wednesday, September 26, 2018

The Spooky Side of the Pick Up!

So, you may have seen my sweet little Farm Fresh Pickup I posted on Monday.  Well, today, I spent all day making two spooky Pickups for Halloween! 
(It always takes longer to make the first one, as I kind of design it as I go along and think of things or find 'stuff' to use on it!)
They look sort of like pumped up racing trucks at first glance -  and then you notice the skulls!
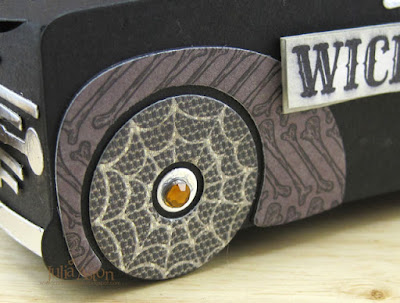
It's the same Dashing in the Snow: Pickup die from PTI as my first trucks - but this time I used some fun DP's on the wheels fenders and windows.   Michaels had their Halloween stuff 40% off already and the bat paper came from A Moonlit Manor Paper Pad.  The spider web paper I used for the tires came from an old Authentique paper pad - Collection/Enchanted.
 The die cut cat and raven are Movers and Shapers dies by Tim Holtz/Sizzix.  The 'Wicked' and 'Boo'  are wooden Amuse stamps.  I added rhinestones to the tire hubs and in the eyes of the big skull lurking in the truck bed!
 Here's the skull out of the truck - pretty big and frightful, right!?
The 'Open if You Dare' stamp is yet another from Amuse.
How cool are these shadow skeletons gazing out the window.  This paper is from the same paper pad from Michaels that I used for the fenders.
And even more of them gazing out the front windshield!!  
On the roof, the two skeletons on the ends are 
Tim Holtz/Idea-ology Skulls.  The one in the center came in a package of really big skulls (like the one in the bed of the trucks) and several  little ones.  I got them at JoAnn last year.  I added orange rhinestones to their wicked eye sockets!  I glued them to the roof with Tombow Glue.
I added a different die cut cat to my 2nd truck (someone gave me this one so I don't know what die was used.)  The sign sentiment is from Midnight Feast by Waltzingmouse (retired). I glued it to a wooden coffee stirrer from Starbucks.  I sponged all the edges of the sentiment pieces with Soft Stone Ink from PTI.
The same three skulls lined up on the roof!
The spider web on this side was also sent to me so I don't know the die.
For my second truck I used a DP with bones on it for the fenders.
The Boo Stamp is another wooden stamp from Amuse.
And finally, a flying bat (a Movers and Shapers die from Tim Holtz/Sizzix) was added to the grill on a foam dot and given orange rhinestone eyes!
Cute in a spooky way, right??!  
These little pickups measure about 4 1/2" long x 2 1/8" tall at the cab and 1 3/4" wide. 
My next project with this fun Pickup Die will probably be for Christmas!  Stay Tuned!!

Stamps:  Wicked, Open if You Dare, Boo! - Amuse, Midnight Feast - Waltzingmouse (retired)
Paper:  True Black, Soft Stone - PTI, Kraft Metalics - Tim Holtz/Idea-ology, DP - Collection:enchanted - Authentique, Moonlit Manor Paper Pad - Michaels.
Ink:  Hero Hues Black, Soft Stone - PTI, 
Accessories:  Dashing Through the Snow: Pickup Die - PTI, Mini Cat and Raven Dies - Movers and Shapers Tim Holtz/Sizzix, Bat die - Bat and Skull Movers and Shapers Tim Holtz/Sizzix, Skulls - JoAnn, Tiny Twinkles - Taylored Expressions, Orange Rhinestones, Kaiser Craft, Tombow Glue, foam dots.

Tuesday, September 25, 2018

September Papertrey Ink Blog Hop!

Today I'm playing along with the PapertreyInk Blog Hop.  They have a lovely fall table for our inspiration.
I, of course, used the  Simply Gour-eous stamps and dies and Forest Floor Stamp Set and dies  from last month's release as well as older purchases - Shape Shifter Circle 1 and Give Thanks Stamp Set and dies.
I die cut the Kraft card base and Text Style Argyle Socks DP (retired) using Noted: Scalloped A2 Vertical Die.  I layered the Circle die and most of the die cut images up on foam dots.  
This is sure getting me in the mood for the lovely fall season coming up soon!

I'm off to see how everyone else was inspired by this lovely fall table over at the Papertrey Ink Blog.  You have until midnight to join in!

I'm also linking my card to:
Happy Little Stampers


Stamps:  Simply Gourd-eous, Forest Floor, Give Thanks Stamps - PTI
Paper: Kraft, Pine Feather, DP Text Style Argyle Socks - PTI
Ink:  Ripe Avocado, Olive Twist, Summer Sunrise, Canyon Clay, Cocoa Bean, Honey Nut, Orange Zwst, Bright Buttercup, Classic Kraft, Prairie Grass - PTI
Accessories: Simply Gourd-eous dies, Shape Shifter Circle 1 die, Forest Floor Dies, Noted: Scalloped A2 Vertical Die - PTI, foam dots

Monday, September 24, 2018

Fresh from the Farm

Papertrey Ink had this Pick Up Truck Die in their September release and I knew I had to buy it as soon as I saw it!  How cute is this??!!   
It sold out in one day - (but you can click on the NOTIFY ME and they'll send you an e-mail when it's back in stock).  I'm making fall and Halloween cards and crafts to sell at my Church Fair in October and knew this would be a perfect item.  It measures about 4 1/2" long x 2 1/8" tall at the cab and 1 3/4" wide.  
I got the idea from PTI Designer, Betsy Veldman, who made a truck just like this so I can't take credit for the design!   I used a different fence (which is not part of the die set) and I added my little sign along with some brown basket shred (hay!)

I die cut the fence from Village Bungalow (Tim Holtz/Sizzix) and trimmed it to fit in the truck bed.  The Farm Fresh stamp is from Barnyard Sentiments (PTI) and the Fall Blessings is from Peace and Plenty (Waltzingmouse/retired)  I attached the sign to a wooden stir stick from Starbucks cut to fit.  The oversize pumpkin is from JoAnn - I bought a whole cylinder of them last year and never used them! It's the pumpkin that won the prize for being the biggest at the country fair!

I've made 4 so far -  two of them in Americana card and two in Ocean Tides card.  I sponged all the edges with the same color ink as the paper to give it an aged dimensional look.
With a change of stampings and truck colors, I can make some spooky Halloween Pick Ups and some Christmas Pick Ups! 

I'm linking my red truck to:

Planes, Trains and Automobiles (I hope trucks count?!)


Stamps:  Barnyard Sentiments Stamp Set - PTI, Peace & Plenty - Waltzingmouse (retired)
Paper:  Americana, Ocean Tides, White, True Black - PTI, Brushed Silver - SU, watercolor paper - Canson.
Ink:  True Black, Smokey Shadow, Americana, Ocean Tides - PTI
Accessories:  Dashing Through the Snow: Pick Up Die set - PTI, Village Bungalow Die - Tim Holtz/Sizzix, Tombow Glue, ScorTape, brown basket shred, wooden coffee stirrer, little pumpkins - JoAnn.

Tuesday, September 18, 2018

Twofer - Leaves

I made myself sit down in my craft room and work on two cards for Darnell's Twofer challenge, which this month is Leaves.  

I don't know why I have such trouble thinking of two different ways to use the same stamps - but it seems to shut my creative mind right down!?!  Usually, I'm very good at multi-tasking -  but apparently not so good at multi-designing?!!!
But, I think I got it done.......
 I know at first glance, my cards look similar -  same colors, same grid background stamp, same dew drops, same leaf stamp, but on closer inspection, I'll show you how they are different!

For my first card I stamped this lovely leaf (retired set Season of Change from Sweet N Sassy) by inking the stamp first in Orange Zest and then 'rock n rolling' the edges (remember that technique??!) in Honey Nut Ink.  You can see all the lovely detail in the stamp.  Then I stamped the Distressed Grid background over the panel in Soft Stone and die cut the panel with Pierced Feature Frames from PTI.

My Thanksgiving card!
For my Twofer below - I used the same stamp but "inked' the stamp by coloring it with Tombow Markers, brown around the outside edges and orange on the inside of the leaf.  Then I stamped the leaf onto watercolor paper and brushed over the middle of the stamping with a slightly wet paint brush to move around the color - which also makes all the detail of the stamp disappear 
(although there wasn't much detail showing anyway since this is a textured watercolor paper.) 
I repeated the process for the second leaf. 
Then I die cut the leaves using the coordinated die and layered them with foam dots over a panel of watercolor paper stamped with the same grid stamp as my first card. I layered the panel to a scalloped die cut and onto a card base of Rustic Cream cardstock .
My Thinking of You card.
So, I hope I got it right sis?  Two different designs for different occasions using the same stamps!

Thanksgiving Card
Stamps: Season of Change - Sweet N Sassy (retired), Distressed Grid - Cornish Heritage Farm (retired), Sentiment -  Inky Antics.
Paper:  white, Honey Nut - PTI
Ink:  Soft Stone, Orange Zest, Honey Nut - PTI
Accessories:  Pierced Feature Frame dies - PTI, orange dew drops, foam dots, Tombow Glue.

Thinking of You Card
Stamps:  Season of Change - Sweet N Sassy (retired), Distressed Grid - Cornish Heritage Farm (retired), Sentiment Staples: Thinking of You - PTI
Paper:  Rustic Cream, Honey Nut - PTI, Arches Watercolor paper
Ink:  Soft Stone, Honey Nut - PTI
Accessories:  Tombow Markers Brown and Orange, water, paint brush, Season of Change leaf dies - Sweet N Sassy (retired), Scallop Stackers Medium die - PTI, foam dots.

Monday, September 17, 2018

Eileen Hull - Sizzix: Basket of Jack O' Lanterns

This month, Eileen Hull's Inspiration Team is making Halloween/Fall projects using her Sizzix dies.  She will be gathering the projects from our individual blogs and posting them every week over at her blog during the month of September.

For my project -  I made a spooky little Halloween Basket full of Goblin Jack O' Lanterns and a stray skull, spider and black crow!!
 For my project I used several of Eileen's Sizzix Dies -  Basket, Spring Leaves, and Thinlits Birds and Butterflies.

I have a few creation photos to show what I used and how I put it together.  I die cut the box out of Little Sizzles Black Matboard.  I die cut the Spring Leaves out of some patterned paper.  I cut each of the leaves twice turning the paper over for the 2nd cuts so I could glue them together so the print showed on each side  I had these little hard foam pumpkins in my stash from JoAnn's.
I glued the papers to all 4 sides of the basket and then assembled it.  I attached the handles with brads, putting the head of the brad on the inside.  I love how this paper actually looks like a woven basket!
Then I adhered the rim of the basket onto the top edge on the front and back.  This covers the brad tails and makes everything look neat and tidy!  I used ScorTape on the rims and Tombow Glue on the papers and sides of the basket.
I die cut the bird out of black fun foam - running it through my die cutting machine a couple of times - it cut right through no problem.  I adhered the wing to the bird, stamped the sentiment on a piece of watercolor paper and glued a wooden coffee stirrer (from Starbucks) to the back of the panel so I could just stick it into the basket.
I drew scary faces on 3 little pumpkins with a black Sharpie pen and glued an Idea-ology Skull to the top of one of them.
I put a handfull of Halloween Basket Shred into the basket.  I adhered a spider to one of the handles.
I added some Small Talk Stickers/Occasions to a leaf and the front side of the basket.
I hope I have given you some Halloween inspiration using these dies and that you will check out Eileen's Blog to see what the rest of the Inspiration Team has up their Fall sleeves this month!


Stamps:  Midnight Feast - Waltzingmouse (retired)
Paper:  Black Little Sizzles Matboard - Sizzix,  Arches Watercolor paper, DP Textstyle Hocus Pocus - PTI.
Ink:  Hero Hues Black
Accessories:  Basket Die, Spring Leaves Die, Sizzlits Birds and Butterflies Dies - Eileen Hull/Sizzix, Halloween Basket Grass, 1" Pumpkins - JoAnn, Small Talk StickersOccasions, Spider Adormment, Skull - Idea-ology, black Sharpie, Tombow Glue, ScorTape, wooden coffee stirrer - Starbucks.

Saturday, September 15, 2018

Mid-Month CAS Mix Up Card Challenge Reminder -

We're halfway through September already and it's time to remind you about the CAS Mix Up Card Challenge -  Ink Stamps with Markers!   For your inspiration, there are links to a lot of fun technique videos over at the Blog.
For this card I was inspired by Sandy Allnock's video - Inking the stamps with Tombow Markers, stamping them on watercolor paper and then brushing over them with a slightly wet paint brush to move the colors.  I also used die cuts - Noted Scalloped Square from PTI and Mini Provincial 3D Impresslits from Tim Holtz/Sizzix (these are SO cool!)
I just love the little watercolor garden scene I created here - and it was SO simple! I'm definitely making more of these!  I have some older red rubber-on-wood Art Impressions stamps that I used but I guess they make them as clear stamps now as that is what Sandy used in her video here:  Art Impressions Watercolor by Sandy Allnock (12:20)   She used these stamps.

So please join the rest of the Design Team as well as our September Guest Designer:  Chrissie (Simply One of a Kind) and link your CAS card up at the CAS Mix Up Challenge Blog - you have until Sept 24th!

Also linking this to:
The Flower Challenge


Stamps:  Large Foliage, Salvia Branch - Art Impressions, Small Grass - Sutter Enterprise, Tiny Dots - Magenta.
Paper:  Watercolor paper - Canson, Kraftstock Metallic - Tim Hiltz/Idea-ology
Accessories:  Tombow Markers - gray, green, blue, pink, purple, Noted Scalloped Square dies - PTI, 3D Impresslits Mini Provincial die - Tim Holtz/Sizzix, foam dots, paint brush, water.

Wednesday, September 12, 2018

The Heart of a Tree

I found this older tree stamp from Stamp Oasis (Rubbernecker used to sell them) in my 'tree' drawer and I just had to ink it up -   but I decided to do a watercolor technique of coloring the stamp with Zig Clean Color Real Brush markers (I used a light green, a dark green and a brown), spritzing the stamp with water and then pressing the stamp onto watercolor paper -  and this is what happened!
TOTALLY love how it came out!  I die cut the panel and the card base using Noted: Scalloped A2 dies from PTI.  I stamped the Proverb from an old Stampendous set called Inspired Verses using Wendy Vecchi Archival Orange Blossom Ink.  
To balance off the card design - I added 2 mint green enamel dots in the left corner.  
(I know, I didn't follow the rule of 3, but there really wasn't room for 3 and I only had 2 dots this size!)

I'm linking my card to:

I inked my stamp with markers, stamped, used dies and enamel dots


Stamps:  3 Tree Group - Stamp Oasis, Inspired Verses - Stampendous
Paper:  Arches Watercolor paper, Vintage Cream - PTI
Ink:  Wendy Vecchi Archival Orange Blossom
Accessories:  Noted: Scalloped A2 dies - PTI, enamel dots, Zig Clean Color Real Brush Markers.