Tuesday, May 28, 2024

Group of Seven Cardmakers - May 2024 Bokeh Technique

 This month, the Group of 7 Cardmakers are working with the Bokeh technique.

There is a link to a YouTube video on this technique as well as written instructions and supply list over at the G07 blog.

Here are two cards I created with my Bokeh backgrounds.

The beautiful trees are a stamp called Forest Scene from Lavinia.

Here is my second card using the same colors on my 2nd panel.  The stamps used here are Tall Dandelion (the stem is really straight on the stamp but I bent it a bit to turn into the center of the card) and Drooping Dandelion also from Lavinia.  I added White Nuvo drops to the dandelion bits.
Here is how I made my cards.
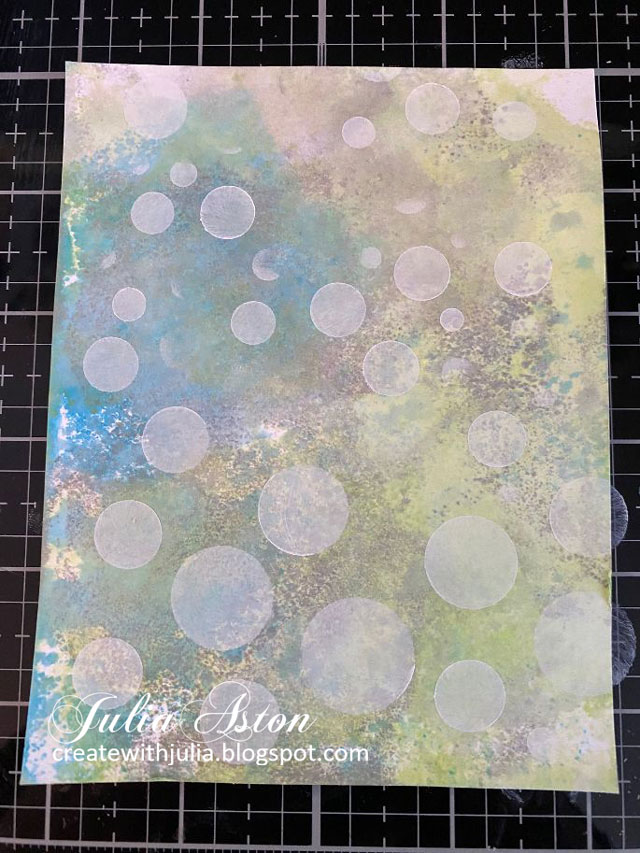
I chose 3 Distress Inks - Mermaid Lagoon, Twisted Cintron and Hickory Smoke.  I smooshed them on my craft mat (one color at a time going light to dark), spritzed with water and pressed a panel of white card stock into the colors.  I kept inking and smooshing until I got a coverage that I liked.  I made two panels in case I ruined one later!  Luckily both survived and I made two cards!

I put double sided removable tape on the back of my panel to hold it down on my glass mat, laid my White Orbs stencil from Lavinia over the panel and taped the edges to hold it.
I took a finger sponge, inked it on a White Pigment ink pad and then dabbed it over random circles.  My stencil was already a mix of big and small circles so I didn't have to move it around.  

Below are my two finished panels.  You can see that even though I used the same inks for smooshing- they look quite different.

NOTE:   I have to confess -  I hadn't gone back to the group instructions after reading it once - and I forgot the part about overlapping some of your circles to make it look more mystical -  probably because my stencil had all the different size circles and I didn't have to move it at all (that's my excuse anyway!)  -  so consider my cards as examples of how it looks if you don't overlap the circles!!??!!  I was afraid to go back when I was done - and try to overlap some -  we all know what happens when you try to fix or add something right??!

I also didn't really achieve darker white on small circles and lighter white on big circles although I tried!  My first panel may be better than the 2nd on this point.

So please check out the rest of the G07's beautiful Bokeh cards over at the Group of Seven Blog.  We hope to inspire you to try it out if you haven't yet, or even play with it again if you have!  You can link up your cards there so we can all see! 


I'm linking my dandelion card to:

first time using the Tall Dandelion stamp

Girly theme -  Flowers  Ends 5/31

Polka Dots ends 6/2


Stamps:  Forest Scene, Tall Dandelion, Drooping Dandelion - Lavinia, Birthday Basics - PTI, Simple Strips - Sympathy - Taylored Expressions.
Paper:  White - PTI, Easter Grass - Bazzill.
Ink:  Twisted Cintron, Mermaid Lagoon, Hickory Smoke - Ranger Distress, White Pigment - Hampton Arts, Nocturne - Versafine Clair.
Accessories:  White Orbs Stencil - Lavinia, A2 Arches - The Greetery, Gloss Simply White Nuvo Drops, Simple Strips flag end and straight end dies - Taylored Expressions.

Wednesday, May 22, 2024

Loving a Fisherman

 I made this sympathy card for a neighbor who's husband passed recently.   He was an avid fisherman.


The background is DP - Ink Drop Earth from Craft Papers, the fisherman is from Technique Junkies and the sentiment is from Unity.

This is the sentiment I stamped inside the card by Dark Room Door - Part of You

I'm linking my card to:

Little Red Wagon challenge 757  

Just One Layer ends 5/29


Stamps: Fisherman Technique Junkies, sentiment from Unity, inside from Darkroom Door - Part of You
Paper: white card base - PTI, DP Ink Drop Earth - Craft Papers
Ink: Nocturne - Versafine Clair

Sunday, May 19, 2024

The Roar of a Miniature Lion

 I'm joining in on the latest Try it on Tuesday challenge - Small Things.  

I made a miniature book on Lions - well 2 books actually so I could show the cover and the pages inside!  

This book measures 1" H x 3/4" W x 1/4" deep and has 11 pages in it, all different pictures of lions. Comparing to a US nickel in the photo.

I found the book patterns on ETSY -  at the shop Ever After Miniatures.  Look under the tab Openable Miniature books. 

She has lots of miniature patterns for all kinds of things!   

I have purchased the patterns for about 25 of her miniature books and am slowly making them all! They are all copies of old books, some are just photos, some have text, some have more pages than others.

She has one on Owls, Dinosaurs, Cats, Rocks and Minerals, Snakes, Witches, King Arthur, The Bible, Peter Rabbit, a Dessert Cook Book, Roses, Orchids, and Butterflies just to name a few!   They average $2-$4 and you get the file to save to your computer so you have it forever and you can make as many as you want! 

They are really easy to make and she includes instructions. You cut the page strips, adhere them end to end in a long strip, score and fold on the lines, glue the backs of the folded pages together and glue into the cover.  You print them on regular computer paper.  

I have always loved miniature things.  I sell the books at my church fair and at an occasional craft fair if I rent a table and gift some to friends, but mostly just enjoy making them and looking through them!!

Linking my miniature book to:

Try it on Tuesday - Small things  ends 5/28


Accessories:  Miniature Lion Book pattern - Ever After Miniatures shop on Etsy, glue, scoring tool, scissors, computer paper.

Saturday, May 18, 2024

Inkspirational Challenge #316 - Spotlight Sympathy

 There's a new challenge over at Inkspirational today -  #316.  

It's Designers Choice and Pia has chosen:


I looked on Pinterest to find samples of spotlighting as well as YouTube. 
 
And this is my DT card for the challenge.

I used my Misti to stamp the leaves and bloom from an older Wallpaper Art stamp set from Altenew onto two panels of white card, stamping them in the exact same place on each panel.  

Then I die cut a rectangle out of the middle of one of them.  I colored the images on the full panel (at least the parts that would show!) and then adhered  the cut out frame panel over it.  I stamped the sentiment and added enamel dots.

I had an extra frame panel (I made a few errors in stamping during my creation journey!) and adhered  that on the inside of my card which just happened to perfectly frame the sentiment I had already stamped!?!  

It was an afterthought that I really like the look of - adds a little more interest to the inside.


So we hope you will check out the spotlight technique and create a card yourself -  we'd love to see it linked up over at Inkspirational!   

You'll also find some lovely inspiration using the technique by the rest of the Design Team!

You have until May 31 to link up your card!

Also linking my card to:

the first time using this sentiment from the Columbine stamp and die set 
that I've had for at least 8 years??!!


Addicted to CAS  ends 5/24


Stamps:  Wallpaper Art stamp set, sympathy sentiment from Build a Flower: Columbine - Altenew
Ink:  Nocturne - Versafine Clair
Paper:  White - Papertrey Ink
Accessories: Rectangle Die - Spellbinders, Copics YG95, R32, enamel dots - Altenew. 

Thursday, May 9, 2024

Seas the Day

 I order so many stamps and dies and then forget to use them (!) so I'm trying to make myself use things within a few weeks of purchasing them.  Realistically, I hope I use them within a month!?!

So I was happy to see the Seize the Birthday challenge just posted as it gave me a chance to use this fun die set from Spellbinders Day at the Beach (It's half price right now, just sayin') that I bought at least a month ago.....


Linking to:


first time using this fun die set!


Stamps:  Free Spirit Sentiments - Waltzingmouse (retired), Salt Air Sentiments, Fence Line Summer - Papertrey Ink (retired)
Ink:  Nocturne - Versafine Clair
Paper:  Fine Linen, Blueberry Sky, Spring Rain - PTI, Pale Rose - Bazzill, DP Beach Vibes - Honey Bee, Indiga - Prima Paper Pad.
Accessories:  Day at the Beach dies - Spellbinders, foam dots.

Saturday, May 4, 2024

Inkspirational Challenge #315 - Seasonal - Cancun Summer

 A new challenge #315 is up over at Inkspirational.


There are lots of ways to interpret Seasonal -  the four seasons of the year, the various holiday's each year, seasonal clothing, seasonal activities, seasonal animals or flowers/plants?

I chose Summer Vacation as my seasonal topic.  

I made this card for my Grandniece Madelyn for her 10th birthday.  That's a photo of her in the center.  It was taken on their recent family vacation to Cancun - where it was already summer weather - hot and sunny!  I resized the photo on my computer to fit the space and printed it on white cardstock.
The fold is called Center Display Fold and I found it at a technique challenge hosted by Sabrina over at Splitcoaststampers.  It's really very easy to do - scores, cuts and cut DP  panels to fit

This is how it looks folded up - and it fits inside a regular A2 envelope for mailing - but might require a little extra postage as it's a little thick.
Here it is fully opened up and flattened.

I made another card using this fold for the April Card Exchange Challenge I posted on May 2nd.  I have Sabrina's full instructions and a diagram on how to make the fold -  see that post here.  Or just scroll down two posts!

So please join us over at Inkspirational and show us what Seasonal means to you in your card design.

 You'll find some creative inspiration from the rest of the DT as well!  
You have until May 17 to link up!

Also linking my card to:

ends 5/5
Middle vertical row - Butterflies/Free/Patterned paper

Fantasy (the giant bird wings on my grandniece!)


Paper: white - PTI, DP Amazon 8x8 Paper pack - Stamperia
Accessories: photo printed from computer, Scor Pal, paper cutter, Computer generated sentiment

Friday, May 3, 2024

No One is Charcuter

 Well, I've been waiting to be inspired to get out this fun Char-Cute-Rie stamp and die set from Avery Elle that I purchased quite some time ago -  and today is the day!!


I colored all the charcuterie items with Copics and layered them onto the cutting board.  (Accept for the strawberry that rolled off the board!) 

The background papers are thin vinyl adhesive-backed paper that I received in a card exchange and worked perfectly for my table cloth and wall paper!

The board and sentiment strip are up on foam dots.

I'm linking my card to:

Inspired By  Ends 5/8


first time using the charcuterie stamps and dies!


Stamps: Char-Cute-Rie - Altenew
Ink: Nocturne - Versafine Clair, Espresso - Altenew
Paper: White - PTI, Water Color Paper - Canson Cold Press, adhesive backed thin vinyl card panels - unknown.
Accessories: Char-Cute-Rie Dies - Avery Elle, Simple Strips Straight Edge - Taylored Expression, Tuxedo Hearts - Honey Bee Stamps, Copics E13, E31, E50, YR00, R29, Y02, YG17, foam dots.

Thursday, May 2, 2024

Card Chain Challenge - April 2024 reveal

 Today is reveal day over at The Card Chain Challenge - where all the cards exchanged around the world in April are revealed.

I sent my card to Kath in the UK and I received a card from Jeanne in Minnesota.

Each month we are given options for our cards - a sketch, themes, colors, product/technique.  We have to use one but can use more.

This month I used two of the colors - green and lilac (didn't use silver!) and I used two of the themes - Spring and Friendship.

The images (flower box, bunny and butterflies) are all rub-ons from the Easter Collection from Taperlogy.  The sentiments are all from Garden Sayings from Impression Obsession.

The card fold is called Center Display Fold.

It folds up to 4 1/4" x 5 1/2" so it fits into a regular A2 size envelope for mailing.
View from the back when it's open.

The card fold is called Center Display Fold and I found it at one of Splitcoaststampers Technique Lovers Challenges.  
You will find Sabrina's challenge here.  

And here is her diagram and tutorial that she shared on the challenge. 


You will need a piece of cardstock for your base 8” wide by 5 ½” high.

Score from top to bottom at 2” and 6”.

1 ¼” from the top and from the bottom, cut between the 2” and 6” lines. 

Now score at 3” and 5” between the cut lines, and at 4” above and below them as shown in the diagram. 

The 2” and 6” score lines become valley folds.

The two shorter inner scores and the ones at the centre of the card become mountain folds.


I cut my DP for matting just ⅛” smaller than each cardstock panel I was layering it onto.

So for the two tall side pieces, that was 5 ⅜” x 1 ⅞”.

For the four smaller strips top and bottom, that was 1 ⅞” x 1 ⅛”

For the centre panel it was 2 ⅞” x 1 ⅞”

And if you want to layer the strips on each side of the centre, that was 2 ⅞” x ⅞”


As mentioned in my write-up, when you are adding die-cuts to the centre panel, make sure that you can still easily fold and open the card.


Folds to 5 ½” x 4” so will fit in a regular US A2 envelope.


For metric measurements:

Base is 20 cm x 14 cm.

Score at 5 and 15 cm.

Cut between these two score lines at 3 cm and 17 cm.

Then score above and below the cut lines at 10 cm, and in between them at 7.5 and 12.5 cm


So please check out all of the cards exchanged in April over at The Card Chain Challenge and sign up to join in for May!  You have until May 6th to sign up.

I'm just in time to link my card to:

F is for FOLD It -  ends May3

First time using this Garden Sayings Sentiment set

Ends 5/9
Middle vertical - Butterflies/Free/Patterned paper


Stamps: Garden Sayings - Impression Obsession
Paper:  White - Papertrey Ink, DP Dainty Flowers 12x12 pack - Stampin Up.
Ink:  Nocturne - Versafine Clair
Accessories:  Oval die - Spellbinders, Oval Punch - SU, Easter Collection Rub-ons - Taperlogy