Wednesday, February 26, 2020

Making Boxes with the Kids!

My last project for Eileen Hull's Blog Posts in February was actually not made by me but by my 9 year old grandnephew Landon and 7 year old grandniece Mila!   I was babysitting for them last week when their parents went out on a date.  
I always bring a craft whenever I babysit for any of my 4 grands.

I was trying to think of something they would like to make 
(I often bring the packaged crafts from Michaels). 
I know they love to have boxes just to 'put stuff in' and the light dawned!  They could each make and decorate a box using Eileen's Sizzix Gift Box

Here they are adhering patterned papers, that I had cut to size, to all the panels.  They did this before we assembled the box pieces.   
Mila got a little overzealous when I asked them to smile for the photo!!  
She was excited that I was going to put this on my Blog.
 I helped them line up the edges that I had put Red Line tape on and we put the box together.  I had picked up several packages of stickers at the Dollar Store a few months ago (you know, just because I might want them sometime!?!), dinosaurs, sloths, robots, llamas and forest animals and they had fun choosing the ones they wanted to decorate their boxes with.
To make the boxes easier to open, they adhered one of the scallops from the die onto the front edge of the cover - so they could just pull on that to open them up.
They were really happy with their new storage boxes and were telling me all of the things they might put in them -  a very fun and easy craft project with the kids!  With such professional looking results!

 If you missed them - check out my other projects using the Gift Box Die

Paint brush holder box
 

Circus Party Box 

Don't forget to check out Eileen's blog for more inspiration from her Inspiration Team!

Paper:  white Little Sizzles Matboard - Sizzix, designer papers - Papertrey Ink
Accessories:  Red Line Tape, roller tape, various stickers - The Dollar Store.

Wednesday, February 19, 2020

James Skiing on TV - Eileen Hull's Display Stand Sizzix Die

Eileen Hull's Inspiration Team is continuing to create with her newly released Display Stand and Gift Box dies.  Every Wednesday the team's projects will be featured on Eileen's blog.

This week I have made a project to give to my 8 year old grandnephew, James, featuring a photo of him skiing this winter on a retro television!
I usually use white matboard to cut out Eileen's dies but I do have a few pieces of black matboard (no longer available on Sizzix site unfortunately)  and so I thought I'd try cutting the Display Stand die in black this time.   

For some reason, when I folded it all together - it looked like a TV set to me!!??!!   So then I Googled vintage retro TV images and scrolled through all the different sites that popped up until I found a TV image that I liked.

Then I decided that this photo I had of James (from his mother's FB page) would look nice on the TV screen.  I sized the photo to fit and printed it on white card stock.  I adhered it onto the TV screen and then covered the screen area with Glossy Accents to make it look like glass.  
I let it dry overnight and then adhered the image to the Display Stand die cut with lots of ScorTape as the Glossy Accents made the paper warp a bit and I wanted it held on flat.   I added little Neutral Candy Dots from Stampin' Up over the knobs printed on the TV to add some dimension.  I used stamps and dies from Two Feet Deep by PTI for the skis and sentiment.  The sentiment is popped up on foam dots.

This came out just how I had envisioned it in my head (which I'm sure you know doesn't always happen!?)  and I'm so happy with it! 
James skis most winter weekends with his family and also in an after school program and he's really getting good at it!  I think he will enjoy seeing himself skiing 'on TV'!

Eileen's Display Stand is a great platform to highlight special photos.
 
So then I had to make one for his 5 year old sister Madelyn, who isn't quite as skilled yet, as she just started last year, but she is a fearless wild woman on the slopes!!
And I made one for my other niece, featuring a lovely family photo!

Don't forget to check out Eileen's Blog to see more uses of her new dies!

If you haven't see this die before - you can check out how you fold it up on my previous post here.

Stamps:  Two Feet Deep - Papertrey Ink.
Paper:  White - PTI, Black Matboard - Sizzix (only white available now).
Ink:  Obsidian, Ultramarine - Altenew, Silver Pigment Ink - Color Box
Accessories:  Display Stand Bigz Die - Eileen Hull/Sizzix, Two Feet Deep Dies - Papertrey Ink, Sentiment Strip die - Neat and Tangled, Neutrals Candy Dots - Stampin Up, foam dots, ScorTape, Tombow Glue, Googled retro TV image.

Saturday, February 15, 2020

Feb Mid-month Reminder - CAS Watercolour and CAS Stencil Challenges

I'm here today with my reminder cards for both CAS Watercolour and CAS Stencil  challenges.  You have until Feb 24th to link up your cards!
For my Red and Black watercolour card - I stamped one of the flowers from Wallpaper Art set by Altenew onto a panel of water color paper using Obsidian Ink also from Altenew.  
I brushed over a few petals at a time with just water and then dipped my brush in watery Rose Madder Deep water color paint and touched it onto the wet areas.  I added more color or took away color with my brush until I was happy with the look achieved.  I brushed Cadmium Scarlet water color paint on the center of the flower.  I sometimes dried an area with my heat tool to see how it looked.  Then I could add more color with water if I wanted.  
I brushed water around the outside of the flower and used the same process of adding black watercolor paint, letting it really spread into the water as I wanted it to be like a grounding shadow rather than stark black.   I let the water define the edges.
When I was happy with the colors, I dried it again with my heat tool and then stamped my sentiment from Rubbernecker.  I layered the watercolor panel to a white card base.

For my foil stencil card - I once again used foil with Transfer Gel and my laminator.
A few process photos.
First the supplies - the smallest Pierced Feature Frame die from PTI, two pieces cut from my foiled panel, Soft Lilac Metallic Shimmer Ink Spray from Altenew, Decofoil Transfer Gel, Deco Foil Rainbow Shattered Glass, #78 Stencil designed by Olga Heldwein  from Aall and Create.
I spread Decofoil Transfer Gel over my stencil with a plastic spatula onto a white card panel and let it dry over night.  I got out this sheet of beautiful Rainbow Shattered Glass Deco Foil.
 
I placed the foil shiny side up over the stenciled panel, put it inside a folded piece of computer paper and ran it through my 13" Royal Sovereign Laminator putting the fold side into the machine.
And it came out like this, its really hard to show the gorgeous shiny colors in a photo!  Notice how white the stenciling looks (where there was no gel and so no shiny foil adhered to it).  I decided to spray the panel with Soft Lilac Metallic Shimmer Ink Spray from Altenew to tone down the white. 
(I wiped the spray off the metallic areas after spraying as it doesn't stick there anyway.)
For my card, I cut a piece from the panel using the smallest Pierced Feature Frame die. This area had blues and greens.  I stenciled over a white panel with Distress Tumbled Glass ink using a Blender Brush and the same stencil as used with the foil.  The sentiment is from  Keep It Simple: Friendship Mini Set by PTI.
I adhered the outside of the frame with foam dots and the inside just with tape runner inside the frame.  You can see more shimmer at this angle and you can also see the Lilac Ink Spray on the pattern. The spray has a shimmer as well!
I was able to cut a another frame from my original foiled panel and made a second card.  This section of the panel had blue and purple foil.  I used the same process of stenciling behind using Wilted Violet Distress Ink with my blender brush on this one.
 Once again a shot of both cards
CAS Watercolour and CAS Stencil
 

So if you were thinking of joining us in either challenge - now's the time to get it done!  Can't wait to see how you watercolor with black and red - and/or use foil with your stencils.  You don't have to use a laminator - there are other ways to use foil.  There are technique videos linked at the challenge.  Check out CAS Watercolour here -   check out CAS Stencil here!

Thanks for sticking with me for such a long post!

I'm linking my Sympathy Card to:

Fusion Card Challenge -  just the sketch
(although I did use red on the flower!)
 
 Creative with Stamps
 Water Cooler Wednesday


I'm linking my Wonderful Friend card to:
TIME OUT Challenges
 Try it On Tuesday
Share the Love


Watercolor Sympathy
Stamps: Wallpaper Art - Altenew, You are in our thoughts - Rubbernecker
Paper:  water color paper - Canson, White - PTI
Ink: Obsidian - Altenew
Accessories: Kuretake water color paints - Rose Madder Deep, Black, Cadmium Scarlet, water brush, water, heat tool.

Wonderful Friend Foil
Stamps:  Keep it Simple Mini Set: Friendship - PTI
Paper: White - PTI.
Ink:Obsidian - Altenew, Ranger Distress Tumbled Glass and Wiled Violet.
Accessories:  #78 Stencil - Aall and Create, Deco Transfer Gel and Deco Foil Rainbow Shattered Glass - Thermoweb, Pierced Feature Frame Dies - PTI, Royal Sovereign Laminator, foam dots.

Tuesday, February 4, 2020

February CAS Stencil Card Challenge - Use Foil

The February CAS Stencil Card Challenge is posted today!  Barb is our talented hostess this month and she wants us to use foil with our stencils! 
There are links to several technique videos over at the blog - you don't have to use a laminator.
For today's cards I did use foil with a Royal Sovereign 13" laminator.  (I got mine on Amazon).  I'll show you my cards and then a few process photos.
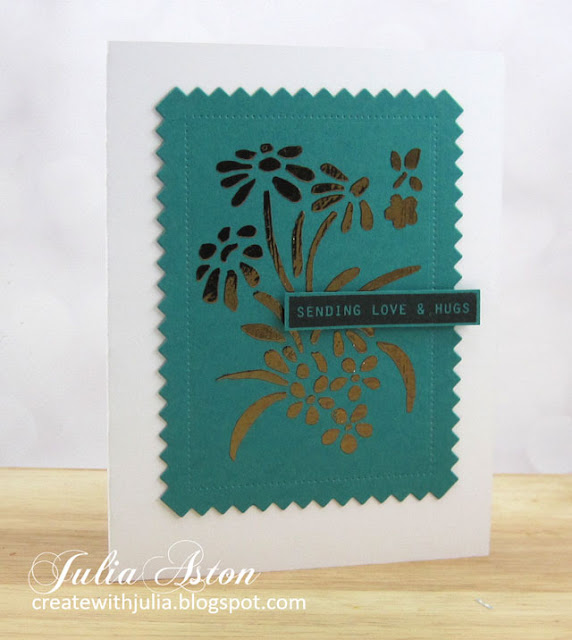
I used the same products on both cards - just a different color foil.  The stencil is from Stencil Girl ATC Mix Up Toadstools a 12" stencil that has 9 small ATC size stencils on it.  I used Deco Foil in Aqua for this card.  The panel is die cut with Mix and Mat Pinked Edge Die from PTI.  The sentiment is from Best Sentiments from Altenew and is popped up on foam.
I used Deco Foil in Bronze for my second card.
Close up to see the wonderful shine!
Here's how I did the foiling for my second card with the Bronze foil.  
I taped my stencil over a panel of Tropical Teal card.
Then I spread Deco Foil Transfer Gel over the stencil using a plastic spatula.
I removed the stencil and washed the stencil right away.  
The stenciling looks white at this point - but it turns clear after drying (I left it to dry overnight)
So I didn't take a photo of this piece showing the sandwich that I used for putting it through the laminator - but I do have this photo below of another one I tried (but ended up not liking the colors).
So the stenciling on the brown card below is now clear.  I cut a piece of foil to fit over the panel and laid it over the stenciling shiny side up.  I placed it inside a piece of folded computer paper and then put it through the laminator with the fold of the computer paper going in first.  The laminator grabs the paper and runs it through automatically rather slowly.
When it comes out of the laminator on the other side - remove the folder, open the paper up and peel the Deco Foil off the panel
  This one was made using Bronze Deco Foil.
This one was made using Aqua Deco Foil.
So we hope you will give foil a try!  You'll find all the challenge details, links to technique videos and beautiful inspiration from the DT, including our wonderful Guest Designer this month Steph (My Paper Corner), here at CAS Stencil

We can't wait to see how you use foil with your stencils!  The challenge ends on Feb 24.

Also linking my card to:
The Flower Challenge

Stamps:  Best Sentiments - Altenew (I got this free for being a good customer this past year!)
Paper:  White, Tropical Teal - PTI
Ink:  Obsidian - Altenew
Accessories:  Royal Sovereign 13" Laminator, Bronze and Aqua foil - Deco Foil/Thermo Web, ATC Mix Up Toadstools Stencil - Stencil Girls, Mix and Mat Pinked Edge Die - PTI, Deco Foil Transfer Gel, plastic spatula, mask tape, foam dots.

Sunday, February 2, 2020

February CAS Watercolour Card Challenge - Red and Black

Welcome to February and the CAS Watercolour Challenge which has just posted!  Marcia is our colorful hostess this month and she would like us to use Red and Black!
I made a Valentine - as a couple of stamping friends and I have a Valentine Sale at our church coming up!
For my watercolouring - I used Brushos spritzed with water.  I used mostly Brilliant Red with a few shakes of Black as the black has some blue mixed in with it and the blue shows up more when you use more!
I die cut the watercoloured panel with Heart Confetti Collage die from Poppy Stamps.  I layered the panel with foam dots over a panel cut with Pierced Feature Frame die from PTI and layered that onto a white card base.  I stamped the sentiment from Cupids Arrow stamp set by PTI.  I also added in some of the cut out hearts inside the hearts.

I made a second card using the left over bits from the die cut used in my first card.  This time just raising the big heart and the arrow up on foam dots.
So please check out the February CAS Watercolour Card Challenge here.   You'll find hostess Marcia's description of the challenge as well as lots of red and black inspiration from the team, where we are also joined by our very talented Guest Designer this month - Michele (I Card Everyone)

I'm also linking my card to:
The Paper Players


Stamps:  Cupids Arrow - Papertrey Ink
Ink:  Obsidian - Altenew
Paper:  White, True Blac - PTI, Water color paper - Canson.
Accessories:  Heart Confetti Collage Die - Poppy Stamps, Pierced Feature Frame Dies, Cupids Arrow Dies - PTI,  Brilliant Red and Black Brushos, water mister, foam dots, Tombow Glue.