Showing posts with label Eileen Hull. Show all posts

Saturday, November 8, 2025

Inkspirational Challenge #354 - Word Prompt Knit

 There's a new challenge up over at Inkspirational:

I pulled out a sweater die from The Greetery and a Sweater 3D embossing folder by Eileen Hull/Sizzix for my card. (It's a vertical cable stitch - not sure if you can see it? It flattened a bit when I die cut the framing after embossing Ugh.)  

I cut the sweater pieces out of watercolor paper and colored them with Copics.  I die cut the leaf and acorn out of colored card stock.


I die cut the leaf and acorn using Autumn Side Kick Die by Tim Holtz/Alterations. The Nordic circle die is from The Greetery and the back panel is die cut with a Nested Rectangle with Square Holes die from Rubbernecker - now Brass and Bliss.  The sentiment is from Sending Warm Fuzzies from Unity. The enamel dots are from Altenew.

So please join in with us at Inkspirational - and create a card inspired by Knit/Knitted!
You'll find lots of inspiration from the rest of the Design Team as well as Mr. Linky over at Inkspirational!

This challenge ends November 21!

Also sending my card to:

1st time using the Side Kick Dies (acorn and leaf)

ends 11/12

This card would work for Thanksgiving or Birthday 
ends 11/12

These are a few of my favorite crafty things -  die cuts, embossing folders, enamel dots.
ends 11/17


Stamps:  Sending Warm Fuzzies - Unity.
Ink:  Portobello - Versafine Clair, Ranger Distress Old Paper.
Paper:  Water Color Paper - Canson Cold Press, White, Rustic Cream, Pure Poppy, Dark Chocolate, Cocoa Bean, Summer Sunrise - PaperTrey Ink.
Other Supplies:  Hearts at Home Sweater Die, Nordic Circles Die - The Greetery, Autumn Side Kick Dies (acorn and leaf) - Tim Holtz/Alterations, Nested Rectangle With Square Holes Die - Brass and Bliss, Sweater 3D Embossing Folder - Eileen Hull/Sizzix, Copics E19, YR09, Blender Brush, enamel dots and star - Altenew, foam dots.

Tuesday, February 28, 2023

February Group of Seven Cardmakers: Technique - Resist Debossed Background

It's time for the February Group of Seven Cardmakers post, playing with the Resist Debossed Background technique. 

Our group met for a zoom call in early February to try out a recent video tutorial from Splitcoaststampers (created by Anna-Karin Evaldsson).  

I love how this came out and I think blues and browns are my favorite colors to use with this technique!

So, basically, you lightly run a Versamark ink pad over the raised, inside, back of your embossing folder. (3D embossing folders seem to work best because they give a deeper impression).  

Take a piece of water color paper (or any water friendly paper like Mixed Media), rub over the paper with an Embossing Buddy (powder), put it in the embossing folder powder side down (over the Versamark inked side) and run it through your machine.

Take the panel out and cover the back side (the debossed side with the Versamark ink on it) with white embossing powder.  If the powder sticks to too much of your panel background, you can brush some off gently with a paint brush.  You want the powder to be on the design which is 'debossed' since you are using the back of your panel.

Then heat emboss the panel.  

To add color to the parts not white embossed on my panel, I pulled out two Distress Inks - Tumbled Glass and Frayed Burlap and two Distress Oxide Inks Salvaged Patina and Walnut Stain (DOX inks leave a darker color than the regular Distress inks).  You want to use water based inks.  I rubbed the inks (one at a time and do the Distress first, then the DOX since they are darker) onto my craft mat, spritzed with water and then pressed the panel randomly into the ink, then looking where there were open spaces and pressing that section into the ink.  

Notes: 

1.  You can just use one or two water based inks. 

2.  You should try several different embossing folders, as some work well and some not so well?!


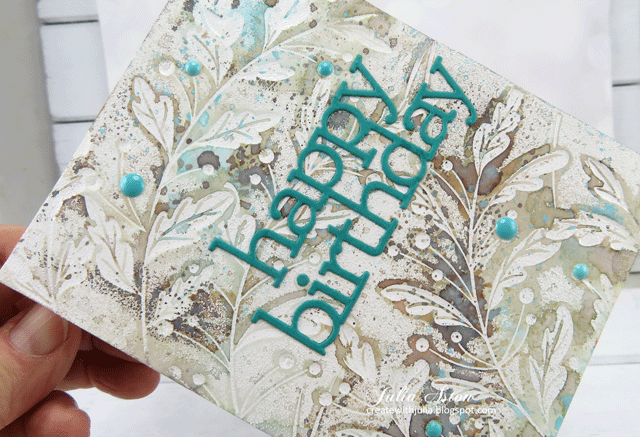
A close up:
I added the die cut sentiment and some enamel dots to the panel.

I made a second card (below) using the same technique, embossing folder, white embossing powder and inks - and you can see it looks very different.  

The white embossing powder stuck to more of the card rather than just the debossed image and so just small bits of the panel absorbed the smooshed inks. (I didn't brush off the excess white powder on the flat bits!)  But it still makes for a pretty and interesting background I think?!

I'm linking my birthday card to:


Three more cards I made using this technique.
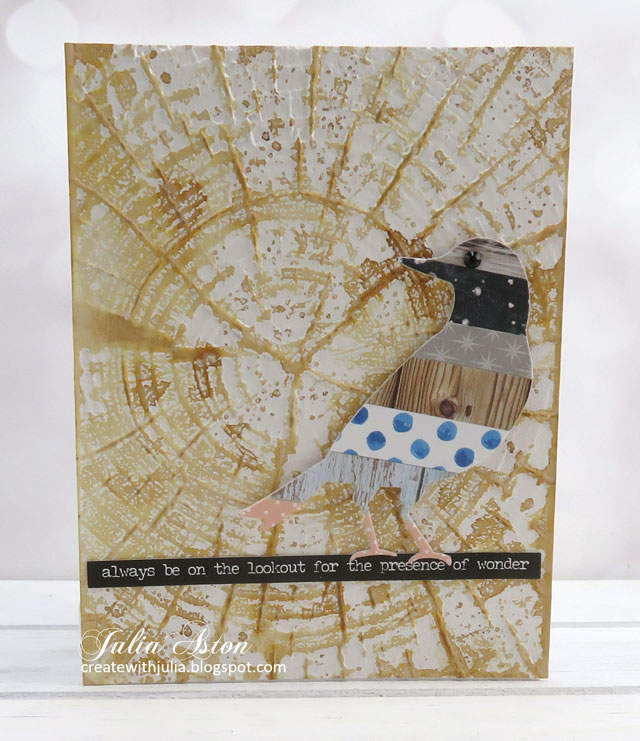
Embossing folder:  Tree Rings - Tim Holtz/Sizzix.  White Embossing Powder/Distress Oxide Vintage Photo Ink.  The bird is Feathered Friends Thinlit dies - Tim Holtz/Sizzix covered with strips of DP.

I'm linking my tree ring card to:

anything embossed - optional things with wings


Embossing Folder:  Vintage Button - Eileen Hull/Sizzix.  White Embossing Powder, Distress Tumbled Glass and Frayed Burlap Inks.  The horse is an old wooden stamp by Judith, colored with markers.

I'm linking my Baby card to:
Feb - anything stamped


Embossing Folder: Circuit - Tim Holtz/Sizzix.  White Embossing Powder/Distress Lost Shadow Ink. Die: Voltage Bigz Die - Tim Holtz/Sizzix

I'm linking my voltage card to:

First time using both the circuit Emb Folder and the Voltage Die


For the full tutorial of this Resist Debossed Background and inspiring samples from the rest of the Seven Cardmakers, please pop over to the Group of Seven Cardmakers Blog.

We post a new technique on the 28th of each month that we hope will inspire you to try it out as well!

  We've added a Mr. Linky to the post - so you can link up your creations if you try this technique -  It's not a challenge, just a place you can put your card so everyone can see it and be inspired! 


Birthday Card
Paper:  Water color - Canson Cold Press, Tropical Teal - Papertrey Ink.
Ink:  Ranger Distress Tumbled Glass, Frayed Burlap, Ranger Distress Oxide Ink Salvaged Patina, Walnut Stain, Versamark.
Accessories:  Gracious Leaves Embossing Folder - Memory Box, white embossing powder, heat tool, water mister, craft mat, Happy Birthday Die - Simon Says Stamp, Happy Birthday Poe Script Die - Poppy Stamps, Enamel Dots - Altenew.

Saturday, January 14, 2023

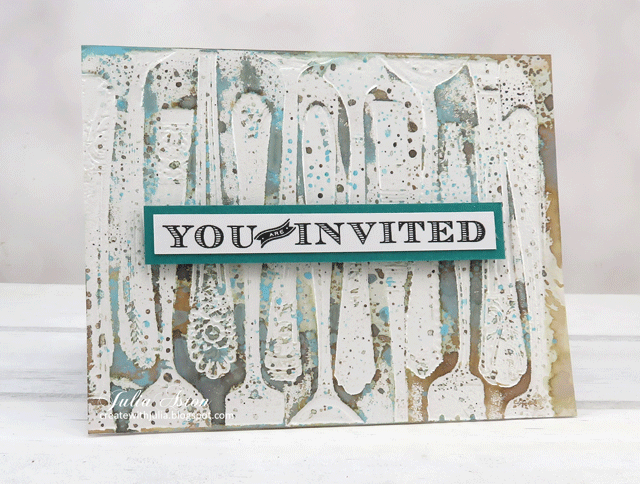
You Are Invited

 I am excited to tell you that I was asked to be on the Inkspirational Design Team!  So this is my very first post making a card for the 1st Inkspirational Challenge for 2023!


I was inspired by the word prompt - Welcome - and made a card to be used as an invitation to a dinner or party.  I would feel welcome if I was invited to a party wouldn't you?

I created my background using a fun embossing folder by Eileen Hull/Sizzix called Silverware (it just shows mostly the handles of the forks, knives and spoons!)  Can you see the silverware?  They are the white bits!

I used the resist debossed background technique on the panel (sounds difficult but it's really easy!)  I rubbed my Versamark ink on the inside bottom piece of the opened embossing folder - so the raised part gets inked.  I put a piece of white Mixed Media card in the folder and ran it through my Big Shot.  I removed the panel and covered the back side that had gotten the Versamark on it, with white embossing powder, tapped the extra powder off and embossed with my heat tool. 

Theoretically, just the raised parts get embossed in white (you might have to brush some of the embossing powder off the card around the edges of the images if  the panel seems to be totally covered?!)

Then I smooshed various Distress inks first and then DOX inks (blues and browns, listed below) on my craft mat (one at at time) spritzed with water and smooshed the panel into the ink.  Only the parts that didn't get embossed in white will absorb the ink.  

I stamped the sentiment onto a strip of white card, backed it to a slightly larger strip of teal card and adhered it over the panel with foam tape. 

We'd love to have you join us over at Inkspirational!  Check out the great creations from the other DT members and link up your card by Friday 1/27!

I'm also linking my card to:

Use your favorite colors - mine are blues and browns

first time using the Silverware Emb folder


Stamps:  Table Service - Papertrey Ink (retired)
Paper:  Strathmore Mixed Media White,  Tropical Teal and white - Papertrey Ink.
Ink:  Ranger Distress Tumbled Glass and Grand Espresso, Ranger Distress Oxide Salvaged Patina and Walnut Stain, Versamark, Nocturne - Versafine Clair.
Accessories:  Silverware 3D Textured Embossing Folder - Eileen Hull/Sizzix, white embossing powder, heat tool, water mister, craft mat, foam strips.

Thursday, May 5, 2022

Gift Boxes for Mother's Day

 A friend commissioned me to create some Mother's Day gift boxes to put small gifts in for her mother-in-law, and daughters-in-law.  

I have lots of Eileen Hull/Sizzix container dies (having just retired from her wonderful Design Team after 6 years) and so made up a few undecorated containers so she could choose size and shape.  My friend wanted a flower/bee theme on all of them as she was giving at least one of the receivers some honey!  

She said it was ok to use the same general design on all of them - which made it easier for me!

I made a sunflower for each of the projects below using a beautiful die from Honey Bee Stamps called Lovely Layers Sunflower.  I die cut them out of yellow textured paper and then sponged over them with Wild Honey Distress Ink to add depth to the petals.  I cut the leaves out of a textured green cardstock and sponged the center of them with Peeled Paint Distress Ink to highlight the veins.

I made bees for all of the projects using the Fireflies die from the Greetery - cutting them from white cardstock and coloring the bodies with Copics to make them look like bees.

I die cut bows for all of the projects with Put a Bow On It die and stamped the sentiment from Put a Bow On It stamp set - both from the Greetery.

I die cut all of the boxes out of Little Sizzles Matboard from Sizzix.  I added DP to all of the boxes, some of the pieces I cut with the die and some I just cut panels to fit. (I don't like to wrap DP around corners as sometimes it creates a gap - so I cut pieces for each square or rectangle side instead.)

Here are the gift boxes I created.

First up is this sweet little box made using Eileen Hulls Sizzix Bag Caddy Die (retired).  I cut it out of Sizzix Matboard and covered it with a Teal Bumble Bees DP from Michaels.  I added the stamped die cut bow to the top and the sunflower on the front.  I didn't add any leaves to this sunflower since the area was so small and it was fun to see this pretty paper!

I decorated the back of each container the same way with Sentiments Squared Stamps and dies from The Greetery.  The sentiment strip was cut with Simple Strips Die from Taylored Expression.

I used Eileen Hull's Sizzix 3D Teacup Bigz die for my second project.  The die also cuts the tea bag and spoon.  I added twine to the teabag and sponged it with Vintage Photo Distress Ink.  I pressed the spoon onto a Versamark Ink pad and embossed it with Platinum Ultra Thick Embossing Powder.  

My friend ordered 4 boxes cut from Eileen Hull's Sizzix Gift Box Scalloped Edge Die.   I didn't fold the back piece of the box on the scoreline so it stood up as a tall back and I cut off the tab on the top edge.  I added the two scallop pieces from the die to the top edge (the small scallop adhered over the larger scallop at the score edge).  I made these boxes all the same but used different papers.

This one was made with a yellow background with white dots DP - I sponged randomly over it with Wild Honey Distress Ink to tone down the white dots a bit.

I covered this box with a Hexagon DP from American Crafts.

I made the last two boxes with this fun bee paper from American Crafts.  The paper had a white background with the black bees, and I thought the bees looked a little scary against the white (!) -  so I sponged randomly over the paper with Wild Honey Distress Ink to make the bees look more friendly!?


Design Tip - I wanted to share how I reinforced the bottom side edges of this Scalloped Edge Gift box.  
The Design of the die cut only secures the front and back edges of the bottom of the box when you assemble it and there can be a little gap on the bottom sides depending on how sturdy the  matboard you use is. 
The Little Sizzles I use is very sturdy, but I wasn't sure how heavy the items might be that she was going to put in the boxes, so I die cut 2 more of the larger scallop edge on the die, folded them on the score line and adhered them inside the box on both sides using ScorTape, so the flat edge is adhered to the bottom of the box and the scalloped edge is adhered to the side, holding the sides to the bottom of the box.
(I hope this makes sense to you......)

My friend was very happy with these Mother's Day gift boxes!
 
I'm linking my Tea Cup Box to:


Creatalicious Challenges - Anything Goes - Optional: Mother's Day


Path of Positivity Challenge - Anything Goes - or Something special about a friend.


Stamps:  Put a Bow On It, Sentiments Squared - The Greetery

Ink:  Versafine,  Canyon Clay - PTI, Ranger Distress Wild Honey, Peeled Paint, Vintage Photo

Paper:  White Little Sizzles Matboard - Sizzix, Precision Yellow and Brown Textured Card Stock- Parklane/JoAnn, Green Textured Card Stock - Lawn Fawn, DP:  Core-dinations Yellow Hexagon and Bumble Bee - American Crafts/JoAnn, Teal Bumblebees, Yellow Pin dots - Recollections/Michaels.

Accessories:  Bag Caddy Die, 3D Tea Cup Die, Gift Box Scalloped Edge Die - Eileen Hull/Sizzix, Put a Bow On It Die, Sentiments Squared Die, Firefly Dies - The Greetery, Simple Strips Dies - Taylored Expressions, Lovely Layers Sunflower Die - Honey Bee, Ultra Thick Platinum Embossing Powder - UTEE, brown POSCA Pen (for centers of sunflowers), foam dots, orange gem - from stash, Copics - Y38, 100 (to color bees)

Monday, February 21, 2022

Birthday, Baby and Friend Cards

 Today I'm sharing 3 cards I've made using some of Eileen Hull's Sizzix Chapter 1 releases.  

I've used the beautiful Vintage Buttons 3D Embossing Folder and her Snail Mail Thinlit Die (that coordinates with her Snail Mail Everyday Sentiments Maker Forte stamp set released last year).

First a card for a new baby boy.

I embossed a white card panel spritzed with a little water for the base of my card using the Vintage Buttons 3D embossing folder.  Such a gorgeous deep impression!

For the top embossed panel,  I rubbed the inside of the front of the embossing folder with blue ink, spritzed the white card panel with water, and then embossed the panel in the inked embossing folder - it gives a lovely subtle color behind the buttons!  

I cut this panel to fit inside the scallops of this die cut frame

I layered this over the white button embossed panel, added a sentiment and a button, both popped up on foam dots.

I stamped 'welcome little one' from Eileen's Snail Mail Every Day Sentiments stamp set inside.

For my next two cards I used die cuts from Thinlit Snail Mail Die and sentiments from Snail Mail Every Day Sentiments Stamp Set.

Hello Friend card.  

I adhered a strip of designer paper to the left side of the card.   I adhered the frame piece from the die centered on the card and layered 3 sizes of the cut blocks in different colors to frame my stamped sentiment.


Happy Birthday Card
I adhered a piece of patterned paper onto a white card base, adhered the frame offset over the paper (to feature the lovely florals in the corner!), stamped the sentiment on a block from the die and added red Nuvo Drops to opposite corners.
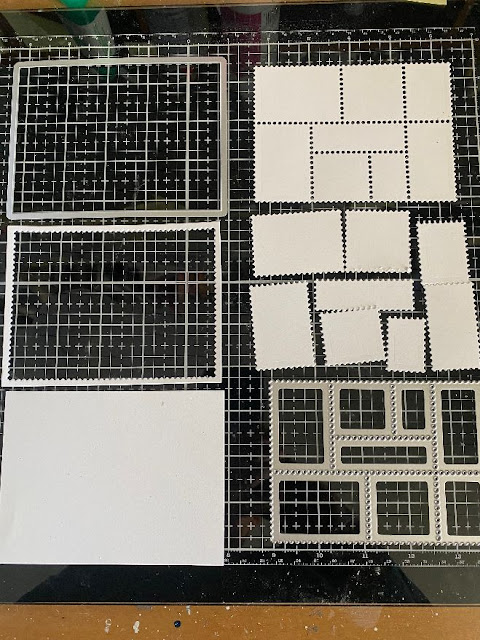
This photo shows the frame and blocks die included in the Thinlits Snail Mail Die along with die cuts out of white card.  If you cut the blocks on the dots - you get pieces that look like postage stamps!
To get the scalloped edge on the outside frame -  you cut a panel with the squares inside the frame.  If you cut just the outside piece it gives you a plain rectangle panel.


It is with a heavy heart that I say this is my last post as a member of Eileen Hull's Inspiration Team.
  
I have loved creating with Eileen's dies and working with Eileen and all of the wonderful creative people on her team over the past 6 years. 

I've just reached a time in my life when I want less deadlines and more free time for spontaneous activities now that COVID is loosening it's grip on us! (dare I say that?!)
Thank you Eileen for all of your support and encouragement while I've been on your team! I will certainly continue to create with your beautiful dies!

Remember to check out Eileen's blog every Wednesday to see a gathering of the teams creations!


Stamps:  Snail Mail Everyday Sentiments - Eileen Hull/Maker Forte, Cute as a Button from Baby Button Bits - Papertrey Ink.
Ink:  Caribbean Sky, Obsidian, Coral Berry - Altenew.
Paper:  White, Blueberry Sky, True Black, Raspberry Fizz - PTI, DP Garland 6x6 Pad - Memory Box.
Accessories:  Snail Mail Thinlit Die, Vintage Buttons Embossing Folder - Eileen Hull/Sizzix, button, foam dots, water mister, Word Window Punch - SU, Nuvo Crystal Drops Autumn Red.