Sunday, April 30, 2017

Paloma's Message of Freedom and Peace

Paloma came to visit me
Hello all! I'm not sure how many of you know about Paloma - she is a dove of peace created by Lys in France and began her travels in late 2015 visiting crafty people all around the world sharing her hope of peace. You can find out more about Paloma's travels here on this page on Lys' blog.

I took Paloma to church with me (St. John's Episcopal) as we pray for world peace every Sunday. She perched on the Pascal candle before the service started.  We have a lively coffee hour after the service and I told several of my friends about Paloma's journey and they were quite interested in how far she had traveled and in her message of world peace.
Later Paloma enjoyed flying around the American Flag in our back yard to prove she had visited the USA.
These are Lys's reasons for starting the travels of her little paper dove - so each receiver will hear the message of peace and send it on - all over the world.  
She wrote this on her blog after the attack on Paris in 2015:
After the shock, the anger, the nausea... what to say, what to do?
I have only weapons made of paper and words... 
I can face violence only with my values and beliefs.
Freedom and peace are the ones I wished to give today.
So this is Paloma, my little simple paper dove.
 For her I make a wish: could she take flight and give all around the world her freedom and peace message.
Paloma arrived at my house on April 26, 2017, all the way from Dot in Australia!  Prior to Australia - she had been in England and Scotland. 
 (Paloma has been in many places, but unfortunately, the original passport was lost somewhere in transit, so when Astrid in Scotland received her - she made a beautiful new Passport adding the names of people that had signed up to receive her but had not visited yet)
If you would like to be involved in the Paloma Passport to Peace Project please send me your name and address and I will put it in the Passport and add you to the list to receive the items in the above photo.  
When you receive the package - take a photo of Paloma somewhere around your home or town, post about the visit on your blog and send Paloma, the Passport and card on to the next person written in the Passport Book.
I am sending Paloma on to Jackie in New York.  
 I will be sending Paloma on her travels soon - so please e-mail me right away if you would like your name and address added! 
e-mail:   julia.aston@comcast.net

It's very sad that we seem to continually need prayers for World Peace but we are also always hopeful that it will be achieved!


Tuesday, April 25, 2017

PTI April Blog Hop

I forgot that today was the Papertrey Ink April Blog hop - but was reminded with an e-mail and I happened to have some time to stamp and was inspired by the photo so I am joining in -  better late than never!  
Here's Nicole's inspiration photo for the challenge.
And here is my card -  I like to keep sympathy cards on hand so that is the sentiment I used.
I've had the Lovely Layers dies for many years and finally got around to ordering the stamps that go with it recently!   

I also used the new Fun Frames die.  The sentiment and vine are from an older set Beyond Basic Borders. (this set is now in the Vault)

You'll find the challenge here.
Stamps:  Lovely Layers, Beyond Basic Borders - PTI
Paper:  Sweet Bush, Stormy Sea, white - PTI
Ink:  Sweet Blush, Stormy Sea, Bright Buttercup, Orange Zest - PTI
Accessories:  Fun Frames Dies, Lovely Layers Dies - PTI, foam dots, Tombow Liquid Glue.

Sunday, April 23, 2017

Three Feathers

I finally had a chance to make a card Just for fun!  
I've been doing a total cleaning out of my craft room (ongoing for 3 weeks so far and expected to take 3 weeks more at least!)  and I found some beautiful feathers! 
I did the in-laid die technique for the birthday piece -  die cutting the word out of the Vintage Cream panel, cutting it again out of a piece of sanded Kraft Core Core-dinations paper and inserting that piece in the space where I removed the cream piece.
This makes for a perfect masculine card with these colors -  but would also work for a female!

My card design was inspired by:

Just before the bell!  Link up by 4/24!
I used stamping, inlaid die cutting, feathers, sanding (of die cut), and rhinestones.


Stamps:  Studio Calico Limited Edition
Paper:  Vintage Cream, Dark Chocolate - PTI, Kraft Core Core-dinations.
Ink:  Cocoa Bean - PTI
Accessories:  Wonderful Words Birthday Die - PTI, mini sander - Ranger, feathers from stash, rhinestones - Kaiser Craft.

Tuesday, April 18, 2017

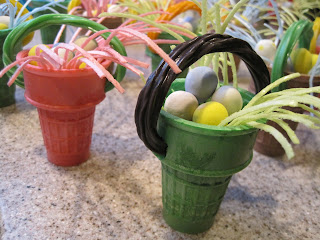
Ice Cream Cone Nests - The Tutorial

As promised on my Easter post, here is a little tutorial on how I put my Easter Place Setting treats together -  I saw the idea on Pinterest.
Here are the supplies -  Ice Cream Cones, Rainbow Twizzlers Candy, Cadbury Mini Eggs
and Edible Grass (I found the grass at Rite Aid but also saw it at Target and Walmart)
I wasn't quite sure how to 'drill' the holes in each side of the cone for the handle without cracking the cone and then I had the bright idea to get out the spiked handles we use when we eat corn on the cob! First I pushed the spikes through, a bit down from the top as shown.  I turned the handle clockwise and it made a perfect circle!
 The circle needed to be wider to fit the Twizzler - so I turned the corn holder around and gently pushed it through the hole to the end of the corn handle.
And a perfect hole was created without cracking the cone!  Whoo hoo!!
I cut off a bit of each end of the Twizzler candy handle to make a point so it went through the hole easily.
 I stuck one end through each hole from the outside of the cone.
Then I cut some long pieces of the edible grass -  5" or so - and stuck them into the cone.
Then I added my treat -  in this case - Cadbury Easter Eggs - six of them fit.  The green edible grass is flavored with apple, the pink - cherry and the blue - blue raspberry.  It's made of potato starch.
These were so easy to put together once I figured out how to do the holes!
Cute, right??!!


Sunday, April 16, 2017

Happy Easter!

The Good News today -  He is Risen!  Let the Earth Rejoice!  
Wishing everyone a Joyous Easter today!

I thought I'd share some cards and crafts I made this year for Easter.
Playing with my Distress Oxide Inks to create the backgrounds and black embossing the sentiments on these 4 cards.
A little wreath I made with grands Landon and Mila -  using a paper plate as the base with the center cut out, layering die cut Nestie eggs around the wreath - some cut out of patterned paper and some plain to stamp or color on - they came out so cute and the kids loved them!
A clean and simple card out of Kraft cardstock - stamps from Waltzingmouse (retired)
More stamps from Waltzingmoues (retired) die cut layered over a piece of Washi Tape.
I made these tiny coffee bags (1"x2") using a Waltzingmouse die and stamps (retired), that just fit 4 Cadbury eggs inside.  A little piece of lace and Nestie cut egg decorate the front.
I made these sweet little sunbonneted bunnies out of clothespins, painting the bodies white and the stand base green, gathering a little rectangle of cloth around their necks for the dress, painting wooden ears and sticking them on the back of the hats, making arms out of a knotted piece of twine and adding a carrot, chickie or egg.  I drew the face with a Micron 01 fine black pen and put a little rouge on their cheeks. 
After church - we're having Easter dinner at niece Christie and Nate's along with niece Katie and her family as well as Christie's in-laws -  I'm bringing roasted rainbow carrots and cookies
 along with the place settings that I made out of ice cream cones with edible grass, rainbow Twizzle handles and Cadbury eggs.  (I'll post a little tutorial in a few days!)

Happy Easter to all those celebrating!


Saturday, April 15, 2017

April CAS Mix Up Challenge - Mid Month Reminder!

Here's my post for the Mid Month reminder of the April CAS Mix Up Challenge!  We're using Inlaid Die cutting along with stamping and your choice of another media.
I made another Easter card for this month's challenge - just in time right???!!!  
I -  1) stamped the egg, 2) inlaid the die cut egg and die cut bunny, and 3) my choices - die cut the panel with a stitched edge die, used Wink of Stella, a black pearl, and die cut tissue grass
I die cut the egg out of a white card panel that I had cut with a stitched edge die.  
I stamped this beautiful egg on the white egg die cut.  Then I die cut the bunny out of the center of the stamped egg.  At this point, I adhered the white panel onto the white card base.
I die cut the bunny again out of a piece of brown Color Core Cordinations and sanded the edges so the red showed through.  I die cut the bow out of Hibiscus Burst card and brushed it with Clear Wink of Stella for a little glitter!
I inlaid the bunny on the egg (she pops up a bit as I layered it onto the piece I cut out of the egg), adhered the bow, and added her black pearl eye.  I die cut some grass out of green tissue using a fringe border die and adhered two layers of  it over the bottom of the bunny.
You have until April 24th to link up your inlaid die cut cards!  You'll find the challenge rules, video links to Inlaid Die cutting methods and wonderful inspiration from the Design Team here.

Also linking my card to:


Stamps:  Nestie Eggs - Waltzingmouse (retired)
Paper:  White and Hibiscus Burst - PTI, green tissue paper, Color Core Cordinations
Ink:  Blueberry Sky - PTI
Accessories:  Dies - Stitched Edge - Waltzingmouse (retired), Nested Eggs- Nestabilities, Mini Bunny and Bow Set - Tim Holtz/Alterations Movers and Shapers, Fringe Border - Memory Box, Mini Sander - Ranger, Tombow Glue, Clear Wink of Stella, black pearl - Kaiser Craft.

Friday, April 14, 2017

Eileen Hull Heart Felt Journals - A Garden Record

Today I have another journal to share that I made using Eileen Hull's new Sizzix Journal Die.  The Creative Team has been sharing journals all month over at Eileen's Blog.
I love to garden in my yard and every year I tell myself I'm going to document what was growing that year and where everything was planted and I finally made a Garden Journal for myself to do just that!
 And I've used Eileen Hull's wonderful new Journal Die for my project!
Here are some photos of just how I put this together.
I die cut two covers out of grey felt using Eileen Hull's Sizzix Journal Die.  I cut two pieces of lace and pinned them across the top and bottom of what will be the front cover. 
I cut two more journal covers out of Black Paper Leather (which is pliable, sturdy and light weight) and folded them along the score lines.
I layered the felt and Paper Leather pieces together (to give the felt cover a little sturdiness) being sure the holes matched up.  I sewed along the top and bottom edge of the front cover piece and I sewed just along the binding edge of the back cover to hold the felt and paper leather together.
Here you can see from the back side - the lines of stitching in white.
I added a little glue to the binding edge of the front cover just to hold the pieces together.
Then I glued the two covers together at the binding being sure the holes were lined up.  I held them together with a couple of clothespins while it dried.
I added a tie closure of Fringe Edge Linen Ribbon using a brad through the hole in the center of the binding, using enough ribbon to wrap around the journal twice to accommodate extra thickness as I added garden photos and journaling notes.
I threaded two 16" black elastic cords through the top and bottom holes on the binding to hold the signatures in the journal tying the knots on the inside.
I made two signatures - using 6 papers 7 1/4" x 8 1/2" folded in half to make twelve 7 1/4" x 4 1/4" pages for each signature.
I slipped each signature under a cord in the middle of the signature making it easy to add more pages if I need to.
I die cut petals out of several colors of felt using Eileen Hull's Heartfelt Stitchy Flowers and Leaf Thinlit die set.
I layered several of the petals and leaves together to make 3 flowers.   I stamped sentiments from One With Nature stamp set onto a piece of canvas and adhered it to the cover.  I adhered the flowers onto the cover adding flower gems to the centers and one to the sentiment.
A side view showing the black elastic cords and double wrapped closure ribbon with the brad.
A view showing the tied ribbon
A view of the first few pages I've started to document different areas of my gardens.  These photos are from last year.
One of my patches of Brown Eyed Susans.
A big geranium on our side steps accompanied by a statue.
And also some of the animals (a giant raccoon and Mr. and Mrs. Mallard) that have wandered into our yard attracted by our bird feeders!
And a beautiful Red Tailed Hawk looking for a meal and then preening his feathers in the sun!
Our Rose of Sharon Bushes -  one with pink/purple blooms and one with white blooms even though they grew from shoots off of the same white bloom bush!
I can't wait until my garden starts blooming again this year so I can add new photos and notes to my new Garden Journal!  I love the earthy feel of this felt journal when I hold it in my hands!
What will you make your journal for??
You can pre-order Eileen's Sizzix Journal die over at The Funkie Junkie Boutique!

I'm also linking my journal to the following:


Stamps:  One with Nature - Simon Says Stamp
Paper:  canvas sheet from stash, Black Leather Paper - Sizzix, Lined cardstock - Amuse
Ink:  True Black - PTI
Accessories:  Eileen Hull Sizzix Dies - Journal Die and Stitchy Flowers and Leaf Thinlits Die, Grey  felt - Kunin,  Blue, Green Orange, light Green felts - PTI, Fine Linen Ribbon - Funkie Junkie Boutique, Idea-ology Fasteners/Dapper, Black Elastic Cord - Dritz, flower gems, Sewing Machine.