Showing posts with label Festive Friday. Show all posts

Monday, August 25, 2025

Smell the Sea and Feel the Sky

 A blogging friend of mine (Michele Ferguson - thank you!) posted a card a while ago using stamps from the now retired Sandy Toes set from Waffle Flower.    She was nice enough so send me a stamped and die cut set of the images and I just made a card using 3 of the 5 images.

I colored the images with Copics, added an enamel heart to the beach ball and board and popped the images up on foam dots.

The background is a wonderful piece of DP that I only had a small piece of so this card is a 3"x6" mini slim card!

The sentiment is from a Colorado Craft set, Seas the Day.

I loved this Sandy Toes set so much I contacted Waffle Flower by e-mail on their web site to see if, by any chance there was a set of these stamps hanging around in their warehouse - and they looked but no, none there. They did say if enough people write in to request it be made again - they would! 

I used the colors from this weeks Color Challenge over on Splitcoaststampers where I have been one of their Guest DT's for the month of August.

I'm also sending my card to:

I used Beach ball, sand, and relax sentiment
ends 8/26


Optional Theme - Summer
ends 8/31


Week 4 Anything Goes

first time using the image and sentiment stamps


Stamps: Sandy Toes - Waffle Flower (retired), Seas the Day - Colorado Craft
Paper: water color paper, DP Beach Vibes - Honey Bee Stamps
Ink: Nocturne - Versafine Clair
Accessories: Sandy Toes Dies - Waffle Flower (retired), Copics RV25, Y17, RY04, R20, BG10, E00, E33, foam dots, acrylic hearts - Altenew

Thursday, July 10, 2025

As Carefree as a Seagull

I'm excited to be posting my Seize the Birthday card today as the Surprise Party Guest, having been one of the winners with my card for the Fancy Fold  #307 challenge

I opted for the food option on my card - using the Happy Seagull Die set from Waffle Flower.

If you live near or vacation at the ocean you know how adept seagulls are at sweeping down and stealing food from unwary beach goers!  We live 3 miles from the ocean and most of our mall parking lots that have food stores in them have seagulls sitting on the tall parking lot lights waiting for someone to drop some food! 

This guy (or gal!?) is walking off with a whole beach bucket full of fries at the beach!

I embossed the background with Wave Pierced A2 cover plate from Honey Bee and then rubbed ink pads over the sand and sea/sky areas with Ranger Distress Scattered Straw and Speckled Egg.  All the die cuts and sentiment are up on foam dots.

So please join us at Seize the Birthday making it just a birthday card - or using the optional Food &/or Drink!  You'll find the challenge here.

And thank you to Nancy at Seize the Birthday for inviting me to be a surprise party guest!

Also sending my card to:

A trip to the beach

1st time using this seagull die purchased last year! 
1st time using this new Waves Pierced A2 cover plate

pick 3   ends 7/16
Yellow, swirls (wave pierced cover plate), and Food related sentiment

Birthday -  ends 7/31

July - Sun, Sea, Sand  ends 7/31
sentiment and foot prints stamped

ends 7/16


Stamps:  Inquisitive Seagulls - Waffle Flower.
Ink:  Nocturne Versafine Clair, Scattered Straw, Speckled Egg - Ranger Distress, Caramel Toffee (on foot prints) - Altenew.
Paper:  Water color - Canson Cold Press, True Black, Soft Stone, Orange Zest, Lemon Tart, Weathervane, Pure Poppy - PTI, Brushed Silver - SU.
Other Supplies:  Happy Seagull Die - Waffle Flower, Waves Pierced A2 Cover Plate - Honey Bee, Copics E53 (on french fries), C1 (dots on seagull white body), white Gelly Roll Pen (on wings, tail and bucket)

Saturday, March 12, 2022

Snow Drops for Easter

 Time to make my Easter Cards!

I water colored a panel of white with strokes of Bronze paint to make it look more like the uneven coloring on an egg shell, and die cut a Nestability egg out of the panel. I cut the top off the die cut egg using the bottom edge of the egg die.

I die cut and water colored Snow Drops and stems out of white and adhered them to the back of the egg with tape.

 I embossed the background with the Tufted Embossing Folder from SU and then stenciled over it with the Pebbles stencil from Lavinia using Antique Linen Distress ink and a blending brush - just lightly stenciling over the center of the panel.

I adhered the egg and snowdrops to the panel with thick foam dots, curving the outside edges of the egg down. I added Glossy White Nuvo Crystal drops over the snow drop blossoms to add a little dimension.  I stamped the sentiment and punched it with the Word Window punch from SU.

 I'm linking my card to:

Just Us Girls

As you See It Challenge

Festive Friday Challenge

I used flowers, green, stencil


Stamps: A Beary Good Year - The Cats Pajamas
Paper: white - Papertrey Ink
Ink: Antique Linen Ranger Distress, Obsidian - Altenew
Accessories: Bronze water color paint - Ruby Mountain Paint Co, green water color paint - Winsor Newton, paint brush, water, Egg Die Nestability, Snow Drop Die - Alexandra Renke, Tufted Dynamic Textured Impressions Emb Folder - SU, Pebble Stencil - Lavinia, blending brush.

Wednesday, September 3, 2014

A Wreath with Christmas Wishes

Here's another card for my Christmas card stash -  that I made for the latest Festive Friday challenge.
I made my own barnboard background by scoring a white card stock panel with my ScorPal and then rubbing two ink colors over the panel -  Ranger Distress Stormy Sky and Pumice Stone.  I die cut the wreath out of both white card stock and a piece of patterned paper that looks like a photo of pine branches from Die Cuts With a View Christmas Stack (that I've had for years!)  I layered the two cuts together for strength since the DP is thin. I used Tim Holtz Holiday Wreath die that has little cut outs in it in the shape of holly - you can see them lifted up in the photo.
 I covered the wreath with Glitter Glaze Sheer Sparkle from MFT -  you can see the sparkle in this close up.  I made the sentiment panel by clear embossing the sentiment from Tis The Season from Waltzingmouse on white card stock - and then sponging over it with Stormy Sky Distress Ink.  I layered the wreath onto the barnboard panel with foam dots - and layered the sentiment piece over the wreath with more foam dots.
Here's the Festive Friday Image that inspired my card:
and here's my card again.
Love this blue and green color mix for Christmas!  Are you working on your holiday cards yet?

I'm also linking this to Virginia's View Challenge #7 - Pattern Paper
 
  Thanks for stopping by today!
Stamps:  Tis the Season - Waltzingmouse
Ink:  Versamark, Ranger Distress Stormy Sky and Pumice Stone
Paper:  White - PTI, DP - Die Cuts with a View/Christmas Stack
Accessories:  Scor Pal,  Glitter Glaze Sheer Sparkle - MFT, clear embossing powder, heat tool, Holiday wreath die - Alterations/Tim Holtz.

Sunday, August 17, 2014

Snow in the Mountains

Today I have a Christmas card to share - using the rather unlikely colors of black, tan and white!
I used one of my favorite Waltzingmouse dies -  the Alpine Christmas die set along with the coordinating Alpine Christmas stamp set.  I white embossed both the beautiful mountain range and snowflakes.
My card was inspired by this wonderful image for the Festive Friday Challenge
 Can't you just smell those yummy frosted gingerbread snowflakes???!!! Hmmm - I love the smells of baking in the kitchen at Christmastime....

It's just a few months till Christmas (gasp!) so it's really time to get going on our Christmas cards so we can relax and enjoy the season don't you think?!  I'm glad I'm getting mine done early!  You have until the 27th to link up to Festive Friday.

Stamps:  Alpine Christmas - Waltzingmouse
Paper:  White, True Black, Fine Linen - PTI
Ink:  Memento Tuxedo Black, Versamark
Accessories:  Alpine Christmas Die Set - Waltzingmouse, foam dots, white embossing powder, foam dots.

Friday, August 1, 2014

Guest Designing for Festive Friday!!

I was thrilled beyond words when I got an e-mail from Ardyth asking if I'd like to be Guest DT for this week's Festive Friday Challenge -  I quickly replied a resounding "YES  - I'd LOVE to!"   So here I am -- with my card for this week's Festive Friday Inspiration photo - isn't this a wonderful Christmas scene??!  
This is how Christmas looks in New England where I live. (accept for the once in a while years when we don't have snow - which is SO depressing!!)
I knew right away - that I'd pull out my Papertrey Ink stamp set and die - Enjoy the Ride to create my card..  
And then I went searching for my old SU set Loads of Love Accessories (that goes with the cute pick up truck from Loads of Love)  I've sold most of my SU sets on Ebay -  but I knew I had kept this one - and the presents and dogs stamps (that go in the bed of the truck) were the perfect scale for the VW!   And don't worry  - the dogs are not driving -  this is the back window of the car!! 
I stamped the dogs right in the car window - using a sticky note along the bottom to be sure it didn't stamp outside the car. I colored 2 of them with a tan Copic and colored their noses with a Spica black pen so they have a little sparkle (like a dogs wet nose!) I stamped the presents on white card stock, cut them out and colored them with a red Copic.  The wreath, berries and tiny snowflakes (see one just above my name on the pic above?!) are stamps from Twas the Night Before Christmas by Waltzingmouse.  I stamped the wreath and berries, cut around the outside edges and punched a hole out of the middle.  I stamped the snowflakes in Distress Antique Linen randomly on the snowy field and in the sky - very subtle!  I also sponged the edges of each piece and the background panel with the Antique Linen. 

The trees and rocks are a red rubber stamp called Lakeside Reflections from StampScapes - I stamped it 3 times to fill the background panel (and I only inked the top half as the bottom half shows a reflection in the lake!).  Then I layered the car onto the panel, the presents on the roof and the wreath on the back of the car with foam dots.   I added red enamel dots over the lights on the car and finally stamped the Merry Christmas from Nutcracker Sweet by Waltzingmouse along the top.

I hope the challenge photo inspires you to make a Christmas Card in August and get ahead of the holiday rush when December rolls around!!  I already have a box full of cards ready to send out because I participate in the Festive Friday challenges!
Please check out all of the lovely Design Team's inspiration over at Festive Friday - and I hope to see your card linked up there.
 You have until Midnight EST on Wed 8/13 to link up!

And thank you to Ardyth and all the DT ladies from Festive Friday for allowing me to join you as Guest DT for this week's challenge!

Stamps:  Twas the Night Before Christmas and Nutcracker Sweet - Waltzingmouse; Enjoy the Ride - Papertrey Ink; Loads of Love Accessories - Stampin' Up; Lakeside Reflections - StampScapes.
Paper:  White - PTI
Ink:  Ranger Distress Antique Linen, Memento London Fog, Archival Red Geranium, Tree Bark and Fern Green.
Accessories:  Copics E31, R05, foam dots, Circle Punch - EK Success, Spica Black Pen, enamel dots - home made from Perler beads, car die - Enjoy the Ride/PTI.

Monday, July 21, 2014

Winter Bunny

I've missed a couple of the Festive Friday Challenges - and I was determined not to miss it again!  This is the beautiful inspiration photo:
So many pretty things to focus on -  first I thought pinecones,  then snowflakes, then white frame and wreath,  I toyed with the idea of branches with silver balls, or a roaring fire..... but then
The little bunny won out! I love the stitched bunny and bow from Lil' Inker Designs - I guess she's not just for Easter anymore!! I cut her out of a brushed gold card stock.  I also used (for the very first time!) my long ago purchased and stored away Impression Plate from the Luxe Letter Press Market Kit from PTI.  
I stamped the NOEL from the Nutcracker Sweet set by Waltzingmouse in Brilliance Gold Ink next to my bunny.  The bunny and bow are both popped up on foam tape. 

On the inside I stamped this verse from an old wood mounted rubber stamp I have:  
In the stillness of snow falling
In the glow of candlelight
In the beauty of frosty windows
May peace be yours tonight.

Perfect for my little bunny, I think.....

Stamps:  Noel from Nutcracker Sweet - Waltzingmouse
Paper:  Vintage Cream, Letter Press 110# Stock - PTI,  brushed gold from stash
Ink:  Brilliance Galaxy Gold
Accessories:  Bunnies and Bows Die set - Lil' Inker Designs, Luxe Letter Press Impression Plate - PTI

Saturday, June 28, 2014

Pastel Christmas in the Round

I have two round Christmas cards to share today -  
I used the same technique for the background on both cards.  I took Worn Lipstick and Salty Ocean Distress Stains and ran them over my NonStick Craft Mat in two lines.  I spritzed the mat with water over the stains and then swiped a panel of glossy card stock straight through the colors.  I flipped over the panel and let the colors drip a bit - then dried it with my heat tool and blotted any big pools of color with a paper towel. The card above was made using the first panel I swiped through the stains - so the colors are stronger.

The card below was made with a glossy card stock panel swiped through what was left on the mat after the first swipe, so the colors are a little weaker, especially the Worn Lipstick on the right..  I die cut the panels with a circle Nestability as well as the card bases - having the die a little over the fold in the card so it didn't cut through all the way around, leaving a fold at the top.  The PEACE cut out was made with a Movers and Shapers die from Alterations/Tim Holtz.   This panel is popped up on foam dots to accent the cut out.  I adhered Lemonade Blend sequins from Avery Elle on the card above and sequins from Neat and Tangled on the card below (the sequins were included free in an order I just got from them!)
I'm linking my cards to two Christmas Challenges:
Festive Friday - which was this photo for inspiration
and Merry Monday - which was to use sparkle -  I used sequins for sparkle and glossy paper that shines!

Joy Card:
Stamps:  Joy to the World - Verve
Paper:  White - PTI, Gloss Card Stock - Ranger
Ink:  Archival Jet Black
Accessories:  Circle Nestabilities - Spellbinders, Ranger Distress Stains Worn Lipstick and Salty Ocean, Non Stick Craft Mat - Ranger, Water Mister - Ranger, Lemonade Blend sequins - Avery Elle.

Peace Card:
Paper:  Sweet Blush - PTI, Gloss Card Stock - Ranger
Accessories:  Circle Nestabilities - Spellbinders, Peace Movers and Shapers die - Alterations/Tim Holtz, foam dots, sequins - Neat and Tangled, Non Stick Craft Mat - Ranger, Water Mister - Ranger,

Thursday, June 12, 2014

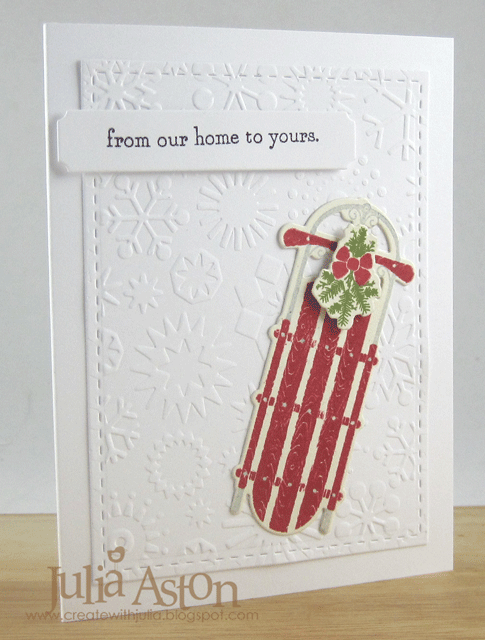
From Our Home to Yours

Yes folks,  I am daring to post yet another Christmas card when the wonderful warm summer has finally come upon us here in Massachusetts!

I actually have two cards to share -  because I thought I was going to use both images on one card - but when I die cut them - it looked too crowded having both together.

On my first card I used the lovely skis, pine bough and sentiment from the Two Feet Deep set from PTI.  I used the coordinating dies for the skis and bough. 
 I embossed the stitched mat die cut panel with the Snowflakes embossing folder from Provo Craft.  The sentiment is on a die cut sentiment strip from MFT.
 And here's the 2nd card - with the exact same layout but using the sled instead of the skiis.
My cards were inspired by two challenges:
Darnell's new NBUS challenge: to use never before used 'schtuff' with a friendship theme -  I bought the PTI stamp and die sets months ago and this is their virgin debut - and my card is being sent from our home to yours (friend!)
And the Festive Friday Challenge - you can see what inspired me here!
Stamps:  Two Feet Deep - PTI
Paper:  White, Rustic Cream - PTI
Ink:  Archival Jet Black, Red Geranium, Fern Green Tree Branch; Memento London Fog
Accessories:  Stitched Mat Rectangle Die - Lil' Inker Designs, Two Feet Deep Die Collection - PTI, Dienamics Sentiment Strips - MFT, foam dots.

Tuesday, May 27, 2014

Peace on Earth

Here I am with another Christmas Card to share -  I only need about 40 Christmas cards in December and I'm pretty close to having that many made already!   I punched several different sized circles out of  red and lime green glitter card stock from Michaels.  I die cut the deer from Starry Christmas by MFT out of Brushed Silver Cardstock from SU and then white embossed it using the coordinating deer stamp from the Starry Christmas stamp set by MFT. The Peace on Earth is from the same stamp set.  I layered them all onto a panel I die cut with my Stitched Mat Rectangle from Lil' Inker Designs.
Here's a close up of the deer showing the silver with white embossing a little better.
I'm linking my Christmas card to 3 challenges:
Festive Friday -  I was inspired by the red ball ornaments on the tray, the green tree and the prancing silver reindeer on the tree.
Jingle Belles -  Theme Peace -  the deer flying through the galaxy evokes a feeling of Peace for me on this card!

Stamps:  Starry Christmas - My Favorite Things
Paper:  White - PTI, Glitter Card Stock -Michaels, Brushed Silver - Stampin'Up
Ink:  Archival Jet Black, Versamark
Accessories:  foam tape, white embossing powder, heat tool, circle punches - EK Success, reindeer die - Starry Christmas set - My Favorite Things, Stitched Mat Rectangle die - Lil' Inker Designs.