Showing posts with label Gelli Plate. Show all posts

Thursday, April 2, 2020

A Vintage Journey - April Challenge - It's Gelli Time!

There's a new challenge up at A Vintage Journey today - and I'm the hostess for April.  
Our challenge this month is to get those Gelli Plates out and create 

Yes, get those gel plates out and have a play.  Printing and mark making are unique and somewhat addictive when you start so let us see what you create and how you use it in your project.  Just remember to create your project in one of our preferred styles: vintage, shabby, mixed media, art journaling, industrial, timeworn or steampunk.
 
I'm just sharing some photos of my project today - as I will be posting a tutorial for it over at A Vintage Journey on April 18th.

Here's the print I created and used in my framed project using just a section of a 9"x12" Mosaic Flowers Repeat stencil from Stencil Girls.
I decided to create a framed wedding theme piece with my print as the background.


In the past I hadn't been very successful in getting anything I considered usable with my Gelli Plate - so I spent a couple of afternoons watching YouTube videos on the topic and then playing in my craft room.  I found things that worked for me and things that didn't and learned a lot!  

Here are a few other prints I made after many, many 'pulls'! 
I used a 6"x 6" Gelli Plate for all my prints.
A big 9"x12" print on Bristol Smooth Surface paper.
(I learned if you print words you have to turn the stencil over on the gel pad and ink through the back to be able to read the words on your print!) 
I was playing with mixing different Dina Wakley stencils and colors for this one. 
 I printed this on a piece of 8 1/2" x 11" Deli Paper that I had in my stash using a Stencil Girl Stencil.
These two are printed on white card stock 4 1/4" x 5 1/2" panels using two stencils from Stamplorations.

I'm sure a lot of you are more skilled in Gelli Printing than me and I can't wait to see what you link up over at A Vintage Journey this month!  

Please visit the AVJ challenge blog here - where you will also find lots more inspiration from the Creative Guides joining me this month!

I'm also linking my framed wedding to:
Anything Goes - Optional Wedding

Paper:  white card stock, Deli Paper, Bristol Smooth Surface
Accessories:  Golden Acrylics Quinacridone Magenta, Teal, Diarylide Yellow, Carbon Black, paint brush, Vignette Frames, Remnant Rubs Life Quotes and Elements, Paper Dolls - Tim Holtz/Idea-ology, thick foam dots, Copics YG17, Ell, R02, YR04, R37, B05 Mosaic Flowers Repeat 9"x12" stencil - Stencil Girls,  You Can, Mod, Mini Casey and Penelope stencls - Dina Wakley, Abstract Oats and Bold Florals stencils - Stamplorations,

Tuesday, February 13, 2018

Another Favorite Eillen Hull Sizzix Die - The Tool Box

I have another favorite Eileen Hull Sizzix die to share today!  All this month the Inspiration Team is posting projects using their favs - and they will be gathered on Eileen's Blog during the month of February.
I just LOVE being on Eileen's team as I also LOVE making 3D items - and Eileen has so many wonderful dies - you can see them here at the Sizzix site.

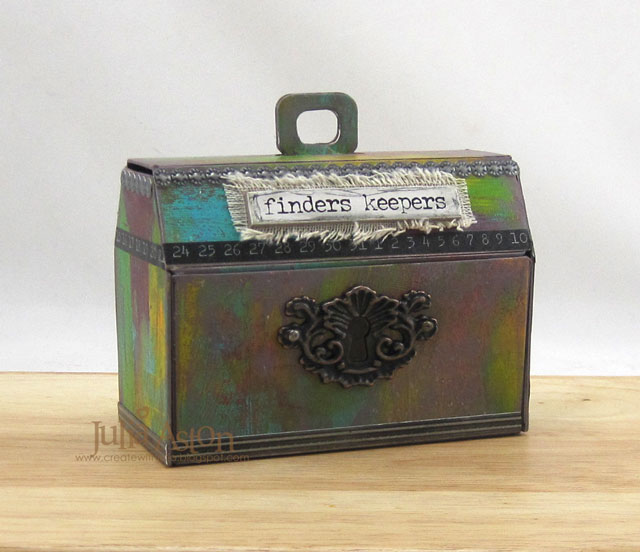
Today I've made a project using the cool Tool Box Die
It is a miniature tool box - measuring 4 1/4"w x 3"h x 2"d
but it has plenty of room to hold lots of trinkets, treats or little notes!  You just pull up on the handle and the top lifts up.  The edge tucks back into the box to hold it closed.
Here's a view from the back!
Here are some photos showing how I put this together.
To color the box, I used my new 12"x14" Gelli Plate (Thanks to Anne's demo done at Creativation!) putting drops of Golden Acrylic Paints in Teal, Diarylide Yellow and Quinacridone Magenta onto the plate and rolling them out to blend them
Then I pressed the pieces I die cut out of white Little Sizzles Mat Board onto the Gelli Plate and rubbed over all the areas so they would pick up the color.
You can see below some spots that didn't pick up the color - you can press the piece back onto the Gelli plate to try and pick up more color, leave it like it is, or you can rub some paint over the areas with your finger - depending on what look you want.
I folded the box on all the creases and assembled the box using ScorTape.  I glued the handle pieces together, slipped the handle through the slot in the top and adhered the base pieces on the inside of the cover.
 (see photo of handle inside cover in photo of opened box above)
The color of the board you use always shows up on the bent corners of your box - so I painted over all the edges, as well as the inside of the box, with London Fog Fresco Finish Chalk Acrylic Paint from PaperArtsy.  I also touched up some of the white spots on the sides, rubbing over them with the London Fog paint on my finger and wiping it down with a baby wipe so it wasn't too dark.
I decorated the edges of my tool box using Tim's Design Tape and Industrious Stickers.  I added a Locket Key with two brads on the front, coloring inside the keyhole with a Black Sharpie
I frayed the edges of a piece of Linen Ribbon and layered a Quote Chip over it.  I drew lines around the Quote Chip with my Black Stabilo Pencil and rubbed it with a damp finger to distress it.
So there you have another of my favorite dies by Eileen Hull!   Remember to check out Eileen's blog so see more of the Inspiration Teams favorites

If you missed my Adirondack Chair post last week -  you can check it out here!

Paper:  White Little Sizzles Mat Board - Sizzix
Accessories:  Tool Box Die - Eileen Hull/Sizzix, Idea-ology - Locket Keys, Design Tape, Industiourrs Stickers, Quote Chips, Stabilo Black Pencil, Teal, Diarylide Yellow, Quinacridone Magenta Golden Acrylic Paints, Black Sharpie (to fill key hole), Linen Ribbon - Funkie Junkie Boutique