Showing posts with label Memory Box. Show all posts

Saturday, June 27, 2026

Hope Your Day Soars

 Today I'm sharing a card I made using this adorable Happy Dance Bird die from Memory Box.  I just had to purchase it after seeing several blogging friends use her on their cards.  She just cracks me up!

I'm sending my card to:

The Inspiration Challenge at Splitcoast Stampers


Seize the Birthday


1st time using the Happy Dance Bird


Stamps: Spread Your Wings Sentiments - Spellbinders
Paper: White, Lovely Lady, True Black, Lemon Tart - PTI, DP - a card front from Donation we made to St. Labre Indian School.
Ink: Nocturne - Versafine Clair
Accessories: Happy Dance Bird Die - Memory Box, Close the Gate Die - Heffy Doodle, Pierced Feature Frame - PTI, Pink Candy Dots - Waffle Flower,

Saturday, April 22, 2023

Inkspirational #288 Designers Choice - Dots AND Stripes

 It's time for the next Inkspirational Challenge - #288 is Designers Choice.  Nonni is our designer this time and she would like us to use Dots AND Stripes!


I used striped DP on the bottom half of my card and dotted DP on the top half.  I also splattered with a black POSCA pen which created more dots!  I colored the stems and centers of the daisies with Copics.  The little strip between the patterns was made with a die from Stitching Lines by Ellen Hutson.

Inside is stamped a Happy Birthday sentiment.

Please join us and link up your striped and dotted creation!  

Check out all the inspiration from the DT at Inkspirational.   
You have until May 5th to link up your card!

I'm linking my card to:
Layered sentiment over die cut flowers, over center die cut strip, over DP!


Paper: White, Simply Chartreuse, Simply Chartreuse Pattern Pack - Papertrey Ink.
Accessories: Daisy Stems dies - Memory Box, Wildflower Stems #1 - Tim Holtz/Sizzix, Stitching Lines die - Essentials by Ellen/Ellen Hutson, Black Posca Pen, foam dots, Copics, printed sentiment strip from stash.

Tuesday, February 28, 2023

February Group of Seven Cardmakers: Technique - Resist Debossed Background

It's time for the February Group of Seven Cardmakers post, playing with the Resist Debossed Background technique. 

Our group met for a zoom call in early February to try out a recent video tutorial from Splitcoaststampers (created by Anna-Karin Evaldsson).  

I love how this came out and I think blues and browns are my favorite colors to use with this technique!

So, basically, you lightly run a Versamark ink pad over the raised, inside, back of your embossing folder. (3D embossing folders seem to work best because they give a deeper impression).  

Take a piece of water color paper (or any water friendly paper like Mixed Media), rub over the paper with an Embossing Buddy (powder), put it in the embossing folder powder side down (over the Versamark inked side) and run it through your machine.

Take the panel out and cover the back side (the debossed side with the Versamark ink on it) with white embossing powder.  If the powder sticks to too much of your panel background, you can brush some off gently with a paint brush.  You want the powder to be on the design which is 'debossed' since you are using the back of your panel.

Then heat emboss the panel.  

To add color to the parts not white embossed on my panel, I pulled out two Distress Inks - Tumbled Glass and Frayed Burlap and two Distress Oxide Inks Salvaged Patina and Walnut Stain (DOX inks leave a darker color than the regular Distress inks).  You want to use water based inks.  I rubbed the inks (one at a time and do the Distress first, then the DOX since they are darker) onto my craft mat, spritzed with water and then pressed the panel randomly into the ink, then looking where there were open spaces and pressing that section into the ink.  

Notes: 

1.  You can just use one or two water based inks. 

2.  You should try several different embossing folders, as some work well and some not so well?!


A close up:
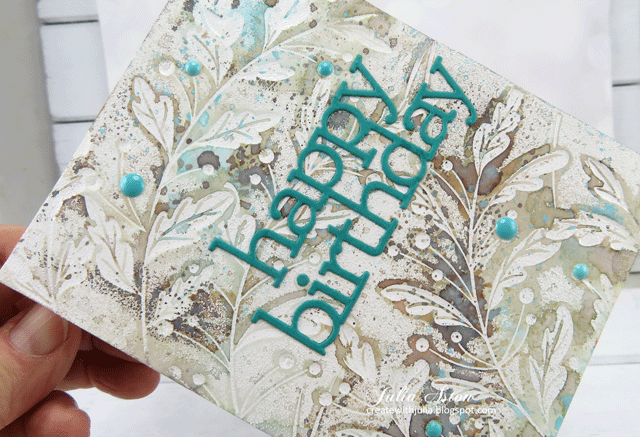
I added the die cut sentiment and some enamel dots to the panel.

I made a second card (below) using the same technique, embossing folder, white embossing powder and inks - and you can see it looks very different.  

The white embossing powder stuck to more of the card rather than just the debossed image and so just small bits of the panel absorbed the smooshed inks. (I didn't brush off the excess white powder on the flat bits!)  But it still makes for a pretty and interesting background I think?!

I'm linking my birthday card to:


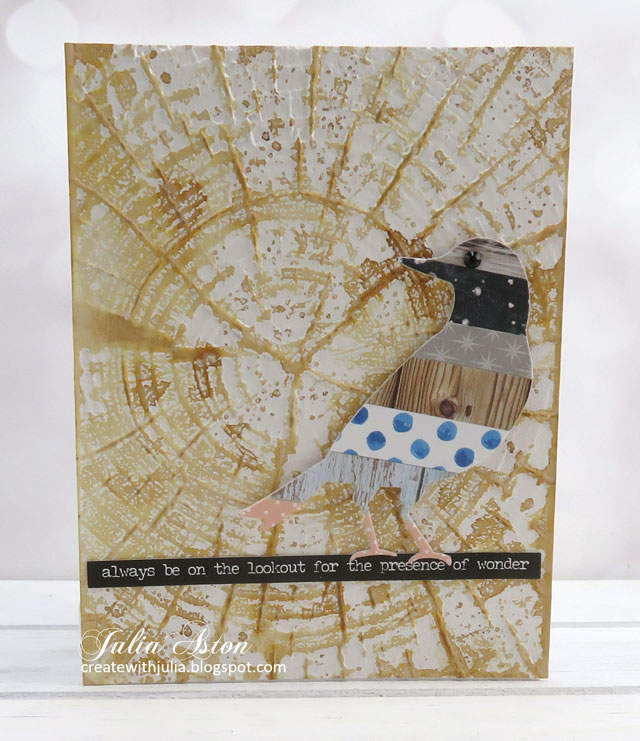
Three more cards I made using this technique.
Embossing folder:  Tree Rings - Tim Holtz/Sizzix.  White Embossing Powder/Distress Oxide Vintage Photo Ink.  The bird is Feathered Friends Thinlit dies - Tim Holtz/Sizzix covered with strips of DP.

I'm linking my tree ring card to:

anything embossed - optional things with wings


Embossing Folder:  Vintage Button - Eileen Hull/Sizzix.  White Embossing Powder, Distress Tumbled Glass and Frayed Burlap Inks.  The horse is an old wooden stamp by Judith, colored with markers.

I'm linking my Baby card to:
Feb - anything stamped


Embossing Folder: Circuit - Tim Holtz/Sizzix.  White Embossing Powder/Distress Lost Shadow Ink. Die: Voltage Bigz Die - Tim Holtz/Sizzix

I'm linking my voltage card to:

First time using both the circuit Emb Folder and the Voltage Die


For the full tutorial of this Resist Debossed Background and inspiring samples from the rest of the Seven Cardmakers, please pop over to the Group of Seven Cardmakers Blog.

We post a new technique on the 28th of each month that we hope will inspire you to try it out as well!

  We've added a Mr. Linky to the post - so you can link up your creations if you try this technique -  It's not a challenge, just a place you can put your card so everyone can see it and be inspired! 


Birthday Card
Paper:  Water color - Canson Cold Press, Tropical Teal - Papertrey Ink.
Ink:  Ranger Distress Tumbled Glass, Frayed Burlap, Ranger Distress Oxide Ink Salvaged Patina, Walnut Stain, Versamark.
Accessories:  Gracious Leaves Embossing Folder - Memory Box, white embossing powder, heat tool, water mister, craft mat, Happy Birthday Die - Simon Says Stamp, Happy Birthday Poe Script Die - Poppy Stamps, Enamel Dots - Altenew.

Saturday, January 28, 2023

Sending Love

 It's time for the next Inkspirational Challenge, and it's a wonderful Mood Board!


I'm sure you can tell - I  was inspired by the plate of cookies and the colors!

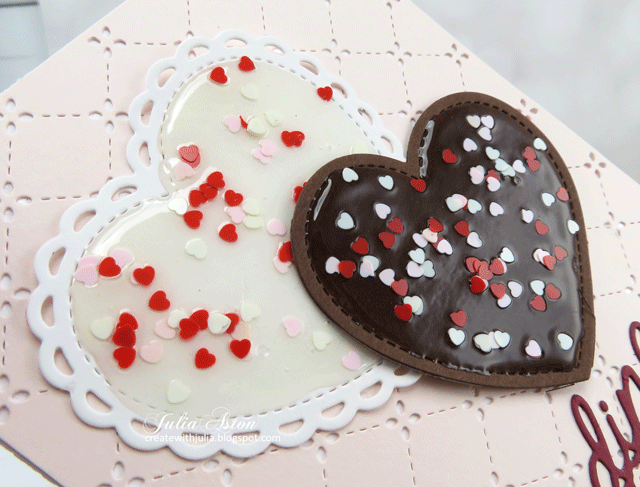
I die cut the hearts from Lawn Fawn out of white and Dark Chocolate card and spread a layer of Glossy Accents over each one.  
Then I sprinkled Tiny Hearts Valentine Mix from Ellen Hutson over them and let the Glossy Accents dry overnight.

I die cut the background using Quilted Backdrop from Lawn Fawn.
  
The chocolate heart is up on foam dots overlaying the white heart.   
I adhered the die cut sentiment from Memory Box beneath the hearts.

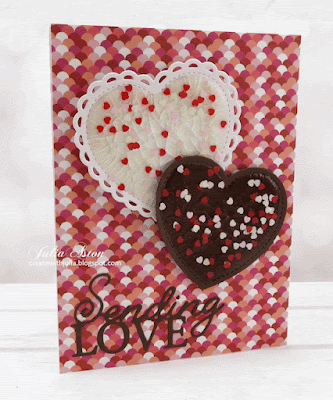
This card below was the first card I had made for the challenge, but I accidentally picked up the Crackle Glossy Accents!  

When I first saw it dried - I thought "did it crack because it was too thick??"  then I looked at the bottle and saw it was the Crackle Glossy Accents, duh...... I had really wanted it to be smooth 'frosting' so I made the card above.   
The only difference in the cards is the Crackle Glossy accents and a pretty patterned paper background. (Sweet as Sugar - Reverse Confetti)
It shows you how changing just one thing can bring a totally different look to a card!

Well, that and these cookies look like the frosting dried out sitting on the counter too long !

How will the Mood Board inspire you??   We can't wait to see what you create.  Check out all of the lovely inspired designs from the rest of the DT over at Inkspirational!

You have until Feb 10th to link up your project! 

Also linking my card to:


Krafty Chicks - All Occasions - Valentines


Linking my 2nd card to:
1st vertical row
Die Cut - Heart - Patterned Paper


Paper:  White, Scarlet Jewell, Dark Chocolate - Papertrey Ink, Pale Rose - Bazzill, Sweet as Sugar - Reverse Confetti (on 2nd card)
Accessories:  Lacy Heart Stackables, Outside In Stitched Heart Stackables, Quilted Backdrop - Lawn Fawn, Sending Love Posh Script - Memory Box, Glossy Accents - Ranger,  Crackle Glossy Accents (on 2nd card) Tiny Hearts Valentine Mix - Essentials by Ellen Hutson, foam dots.

Tuesday, January 10, 2023

A Cart Full of Love

 Time to get going on some Valentine Cards!

I just love this little Hand Cart die from Charlie and Paulchen, and today it is carrying a big heart, sending Love to a Valentine.   The sentiment is a die from Memory Box the heart die is My Favorite Things.  The little black hearts are from Honey Bee.  The card is up on foam dots.

I'm linking my card to:


Valentines


Paper:  Pure Poppy - Papertrey Ink, watercolor paper - Canson Cold Press, DP: Be Mine - Recollections/Michaels.
Accessories:  Sending Love Posh Script die - Memory Box, Transformable Hearts Full of Love - My Favorite Things, Hand Cart Die - Charlie and Paulchen, Tuxedo Hearts - Honey Bee, foam dots.

Thursday, December 1, 2022

Winter Village Snow Globe

Another Christmas card - simple to put together if you're trying to make multiples!

I die cut a flat bottom circle out of a white panel (to look like a snow globe!).  I die cut the Country Landscape from Memory box and adhered it behind the circle.  I put foam dots on the back of the white panel and layered the patterned paper behind the cut out then adhered it all to a white card base.  I added 3 tiny clear gems to 3 snowflakes.  The base of the snow globe (with the sentiment on it) is a die from Snowglobe #2 set from Sizzix and up on foam dots.  The sentiment is from PTI.

I'm linking my card to:

Time Out Challenge


Sketch on side!    
So Sorry to hear this challenge is closing


Stamps: Inside and Out Holiday - Papertrey Ink.
Paper: White - PTI, DP Northern Lights Paperpad - Recollections (Michaels)
Ink: Ultramarine - Altenew
Accessories: Flat Bottom Circle Die - Amazon, Country Landscape Die - Memory Box, Snowglobe #2 (base) - Tim Holtz/Sizzix, foam dots, Tiny Twinkles - Taylored Expressions.

Wednesday, September 18, 2019

Mid Month Reminder: Sept CAS Stencil Challenge - Baby Wipes

Hello friends!  I'm here today to remind you that there is still time to link up your Sept CAS Stencil Card Challenge.    I'm hosting this month and my challenge is to use Baby Wipes with your stencils.  There are a few links to techniques over at CAS Stencil for your inspiration.
Today I used the technique I like the best - sponging a panel with water based inks (I used Distress Oxides here) and then laying the stencil over the panel and rubbing over the stencil with a baby wipe to remove some ink.
I'm in Halloween mode already as 2 friends and I will be having a Halloween sale at my church in October so we have to get crackin'! 
a close up of the web
Here are a few process photos.
I sponged Distress Oxide Black Soot ink over a water color panel - this is 5" x 5" but I later trim it down to fit an A2 card front.
I laid my Web Stencil from MFT over the panel and held it with some mask tape.
I rubbed over the stencil with a baby wipe.
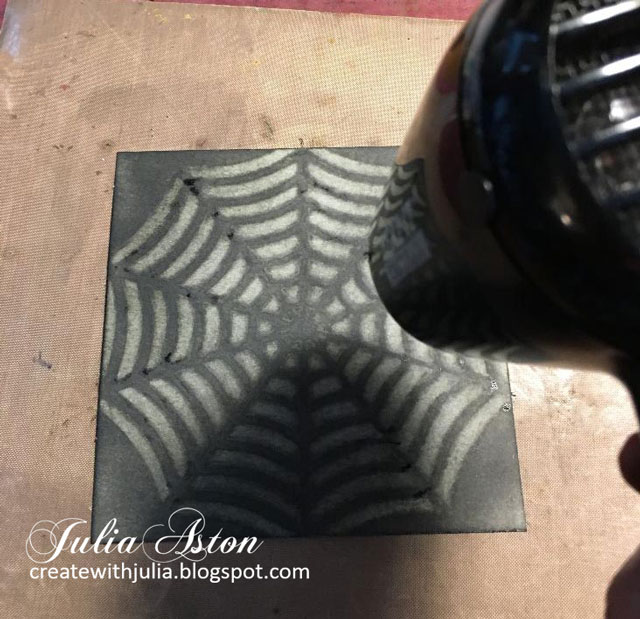
The wipe was a little bit over-wet and you can see that it looks a bit juicy after I removed the stencil!
So I quickly got out my heat tool to dry it before I smudged it!
and here it is all nice and dry!
Then I die cut a black card panel using Lawn Fawns Reverse Stitches Scalloped Circle Die, layered it over the web  (that I trimmed to 4 1/4" x 5 1/2" size) on foam dots.  I die cut the Memory Box Dangling Spider out of  black Kraft Stock and laid it over the web with a foam dot as well.  I added two Tiny Twinkle yellow eyes.  I white embossed the sentiment from Amuse in the corner.
 I think this is the first time that I have used black as my open CAS space.  But I knew if I used white it just wouldn't be as scary! 

I also wanted to share with you what I did since I had all my supplies out on my work table.  I had saved some white inside pieces from prior projects that I cut using the Scalloped Circles Die. (We just can't throw this stuff away right?!)  The three lighter ones are just a white card stock.  I sponged them with the DOX Black Soot ink, laid the stencil over them and wiped with the baby wipe.  
The one on the top left was the black piece cut out from this project and I just sponged it with the black and then wiped over the stencil and was surprised that even black over black gave a fun result!  So now I can make 4 more Halloween cards using these!


You have until 9/24 to link up your CAS stencil with baby wipes card.  I can't wait to see what you do!  
There's lots of Design Team inspiration over at CAS Stencil - as well as from our talented Guest Designer this month - Sarah!

Stamps:  Boo - Amuse wooden stamp.
Paper: Watercolor paper - Canson, White, True Black - PTI, Kraft Stock Black - Tim Holtz/Idea-ology
Ink: Versamark, Ranger Distress Oxide Black Soot
Accessories: Dangling Spider Die - Memory Box, Reverse Stitches Scalloped Circle Window Dies - Lawn Fawn, Tiny Twinkles, foam dots, Spider Web Stencil - My Favorite Things, baby wipes, heat tool, white embossing powder, Tiny Twinkles rhinestones.