Thursday, November 29, 2018

A Vintage Journey Tag Friday

Whenever there is a 5th Friday in the month - several of the Creative Guides for A Vintage Journey post a tag -  and this month I'm one of those Creative Guides!

Since it is now the season, I made a Christmas Tag!
I have a few process photos to show you just how I created my tag.  
I started with a manila tag 6 1/4" x 3 1/4".  I rubbed Twisted Cintron DOX onto my craft mat, spritzed with water and pressed my tag into it.  I dried it with my heat tool.
Then I sponged Fired Brick DOX through a Tim Holtz Christmas Stencil onto the tag.
And for a third layer - I sponged Versamark ink through Tim's Festive Stencil and embossed it with Vintage Beeswax Baked Texture.  This made a wonderfully shiny almost-clear design over the other layers.
To vintage it up a bit - I sponged around the edges of the tag with Vintage Photo DOX.
Then I took out my Dashing Deer die and cut it out of Kraft Core-dinations brown and then just the antlers out of a lighter tan.   Before removing the cuts from the paper, I sanded over them to reveal some of the Kraft Core.
I trimmed the bottom edge of the antlers and adhered them over the brown die cut and then sponged the edges a bit with the Vintage Photo DOX.
I adhered the deer to the tag, added some dew drops to his antlers, a Metallic Holiday Sticker and looped a piece of Cream/Red Trimmings through the hole of the tag.
I layered my tag to a slightly larger piece of brown card stock just to give it a more finished look.
 So please take a look at all the wonderful tags created by the Creative Guides over at A Vintage Journey - you can also link up your tag there to share with us!
Welcome to this wonderful holiday season!


I'm also linking my tag to:
The Holly and Ivy Christmas Challenge - Anything Goes Christmas

Make My Monday - Non Traditional Christmas Colors

Simon Says Stamp Wednesday Challenge - Anything Goes

Crafty Card Makers - Anything but a card

ModSquad Challenge -  Use a Critter on your holiday card/project

Paper:  6 1/4' x 3 1/4" manila tag - Ranger, Kraft Core-dinations tan and brown, Dark Chocolate - PTI.
Ink:  Ranger Distress Oxides Twisted Cintron, Fired Brick, Vintage Photo, Versamark.
Accessories:  Christmas Stencil, Festive Stencil - Tim Holtz/Stampers Anonymous, Dashing Deer Die - Tim Holtz/Sizzix, Vintage Beeswax Baked Texture - Emerald Creek, heat tool, Dew Drops, Tombow Glue, Trimmings/Naturals Red/Cream - Tim Holtz/Idea-ology, mini sander, Metallic Stickers Holiday Talk - Tim Holtz/Idea-ology.

Sunday, November 25, 2018

Papertrey Ink November Blog Hop

Today I'm participating in the November Papertrey Ink Blog Hop.  Here is the inspiration piece. Lovely white presents tied with colorful ribbons under the tree!
I was inspired by the white paper the red ribbons and the tags!  
I made a little 2 1/2" x 3 3/4" x 3/4" gift box.
I made my box using the book cover die from Betsy's newest Make It Market Kit - Fairy Tale Christmas.  The box piece was cut with the Matchbox Base Die 
 (which I actually got with Betsy's prior Make It Market Kit - All Through the House).
I die cut one of the tags from Tremendous Tags, added a die cut holly using a die and the patterned paper from the Fairy Tale Christmas kit.  I looped a piece of Marischino Twine through the hole on the tag. The 'tis the SEASON' stamp is from the newly released Enchanted Forest stamp set.
I lined the inside cover and bottom of the box with red Bitty Star Basics paper .
Before I added the paper on the cover, I wrapped a piece of Pure Poppy Grosgrain ribbon vertically around the cover, taping the ends on the inside - then the star paper covered up the tape.
Then I wrapped a 20" piece of Pure Poppy grosgrain around the box horizontally gluing it to the box on the back to hold it in place when untied.
A gift card fits perfectly inside this box - and it's deep enough to hold a small gift - like a bracelet or earrings or even a bar of designer soap!
Now I'm off to check out how everyone else was inspired today!  You'll find the PTI Blog hop here.

Stamps:  Enchanted Forest - PTI
Paper:  White, Bitty Star Basics, Fairy Tale Christmas Patterned paper - PTI,
Ink:  Pure Poppy - PTI
Accessories:  Tremendous Tags Dies, Book Cover Die, Matchbox Base Die, Holly Die - PTI, Pure Poppy Grosgrain Ribbon - PTI, Maraschino Twine - The Twinery, foam dots, Tombow Glue.

Friday, November 23, 2018

Two for Christmas!

I've got two Christmas cards to share today using a lovely new stamp set by Tim Holtz/Stampers Anonymous called Festive Overlay. (it's on sale today, Black Friday, over at The Funkie Junkie Boutique!) All the images look great stamped behind all the sentiments!  You just have to figure out a lighter shade of color for the image so the sentiment shows up over it!
I used Pierced Feature Frames Ovals from PTI cutting them out of white paper and Birch Wrapping Paper.  I stamped the Santa in Broken China DOX - stamping off on paper first so the ink wasn't too dark and then stamping on the card stock oval, and stamped the sentiment over it using Wendy Vecchi Archival Watering Can Ink.
and on the inside I used the inside oval cut from the birch wrapping paper behind the sentiment! (sorry for the blurry photo!)
I'm linking my Santa card to:
 I made my second card using a wreath from the same stamp set - but instead of stamping it in ink, I colored the stamp with my Mowed Lawn Ranger Distress Marker, spritzed the stamp with my water mister and stamped it on the die cut oval.    
I stamped the sentiment in Wendy Vecchi Archival Red Geranium Ink first - but it wasn't quite dark enough to show up over the green -  so I stamped over it with Hero Hues Black - a tough thing to do since its a red rubber stamp but somehow I got it just right - a little off set - so you can see the red around the edge of the black!?!  (how often would that work out??!! )
And here's the inside.  I stamped the sentiment the same way with both red and black inks and it worked out again! (I did have a couple of non alignment stampings that went in the bin!)

I'm linking my watercolored wreath to:

Two more for the Christmas box!  I actually have enough cards made for this year already for my own cards but I sell some at my church as well so always good to have extra!

Stamps:  Festive Overlay - Tim Holtz/Stampers Anonymous.
Paper:  White - PTI, Birch Bark Wrapping Paper - Pier 1 Imports.
Ink:  Ranger Distress Oxide Broken China, Wendy Vecchi Archival Watering Can and Red Geranium, Hero Hues Black.
Accessories:  Pierced Feature Frames Ovals - PTI, foam dots, water mister.

Thursday, November 22, 2018

Winter Wishes Blog Hop - Eileen Hull/Sizzix and Emerald Creek

Warm thoughts are unfolding, as we begin to enter a festive time of year. 

Eileen, Kim and The Teams have created a fun blog hop challenge to kick off the American Thanksgiving and Winter festivities.

To play along all you need to do is follow along and comment on every blog. If you play along and link up your own creation using Eileen Hull/Sizzix and Emerald Creek products, you will get 2 bonus entries for the draw. Contest Closes on Sunday November 25th, with the Winner announced Cyber Monday!

Prize includes an Eileen Hull Journal Die and a $50.00 gift certificate to the Emerald Creek Shop.
As a member of Eileen Hull's Inspiration team - I made two projects for this blog hop - an embroidery hoop ornament and a treat holder.
For the treat holder - I used Eileen's 3D Vase Die cutting it from matboard and embossing it with Peppered Chantilly Allure Powder from Emerald Creek.  I die cut friend out of Red Stiffened Felt using a word die from Eileen's Floral Arch and Words die set.
I stamped the Snowy Trees  from Emerald Creen on watercolor paper using Versamark and embossed it with Midnight Sky Allure Powder.  I love the sparkle it gives to the outline of the trees!  I watercolored the tree and holly bits in green and then went over the tree parts with white so it looked like snow.  I fussy cut around the stamping leaving a bit along the bottom so I could adhere Carnelian Gem Stones.  I painted a bit of white on the stones, like snow, and adhered the tree to the vase with foam dots.
You can see the great mix of black and white particles in the Peppered Chantilly Allure powder on the vase in this photo below as well as the sparkle on the tree outline from the Midnight Sky Allure Powder!
For my second project, I die cut Eileen's Embroidery Hoop out of white mat board and Birch Bark Wrapping paper.   I glued all the pieces together and looped a piece of twine through the top.
I stamped the Cat-ching  kitty from Emerald Creek on Bristol Smooth Surface paper and colored her using Tombow Markers spreading the color around with a Clear Glitter Wink of Stella pen so it's really shimmery IRL!  I stamped the Joy from Emerald Creek in red and fussy cut it.  I adhered the word and cat to the hoop with foam dots.
Here's a view where you can hopefully see the shimmer!

Reminder:  To play along all you need to do is follow along and comment on every blog. If you play along and link up your own creation using Eileen Hull/Sizzix and Emerald Creek products, you will get 2 bonus entries for the draw. Contest closes on Sunday November 25th, with the Winner announced Cyber Monday (Nov 26th)!

Blog Hop List:

12. Julia Aston (you are here!)


Embroidery Hoop Cat Ornament
Stamps:  Cat-ching and Joy - Emerald Creek 
Paper:  White Little Sizzles Mat Board - Sizzix, Bristol Smooth Surface Paper, Birch wrapping Paper - Pier 1.  
Ink:  Hero Hues Black, Pure Poppy - PTI
Accessories:  Embroider Hoop Die - Eileen Hull/Sizzix, Tombow Markers, Clear Glitter Wink of Stella, Maraschino Twine - The Twinery, foam dots.

3D Vase Treat Holder
Stamps:  Snowy Trees - Emerald Creek
Paper:  White Little Sizzles Mat Board - Sizzix, Water color paper - Canson
Ink:  Versamark
Accessories:  3D Vase Die, Floral Arch and Words dies - Eileen Hull/Sizzix, Peppered Chantilly Allure Powder, Midnight Sky Allure Powder, Quarry Stone Gems - Emerald Creek, heat tool, white and green water color paints, paint brush, Red Stiffened Felt - Joann, foam dots, Tombow Glue.

Tuesday, November 20, 2018

Wishing You Peace and Joy

I have two Christmas cards to share today.

I created my positive and negative backgrounds using Tim Holtz Cracked Embossing Folder.  I sponged Antarctic Fresco Finish Chalk Paint over one side of the inside of my embossing folder, spritzed heavily with water and pressed a panel of watercolor paper into it and rubbed over it for a minute or two to be sure the watery ink absorbed into the paper.  I removed the panel and washed the EF.  I used the same technique on the other side of the EF.  

I thought the light blue paint made a rather artistic snowy background for my stamping of Tim Holtz Scribble Woodland stamps.

I'm linking my cards to:
Embossing Folder, Acrylic Paint, stamping, Clear Glitter Wink of Stella


Stamps:  Scribble Woodland - Tim Holtz/Stampers Anonymous
Ink:  Hero Hues Black, Ranger Distress Oxide Stormy Sky.
Paper:  Water color paper - Canson, White and Blueberry Sky - PTI
Accessories:  Cracked Embossing Folder - Tim Holtz/Sizzix, Antarctic Fresco Finish Chalk Paint - Paper Artsy, water Mister, Clear Glitter Wink of Stella.

Monday, November 19, 2018

Winter Wonderland - Eileen Hull's Dies for the Holidays

This month members of Eileen Hull's Inspiration Team are creating holiday decorations using a variety of Eileen's Sizzix dies.
Today, I have a project using her fun Cupcake Stand and Pennant die, using the pennant piece to make trees!
First I cut out all the pieces from Little Sizzles Matboard.  Then I cut out pieces from patterned papers to adhere to the matboard.
I was thinking I'd use little bottle brush trees for my scene, but then, when I was looking at the pennants they suddenly looked like trees to me!
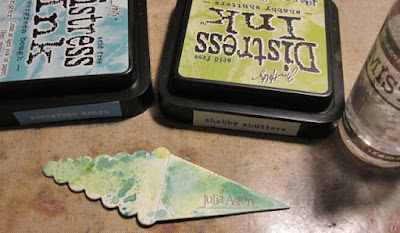
I colored the "trees" by smooshing them onto my craft mat where I had rubbed some Distress Inks (Shabby Shutters and Evergreen Bough) and spritzed them with water.
I kept pouncing the "trees" into the inks until I was happy with the coverage.
and I inked them on both sides.
Here are the three trees - all inked and folded in half and glued
I wanted the top of the stand to look snowy and so I got out my Frantage Shabby White embossing powder.  I rubbed Versamark just over a portion of the top using a small round sponge to keep it 'snow like' and not in straight lines, sprinkled on the powder and hit it with my heat tool.
I love the lumps and pieces of gold in the Frantage  powders.
Then, I just had to glue the legs under the top of the Cupcake Stand, and glue the trees and little 
Idea-ology deer to the top.  I sponged Walnut Stain Distress Ink over the edges of the trees, the edges of the table and legs as well as rubbing some on the deer.
I added a Metallic Stickers/Holiday Talk to each side of the table.
It's fun to see if you can use a die for a different purpose than it was intended for!  
Please check out Eileen's blog all this month for creative ideas for the holidays using her dies!

Paper:  White Little Sizzles Matboard - Sizzix, Paper Stash/Tidings - Tim Holtz/Idea-ology.
Ink:  Ranger Distress Shabby Shutters, Evergreen Bough, Walnut Stain,  Versamark.
Accessories:  Cupcake Stand and Pennant - Eileen Hull/Sizzix, Decorative Deer, Metallic Stickers/Holiday Talk - Idea-ology, heat tool, craft mat, water mister, sponge and sponge applicator - Ranger, Frantage Shabby White Embossing Powder - Stampendous, Tombow Glue.