Showing posts with label Happy Little Stampers. Show all posts

Saturday, June 20, 2020

A Bike Card for Lucas

A friend asked me to make a card for her grandson who is turning 9 this month - and he's getting a bike (which they are frantically looking for because everyone is sold out due to the Corona Virus stay at home edict - more families are riding bikes together and didn't own them prior to this spring apparently!)

So I also found out that I didn't have ONE bicycle stamp in my craft room (shocking!! I later found a bicycle die but still no stamps!)  so I ran over to recently re-opened Michaels and found they had just ONE 3D sticker package of bicycles and bike paraphernalia!  And it was perfect for what I needed!
I brought it home and made this fun pop up box card for Lucas!
The Scalloped Box Card Pop Up Die is from Lawn Fawn and is really easy to put together - they have videos on YouTube showing how it's done. The photo below shows the 3 inside sections where you can attach die cuts, stickers or sentiments to create a dimensional scene.
 I put a white panel on the back so my friend can write her birthday message to Lucas.
 Another view of the dividers inside.  I used a grass die from MFT for the grass on each divider.
 A view from the bottom
 The balloon image and die are from Mama Elephant.  The bike, sign and helmet are from a 3D sticker set by Paper House (Michaels).  The Keep Calm and Bike On sentiment is from a set called Live to Ride by Jillian Vance Designs.   I adhered the strip with LUCAS on it to a thin strip of acetate and adhered the bottom of the strip to the back of the first divider so it appears to 'float' in the air.
 The box card folds flat and fits in a regular A2 envelope but will require additional postage as it is thick.  The thickness depends on what you attach to all of the dividers.  
(The stickers I used are 3D and also have thick foam dots on the back of them which made them even thicker.)
 So when it's first opened you just lift it up, hold it loose in your hands and let it open up like a box.
 Then you fold down the sides and front

My friend loved this personalized card for Lucas and I think he will like it too!  And hopefully his parents find a real bike for him soon!  I wonder if it will be green?!?


I'm linking my birthday Box Card to the following challenges:
Summer

Summer Activities


Anything Goes

Anything Goes

Stamps:  Half Pint Heroes (happyBirthday) - Waltzingmouse (retired), Live to Ride - Jillian Vance Designs (retired), Snap Stamps Alphabet and Numbers - Karen Foster (retired)
Paper:  Water Color Paper - Canson, Leaf Green, Pure Poppy, Clear Acetate - PTI, Knock On Wood 6x6 paperpad - Lawn Fawn, Grass DP sheet, FireFly DP Sheet - Michaels.
Accessories:  Scalloped Box Card Pop Up Dies - Lawn Fawn, 3D Bike Stickers - Paper House (Michaels), Grass Die - MFT, Copics BG49, YR09, YG23, Y38, Sentiment Strips Die - MFT, 1" circle punch - EK Success, ScorTape, Tombow Glue.

Thursday, April 2, 2020

April CAS Watercolor - Spring Flowers

The CAS Watercolour Challenge for April has just posted!  Susan is our lovely hostess this month and she would like us to watercolor spring flowers - she's looking for SPRING flowers - not just any flowers.  So please think snowdrops, daffodils, tulips, crocuses, apple and cherry blossom, dogwood, etc.
 I water colored die cut snowdrops from Alexandra Renke for my card
 
Here are a few process photos.
I wanted to layer several cuts of the Snow Drops since they are so intricate.  So I adhered an adhesive sheet to the back of a panel of watercolor paper.  Then I die cut the snow drops, placing the dies on the watercolor paper side.  I peeled off the back of the pieces and easily layered them together .
I water colored the stems in two colors of green water color paint - Sap Green and Viridian and left the blooms the color of the paper.
Using a light blue watercolor paint with lots of water, I painted a background circle for the snow drops and then adhered them over the circle.
I die cut the card base using Noted A2 Scalloped die from PTI (no longer available). The sentiment is from Happy Snippets by Penny Black.
I have lots of crocus in my gardens but no snowdrops - I think I'm going to have to buy some for next spring - they are so pretty!
 You will find the challenge as well as lots of inspiration by the Design Team and our talented April Guest Designer Vicky here.  
The challenge is open through 4/24/20.  

 Please join us with your CAS water colored spring flowers!

I'm also linking my card to:

Happy Little Stampers watercolour Challenge

Try it on Tuesday
The Beauty of Nature


Stamps:  Happy Snippets - Penny Black
Paper:  Watercolor - Canson
Ink:  Obsidian - Altenew
Accessories:  Snow Drops Die - Alexandra Renke, Noted A2 Scalloped Die - PTI, Easy Cut Adhesive Sheet - Thermo Web, blue watercolor tray paint,  Kuretake watercolor paints Sap Green Viridian.

Wednesday, March 4, 2020

March CAS Stencil Card Challenge - Heat Embossing

The March CAS Stencil Card Challenge has just been posted!  Viv is our creative Hostess this month and she would like us to use heat embossing with our stencils.  There are links to technique videos to give you some ideas over at CAS Stencil.
Here is the card I created for the challenge!
A close up to show you the shine on the embossing.
I laid the Wildflowers stencil  from Stencil Girl, over a smaller panel of watercolor paper.  I actually found an Emboss It Dabber in my drawer (bought in some long ago past, put away and promptly forgotten!)  It works wonderfully over a stencil, being a little more fluid than a Versamark pad and giving great coverage - I highly recommend you purchasing this little treasure if you think you are going to use this technique more often! 
 (The dabber can also be used in the traditional way of Versamark on your stamps when heat embossing but is recommended for larger stamps as I think you'd lose detail on smaller stamps given that the dabber is more fluid)
Here you can see how wet it is - getting into all the little spaces of the stencil.  I lifted the stencil carefully off the watercolor paper and put the stencil aside to wash later 
(it stays wet longer so don't lay anything over it while you continue to create!)
I used two new embossing powders.
(I purchased them quite some time ago so the NEW is relative meaning never used yet!) 
They are from Seth Apter/Emerald Creek - Baked Velvet in Aegean Sea and Lime.  I wanted the Aegean Sea (blue) on the top half where the flowers are and the Lime on the bottom half where the stems are.  So I poured the Aegean Sea over the top first, cleaned up the powder and put it back in the jar.
And then poured the Lime over the bottom half, cleaned up the powder on the paper and heated the panel with my heat tool.  I didn't worry about a little overlap where the colors joined, that just makes it look more blended!
Hopefully you can see some of the resulting shine on this photo.
To finish the panel, I sponged the edges with Antique Linen Distress Oxide, layered it to a card base cut with a scalloped edge die (no longer available from PTI), added the sentiment from Big Hugs and the die cut from Big Hugs Die - both from PTI.  I layered two hugs die cuts together to make it thicker.
(For those with eagle eyes - I actually made a couple of embossed panels while working on this - so the piece shown in my 'how to' photos above was made from a slightly different spot on my bigger stencil than my card shown below!  Just thought I'd mention that for those who may have noticed.)
So please join us this month and show us how you use heat embossing with your stencils!  You'll find links to technique videos, the challenge rules and description and lots of inspiration from the team as well as our talented March Guest Designer Cat (Cat Luvs Paper) over at CAS Stencil!

I'm also linking my card to:
Heat embossing


Stamps: Big Hugs - PTI
Paper:  Water color paper - Canson, Tropical Teal, Rustic Cream - PTI
Ink: True Black - PTI,  Emboss it Dab On Clear - Ranger, Antique Linen Distress Ink
Accessories:  S666 Evans Stencil - Stencil Girl, Big Hugs Dies - PTI, Baked Velvet Aegean Sea and Lime Embossing Powders - Seth Apter/Emerald Creek,  Noted A2 Vertical Die: Scalloped - PTI.

Thursday, January 30, 2020

Tag Friday at A Vintage Journey

Whenever there is a 5th Friday in a month - A Vintage Journey has a Tag Friday Post and as one of the Creative Guides,  I signed up to make one this month.
My creative juices are moving towards Valentines day and I used some old and new products to create my tag today.

I finally 'cracked' and purchased the 3D Texture Fade Crackle embossing folder and used that for the base of my tag.  I sprayed a piece of  Kraft Stock paper with water and embossed it.  I dried it with my heat tool and then sponged over it with Vintage Photo DOX ink which really highlighted the wonderful crackle achieved!
Then I used a newly released die - Heart Beat Thinlits by Tim Holtz/Sizzix - cutting it out of a piece of black Classic Kraft and the heart piece out of red.  I sanded over both pieces lightly to expose some of the kraft beneath the colors.  I layered the heart frame over the panel with foam dots and then added the red heart in the center with foam dots.  I adhered a Chit Chat Sticker, a Clippings Sticker and tiny white clay hearts from Honey Bee Stamps onto the piece.
I used an older Stacked Words: Valentines die from Tim Holtz/Sizzix to cut the XO out of red Kraft Stock, sanding it a bit and layering it on with foam dots.  I added black clay hearts around it.
I stamped the sentiment from an older Saying Stuff stamp set by Tim Holtz/Stampers Anonymous on a sentiment strip from My Favorite Things, sponging the edges with the Vintage Photo Dox.  I cut a piece of black card slightly larger than my tag and adhered the tag to it.  I punched the hole out, looped a piece of satin ribbon through it and adhered a little bit of vintage lace along the top edge. (Adding the lace immediately made it feminine  - so if I was making this for a male, I might not add the lace!)
So please join us over at A Vintage Journey and link up your own tag - we'd LOVE to see what you create!  You'll find Tag Friday here.


I'm also linking my tag to:


Love

Stamps:  Saying Stuff - Tim Holz/Stampers Anonymous
Paper:  kraft tag, Classic Kraft  papers Tim Holtz/Idea-ology, water color paper - Canson.
Ink:  Ranger Distress Oxide Vintage Photo
Accesories:  Heart Beat Thinlit Die, Stacked Words: Valentines Die - Tim Holtz/Sizzix, Dienamics Sentiment Strips - My Favorite Things, Crackle 3D Texture Fade Folder - Tim Holtz/Sizzix, Tuxedo Clay Hearts - Honey Bee Stamps, Chit Chat Stickers and Clipping Stickers - Tim Holtz/Idea-ology, satin ribbon, vintage lace, form dots, Tombow Glue, mini sander.

Wednesday, January 15, 2020

January Mid Month Reminder Post - CAS Watercolour and CAS Stencil!

So, since I'm now on the Design Teams for both the CAS Watercolour Card Challenge AND the CAS Stencil Card Challenge, I have two reminder cards to share with you today to let you know you still have time to play along with both challenges!
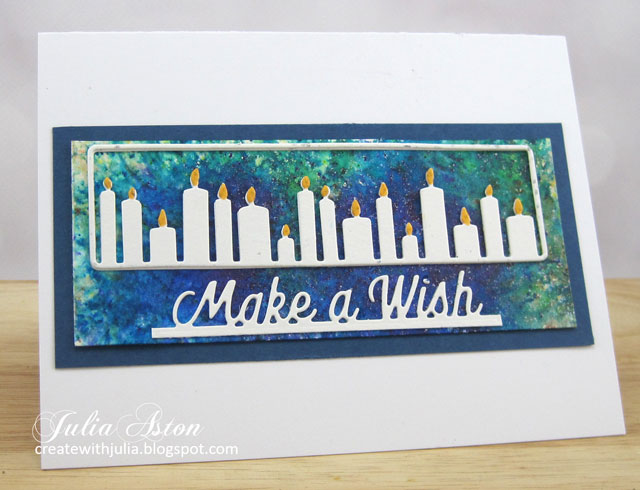
I just realized that my Brusho watercolour background looks very similar to the challenge notice above!
To make my background, I sprinkled Turquoise, Sea Green, Ultramarine and Olive Green Brushos onto a water color paper panel and spritzed with water. 
I die cut the Candles Die and Make a Wish out of watercolor paper and layered them over the panel - coloring the flames on the candles with a Copic. 
I adhered the die cuts over the panel and layered the panel to a slightly larger piece of Enchanted Evening card stock and then to a white card base.
Reminder:  there are prizes to be won for entries to the CAS Stencil 1st Birthday Celebration!

I used a brand new 12 x 12 stencil ATC Mix Up: Toadstools from Stencil Girls for my reminder card.  This stencil has 9 small designs on it and I just realized I should cut them up into individual  stencils!  
My card is 3 3/4" x 3 3/4".
I used Blender Brushes from Picket Fence to rub the Distress Oxide inks through the stencil.  I've had these brushes for quite some time - but this is the first time I've used them!?!   
First I inked over the mushroom stems with Antique Linen, then I colored the mushroom heads with Candied Apple and then I realized some of the pieces by the stems were grasses - so I brushed over them with Evergreen Bough - not worrying if the green overlapped onto some the the stem pieces.
(I could have masked the stencil if I wanted each color pristine but I liked the look of it blended, it adds more depth!)  

I added Vanilla Flower Sequins from Simon Says stamp along the bottom of the stems.  I die cut the stenciled panel with a square Nestability die and layered it to my card base cut with Noted Scalloped Square Die from PTI.
You have until Jan 24th to link up your cards to either challenge.
CAS Watercolour and CAS Stencil.
Please join us!

I'm linking my birthday card to:
Happy Little Stampers

I'm linking my mushroom card (new stencil) to:
Die Cut Divas


Make a Wish
Paper:  White, Enchanted Evening - PTI, Water Color Paper - Canson.
Accessories:  Brushos - Turquoise, Sea Green, Ultramarine, Olive Green, water mister, Candles Die - Alexandra Renke, Birthday Top Edgers Dies - Impression Obsession, Copic Y38

Mushroom
Paper:  Water Color Paper - Canson
Ink:  Ranger Distress Oxide Ink - Antique Linen, Candied Apple, Evergreen Bough, Blender Brushes - Picket Fence, ATC Mix Up: Toadstools Stencil - Stencil Girls.