Showing posts with label Stampotique. Show all posts

Saturday, May 20, 2023

Inkspirational #290 - Mood Board

 There's a new challenge up at Inkspirational today -  #290 and it's a lovely Moodboard!

I was inspired by the colors and the green tulip buds!

The tulip dies, bow dies, arch die, Elegant Arches stamp and Fond of Foliage stamp,  are all from The Greetery. (yes, I kind of love all their products!) The sentiment is from Stampotique.

I sponged the edges of the tulip and bow pieces with green ink.  The arch panel and tulips are popped up on foam dots.

Please check out all of the inspiration from the rest of the DT over at Inkspirational!
Link up your inspired card by June 2nd!

Also linking my card to:


Spring Flowers - Clean and Layered

Inspired by Nature

Send Me Flowers


Stamps:  Elegant Arches, Fond of Foliage - The Greetery, Plant Kindness - Stampotique.
Paper:  Carmel Apple, Light Green - Bazzill, Melon Berry - Papertrey Ink.
Ink:  Lime Punch - Elements/Lavinia, Ranger Distress Mowed Lawn, Nocturne Versafine Clair.
Accessories:  Botanicuts: Tulips, Fit to be Tied, A2 Arches - The Greetery, foam dots.

Monday, September 6, 2021

Using Dies in Different ways - Nature Junk Journal

A new month means a new theme for Eileen Hull's Inspiration and Education Teams. This month we are taking a look at journals inspired by nature.  And just to make it a little more tricky, we have been challenged to use dies that aren’t normally considered “journal dies”.
I used Eileen's Gift Card Folder to hold a little nature journal. The Junk Journal stamp is from her new set Buttons Cards and More.  The Nature stamp is from a soon to be released new set!
I held the flaps of the folder closed with a blue elastic ribbon.
Remove the ribbon and you'll find a little junk journal
I added a little felt flower using Eileen/s Journaling Cards - Flowers and Leaves Thinlit dies.
I pressed leaves and flowers from my garden using my Vagabond onto panels of watercolor paper 
and onto tea bags that I used as pockets on some pages.
I slipped little die cut pieces into the tea bags.

Here are a few shots showing how I put this together.
I die cut Eileen's Gift Card Folder out of matboard.  Then I stamped it with her beautiful new Damask stamp on both sides.  
Then I used a blender brush to ink all the edges with Distress Antique Linen. (not shown in photo) 
I die cut the ornate piece from Eileen's Gift Box Scalloped Edge die out of matboard and stamped the image from her new Buttons Cards and More stamp set onto it.  I also stamped the ticket from the same set onto a piece of DP and fussy cut around the edges.  I later looped a piece of twine through a hole I punched on one edge so it was easier to get out of the tea bag pocket I put it in.  I die cut the larger leaf from Eileen's Spring Leaves Die out of watercolor paper, stamped a sentiment  and leaf from a 'soon to be released' stamp set from Eileen.
I went out to my garden and gathered some leaves and blooms so I could 'press' them using my Vagabond.  I used a geranium leaf, petunia blossoms, clover, an astilbe leaf stem, Solomon Seal leaves and phlox stems and blossoms.  I pressed them onto new teabags that I had stained with watery Ranger Distress Vintage Photo ink to make them look 'used' as well as water color paper.   My sandwich was teabag, leaf or blossom, piece of watercolor paper.
This shows how wonderfully the petunia blossom pressed into the watercolor paper.  I hadn't removed one of the blossoms from the top piece yet for illustration.
For my Nature Junk Journal, I cut 3 pieces of watercolor paper each one 4 3/4" x 3" that I scored in the mittle of the long edge to create 6 pages.  I laid the pages on top of each other and bound them with a knotted piece of black twine.
I die cut all my pressed pieces with a rectangle Nestability slightly smaller than my journal pages and stamped some of them with various nature themed sentiments.


Please check out Eileen's blog every Wednesday this month where you will find lots of inspiration for using your dies in different ways for journaling!


Stamps:  Vintage Damask, Buttons Cards and More - Eileen Hull/Maker Forte, EAB16 and EAB04 Alison Bomber - PaperArtsy, Potters Bench - Stamping Bella, Stampotique, Verve Stamps.
Paper:  Little Sizzles Matboard - Sizzix, water color paper - Canson Cold Press, DP Petite Places - PTI.
Ink:  Ranger Distress Vintage Photo, Antique Linen, Iced Spruce, True Black - PTI, Iceberg - Altenew.
Accessories:  Gift Card Folder die, Spring Leaves Die, Thinlit Journaling Cards Flowers and Leaves - Eileen Hull/Sizzix, Classic Rectangle die - Nestabilities, new teabags - gift from a friend, black cord, blue elastic ribbon - Cousin, rhinestone heart, ScorTape, felt from stash, Vagabond Machine, leaves and blooms from my garden.

Monday, April 26, 2021

Garden Journal Tutorial using Eileen Hull's Sizzix Dies

 Today I have a tutorial for my Garden Theme Passport Journal using Eileen Hull's new Sizzix  Bookbinding and Label die inside a journal made using her older Passport Die!  I posted the journal a few weeks ago for Eileen's Blog Hop.

Here are photos of the finished journal and the pages inside.

Back cover of Journal.
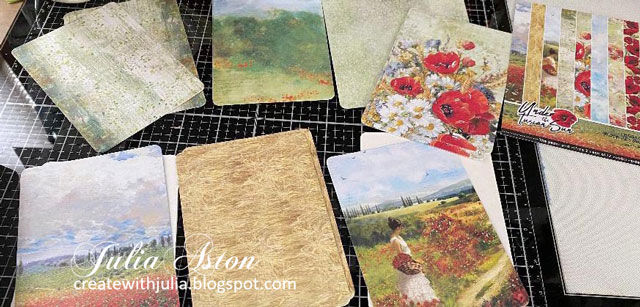
I used beautiful papers called Under the Tuscan Sun by Ciao Bella for my covers and pages.  The daisy is a die from Wild Flower Stems #1 - Tim Holtz/Sizzix, the sentiment is from Tiny Text from Tim Holtz/Stampers Anonymous and quote stamp is from Stampotique.
The rest of the garden quotes and images are stamps from Stampotique.

I added a little notebook I had in my stash, stenciling it and then adding a die cut Ragged Daisy from Poppy Stamps and sentiment from Tiny Text.
I stenciled the background with Pebble Stencil from Lavinia.


Here's how I put it together
The bookbinding die is a way for you to attach your pages inside a journal.
I die cut the piece and did valley and mountain folds on the scores
I added ScorTape to one side of the 'mountains' then pressed them together to create the bindings.
This is what it looks like - die cut, fan folded and glued.
Flat on the back
I trimmed it down to just 3 ridges to fit the width of the binding in the Passport Journal,
I die cut the pieces of the Passport Die out of Little Sizzles White Matboard - one binding and two covers.  The other piece in the die cuts pages for the journal.
I adhered the binding to the inside center of the journal binding piece.

Here are all the pages cut out using the Passport die.
I then cut another binding out of a lovely piece of black leather and adhered it to the matboard die cut binding lining up the holes in the binding. 
(Sizzix may not carry this anymore but you can find leather on Amazon)
I glued the front and back covers on the inside of the journal binding piece.

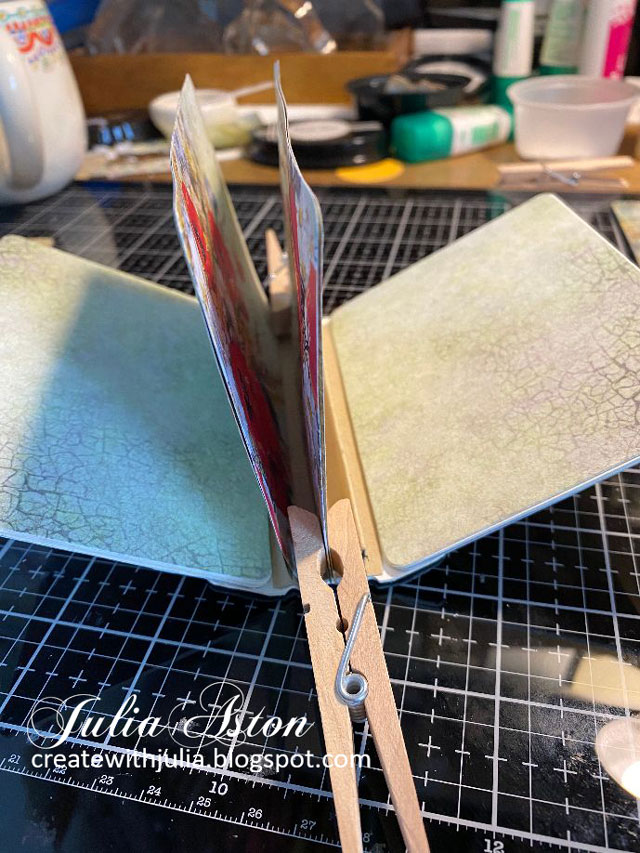
Then I glued two pages together around each of the binding ridges.
So there are 3 pages- 6 surfaces.
I held the base of the pages with clothespins to be sure they were adhered to the binding.
As already shown above -  I adhered a little notebook to the inside of the back cover.

I knotted a piece of black round elastic cord, doubled it up and wrapped it around the journal
You can add a pen to either the binding or opening side if you want to keep one handy with the journal.
Please check out Eileen's Blog for more inspiration using her new Chapter 2 Dies!


Garden Theme Journal
Stamps:  Stampotique, Tiny Text - Tim Holtz/Stampers Anonymous.
Ink:  Obsidian - Altenew, Ranger Distress Twisted Cintron
Paper:  White Little Sizzles Matboard - Sizzix, Kraft cardstock - Papertrey Ink, DP - Under the Tuscan Sun - Ciao Bella.
Accessories:  Bookbinding and Label Die, Passport Die - Eileen Hull/Sizzix, Wildflower Stems #1 - Tim Holtz/Sizzix, Ragged Daisy Die - Poppy Stamps, Pebble Stencil - Lavina, black leather - Sizzix, UltraBond Adhesive - iCraft, Scortape, black elastic cord from stash, floral pen - The Greetery