Saturday, March 30, 2013

PSA Stamp Camp - Past and Present Designer Spring Blog Hop

Welcome to the PSA Past and Present Designer Spring Blog Hop! -  Being an alumnus Design Team Member - Libby asked if I'd like to join in on the festivities and, of course, I said YES!  It's a great time to get excited about spring coming - the snow here in New England is finally melting away and the crocus and daffodils are poking out of the ground!

You should start the hop at the PSA Stamp Camp.  If you came here from Anthonette Chavez Blog you are in the right place!

Well, spring brings to mind a lot of things- warmer days, flowers, new beginnings and WEDDINGS!

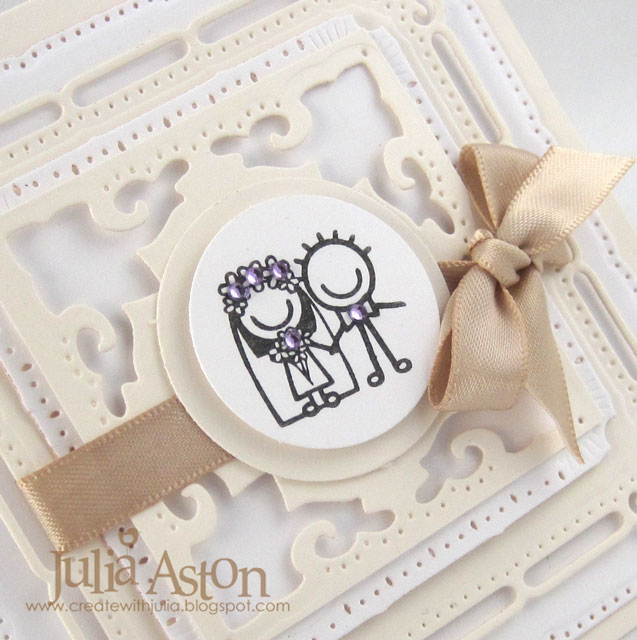
I used a stamp from a sweet wedding set called Kiss Me Now on my card.  The little bridal couple is front and center on this card - nestled inside alternating layers of cream and white cardstock of Spellbinders Marvelous Squares die cuts.  I added some purple Tiny Twinkles to the flowers on her head piece and bouquet, and his bow tie - just a touch of color and bling!
Inside I stamped one of the sentiments in this set - a sweet and simple message for the new couple.
I wove a beige satin ribbon through two of the layers - tying it in a little bow next to the Bride and Groom.

And, of course - there is a prize to be won on this blog hop!!! The grand prize of 1 custom stamp, 3 Peel & Stick stamp sets, 2 notecards, 1 alignment tool, 1 black ink, 1 2-color ink, and free shipping to the winner.   Value of the package is $150.   You can enter to win by going to PSA Stamp Camp 

Now off you go to the next designer on the hop -  Regina Mangum - lets go see what spring inspiration she has for us!

Thanks so much for stopping by today!

Stamps:  PSA - Smirk Kiss Me Now
Paper:  Vintage Cream, white - PTI
Ink:  Versafine Onyx Black
Accessories:  Spellbinders Majextic Elements - Marvelous Squares, foam dots, 1 1/4" and 1 1/2" circle punches - SU, Tiny Twinkles - Taylored Expressions.

Friday, March 29, 2013

A Funny Bunny Easter Basket

Today's Cas-ual Fridays challenge is Funny Bunny -  to make a CAS Easter Project that is not a card.

I made these cute little Easter Baskets using two templates from Creations by AR.  I made the basket from a template called Goody Basket and I made the little bunny from a template called Bunny Box.  I resized the bunny template using my Silhouette Cameo to make it approx 1.5" x 1.5".

I made them in blues and pinks.  I stamped the Happy Easter on white card stock and punched it with a scallop oval punch.  I looped some wrinkled seam tape through a hole I punched on the end and knotted it onto the handle of the basket.
 
You could down load these templates today and whip up some of these cute baskets in time for Easter!  They come as both PDF files (to print and cut out) and SVG files to use with a cutting machine like a Silhouette Cameo.  Either way - they work up really easily and quickly!
 
I put basket shred and some malted milk chocolate eggs in my baskets with one fitting inside the little bunny box.
I wish all my Christian friends who are celebrating  the Risen Lord this weekend a most blessed Easter.

Monday, March 25, 2013

An Easter Basket - Just for You!

Today I wanted to share the cute little Easter Bag/Baskets I made for my grandniece and nephews.  I am hosting Easter Dinner this year and I wanted to have something special for the little ones.

I had just purchased these sweet little Jute Mini Natural Bags and knew their little 4"x4"x4" size would be perfect for the little people!  The bottoms are 4"x4" but the sides push out a little so they are sort of roundish in shape if they were filled up and the opening is larger than 4"x4".

 I personalized each bag by printing a picture of each of them on Sticky Back Canvas with their name and Easter 2013.  I printed them in Sepia to match the natural bag.
This one is for James who will be 2 years old in May.  Inside each bag I put a squishy rubber chick, an egg filled with Mini Teddy Grahams and a plastic chick filled with mini peanut butter crackers - trying to be a little more healthy than candy for the kidos! 

Here's a close up of the picture of James - such a happy little kid!  The canvas has a sticky back - but since the jute is so coarse I was afraid it wouldn't keep sticking - so I tacked down the corners with some bakers twine.
 
 Here's the bag for Landon who is James' cousin and will be 3 in September.  I used different colors of wrinkled seam tape on each bag.
Just look at this sweet face -   his eyes are a beautiful blue.
And finally the bag for Mila (pronounced Mee-la) Landon's little sister, who is just 7 months old.
Here's the close up of Mila -  she is just the cutest little button!!  
I'm actually going to give them the bags empty and have each one go on an Easter Egg Hunt to find the goodies to put in their bags. Mila will need a little help finding her treats but she'll have fun holding everything.  
I'm so looking forward to this lovely family Easter gathering!

Accessories:  Jute Mini Natural Bag - Save-on-crafts.com, Sticky Back Canvas - Ranger, Bakers Twine - The Twinery, wrinkled seam tape - Prairie Bird Boutique Etsy Shop, 1/8" hole punch

Saturday, March 23, 2013

Song of the Cardinal

Happy weekend friends!  Today's card was made for two challenges.
The Inspiration Challenge over on Split Coast was the Web Store - Madewell - a sister store to J Crew
I was inspired by this jacket with red and white birds on it.  The cardinal is one of my favorite birds -  we have several cardinal families that come to feed at the feeders in our yard.  I love the males bright red color, especially against the snow in the winter, the females green/brown and the lovely crowns on their heads!
I'm also entering this in this weeks CASology Cue Card - Song
My background music stamp is from Waltzingmouse.  The cute cardinal is a Tim Holtz Alterations Movers and Shapers Die.

Stamps: Waltzingmouse - Musical Backgrounds
Paper: white, pure poppy - PTI
Ink: Versafine Onyx Black
Accessories: Copics - YR23, 100, foam tape, bird die - Tim Holtz Alterations - Movers & Shapers Mini Cardinal and Poinsettia

Thursday, March 21, 2013

Creations by AR - March Release - My Picnic Basket

Welcome to the March Creations by AR new release Design Team Blog Hop!  Today Adela is releasing the cutest template called My Picnic Basket - just in time for all of our summer picnic party needs!

I looked through Pinterest to get some color ideas for my projects today and found lots of colorful samples but this more sedate basket caught my eye!
 

I made two similar baskets based on this inspiration - the first more clean and simple - the 2nd a little more ornate. 
To make the white trim on the edge of the cover - I traced the line of the cover before putting it together.  I sponged the 'weave' on this basket base using the Mini Basket Weave template from The Crafters Workshop with Frayed Burlap Ranger Distress Ink.  I just layed the template across the base before I put it together - sponging and moving the template until I had the whole thing sponged.  It was really easy to line it up.
Here's a close up of the back side.
I lined this basket with a brown and cream gingham patterned paper.  I cut the tag with a Spellbinders Scalloped Tag.  The stamps are from Waltzingmouse.
For the second basket, I painted the 'weave' on the base using Frayed Burlap Ranger Distress Crackle Paint.  I adhered some fun pom pom ribbon along the edges of the basket cover.
Here's a close up of the painted 'weave' on the back.  The stamps are from Waltzingmouse.
 Inside this basket I put a little sewing kit that I had in my stash from a project I did many years ago to go along with the "Thank You Sew Much" sentiment on the basket.
When I showed this to my husband - he said "do people still do hand sewing???"   Probably not so many !?! but everyone has to sew on a button or fix a hem now and then - don't they???!!  
You can see how nicely it tucks inside. I lined this basket with a piece of burlap patterned paper I found at Joann's.
I had so much fun creating these easy to make little picnic baskets -  I'm sure you will to!  You can find the template in the Creations by AR shop here.  The templates come in PDF (you print and cut out), and SVG/DXF for use with cutting machines line Silhouette Cameo.

HOW TO WIN this template:
• Leave comments on each blog linked below.
AR Face Book:
AR Paper Crafts Planet  Group:

Comments accepted until Mar. 24 (12:00 noon EST)
One random winner will be announced March 25 on the AR Blog
And now - let's head out to see what lovely Picnic Baskets the following members of the Design Team have created to inspire us today - here are the links:
Stamps:  Waltzingmouse - Bountiful Basket Additions, Sewing Box Hugs
Paper:  True Black, White, Fine Linen - PTI, Burlap DP - Paper Pizazz, Dark Chocolate Pattern Pack - PTI
Ink:  Versamark, Versafine Onyx Black, Ranger Distress Frayed Burlap
Accessories:  My Picnic Basket Template - Creations by AR, white embossing powder, heat gun, foam tape, Scor Tape, white pompom ribbon -American Crafts, Frayed Burlap Ranger Distress Crackle Paint, Spellbinders Scalloped Tags, Large black brads - American Crafts, Mini Basketweave Template - The Crafters Workshop, Silhouette Cameo.

Wednesday, March 20, 2013

Creations By AR - Something Old - Bunny Box Template


As one of the Design Team members for Creations by AR -  today is my Wednesday to post a new project using one of Adella's older templates (hence the name - Something Old..... Somthing New!).  Needing some cute decorations for my Easter Dinner table this year - I chose to use her delightful Bunny Box Template.
I used my Silhouette Cameo to cut the template - so I was able to adjust the size of the template.  I decided to make mother bunnies the size of Adella's template (10.77" x 7.345" approx 4.5" x 4.5" when finished) and then reduce the size to make a bunch of  little baby bunnies! (template size 4" x .7.25" approx 1.5"x1.5" when finished)
I made my bunnies quite simply -  just cutting them from some patterned papers and assembling them.  Adella includes eyes, a nose and pink inner ears with her template - but I chose to just draw black eyes on the babies and draw black eyes on white punched circles for the mothers.  I tied two colors of wrinkled seam tape around the mother's necks.  I wanted something quick and easy (but still adorable!) for my Easter Table!
I put one little chocolate malted milk egg in each of the baby boxes - some paper shred and one large Cadbury egg in the mother boxes.
I think they look so pretty in all the different colors and patterns don't you??   Here's a picture of all the babies together....
How cute are these little guys??!!!  I'll place the mummy bunnies in the center of our Easter table and I'll have a baby at each persons place setting!
I'm also entering my bunnies in this weeks Simon Says Stamp Challenge -  Easter/Spring!

I'll be back tomorrow with Adella's March Release Template -  I hope you'll stop by to see it!!

Papers:  Papertrey Ink - Bitty Baby Blessings, Berry Sorbet Bitty Dot
Accessories:  Sharpie black marker, Wrinkled Seam Tape - Prairie Bird Boutique Etsy Shop, Scor Tape, Bunny Box Template - Creations by AR, Silhouette Cameo

Monday, March 18, 2013

Framed Wings and Some Embossed Sympathy

I have two cards to share today.
I made this card for the following challenges:
The SCS Try a New Technique challenge - Transform a map -  I punched my butterflies out of a map from a National Geographic.
Less is More Challenge -  Frame It -  I embossed a square Nestability frame in the card base.
CAS on Sunday -  Flutterby - I used three butterflies on my card.
Addicted to CAS -  code word WINGS -  there are 6 of them on my card!


I've been needing Sympathy cards for my stash so that's what I made my next card. 
 I was inspired by the color stripes and white embossed flowers on this weeks Muse Challenge.

Thanks so much for stopping by today.   Wednesday I'll be posting a really cute Easter project using a template from Creations by AR.  Hope you can come by then!

You are Missed:
Stamps:  Waltzingmouse - Fancy Phrases
Paper:  Vintage Cream - PTI
Ink:  Memento Nautical Blue
Accessories:  Butterfly Punch - Martha Stewart, map - National Geographic Magazine, Square Nestabilities, glue dots.
Sympathy
Stamps:  Roses In Bloom - Waltzingmouse,  Close as a Memory - SU
Paper:  White - PTI, blues - Prismatics
Ink:  Versamark, Versafine Onyx Black
Accessories:  white embossing powder, heat gun,

Sunday, March 17, 2013

WMS March Blog Party - Luck

Well -  it's the 17th of the month again - so that means it's time for the WMS Blog Party!!  This month's theme is, appropriately enough,  LUCK!
I made my 'luck' card for St. Patrick's Day using two sets of Waltzingmouse Stamps.  The Irish Blessing sentiment and the shamrocks are from Irish Blessings -  and the pot with gold is from Halloween Party.  I used Brilliance Galaxy Gold ink for the bubbling coins.  I embossed the card base with a Sizzix Bricked embossing folder.  The stamped panel is die cut with a Wonky Rectangle Nestability.

I hope you're joining our blog Party this month -  the theme gets posted on the first of every month over on Claire's WMS blog.   If you didn't make a card yet - you still have 24 hours to do so and get it linked up.

I'm off to check out all of the other 'Luck' cards people created for today!  Happy St. Patrick's Day everyone!


Stamps:  Waltziingmouse - Irish Blessings, Halloween Party
Paper:  Ripe Avocado, Limeade Ice - PTI
Ink:  Versafine Onyx Black, Ranger Distress Peeled Paint, Brilliance Galaxy Gold
Accessories:  form tape, Wonky Rectangle Nestabilities, Bricked Embossing Folder - Sizzix.


Friday, March 15, 2013

Monochromatic Muse Sketch

I've just finished a card for 3 lovely challenges:

Jingle Belles - Use only neutral colors

CAS(E) this sketch
 and a new challenge I just found  - Muse Challenge
where we are to be inspired by this card:
And here are the three challenges all rolled up into my one card!   I used tans for my neutrals - Vintage Cream Cardstock with Frayed Burlap and Old Paper Distress for inks.  I made my background with an Aspen Tree Stencil that I sponged with the Old Paper Ink.  The window die is the Small Madison Window that I popped up over the background with foam dots and I punched the sentiment with the Modern Label punch by SU.
 The Muse challenge ends tomorrow so I'm going to hurry up and post this so I can link it up  - don't want to miss it like my project on yesterday's post!!

ETA:   I'm also entering this into the Little Red Wagon challenge I just found - to use a window!

Thanks so much for stopping by -  have a great weekend everyone!!

Stamps:  Merry Christmas from Nordic Winter - Waltzingmouse
Paper:  Vintage Cream - PTI
Ink:  Ranger Distress Old Paper and Frayed Burlap
Accessories:  Small Madison Window Die - Poppy Stamps, foam dots, Aspen Tree Stencil - The Crafters Workshop, modern label punch - SU

Thursday, March 14, 2013

Sticky and Sweet

Today I have a bunch of Christmas cards I made for the latest Jingle Belles challenge -  Stick-y Sweet - to create a holiday card with at least one sticker.

Well ........  I made them over the weekend -  but had a busy beginning of the week and didn't get them posted in time to enter the challenge! Somehow I was thinking I had plenty of time but the deadline was yesterday! - whoops!  So...... anyway...... here they are!
 For the sticker requirement I used these fun layered paper stickers from K & Company that I actually won from the Jingle Belle ladies last January in a big package of goodies seen below.  (See the package of stickers in the middle left?)
So - first I stamped a flourish from Waltzingmouse on my card base - then I placed the sticker over the flourish - placing each one a little differently to please my eye.  The stickers come with a large version and a small version -  here are the ornaments:
and here are the bows with holly
the poinsettia sticker came in only one size but I still made two cards to make an even 6 cards for my stash!
So - I made some pretty little cards (4 1/4" x 4 1/4")  using a simple flourish stamp, a sticker and a sentiment!

Stamps:  Waltzingmouse - Flourishes-Scallops and Dots, Sentiment from  Nutcracker Sweet
Paper:  White - PTI
Ink:  Memento Cottage Ivy, Ranger Distress Festive Berries
Accessories:  Layered Accents Visions of Christmas - K & Company

Tuesday, March 12, 2013

WMS March Christmas Card Challenge

On the 10th of each month -  there is a Christmas Card Challenge posted in the Playroom of the Waltzingmouse Forum that I participate in.

For March - Cassie Jones was our hostess and her challenge was to use Pear Green and Navy Blue -  a very unlikely color combination for Christmas don't you think!   I NEVER in a life time would have picked those colors up -  but I am thrilled with how my cards came out!
I recently downloaded the cut files Claire has for this wonderful set called Festive Foliage (they are free in the WMS shop!) so I thought I'd try using them on my cards.

I used Memento Pear Tart ink on the Mistletoe, the holly and the pine bough - then used Memento Danube Blue for the berries and the pinecones layering them on top with foam dots.  I used the same sentiment from A Cottage Christmas on each card.


I'm going to have so many cards ready by December - I might have enough for 2013 AND 2014!! LOL!!!


Stamps:  Waltzingmouse - Festive Foliage, A Cottage Christmas
Paper:  White - PTI
Ink:  Memento Pear Tart and Danube Blue
Accessories:  Festive Foliage Cut Files (free!) - Waltzingmouse, foam dots.