Showing posts with label The Greetery. Show all posts

Saturday, August 30, 2025

Inkspirational #349 - Add a Tag

 The newest Inkspirational Challenge is up today - 

and here is the DT card I made for it.......with a tag added!

I adhered it to the card with a single foam dot in the center so the receiver can easily remove and hang up the tag if they want to!

The tag is 3 3/4" diameter.


I made 2 more tags using this die set but didn't attach them to cards!


I made the tags using Hey Honeycomb Flower Power Die, Inflated Sentiments Stamp Set, and Honey Comb Balls - all from The Greetery.

So please join us and add a tag to your card design!  
You'll find inspiration from the rest of the talented Design Team as well as Mr. Linky over at the Inkspirational Blog!

This challenge ends on 9/12!

Also sending my card to:

Flowers  ends 9/4

end 9/9

First time using the flower dies

Birthday ends 9/12


Stamps:  Inflated Sentiments - The Greetery
Ink:  Nocturne - Versafine Clair, Aqualicious - Altenew
Paper:  Hammered White - Amazon, White, Hibiscus Burst, Hawaiian Shores, Summer Sunshine, DP Bitty Big Pale Peony - Papertrey Ink.
Other Supplies:  Hey Honeycomb Flower Power Dies- The Greetery, Make a Wish Arch Labels die - Spellbinders, Honey Comb Balls - The Greetery, Twine.

Saturday, August 2, 2025

Card Chain Challenge - July Exchange Reveal

 It's time to reveal all the cards exchanged for July over at The Card Chain Challenge.  I sent a card to Imke in Germany and I received a card from Jeanne H in MN!

For my card this month, I chose one of the themes: Doors or Windows.   I have both on my card!  A lovely center opening door with windows!

Usually you would have the door (Elegant Entrance Arches) as if  you were looking at the outside of the home -  but I decorated mine to be showing the inside of the home - with wall paper around the door (Elegant Arches Stamp) and a potted plant.(Modern Planters and Botanicals: Forget Me Nots.)  All from The Greetery.

And when you open the door you are looking out onto the garden! 

I stenciled the background on the inside of the card using Leaves in the Wind from Carabelle Studio and overlaid the die cut greenery (Garden Tub Filler Die). The sentiment is from Bloom and Grow Sentiments both from The Greetery.

We'd love to have you join us for the August Card Chain Challenge - you send a card to the person signed up ahead of you and you receive a card from the person signed up after you - you'll find all the details on how to sign up at The Card Chain Challenge blog!

The last day to sign up for the August challenge is August 6th!

I'm also linking my card to:
Summertime Blues  ends  8/4


Stamps:  Bloom and Grow Sentiments, Elegant Arches Background Stamp - The Greetery
Paper:  Hammered white - Amazon, White, Enchanted Evening, watercolor paper - Canson Cold Press, metallic gold - from stash.
Ink: Caribbean Sky - Altenew, Ranger Distress - Mowed Lawn and Speckled Egg, (other Distress inks used smooshed on mat for the flowers and water colored on the greenery - I had them in my stash already colored from a previous project)
Other Supplies: Modern Planters Die, Botanicals: Forget Me Nots die, A2 Arches Die, Elegant entrance Arches Die - The Greetery, Leaves in the Wind Stencil - Carabelle Studio, black POSCA pen, foam dots, tiny gems.

Monday, July 21, 2025

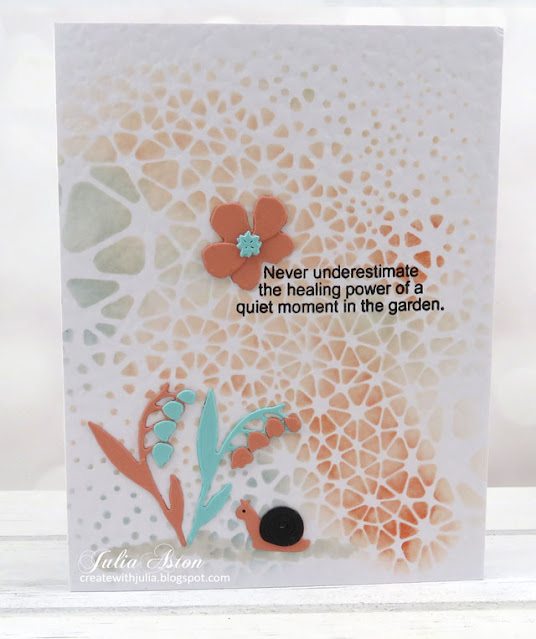
The Healing Power of a Garden

 Today I'm playing along with the Just Us Girls Challenge


I was inspired by the colors, the snail, flower stems and single blossoms!


I got out the Curio Spring Findings dies from The Greetery, that I purchased several years ago and didn't play with until today!  
That's why I love challenges -  they challenge me to use my stuff!

The snails' shell has a die cut curl mark on it but it doesn't show up in the photo.  I added his eye with a Micron 01 black marker.

I stenciled the background using the Milky Way Stencil from A Colorful Life Designs.   The sentiment is from Garden Sayings from Impression Obsession.

I'm also sending my card to:

1st time using the Curio Spring Findings dies.

ends 7/31
diagonal Stencil, Blue, Foliage


Stamps:  Garden Sayings - Impression Obsession
Paper:  Hammered White - Amazon, Robins Egg - Bazzill, Melon Berry, True Black.
Ink:  Melon Berry, Spring Rain - PTI, Nocturne - Versafine Clair.
Other Supplies:  Milky Way Stencil - A Colorful Life Designs, Curio Spring Findings Dies - The Greetery, Copic W2, blender brushes, Sakura Micron 01 black marker.

Sunday, July 20, 2025

Cardinals on a Winter Pine

 Another Christmas card for the box!  


I made this for the Inspiration Challenge over at Splitcoaststampers

I just purchased this lovely cardinal die and stencil set from Waffle Flower so was happy to get it out and play with it.

We are fortunate to have cardinals come to our bird feeders every evening,  so I know the male is the vibrant red and the female and young cardinals are gray/greenish with slight touches of red to protect them from predators - I googled the Cardinal Female to help me try and ink it correctly.


The die comes with a stencil to color them so it was pretty easy once I decided what colors to use!

The pine branch and cones are from an older set called Botanicals: Pine Bough from the Greetery and I actually had some branches and pine cones already cut and colored in an envelope in the die package from some I made a few years ago (yay!) so I used them.

The cardinals and pine cones are up on foam dots. And I added Ice Stickles for frosty glitter. 
(boy, I haven't had Stickles out for quite a while!)


Sending my card to:

Sparkle and Bling
ends 7/31

left vertical - animal, die cut, red
ends 7/30

1st time using the cardinal dies and stencil


Paper: white, Leaf Green, Kraft, Cocoa Bean - PTI, DP Seasons Greetings - Waffle Flower
Ink: Ruby Red, Dark Night, Snapdragon - Altenew, Light Spruce - Gina K Design
Other Supplies: Cardinal Duo Die N Stencil - Waffle Flower, Botanicut: Pine Bough - The Greetery, Christmas Tree Sentiments - Waffle Flower, black gems, foam dots, blender brushes, colored pencils, Ice Stickles glitter glue.

Sunday, June 22, 2025

Honey Comb Birthday Bloom

 I made this card at the request of a friend - personalizing it for her with her daughter Jessicas name.

I used Hey Honeycomb Flower Power Dies, Hey Honeycomb Basics Die, and Hey Honeycomb Sentiments Stamp Set from The Greetery.  She also has a balloon die set and an ice cream cone die set as well as honeycomb circles already cut out but I used some rainbow honeycomb paper that I already had from Inky Antics and used a circle die to cut it according to the paper instructions.

I used the Flying Seagull Fold for my card design which I found on YouTube

The receiver peels off the top paper on a double sided sticky foam die cut flower and pulls over the panel using the tab, to open the circle and presses it against the sticky foam piece to hold the circle open.  

If you are hand delivering the card - you can open the honeycomb before giving it but it won't fit in an envelope!
I'm holding it open with my thumb above and a tool below just to show you how it looks open.


This photo shows the Flying Seagull fold.  
The panels fold up behind the square and fit into an A2 envelope - although with the Honey Comb paper you will need a larger envelope!


I'm sending my card to:

I was inspired by the bright colors of the poppies and sky
ends 6/25


ends 6/24

first time using the Greetery Flower set and stamps


Stamps:  Hey Honeycomb Sentiments - The Greetery, Happy Birthday from Birthday Basics - PTI.
Paper:  Hawaiian Shore, Raspberry Fizz, Summer Sunrise, Amethyst Allure - PTI, Easter Grass - Bazzill, DP  - Hello Sunshine - Taylored Expressions.  Rainbow Honeycomb Paper Pad - Inky Antics (they seem to have only single color pads now).
Ink:  Nocturne - Versafine Clair.
Other Supplies:  Hey Honeycomb Flower Power Die, Hey Honey Comb Basics dies - The Greetery, Double Sided Sticky Foam Sheet. 

Wednesday, May 28, 2025

May Group of Seven Cardmakers - Batik

 This month, the Group of Seven Cardmakers are playing with the technique of Faux Batik.  

There are lots of YouTube videos on the technique all using slightly different methods! Several are linked over at the Group of Seven blog.


Here are some photos of the steps.


I have to say, I found it difficult to choose colors and stamps that ended up with something I liked - it all ends up a bit dark for me.  
The rest of the Group of 7 Cardmakers had greater success than me with this technique!

Please give Faux Batik a try and link up your creations over at The Group of Seven Cardmakers blog.  I'd love to see what colors and stamps you used!  


Also sending my card to:

By the Numbers - use at least one number ends 6/2

Week 4  Anything Goes
clear embossing


Stamps:  Sparkler Background Stamp - The Greetery, 4th of July stamp/Let Freedom Ring - PTI (retired),  Freedom and Liberty stamp/Army - The Greeting Farm (retired)
Ink:  Warm Breeze, Strawberry, Verdant, Portobello, Nocturne - Versafine Clair, Versamark.
Paper:  White - PTI
Other Supplies: Heat Tool, blender brushes, clear embossing powder, embossing pillow, 1 38" circle punch - SU.

Saturday, May 24, 2025

Inkspirational Challenge#342 - Word Prompt

 Inkspirational Challenge #342 is just up over at the blog!  It's a Word Prompt.


My celebration is a Wedding Anniversary!

I took a Tim Holtz/Idea-ology Paper Doll, which is black and white, and colored the bouquet, the hands and faces and the mans' lapel corsage using Distress Water Color Pencils and a Water Brush Pen.  The designer papers are from Worn Wallpaper Scraps also from Tim/Idea-ology.  The couple are popped up on foam dots.  I stamped the Happy Anniversary from Sentiment Suite:Love from The Greetery and added a green enamel heart from Altenew.

How does Celebrate speak to you??  Please join us and link up your celebratory card over at Inkspirational where you'll also find some wonderful inspiration from the rest of the team!  

This challenge ends on 6/6!


Also sending my card to:

ends 6/1
Inspired by the green heart and florals

ends 5/31


ends 6/1


Stamps:  Sentiment Suite: Love - The Greetery
Paper:  White card base - PTI, DP Worn Wall Paper Scraps - Tim Holtz/Idea-ology.
Ink:  Nocturne Versafine Clair
Other Supplies:  Distress Watercolor Pencils - Tumbled Glass, Crushed Olive, Tattered Rose - Tim Holtz/Ranger, water brush pen, Paperdolls - Tim Holtz/Idea-ology, enamel heart - Altenew.

Saturday, March 29, 2025

Inkspirational Challenge #338 - Word Prompt/Sentiments 2 or More

Today I'm sharing my DT card for Inkspirational Challenge #338


I used 2 sentiments as the 'fortune' in the two die cut fortune cookies.    

I made this card for a friend who lost her 34 yr old youngest daughter a few weeks ago.  She had no health issues but died in her sleep from a pulmonary embolism.   

I've been sending encouragement cards to my friend every week since, as she comes to terms with this sudden terrible loss.

So please join us and create a card with at least 2 sentiments on it!  You'll find creative inspiration from the rest of the Ink team as well as Mr. Linky over at the Inkspirational Blog

This challenge ends on April 11!

FYI -  I had surgery on my right shoulder for a torn rotator cuff on March 26th and I'm 6 weeks in a sling so can't stamp or leave lengthy comments on your blogs for a bit!  I've made all my DT posts for the next two months ahead of time so you will see me on the blog! 

Also sending my card to:

Spring ends 4/1
ends 3/31


Paper: Water Color Paper - Canson Cold Press, White, DP Bitty Big Soft Stone - PTI, CP Morning Memories 6x6 - Paper Rose
Ink: Antique Linen Ranger Distress
Other Supplies: Coaster Die - The Greetery, Fortune Cookie Die - Ellen Hutson (retired), Metallic Stickers:Quotations - Tim Holtz/Idea-ology, foam dots.