Monday, January 30, 2023

A White Candle Birthday

 I made this all white slimline clean and simple Birthday card for four different challenges today!

It's a 8 1/4" x 3 1/4 inch slimline card.  The candles and sentiment are die cut out of Distress White Woodgrain Paper from Ranger which gives them some texture against the plain white card base while still being white!  

I also brushed Clear Glitter Wink of Stella over the die cuts so there is a little shimmer when the light hits the card - MAYBE you can see the glittery shine on the candles above?   It's hard to photograph.

I'm linking my card to the following challenges:

White on White

Sketch

Candles

CAS Birthday

Paper:  White - PTI, Distress White Woodgrain Paper - Tim Holtz/Ranger
Accessories:  Candle Die from Candle Light set - Altenew, It's Your Birthday Die - Simon Says Stamp, Slimline Nested Stitch die - Rubbernecker, Clear Glitter Wink of Stella Brush.

Saturday, January 28, 2023

Group of Seven Cardmakers - Creative Heat Embossed Backgrounds

Every month, for the past couple of years, a group of us has been meeting on  Zoom to try out new techniques, revisit older techniques, as well as to discuss art products we might not have used before, or that we have but don't remember what to do with them?! 

We decided to share our experiences on a blog and that blog is called,


This is our Group of Seven!


For our first post - we are showcasing the Creative Heat Embossed Backgrounds technique.  You'll find the full tutorial over at Group of Seven Cardmakers but I will show you how I made my cards below.

I made two cards using the same powder for each background.  First I'll show you the cards and then I'll walk through a few steps on how they were made.


For my background, I used Frantage Embossing Powder - Shabby Blue which is already a mix of fine sparkly blue, thicker white and gold bits. (there are some Frantage powders still available on Amazon)

I applied my Versamark with a crumpled up piece of Saran Wrap, pressing it into the Versamark pad and then dabbing the Saran Wrap on the cardstock - I found that gave a better smooth random pattern than using a piece of sponge (which I tried first!).
Because this embossing powder has some light and some heavy bits, I heated the card from underneath so it didn't just blow all the powders off the panel.   Once the powders were starting to melt, I finished melting the powders with the heat tool facing the front of the card.
I made two panels -  as you can see, when you dab randomly you get different coverage each time.  I used the one above on the birthday card and the one below on the butterfly card.

The Butterfly card
I die cut this (large) beautiful Perspective Butterfly from TH/Sizzix out of Robins Egg Bazzill card, randomly dabbed Versamark over it and embossed with the same Frantage Shabby Blue Powder.  

The larger pieces of powder didn't stick to the small areas of the butterfly, so I just used my heat tool on the front to melt the powder as it would not blow away.
I adhered the butterfly over the embossed panel and clipped off the pieces that went over the edges of the card.
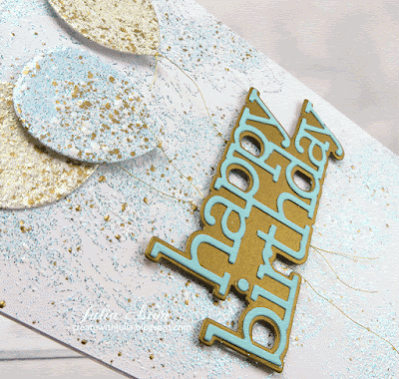
The Birthday card

I die cut the sentiment out of a bronze paper and the 'happy birthday' from the Robins Egg Bazzill used on the butterfly.  I die cut 3 balloons, embossing one with the Frantage Shabby Blue and two with Frantage Shabby white for contrast.  Two of the balloons and the sentiment are up on foam dots.


This close up shows the thin gold threads I tied onto the balloons and laid beneath the sentiment.


Then I tried embossing on a black background with Frantage Shabby White Embossing powder and created this card using the same technique as above for sponging the Versamark on the card and heating up the powder.

The snowflake and skate are both from Sizzix and they are up on foam dots.
Close up of the mix of colors and textures in the Shabby White Frantage Embossing powder.  
It really sparkles as well!

You'll find a complete tutorial for the technique as well as beautiful creations by the rest of the Seven Cardmakers using Creative Heat Embossed Backgrounds over at the Group of Seven Cardmakers blog!

We'll be posting a new technique on the 28th of each month!  We hope they will inspire you to try the technique out every month as well!

I'm linking my Birthday Balloon card to:


I'm linking my Ice Skate card to:
Winter Fun

Snow


Butterfly and Birthday Cards

Stamps: unknown
Paper: White - Papertrey Ink, Robins Egg - Bazzill, Bronze from stash
Ink: Versamark
Accessories: Perspective Butterfly die - Tim Holtz/Sizzix, Happy Birthday die - Simon Says Stamp, Birthday Balloons die - Papertrey Ink, Saran Wrap crinkled up, Frantage Embossing Powder in Shabby Blue and Shabby White - Stampendous, gold thread from stash, foam dots, heat tool.

Snowflake Skate Card

Paper: Mixed Media Black - Strathmore white - Papertrey Ink.
Ink: Versamark
Accessories: Ice Skates Bigz Die, Snowflake 3D Embosslits Die - Tim Holtz/Sizzix, Frantage Shabby White Embossing Powder - Stampendous, silver embossing powder on skate, black marker (coloring sole and heel of skate), foam dots, Metallic Stickers Holiday Talk - Tim Holtz/Idea-ology, red/white twine

Sending Love

 It's time for the next Inkspirational Challenge, and it's a wonderful Mood Board!


I'm sure you can tell - I  was inspired by the plate of cookies and the colors!

I die cut the hearts from Lawn Fawn out of white and Dark Chocolate card and spread a layer of Glossy Accents over each one.  
Then I sprinkled Tiny Hearts Valentine Mix from Ellen Hutson over them and let the Glossy Accents dry overnight.

I die cut the background using Quilted Backdrop from Lawn Fawn.
  
The chocolate heart is up on foam dots overlaying the white heart.   
I adhered the die cut sentiment from Memory Box beneath the hearts.

This card below was the first card I had made for the challenge, but I accidentally picked up the Crackle Glossy Accents!  

When I first saw it dried - I thought "did it crack because it was too thick??"  then I looked at the bottle and saw it was the Crackle Glossy Accents, duh...... I had really wanted it to be smooth 'frosting' so I made the card above.   
The only difference in the cards is the Crackle Glossy accents and a pretty patterned paper background. (Sweet as Sugar - Reverse Confetti)
It shows you how changing just one thing can bring a totally different look to a card!

Well, that and these cookies look like the frosting dried out sitting on the counter too long !

How will the Mood Board inspire you??   We can't wait to see what you create.  Check out all of the lovely inspired designs from the rest of the DT over at Inkspirational!

You have until Feb 10th to link up your project! 

Also linking my card to:


Krafty Chicks - All Occasions - Valentines


Linking my 2nd card to:
1st vertical row
Die Cut - Heart - Patterned Paper


Paper:  White, Scarlet Jewell, Dark Chocolate - Papertrey Ink, Pale Rose - Bazzill, Sweet as Sugar - Reverse Confetti (on 2nd card)
Accessories:  Lacy Heart Stackables, Outside In Stitched Heart Stackables, Quilted Backdrop - Lawn Fawn, Sending Love Posh Script - Memory Box, Glossy Accents - Ranger,  Crackle Glossy Accents (on 2nd card) Tiny Hearts Valentine Mix - Essentials by Ellen Hutson, foam dots.

Thursday, January 19, 2023

Guest DT at Time Out Challenge!

 I'm excited to be Guest Designer over at Time Out today!  I was asked because my card was chosen the winner for Challenge #227

And this is the challenge - Inspired by Words

Here is the card I made for the challenge, inspired by the quote:
No stamping - all die cuts!?!  I just love the look of this layered plaid die set from TH/Sizzix.  I used a Chrome Precision Plate for Thinlit Dies in my cutting sandwich to be sure all the lines got cut through on the plaid pieces.  

The sentiment was made using one of the Bold Text #2 dies also from TH/Sizzix.  
I layered it over a black panel with foam strips and adhered red acrylic hearts inside the open letters - seen better in the close up below!

Todays Time Out challenge is sponsored by AALL & Create and the winning entry will receive a $20.00 credit to their online store- so be sure to link up a card over at Time Out!  

Thank you Time Out for inviting me to be a Guest Designer today!  I had fun creating this card based on the Inspired Words!

I'm also linking my card to:

Valentines


Center vertical - Hearts - Free - Shade of Red


NBUS January
first time using the plaid dies


Paper:  Pure Poppy, True Black, White - Papertrey Ink
Accessories:  Layered Plaid dies, Bold Text #2 dies - Tim Holtz/Sizzix, Chrome Precision Plate - Sizzix, red acrylic hearts - Honey Bee Stamps, foam strips.

Saturday, January 14, 2023

You Are Invited

 I am excited to tell you that I was asked to be on the Inkspirational Design Team!  So this is my very first post making a card for the 1st Inkspirational Challenge for 2023!


I was inspired by the word prompt - Welcome - and made a card to be used as an invitation to a dinner or party.  I would feel welcome if I was invited to a party wouldn't you?

I created my background using a fun embossing folder by Eileen Hull/Sizzix called Silverware (it just shows mostly the handles of the forks, knives and spoons!)  Can you see the silverware?  They are the white bits!

I used the resist debossed background technique on the panel (sounds difficult but it's really easy!)  I rubbed my Versamark ink on the inside bottom piece of the opened embossing folder - so the raised part gets inked.  I put a piece of white Mixed Media card in the folder and ran it through my Big Shot.  I removed the panel and covered the back side that had gotten the Versamark on it, with white embossing powder, tapped the extra powder off and embossed with my heat tool. 

Theoretically, just the raised parts get embossed in white (you might have to brush some of the embossing powder off the card around the edges of the images if  the panel seems to be totally covered?!)

Then I smooshed various Distress inks first and then DOX inks (blues and browns, listed below) on my craft mat (one at at time) spritzed with water and smooshed the panel into the ink.  Only the parts that didn't get embossed in white will absorb the ink.  

I stamped the sentiment onto a strip of white card, backed it to a slightly larger strip of teal card and adhered it over the panel with foam tape. 

We'd love to have you join us over at Inkspirational!  Check out the great creations from the other DT members and link up your card by Friday 1/27!

I'm also linking my card to:

Use your favorite colors - mine are blues and browns

first time using the Silverware Emb folder


Stamps:  Table Service - Papertrey Ink (retired)
Paper:  Strathmore Mixed Media White,  Tropical Teal and white - Papertrey Ink.
Ink:  Ranger Distress Tumbled Glass and Grand Espresso, Ranger Distress Oxide Salvaged Patina and Walnut Stain, Versamark, Nocturne - Versafine Clair.
Accessories:  Silverware 3D Textured Embossing Folder - Eileen Hull/Sizzix, white embossing powder, heat tool, water mister, craft mat, foam strips.

Wednesday, January 11, 2023

Adventures with You

 I have a CAS card to share today that is definitely a masculine design (but could be used for any outdoor-loving person!) and would work for a birthday or anniversary.  I haven't put a sentiment on the inside yet - waiting to see just who I'll send it to and for what occasion!

The tree and bear stamps are from the Great Outdoors set from Tim Holtz/Stampers Anonymous.  The sentiment is from a new stamp set I just got Happy Camper from MFT. 
(the Happy Camper stamps and die set are on sale right now! - just sayin')

The card base is textured, which you can see on the bear - he usually would be totally black accept for the larger clear spots which are part of the stamp.  I stamped the sentiment on a plain card strip so it was clear to read and also grounded the bear!

I'm linking my card to:


Stamp Act - must use stamps

The sentiment is from a new stamp set


Stamps:  Great Outdoors - Tim Holtz/Stampers Anonymous, Happy Camper My Favorite Things.
Paper:  Precision Cardstock - Parklane/JoAnn, smooth tan - Michaels.
Ink:  Nocturne Versafine Claire.