Wednesday, May 28, 2014

CC3 Challenge #3 - Faux Tea Rose Technique

Here's my tag for the 3rd Compendium of Curiosities 3 challenge - to use the Faux Tea Rose Technique that is found on page 65 of Tim Holtz' A Compendium of Curiosities Vol #3.  I'm making tags for all of these challenges and putting them in a Tag Book.   Here's a close up of the lovely tea roses I created using some text and dotted papers.  We cannot share the technique - you need to learn it from your own copy of Tim's book.
But I can share how I put my tag together!
First I adhered some Symphony Tissue tapes on my #8 Manilla Tag.  I painted over the whole tag with Bundled Sage Distress Paint, spritzed it with water, dried it and sponged the whole tag with Walnut Stain Distress Ink (which pretty much covered all the Bundled Sage paint!) then I flicked water on the tag again and blotted it with paper towels.
then I stamped a leaf Art Parts with Studio 490 Reverse Dots using Archival Fern Green ink.  I just pressed the leaf onto the stamp - don't the dots look cute on the leaf?!
Next I made my tea roses and leaves. I used pretty text and dotted papers from the Cowboy Paper Pad from My Minds Eye and sponged them with Vintage Photo.  I also stamped a sentiment from the I Am My Art set from Studio 490 on a Journaling Ticket and sponged the edges with Walnut Stain.
I added some Remnant Rubs Botanical at the top and bottom of my tag.
and a Philosophy Tag that I brushed some Bundled Sage Distress Paint over to highlight the word 'Imagine'  I attached it to the Linen Ribbon  that I looped through the hole with a Wire Pin.
I brushed the Art Parts Leaf with Distress Crackle Paint Clear Rock Candy -  I love the look of the crackle but it kind of masks the pretty dots I stamped on the leaf - you can see the dots on the bottom section better....
I stapled the stamped Journaling Ticket to the bottom of the tag and added a moth from Salvage Stickers/Crowded Attic with a foam dot.  The mushroom is a Remnant Rub/Botanical.
Here's my finished tag, once again.
There are several prizes to be won with each CC3 Challenge - there's a new one every other Saturday -  this week one of the prizes is a $50 gift certificate from the Inspiration Emporium!  So be sure to check out the challenge here!
Stamps:  Reverse Dots, I Am My Art - Studio 490 Wendy Vecchi.
Paper:  #8 Manilla tag, Tissue Tape Symphony - Ranger,  DP - My Minds Eye Paper Pad/Cowboy, True Black - PTI
Ink:  Ranger Distress Ink Walnut Stain and Vintage Photo, Archival Fern Green and Jet Black
Accessories:  Ideology - Salvage Stickers/Crowded Attic, Wire Pins,  Philosophy Tags, Remnant Rubs/Botanical, Art Parts Leaves, Distress Glitter Clear Rock Candy, Distress Crackle Paint Clear Rock Candy, Glue N Seal - Ranger, Tattered Pine Cone Die - Alterations.


Tuesday, May 27, 2014

Peace on Earth

Here I am with another Christmas Card to share -  I only need about 40 Christmas cards in December and I'm pretty close to having that many made already!   I punched several different sized circles out of  red and lime green glitter card stock from Michaels.  I die cut the deer from Starry Christmas by MFT out of Brushed Silver Cardstock from SU and then white embossed it using the coordinating deer stamp from the Starry Christmas stamp set by MFT. The Peace on Earth is from the same stamp set.  I layered them all onto a panel I die cut with my Stitched Mat Rectangle from Lil' Inker Designs.
Here's a close up of the deer showing the silver with white embossing a little better.
I'm linking my Christmas card to 3 challenges:
Festive Friday -  I was inspired by the red ball ornaments on the tray, the green tree and the prancing silver reindeer on the tree.
Jingle Belles -  Theme Peace -  the deer flying through the galaxy evokes a feeling of Peace for me on this card!

Stamps:  Starry Christmas - My Favorite Things
Paper:  White - PTI, Glitter Card Stock -Michaels, Brushed Silver - Stampin'Up
Ink:  Archival Jet Black, Versamark
Accessories:  foam tape, white embossing powder, heat tool, circle punches - EK Success, reindeer die - Starry Christmas set - My Favorite Things, Stitched Mat Rectangle die - Lil' Inker Designs.

Monday, May 26, 2014

Tim Holtz - 12 Tags of 2014 - May

Happy Memorial Day to my friends living in the US.  I would like to take a moment to thank all those who serve or have served in the military (including my son) keeping us safe and putting their lives on the line every day they serve.

I've been watching the Tim Holtz 12 Tags of 2014 each month and finally decided to join in - better late than never I say! You can see Tim's May tag here.
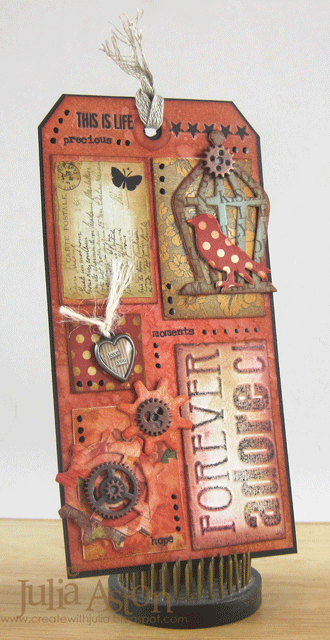
And here is my version:
I started my tag by sponging Ranger Distress Fired Brick and Vintage Photo.  I flicked water on the tag, blotted the water off and dried it with my heat gun.  On the top half, I adhered a Post Card sticker from Salvage Stickers/Crowded Attic, the mini bird and cage die cuts and some Remnant Rubs/Botanical and Life Quotes.  Both are mounted on a rectangle of patterned paper and chipboard.  I sanded the edges with the Tim Holtz hand sander.
On the bottom half I adhered a Heart Charm tied with twine and a panel embossed using part of the Texture Fade Valentine Background and Borders that I inked on the inside with Archival Jet Black Ink.  I also added gears cut with the Mini Gears Movers and Shapers set layered with metal mini gears.
I drew lines of dots throughout the tag with a Gelly Roll Glaze Pen
 I adhered the tag to a slightly larger piece of black card stock, trimmed the corners and looped a piece of Linen Ribbon through the hole at the top - pulling open the ends of the ribbon.

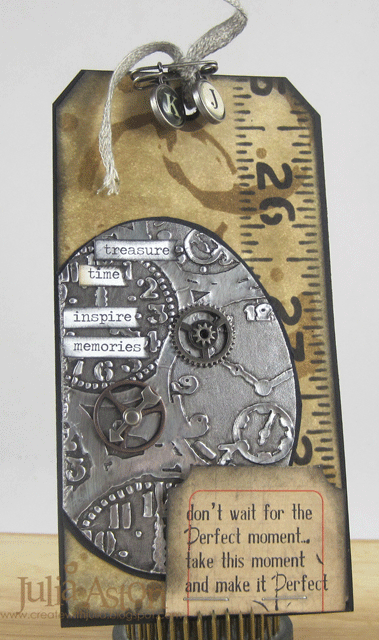
And here are my versions of Tim's January and February tags (I'm too late to link them but I wanted to work with the techniques he showed us! I'll be posting March and April soon!)
My January Tag 
(here's the link to Tim's)
 The stamp is from Studio 490 Wendy Vecchi Forever Art.  I used the Splatters and Measured Stencils.
 I used the Texture Fades Pocket Watch embossing folder on the Foil Tape Sheet.
My February Tag 
(here is the link to Tim's)
 The graduated hearts stencil was designed by my friend Mona for MFT.
 The stamp is from Studio 490 Wendy Vecchi - The Beauty of Art - I white embossed it, then scribbled chalk over the black cardstock.


May Tag
Paper:  Manilla Tag - Ranger, True Black - Papertrey Ink, DP - Webster's Pages Petite Papers, chip board from stash.
Ink:  Ranger Distress Fired Brick, Vintage Photo, Archival Jet Black
Accessories:  Ideology - Mini Gears, Linen Ribbon, Remnant Rubs/Botanical and Life Quotes, Heart Charms, Hand Sander, Salvage Stickers/Crowded Attic; Gelly Roll Glaze Pen - Sakura; Alterations - Texture Fade Valentine Background and Borders embossing folder, Movers and Shapers Mini Bird and Cage set and Mini Gears Set.

January Tag
Stamps:  Studio 490 Wendy Vecchi - Forever Art
Paper:  Manilla Tag - Ranger, True Black - PTI, Foil Tape Sheet - Ranger
Ink:  Ranger Distress - Frayed Burlap, Black Soot
Accessories:  Ranger Distress Stain - Frayed Burlap, Splatters and Measured Stencils - Tim Holtz/Ranger, Ideology - Game Spinners, Mini Gears, Gears, Wire Pin, Type Charms, Chit Chat Stickers, Journaling Ticket,Linen Ribbon;  Glossy Accents, Movers and Shapers Sized Ovals, Texture Fades Pocket Watches embossing folder - Tim Holtz.

February Tag 
Stamps:  Studio 490 Wendy Vecchi - The Beauty of Art
Paper:  Manilla Tag - Ranger, True Black - PTI, Brushed Silver - SU, Grungeboard heart from Harlequin Elements Ideology.
Ink:  Ranger Distress - Walnut Stain, Fired Brick, Worn Lipstick, Barn Red, Versamark
Accessories:  Ranger Distress Stain - Tattered Rose, Frayed Burlap, Old Paper; Graduated Hearts Stencil - MFT,  Festive Berries Distress Glitter - Ranger, Glue N Seal - Ranger, Ideology -  Industrious Stickers/Borders, Remnant Rubs Botanicals and Life Quotes, foam tape, Linen Ribbon - Ranger, Mini Mister - Ranger, heat tool, white chalk, White embossing powder, clear embossing powder.

Sunday, May 25, 2014

PTI May Blog Hop - Aqua & Melon

Hi everyone - Happy Middle of the Memorial Day Weekend to all my US stamping friends - I'm excited to be playing along with the PTI Blog Hop today - this is the delightful inspiration -  to use Aqua and Melon
I used some new dies that I've purchased from PTI over the past few months (SO happy to use what I purchase instead of just putting it on the shelf!) - the Phrase Play #3 die AND stamp set, along with the Bitty Button Stacks dies.  I used Aqua Mist and Berry Sorbet card stock (I guess I ran out of Melon Berry?!) but I did use Melon Berry Ink!  
I'll be at church when the hop goes live at 10 am EST - so I'll be linking up a couple of hours later when I get home.  I'm sure there will be lots of lovely spring and summer designs with these pretty colors! 

Stamps:  Phrase Play #3 - PTI
Paper:  White, Aqua Mist, Berry Sorbet - PTI
Ink:  Melon Berry - PTI
Accessories:  Dies - Phrase Play #3 and Bitty Button Stacks - PTI, Stitched Mat Rectangle Die - Lil' Inker Designs, foam dots.

Saturday, May 24, 2014

Old Salt

Today I have a clean and simple masculine Birthday Card to share using  a wonderful nautical stamp set from Waltzingmouse called Ocean Bound.
The kraft tag is cut with a Stitched Tag Die from Waltzingmouse - and the circle die is from Lil' Inker Designs.
I'm entering this card in the Keep It Simple Challenge - Maritime.

A short and sweet post -  for this first day of the Memorial Day long weekend here in the US -  I'm going out to lunch with my sister at Pickity Place - a wonderful gourmet restaurant in a lovely old home in the woods of Mason, New Hampshire!

Here's what we'll be having!

Monthly Menu for May

New England Vegetable Dip
Creamy Broccoli with Smoked Ghouda
Spring Chopped Salad with Black Salt and White Pepper
Garlic Bread with Sun Dried Tomato Dipping Oil

Choice of entree:
Abruzzo Stuffed Pepper
— or —
Four Cheese Ratatouille Quiche
Sauteed Asparagus with Citrus Shallot Butter
Dutch Chocolate Mousse in Sweet Pastry
Stamps:  Ocean Bound - Waltzingmouse
Paper:  White, Kraft - PTI
Ink:  Memento Nautical Blue
Accessories:  Stitched Tag Die - Waltzingmouse, Stitched Mat Circle Die - Lil' Inker Designs, foam dots.

Friday, May 23, 2014

A Vintage Journey Challenge - All About Him

Today I'm happy to be playing along with the A Vintage Journey Challenge #6 - All About Him.  

Anne is our host for this challenge and in her words:  "I have chosen 'All About Him' as my theme.  Men are usually difficult to make things for but with Tim Holtz's range of stamps, dies and accessories it does make life so much easier!  So with Father's Day just around the corner, this is a perfect chance to create something. This challenge is to make a card/tag/3D or any other type of project specifically for a man, using Tim's techniques or products wherever possible."

I made a tag for my project -  while I'm learning to design with Mixed Media - the size of a tag is just right for me to work on!  And - I'm going to be making a Tag Booklet to keep my tags in.  I'll place them on my kitchen counter or my desk at work so I can flip through them and admire all my handy work!
So - here is my All About Him tag -  my dad passed when he was just retired - suddenly - at the age of 66 (when I was 27) so I just made this tag masculine and not about a dad particularly.
Things that make it All About Him -   darker colors -  I used Orange Blossom, Cornflower Blue, Leaf Green Archival Inks, Black Soot and Vintage Photo Ranger Distress Inks (the poor guys always get the depressing colors don't they!?)
I used an architectural window stamp from Classics #16 and a pediments die (that I cut from Grunge Paper - inked and then adhered Ranger Distress Tarnished Brass Glitter to).  I used metal - with the Heart Charm,(I love these little hearts!) Time Pieces with Game Spinners, (that I inked with Orange Blossom, Cornflower Blue and Leaf Green Archival inks) the Ring Fastener, the Trinket Pin and black paper string.  I made the background by placing some puddles of Ranger Distress paints (Mustard Seed, Rusty Hinge and Bundled Sage) on my nonstick mat - spraying with water and then dragging the tag through it.  I dried it with my heat gun then sponged over it with Vintage Photo and black soot Distress Inks. I inked a damask stencil designed my my friend Mona over at MFT (I don't have a Tim one!) on the tag using Vintage Photo Distress Ink - you can just see it above - I layered so many things over it!
I added Remnant Rubs/Life Quotes, Industrious Stickers/Borders (that I inked with Orange Blossom and Leaf Green Archival Inks) and Chit Chat stickers.
I placed a number Salvage Sticker on a Journaling Ticket adding a Blossom Bucket black star, another Remnant rubs/Life Quotes and Chit Chat Sticker  Then I spritzed all over the tag using the Distress Marker Spritzer with a Black Soot Distress Marker.

Ok, I'm finally DONE explaining it all -  and I'm happy with it!  Come and join us at  A Vintage Journey Challenge!

Stamps:  Classics #16 - Stampers Anonymous/Tim Holtz
Paper:  Ranger Manilla Tag, True Black - Papertrey Ink
Ink:  Ranger Distress - Black Soot, Vintage Photo; Archival - Orange Blossom, Cornflower Blue, Leaf Green.
Accessories:  Ideology - Journaling Tickets, Salvage Stickers, Remnant Rubs/Life Quotes, Chit Chat Stickers, Trinket Pins, Black Paper String, Heart Charms, Ring Fasteners, Time Pieces, Game Spinners, Industrious Stickers/Borders, Ranger Distress Tarnished Brass Glitter, Grunge Paper - Ranger, Damask Stencil - My Favorite Things, brown Twine - Waltzingmouse, Distress Marker Spritzer - Ranger,  Black Soot Distress Marker - Ranger, Ranger Distress Paints - Mustard Seed, Rusty Hinge, Bundled Sage.

Thursday, May 22, 2014

Fusion Card Challenge - May 22nd

Wow, wow, wow - did you see all the wonderful bright yellow with contrasting black designs linked up at the Fusion Challenge the past two weeks??!  It is always quite a challenge for the Design Team to pick their favorites - you guys really rock the Fusion!!
This week we have another fun inspiration photo - I just love the red with white dots, and the music bag - and the sketch pretty much matches the image this week!  I've 'sort of' combined the two with my project.

The silverware in the photo immediately  made me think of a package of sweet little plastic forks I just had to purchase when I saw them at my local Christmas Tree Shop - I just knew I'd use them sometime! - at 4" long, they are supposed to be used for appetizers - aren't they the cutest?!
I had these Bazzill Library Pockets sitting in the cubby that's on top of my work table - they've been there for years - just waiting for me to be inspired to use them - which  happened this week!  I stamped the front twice with a stamp from the Musical Background set by Waltzingmouse using Archival Watering Can Ink.  The cute tag with the little heart around the hole was cut from the new Folding Tag Die set from Waltzingmouse.  I looped a little piece of red/white twine through the hole.
I die cut the dotted red Amuse cardstock (another item I've had for years!) with a Mega Mat Stack 3 die from PTI and die cut the slots for the gift card to slip through using the Gift Card It Die from Waltzingmouse.    Here's a pick showing the panel inside and pulled out.
I adhered the fork to the dotted panel with a thick glue dot just under the tines of the fork so the handle is free and can slip over the Library Pocket when the panel is inserted.  The sentiments are from Gift Card It and Join Us by Waltzingmouse.  I thought the "For Drinks" and "For Dinner" would be perfect to go with a gift card to a restaurant
I didn't really want to put the Library Pocket on a card base but I thought it would be nice if it could stand up and be displayed - so I cut an easel with my Tim Holtz Small Easel die from a piece of white PTI card stock, which is very sturdy, and adhered it to the back of the pocket with ScorTape -  Perfect!
I made two of these cuties - so I'm all set to give some gift cards when the need arises!

Now - I can't wait to see how the rest of my Teamies were inspired by this weeks' challenge - let's go see, shall we?!
Please join us by linking up your inspired creation over at the Fusion Card Challenge Blog - you have almost 2 weeks!
 
Stamps:  Gift Card It, Join Us, Musical Backgrounders - Waltzingmouse.
Paper:  White and Pure Poppy - PTI, Dotted DP - Amuse, Bazzill white Library Pocket Card.
Ink:  Archival Watering Can
Accessories:  Dies - Gift Card It and Folding Tag Die - Waltzingmouse, Small Easel Die - Tim Holtz Alterations, Mega Mat Stack 3 Die - PTI, Modern Label Punch - SU, foam dots, ScorTape, thick glue Dots, Maraschino Twine - The Twinery.

Wednesday, May 21, 2014

Coffee Anyone?

The Card Concept has a fun challenge with a theme that just about everyone loves - Coffee.  
I used a cool stamp set from Art Impressions called Coffee Keeper - that includes the cup with the cover and sleeve as well as some sentiments and steam curls. 
It comes with instructions on how to fold the paper, stamp images, what to paper piece  and where to cut the slot so a gift card can be inserted under the flap.
The stamp set instructions leaves the flap loose like this - 
 But I added a clip and the word 'open' stamped on a punched circle to hold the flap closed (see 1st pic above!) - that pleased my asthetic sense better than leaving it open a bit!
Here's a close up of the sentiment stampings on the sleeve where you check off the boxes that you want - I know it's a little harder to read stamped on the digital paper that I used - but I thought it looked more like the corrugated cardboard that they use IRL!  All the patterned papers I used here are digital from the Brown Grunge Texture set from All About Scrapping Etsy Shop - I won them from a challenge I linked a card to a few months ago and I just love them!
I did mount the panel to a white card base so I could write whatever I wanted inside depending on why I was giving a gift card to someone - birthday, thank you etc.  My style is clean and layering.
I'm linking this card to the Card Concept 10

Stamps:  Coffee Keeper - Art Impressions, Karen Fisher Snap stamps tiny alphabet set - retired
Paper:  white and rustic cream - PTI, Digital DP Brown Grunge Texture Set - All About Scrapping Etsy Shop.
Ink:  Archival Tree Branch and Jet Black
Accessories:  round clip from stash, x-acto knife, ScorTape, 5/8" circle punch - EK success.

Tuesday, May 20, 2014

Happy Birthday to You - Honeycomb

I used a new toy on my card today -  the Frameworks Border - Honey Comb die from Tim Holtz.  I embedded the die in a white panel having the negative cut on the panel and filling it with the die cut in Green Bazzill cardstock and filling the honeycombs with patterned paper Out of Print by Basic Grey.  I think the colors I used make this a good choice for a Masculine card.  I added home made enamel dots made from Perler Beads.  I had to add the sentiment from Verve on a square of card stock since I stamped it a little crooked directly onto the panel and had to cover it!
My design was inspired by this week's Cas(e) this Sketch.
Stamps:  Birthday to You - Verve.
Paper:  White - PTI, Green Bazzill, DP - Out of Print - Basic Grey
Ink:  Archival Leaf Green
Accessories:  Honey Comb Die - Tim Holtz/Sizzix, Glue N Seal - Ranger, Enamel Dots made from Perler Beads.


Sunday, May 18, 2014

CC3 Challenge #2 - Distress Glitter Technique

I'm so happy that it's time for the 2nd Compendium of Curiosities 3 challenge.  This time we are using Tim's Distress Glitter Technique that is found on page 56 of A Compendium of Curiosities, Vol #3.  I made a tag for my project - using the Distress Glitter Technique on an Art Parts leaf.  I used Peeled Paint Distress Glitter as it is the only one I have at the present. (but more are winging their way to me at this very moment!)
Let me show you all of the other techniques I used on this tag in addition to the Distress Glitter.  I started with a manilla tag from Ranger that I sponged with Wild Honey and Peeled Paint Distress Inks. Then I stamped the background with Wendy Vecchi's Ornate Dots with Archival Cornflower Blue ink.
I sponged the numbers  1 - 2 - 3 -4 - 5 from the Cargo Stencil along the top


and 6 - 7 - 8 - 9 - 0 along the bottom with Peeled Paint Distress Ink. (you can just barely see it!)  Then I flicked water over the tag to make some water spots.
I inked the Art Parts Flower with Archival Orange Blossom ink, stamped it with the Ornate Dots using Cornflower blue - and then covered it with Distress Crackle Paint Clear Rock Candy.  After it dried I sponged over it with Orange Blossom Ink and added the Wendy Vecchi Blossom Bucket Gold Berry Flower Centers
I also stenciled the dots from the Splatters stencil along 2 edges with Cornflower Blue ink.  I die cut the Frameworks Border Honeycomb die out of Grunge Paper and inked it with Peeled Paint Distress Ink and then brushed the Archival Orange Blossom over it just a tad.  I applied several Remnant Rubs/Botanicals
I inked a metal sprocket gear with Orange Blossom Ink, adhered it around the circle on the tag and looped a piece of Linen Ribbon through the hole, tying it in a double knot and pulling the ends of the ribbon open.  I layered my tag to a piece of black cardstock.
I love my tag!
Now I can't wait for challenge #3!! Challenge #2 ends on May 23rd.
One lucky person who links their project over at the CC3 blog will win a $25.00 gift certificate to The Funkie Junkie Boutique!

I'm also linking this to the eclectic Paperie ePlay challenge - to use stencils - this challenge is open until the last day of May.

Stamps:  Ornate Dots Background - Studio 490 Wendy Vecchi
Paper:  manila tag and Grunge Paper - Ranger
Ink:  Archival Cornflower Blue and Orange Blossom, Ranger Distress Peeled Paint and Wild Honey.
Accessories:  Remnant Rubs/Botanicals, Frameworks Die, Distress Crackle Paint Clear Rock Candy, Glue N Seal, Linen Ribbon, Splatters Stencil, Cargo Stencil - Ranger,  heat gun, Art Parts - Just Flowers, Gold Berry Blossom Centers - Studio 490 Wendy Vecchi/Blossom Bucket.