Showing posts with label Tim Holtz/Ranger. Show all posts

Wednesday, October 22, 2025

A Mug for Santa

 I just LOVE these little Santa mugs from Tim Holtz and watched a YouTube video by Tim on how to  fill them with 'whipped cream' and candy!   

I have a full size mug just like this from my childhood!  This one measures just 1.13"x 1.75"! 

TOO CUTE!!

I wanted to make a little gift using the filled mug, a Decorative Deer and Snow Ball Bubbles all adhered to a 3"x3" square of DP from Paper Stash Tidings from Tim Holtz/Idea-ology.  I layered the DP to a square of white card stock for sturdiness!  

Sorry my photos are dark, not cropped or watermarked!   - I had to buy a new computer as I couldn't download Windows 11 on the one I had - and my Adobe Photo Shop 6 was too old to load onto the new computer (UGH my worst nightmare!)  

All I use the Photoshop for is to crop my photo, lighten if needed, add my watermark and save for the Web for size.   

I've looked at several newer Adobe Photo Shops and they all do way too much stuff that I would never use and I can't see how to just do the simple things I want - also looked at YouTube videos of free Photo programs - again - too in-depth for me -  so for now I'm bungling through taking the photo in my light tent with my phone - and sticking my stamped 'watermark' near the project..... while I continue to search for something I can understand...
 
Better than not being able to post, I guess - YIKES!

This photo shows the deer standing behind the mug.  I adhered the deer and the Snow Ball Bubbles to the DP with Tombo Glue as it's thick and held them on while they dried.  I adhered the mug with a thick Glue Dot.
First, you push a 1" styrofoam ball into the mug (many available on Amazon) -the top curve will just stick out a bit above the mug. Cut the end of the Candy Cane to a length that doesn't stick out above the mug too much and stick it into the foam. Then you add Snowfall Grit Paste over the top of the foam ball (I used a spatula).  I also added Holiday Confetti from The Greetery (no longer available.)  I let it dry overnight before moving anything!

I had these 3"x 3" clear square boxes in my stash and they worked perfectly to house my little Santa Mug Vignette.   
I die cut the red circle and stamped it with a stamp from Festive Overlay by Tim Holtz/Stampers Anonymous. I adhered it with mini glue dots to the top of the box.
The scene fits perfectly inside the box and keeps it safe - I didn't adhere the card stock to the box - so it easily lifts out to sit on a shelf!

I'm linking my Santa Mug Vignette to:


Christmas Song - Hard Candy Christmas 
(my Santa mug has hard candy in it)
ends
First time using the Santa Mug and Bubbles


Stamps:  Festive Overlay - Tim Holtz/Stampers Anonymous.
Paper:  White, Pure Poppy - Papertrey Ink, DP - Paper Stash Tidings - Tim Holtz/Idea-ology.
Ink:  Nocturne - Versafine Clair.
Other Supplies:  1" Styrofoam ball - Amazon, Santa Mug, Bubbles, Confections: Candy Canes, Decorative Deer - Tim Holtz/Idea-ology,  Christmas Confetti - The Greetery (no longer available), 3"x 3" clear box - Clear Bags.Com, Snowfall Grit Paste - Ranger, thick glue dot, Mini Glue Dots, Tombo Glue

Sunday, August 15, 2021

Mid Month Reminder - CAS Christmas Card Challenge - Decorations

 I'm posting today with a mid-month reminder about the CAS Christmas Card Challenge - you have until 8/24 to link your card!   Our theme this month is Decorations!  

For my reminder card, I used a Toy Soldier Die from Sizzix.   It's an older die and was on sale last year at Sizzix for really cheap! (It's still on sale for $8.00!)  He's the perfect size for an A2 card too!
I simply die cut the pieces out of the colors I wanted and assembled the Toy Soldier.  I used 3 of the frames from Stitched Rectangle Scallop Frames from MFT to place behind my soldier, one cut from metallic gold and two cut from white card.  At first I just had the white frames - but felt I needed the outer frame in gold to define the space better.  I adhered the soldier with foam dots over the frames.  I added a tiny yellow rhinestone to his hat plume.

We hope to see your decorations on a CAS Christmas card over at the CAS Christmas Card Challenge!

Paper: Red, Black - Ranger Distress Core-dinations Collection, Metallic Gold - Park Lane/Joann, white - PTI.
Accessories:  Toy Soldier Die - Tim Holtz/Sizzix, Stitched Rectangle Scallop Frames - MFT, foam dots, Tiny Twinkles - Taylored Expressions.

Wednesday, July 22, 2020

Let's Celebrate

Playing around today with some products, inspired by Tim Holtz recent Saturday videos.


The base of my panel is Matte Black Alcohol Ink Card Stock (which I've had for ages and never tried using it!).   The pattern was made using Ranger Distress Oxide Spray in Mermaid Lagoon and Fossilized Amber and Dylusion White Linen Ink Spray.

I poured (not sprayed) some of each of the sprays onto my craft mat close to each other but not mixing. Then  I smooshed the black AI cardstock onto the colors.   I lifted up the card to see how it looked and then smooshed some areas that hadn't gotten covered into the sprays on the mat again.

The cardstock was twice the size as this panel - so I got two cards (both slightly different looking!) from the one smoosh.   Obviously every time you do this it will come out differently!

The sentiment is Metallic Sticker/Quotations from Idea-ology.

I'm linking my card to:


 Country View Challenges - Do What Makes You Happy
Using products I've had sitting in my craft room untouched makes me happy!


Paper:  Matte Black Alcohol Ink Card Stock - Ranger, white - PTI
Accessories:  Ranger Distress Oxide Sprays Mermaid Lagoon, Fossilized Amber, Dylusion White Linen Ink Spray, craft mat, Metallic Stickers/Quotations - Tim Holtz/Idea-ology.

Sunday, September 15, 2019

Four Paper Dolls for Halloween

I purchased some of the new Tim Holtz release for Halloween and wanted to get started using them!  I used the Masquerade dies, some Geo Insects,  the new Abandoned Paper Stash papers, last years Halloween Clippings Stickers for the sentiments and Halloween Paper Dolls to create 4 different designs.

For my first card, I used the largest mask from the Masquerade set as wings and one of the smaller masks on the Paper doll.  I added the Dangling Spider die cut from Poppy Stamps. I lightly sanded both the large mask and spider.  I rubbed over her dress with a Distress Crayon. She and the spider are popped up on foam dots.
 I'm linking the card above to:
International Art and Soul - Things with Wings

For my second card, I die cut one of the Geo Insects out of Kraft Stack black paper as well as a small mask.  I colored the Paper Dolls dress with a Distress Crayon, layered her over the wings and adhered a mask over her eyes.  She is popped up over the wings with foam dots.
 I'm linking the card above to:

I colored the shirts of this Paper Dolls (two girls attached) with a Distress Crayon, added a small mask to one and the other is holding the wing of a bat!  The girls and the bat are popped up on foam dots.
 I'm linking the card above to:
Children

For my final card, I die cut a Geo Insect out of orange Kraft Stack paper and the skull out of tan which I sponged with Gathered Twigs Distress Ink.  I adhered masks to the skull and the Paper Doll.  I colored her dress with a Distress Crayon.  She and the skull are popped up on foam dots.
I'm linking the card above to:

Paper:  white, True Black - PTI, DP Abandoned Paper Stash - Tim Holtz/Idea-ology, Kraft Stack Classics - Tim Holtz/Idea-ology.
Ink:  Ranger Distress Gathered Twigs.
Accessories:  Halloween Paper Dolls, Clippings Stickers/Halloween - Tim Holtz/Idea-ology, Masquerade Dies,Mini Skull and Bat Dies, Geo Insects Dies - Tim Holtz/Sizzix, Dangling Spider Die - Poppy Stamps, foam dots, mini sander, Tiny Twinkles, Ranger Distress Crayons.

Thursday, September 5, 2019

A Vintage Journey - Sept Challenge - Box it Up!

I am the hostess for September over at A Vintage Journey and my challenge is:  Box It Up!

This month our theme is boxes! Perhaps you will make a trunk or suitcase, some kind of package to hold a gift, or maybe make a card or journal page showing presents. 

Just remember to ensure that you create in one of our preferred styles of vintage, shabby, mixed media, art journaling, industrial, timeworn or steampunk.

 I'll be posting a full tutorial over at A Vintage Journey on September 20th so I'm just sharing photos of my finished project here today.
I made a Halloween Haunted House Box using Eileen Hull's new House Ornament Die and some pieces from her House Pocket Die (window frames, chimney, roof trim and door!)
Here are the four sides of the house


And close ups of the creepies peeking out of all the windows and front door.


The bottom of the house box opens and inside I put a treat of Chocolate River Rock Candy that I found on Amazon, an appropriate earthy Halloween treat don't you think?!

So we hope you will join in on our A Vintage Journey September Challenge - and Box It Up - can't wait to see how the theme of a box inspires your creativity!

You'll find the challenge here, as well as lots of inspiration from the other Creative Guides!  You have until Oct 3rd to link up your Box It Up projects! 


Paper:  True Black Card stock - Papertrey Ink,  DP Regions Beyond and Materialize Paper Stash - Tim Holtz/Idea-ology
Accessories:  House Ornament Die, House Pocket Die (window frames and door) - Eileen Hull/Sizzix, Mini Bat Die, Mini Cat Die - Movers and Shapers/Tim Holtz/Sizzix, tiny rhinestones, Halloween Twine - Lawn Fawn,  Bronze Age Metallique Wax - Prima, Chocolate River Rock Candy - Amazon, foam tape, Tombow Glue, Occasion Stickers - Tim Holtz/Idea-ology.

Monday, February 25, 2019

A Floral Storage Box for the Craft Room

This month Eileen Hull's Inspiration Team is making hearts and flowers projects using her Sizzix Dies.   
Today I'm sharing an open storage box that will use for craft storage in my craft room.  
I love to have artistic storage on my shelves!  
It makes me happy just looking at it!
I used Eileen's new Treasure Box die but didn't use the hinges or the top of the box that is included with the die.
I have some photos to share showing how I put this all together!

First I cut the pieces I needed out of Little Sizzles Mat Board.  Then I measured the panels and cut pieces of  Tim Holtz Worn Wallpaper to adhere to the sides.
I glued the tabs on the sides with Tombow Glue and let it dry a few minutes being held with clothespins.  Then I adhered the bottom piece to the tabs.
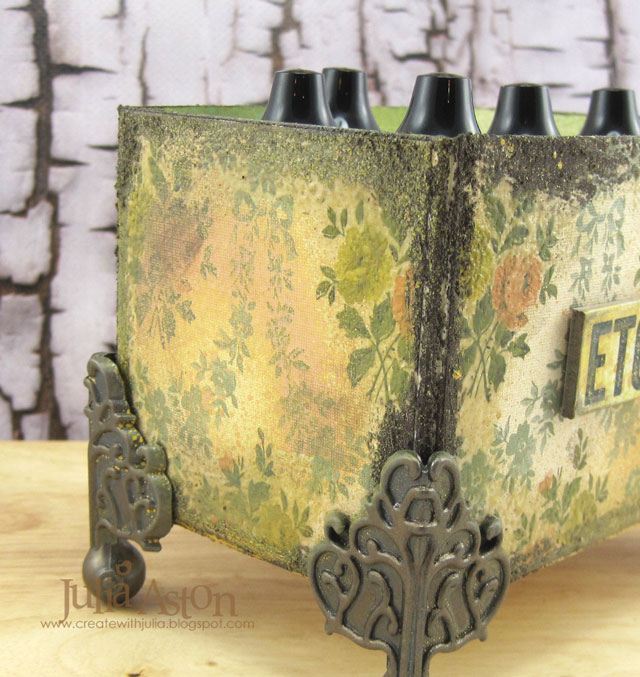
I wanted to age the look of the paper and so rubbed all the edges with Versamark Ink and poured on Vintage Beeswax Baked Texture - shaking off the excess and heating with my heat tool.  I did one side at a time.


Then I rubbed Brown Rust Effect Paste from Prima on all the outside edges with my finger and let it dry overnight.
I added Idea-ology Clawfoot Corners with long brads to the bottom corners piercing the holes with a piercing tool.
I sprayed the inside of the box with both Peeled Paint and Fossilized Amber Distress Oxide Sprays just so it wasn't stark white in there as I knew most of it would be covered with whatever I stored in there!
I also sprayed Fossilized Amber Distress Oxide Spray on all the outside panels
(rather tentatively as I was afraid I'd cover all the flowers!
Sometimes one more thing is too much, right??! )
I also sprayed the Quote Chips then adhered them to the sides with Tombow Glue.
I rubbed Prima Alchemy Bronze Age Metallic Wax over all the feet just to add another tone to the metal and I also rubbed just a little of the wax over the Quote Chip corners and some of the wallpaper.

I was able to fit 10 small bottles of Acrylic Paint inside the box which measures 5" x 3" x 3"  on the inside but I was also thinking it might be a good place to hold word dies?


Please check out Eileen's Blog where all of the Inspiration Team's projects have been posted this month!

Paper:  Little Sizzles Matboard - Sizzix, Worn Wallpaper - Idea-ology/Tim Holtz.
Ink:  Versamark
Accessories:  Treasure Box Die - Eileen Hull/Sizzix, Vintage Beeswax Baked Texture - Emerald Creek, Rust Effect Paste Brown Rust - Prima/Finnabair, Ranger Distress Oxide Spray Peeled Paint and Fossilized Amber, Quote Chips, Foundations Clawfoot Corners, Long Fasteners - Idea-ology, Alchemy Metallic Wax Bronze Age - Prima, Piercing Tool - Sizzix.

Monday, September 17, 2018

Eileen Hull - Sizzix: Basket of Jack O' Lanterns

This month, Eileen Hull's Inspiration Team is making Halloween/Fall projects using her Sizzix dies.  She will be gathering the projects from our individual blogs and posting them every week over at her blog during the month of September.

For my project -  I made a spooky little Halloween Basket full of Goblin Jack O' Lanterns and a stray skull, spider and black crow!!
 For my project I used several of Eileen's Sizzix Dies -  Basket, Spring Leaves, and Thinlits Birds and Butterflies.

I have a few creation photos to show what I used and how I put it together.  I die cut the box out of Little Sizzles Black Matboard.  I die cut the Spring Leaves out of some patterned paper.  I cut each of the leaves twice turning the paper over for the 2nd cuts so I could glue them together so the print showed on each side  I had these little hard foam pumpkins in my stash from JoAnn's.
I glued the papers to all 4 sides of the basket and then assembled it.  I attached the handles with brads, putting the head of the brad on the inside.  I love how this paper actually looks like a woven basket!
Then I adhered the rim of the basket onto the top edge on the front and back.  This covers the brad tails and makes everything look neat and tidy!  I used ScorTape on the rims and Tombow Glue on the papers and sides of the basket.
I die cut the bird out of black fun foam - running it through my die cutting machine a couple of times - it cut right through no problem.  I adhered the wing to the bird, stamped the sentiment on a piece of watercolor paper and glued a wooden coffee stirrer (from Starbucks) to the back of the panel so I could just stick it into the basket.
I drew scary faces on 3 little pumpkins with a black Sharpie pen and glued an Idea-ology Skull to the top of one of them.
I put a handfull of Halloween Basket Shred into the basket.  I adhered a spider to one of the handles.
I added some Small Talk Stickers/Occasions to a leaf and the front side of the basket.
I hope I have given you some Halloween inspiration using these dies and that you will check out Eileen's Blog to see what the rest of the Inspiration Team has up their Fall sleeves this month!


Stamps:  Midnight Feast - Waltzingmouse (retired)
Paper:  Black Little Sizzles Matboard - Sizzix,  Arches Watercolor paper, DP Textstyle Hocus Pocus - PTI.
Ink:  Hero Hues Black
Accessories:  Basket Die, Spring Leaves Die, Sizzlits Birds and Butterflies Dies - Eileen Hull/Sizzix, Halloween Basket Grass, 1" Pumpkins - JoAnn, Small Talk StickersOccasions, Spider Adormment, Skull - Idea-ology, black Sharpie, Tombow Glue, ScorTape, wooden coffee stirrer - Starbucks.