Friday, May 20, 2022

All is Calm - Skiing

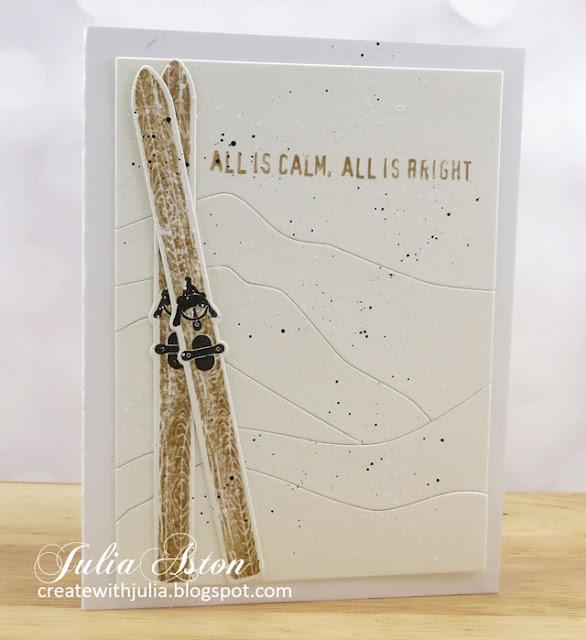
The Jingle Belles challenge just posted and they are looking for Masculine Merry Christmas Cards.

So my card is made up of older style wooden skies (Two Feet Deep from PTI) laid against a watercolor paper die cut mountains background (Abstract Mountains - Essentials by Ellen Hutson).  I splattered the panel with both white and black POSCA Pens.  The sentiment is from Great Outdoors by Tim Holtz/Stampers Anonymous.

I know skiers can be men or women but I've done this card in masculine colors with the brown and black and neutral background.
 
Jingle Belles Challenge - Masculine Merry Christmas


Stamps: Two Feet Deep - PTI, Great Outdoors - Tim Holtz/Stampers Anonmyous.
Paper: Watercolor paper - Canson Cold Press, white card base - PTI
Ink: Rocky Shore, Obsidian - Altenew
Accessories: Two Feet Deep Die Collection - PTI, Abstract Mountains die - Essentials by Ellen Hutson, white and black Posca Pens.

Wednesday, May 18, 2022

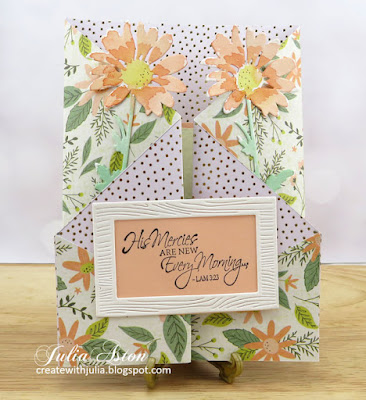
His Mercies are New Every Morning

Every couple of weeks I send cards to two people that have serious medical issues.  I try to keep them upbeat and pretty, something for them to look at and hopefully brighten their day.  This is the most recent card I've mailed to them.

I saw this beautiful card fold on Splitcoaststampers in Karen Ksenzakovic's gallery when she was the featured stamper this past Sunday and she had a link to her blog with a video on how she made it and it's really easy!   
  Here's the link to her blog post and video.
You need a piece of DP that is 12x12 and double sided.  I found a beautiful 12x12 pad at Joann's on sale (!) called Cottonfields by DCWV.  You need a strip 5 1/2" x 12" so you can get two cards from one 12"x12" sheet.

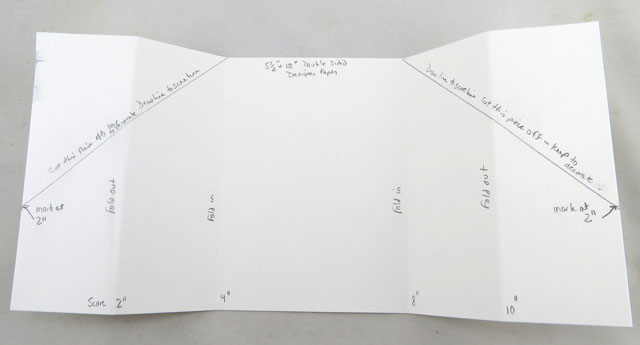
I made a template so I'd remember how to make this fold - here's a photo of it as well as brief instructions.  
Cut a piece 5 1/2" x 12" out of double sided designer paper.  Score along the 12" side at 2", 4", 8" and 10".  Make a mark on the outer edges up 2" from the bottom.  Draw a line from the 2" mark over to the inside scoreline from both sides and cut along the lines - save the cut off triangles to decorate the front flaps as shown above.
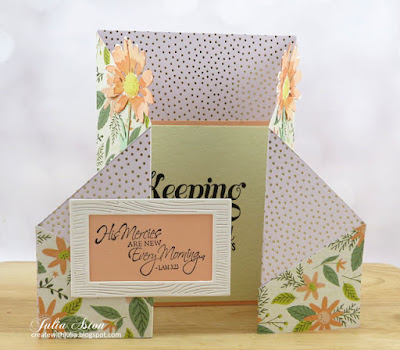
If you create a sentiment for the outside flap as below - remember to only adhere it to the left side so you can open the card!
I cut two daisies out of watercolor paper using Wild Flowers Stems #1 - Tim Holtz/Sizzix,  and glued one to each side panel as shown.
Here's the back of the card.  
My DP was sturdy so I did not have to adhere it to a panel of cardstock as Karen did in her video.

I think this card fold is quite impressive even though it's easy to create!

I'm linking my card to the following challenges:

Addicted to Stamps and More

my occasion is encouragement


I was inspired by the flowers, the colors and my card is Clean and Layered.


Stamps:  Bold and Beautiful Sentiments - Papertrey Ink, His Mercies - Rubbernecker.
Paper:  Iced Kiwi, Frosted Orange - Prismatics, DP Cottonfields 12x12 paper pad - DCWV., water color paper - Canson Cold Press.
Ink:  Obsidian - Altenew
Accessories:  Wild Flower Stems #1 dies - Tim Holtz/Sizzix, Wood Frame dies - Hero Arts, Winsor and Newton Water Color paints, brush, water, Brown 01 Micron Pen.

Monday, May 9, 2022

Rocker with a View

 I purchased these wonderful dies (Sitting Pretty and Sitting Pretty Accessories) from The Greetery when they first came out about a year ago and then filed them away and never got them out to play with - until now.   

This is one of my favorite things to do -  Sit in a rocker on a porch with a view, reading a book or just breathing the fresh air!  I'll have to shoo that kitty off the rocker before I sit though!


Linking my card to:


Paper:  White, True Black, Green Parakeet, New Leaf, Canyon Clay, Pure Poppy, Soft Stone - PTI, Oatmeal Core Stock - Parklane/JoAnn, DP Almwiessen (Alpine Meadows) - Charlie and Paulchen (Germany)
Accessories:  Sitting Pretty and Sitting Pretty Accessories dies - The Greetery, Small Talk Sticker/Occsions - Tim Holtz/Idea-ology 

Thursday, May 5, 2022

Gift Boxes for Mother's Day

 A friend commissioned me to create some Mother's Day gift boxes to put small gifts in for her mother-in-law, and daughters-in-law.  

I have lots of Eileen Hull/Sizzix container dies (having just retired from her wonderful Design Team after 6 years) and so made up a few undecorated containers so she could choose size and shape.  My friend wanted a flower/bee theme on all of them as she was giving at least one of the receivers some honey!  

She said it was ok to use the same general design on all of them - which made it easier for me!

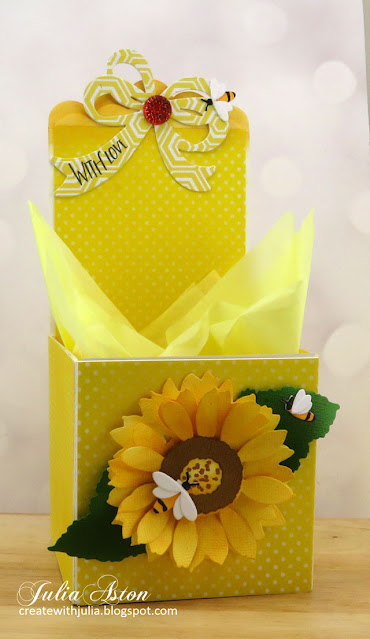
I made a sunflower for each of the projects below using a beautiful die from Honey Bee Stamps called Lovely Layers Sunflower.  I die cut them out of yellow textured paper and then sponged over them with Wild Honey Distress Ink to add depth to the petals.  I cut the leaves out of a textured green cardstock and sponged the center of them with Peeled Paint Distress Ink to highlight the veins.

I made bees for all of the projects using the Fireflies die from the Greetery - cutting them from white cardstock and coloring the bodies with Copics to make them look like bees.

I die cut bows for all of the projects with Put a Bow On It die and stamped the sentiment from Put a Bow On It stamp set - both from the Greetery.

I die cut all of the boxes out of Little Sizzles Matboard from Sizzix.  I added DP to all of the boxes, some of the pieces I cut with the die and some I just cut panels to fit. (I don't like to wrap DP around corners as sometimes it creates a gap - so I cut pieces for each square or rectangle side instead.)

Here are the gift boxes I created.

First up is this sweet little box made using Eileen Hulls Sizzix Bag Caddy Die (retired).  I cut it out of Sizzix Matboard and covered it with a Teal Bumble Bees DP from Michaels.  I added the stamped die cut bow to the top and the sunflower on the front.  I didn't add any leaves to this sunflower since the area was so small and it was fun to see this pretty paper!

I decorated the back of each container the same way with Sentiments Squared Stamps and dies from The Greetery.  The sentiment strip was cut with Simple Strips Die from Taylored Expression.

I used Eileen Hull's Sizzix 3D Teacup Bigz die for my second project.  The die also cuts the tea bag and spoon.  I added twine to the teabag and sponged it with Vintage Photo Distress Ink.  I pressed the spoon onto a Versamark Ink pad and embossed it with Platinum Ultra Thick Embossing Powder.  

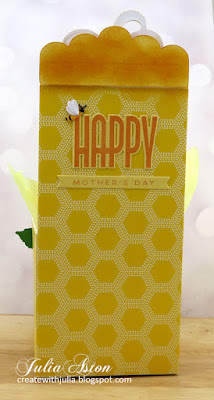
My friend ordered 4 boxes cut from Eileen Hull's Sizzix Gift Box Scalloped Edge Die.   I didn't fold the back piece of the box on the scoreline so it stood up as a tall back and I cut off the tab on the top edge.  I added the two scallop pieces from the die to the top edge (the small scallop adhered over the larger scallop at the score edge).  I made these boxes all the same but used different papers.

This one was made with a yellow background with white dots DP - I sponged randomly over it with Wild Honey Distress Ink to tone down the white dots a bit.

I covered this box with a Hexagon DP from American Crafts.

I made the last two boxes with this fun bee paper from American Crafts.  The paper had a white background with the black bees, and I thought the bees looked a little scary against the white (!) -  so I sponged randomly over the paper with Wild Honey Distress Ink to make the bees look more friendly!?


Design Tip - I wanted to share how I reinforced the bottom side edges of this Scalloped Edge Gift box.  
The Design of the die cut only secures the front and back edges of the bottom of the box when you assemble it and there can be a little gap on the bottom sides depending on how sturdy the  matboard you use is. 
The Little Sizzles I use is very sturdy, but I wasn't sure how heavy the items might be that she was going to put in the boxes, so I die cut 2 more of the larger scallop edge on the die, folded them on the score line and adhered them inside the box on both sides using ScorTape, so the flat edge is adhered to the bottom of the box and the scalloped edge is adhered to the side, holding the sides to the bottom of the box.
(I hope this makes sense to you......)

My friend was very happy with these Mother's Day gift boxes!
 
I'm linking my Tea Cup Box to:


Creatalicious Challenges - Anything Goes - Optional: Mother's Day


Path of Positivity Challenge - Anything Goes - or Something special about a friend.


Stamps:  Put a Bow On It, Sentiments Squared - The Greetery

Ink:  Versafine,  Canyon Clay - PTI, Ranger Distress Wild Honey, Peeled Paint, Vintage Photo

Paper:  White Little Sizzles Matboard - Sizzix, Precision Yellow and Brown Textured Card Stock- Parklane/JoAnn, Green Textured Card Stock - Lawn Fawn, DP:  Core-dinations Yellow Hexagon and Bumble Bee - American Crafts/JoAnn, Teal Bumblebees, Yellow Pin dots - Recollections/Michaels.

Accessories:  Bag Caddy Die, 3D Tea Cup Die, Gift Box Scalloped Edge Die - Eileen Hull/Sizzix, Put a Bow On It Die, Sentiments Squared Die, Firefly Dies - The Greetery, Simple Strips Dies - Taylored Expressions, Lovely Layers Sunflower Die - Honey Bee, Ultra Thick Platinum Embossing Powder - UTEE, brown POSCA Pen (for centers of sunflowers), foam dots, orange gem - from stash, Copics - Y38, 100 (to color bees)

Monday, May 2, 2022

April Card Chain Challenge Reveal Post

 Today's the Reveal Post for the April Card Chain Challenge.  This month I made and sent my card to Hilary in Great Britain and I received a card from Linda in Michigan!

We are given options to choose for our card design each month.   I chose to use the color palette, and two of the themes - Wild and Friendship.


Here's my card

I first die cut the honeycomb corner on a water color paper panel using Mixed Media Thinlits from Tim Holtz/Sizzix.  Then I stenciled over the right side of the panel with one of Tim Holtz/Stampers Anonymous Mini Stencils using a blender brush and Limeade Ink.

I marked my white card base to show where the die cutout part on the panel was and sponged over that area on the card base using a blender brush and Maple Yellow Ink. Then I adhered the die cut panel onto the card base so the yellow showed through the honeycomb.

I made 3 little bees using the Fire Flies Die from The Greetery (coloring them with Copics to look like bees!) and adhered them to the panel with foam dots.  

I stamped the sentiment, a wood mounted stamp from Memory Box, over the stenciled area with Obsidian Ink.

To finish off my design, I added 3 clear sequins for a little sparkle!

If you are interested in making a card and receiving a card any month - please check out The Card Chain Challenge to see how fun and easy it is!  You can just do it one month, or come back and sign up for another!

Also joining in on:


Stamps:  What's the Buzz? - Wood mount stamp/Memory Box
Ink:  Limeade, Maple Yellow, Obsidian - Altenew
Paper:  Water Color Paper - Canson Cold Press, White - Papertrey Ink.
Accessories:  Mixed Media Thinlits Die - Tim Holtz/Sizzix, Fire Flies Die - The Greetery, Mini Stencil - Tim Holtz/Stampers Anonymous, foam dots, orange and black Copics, clear sequins, blender brushes.