Showing posts with label Ink To Paper. Show all posts

Tuesday, November 16, 2021

Warmest Greetings: Coffee, Sweaters and Snowflakes

Joining in with the Coffee Lovers Blog Hop today.
(I've missed a few of them somehow so wanted to be sure to join in this time!)
Here's my card.

I embossed the background with a wonderful 3D Embossing Folder called Sweater by Eileen Hull/Sizzix.  The snowflakes borders were die cut out of holographic silver paper with the Snowflake Edge Die from Ink to Paper.  The pretty coffee pot and mugs were stamped in black on white card and die cut using Coffee Set.  Both stamps and dies from Waltzingmouse (retired).  They are popped up on foam dots over the sentiment from Coffee with a Splash set from Altenew.  I added Glitter Silver Wink of Stella to the centers of the flowers on the pot and mugs.

I'm joining in on the Coffee Lovers Blog Hop


I'm linking my card to the Paper Players.


Stamps:  Coffee Set - Waltzingmouse (retired), Coffee with a Splash - Altenew.
Paper:  White, Weather Vane - PTI, Holographic Silver paper pad - Park Lane.
Ink:  Obsidian - Altenew.
Accessories:  Coffee Set Dies - Waltzingmouse (retired), Snowflake Edge Die - Ink to Paper, Glitter Silver Wink of Stella, foam dots.

Friday, January 1, 2021

December Card Chain Challenge Reveal

 Last month I signed up to participate in the Card Chain Challenge.  You sign up to join in and you are given the name of someone to send a card to using the given monthly challenge.  Participants are from all over the world.  

I sent the card I made to Jutta in Canada.  And I will receive a card from Dee in Kenya! 

Check out this fun monthly challenge here.

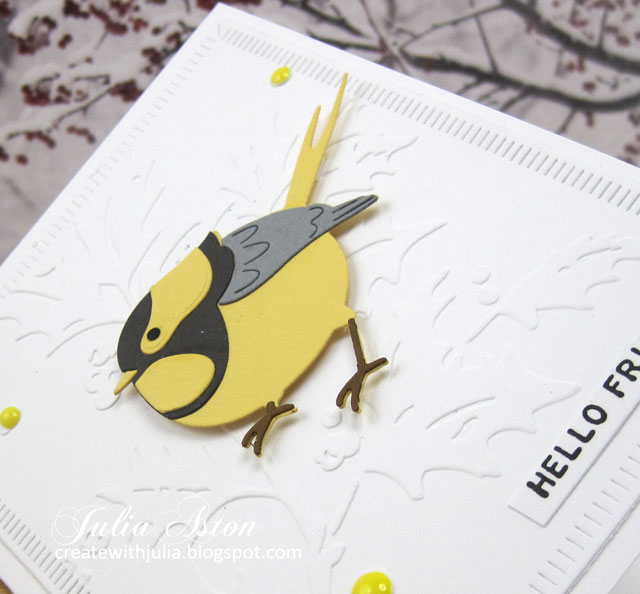
The challenge for December was a tic tac toe board and I chose 3 across - YELLOW - BIRDS -EMBOSS IT.


I embossed the background with a holly embossing folder and die cut it with Crimped Frames from the Greetery.   I die cut the bird from Ink to Paper out of several colors of cardstock and adhered them together.  I layered the bird over the embossed holly panel with foam dots and added some enamel dots.  I stamped the sentiment on a strip of cardstock and adhered it to the corner of the panel.


So if you'd like to make a card, send it out and receive one yourself from around the world - check out The Card Chain Challenge blog and sign up for the next month - there is a cut off date each month to sign up.


Stamps: Tiny Text - Tim Holtz/Stampers Anonymous
Paper: Weather Vane, Harvest Gold, Smokey Shadow, Cocoa Bean - Papertrey Ink
Ink: Obsidian - Altenew
Accessories: Feathered Friends 5 die - Ink to Paper, Crimped Frame die - The Greetery, Holy Embossing Folder - Provo Craft, enamel dots - Altenew, foam dots.

Monday, May 4, 2020

May CAS Stencil Challenge - Layered Stenciling

The May CAS Stencil Card Challenge has just been posted.  Hilary is our hostess this month and she wants us to layer our stencils!
 There are several links to different stencil layering technique videos over on the blog to help inspire you.  I looked at the one by Tim Holtz and used his techniques on my background.
I used 3 stencils on my background two stenciled with Distress Paint and one with Distress Ink. 

First I laid the Typo stencil over a panel of white Bristol Smooth Paper by Strathmore. 
I pounced some Scattered Straw Distress Paint onto my craft mat then rubbed my blending tool with a  foam pad over the ink and pounced it over the stencil.  I wiped off my stencil before the paint could dry. 
(I've had this Distress Paint for years and haven't used it lately. I was happy to find that it was still liquid! You could use any acrylic paint through your stencil - just be sure to clean it right away!)
(my paper looks cream color due to the lighting in my craft room but it is white!)
I dried the panel with my heat tool, then laid the Bubble Layering Stencil over the panel
I used the same process for inking - using Cracked Pistachio Distress Paint and pouncing it over the stencil with my foam applicator. 
 (the paint is not sparkly, that's just the light on my work table reflecting off it on the bottom portion)
I dried my panel with my heat tool and washed off my stencil.  Then I sponged colors onto my panel, first with Ranger Distress Picked Raspberry.
Then Wild Honey and finally Broken China.   
I rubbed over the panel with a paper towel to remove the Distress ink off of the paint stenciled areas. You don't have to do this but it does make the paint stenciling stand out more.
For my final stencil layer, I used this mini leaf stencil with Gathered Twigs Distress Ink.  
I also stenciled on the lower right side of the panel but did not take a photo of that!
I cut my panel in half horizontally and made two cards.   The cat is Mooch from Lavinia Stamps.  The sentiment is from Just Sentiments Birthday by Ink to Paper.  I added some Periwinkle Flower Sequins from Honey Bee Stamps. I layered the stenciled panel to a slightly taller black panel and layered the two over a white card base. 
I really love how this multi layered stenciling came out and will definitely try it again! 
Here's the 2nd card I made from the stenciled panel.
The Stars 2 Mini stamp and Mini Slender Mushrooms stamp below are from Lavinia Stamps and the sentiment is from the same Ink to Paper set as my first card.
So please join us.  What a great new way to use our stencils!  The challenge is open until 5/24/2020.  You will find the challenge, more inspiration from the rest of the Design team as well as our talented Guest Designer Greta here.


Stamps:  Mooch, (cat), Stars 2 Mini Mushrooms - Lavinia Stamps, Just Sentiments - Ink to Paper.
Paper:  White Bristol Smooth - Strathmore; white, True Black - PTI.
Ink:  Obsidian - Altenew, Ranger Distress Picked Raspberry, Wild Honey Gathered Twigs, Broken China.
Accessories:  Bubble Layering Stencil, Typo Stencil, Mini Leaf stencil - Tim Holtz/Stampers Anonymous, Ranger Distress Paint Scattered Straw and Cracked Pistachio, foam and applicator - Ranger.