Showing posts with label Tutorials. Show all posts

Saturday, January 17, 2026

Inkspirational #358 - Shades of Blue

 There's a new challenge up at Inkspirational today - #358 Shades of Blue

I made a 3 1/4" x 4" encouragement card with a Knot Bird made from Yasutomo All Blue Orgami Paper - perfect for this challenge!  
I found a tutorial for making a Knot Bird on YouTube by
Karen Elaine and there are lots of samples by others on Pinterest.

I used Origami paper as it is thinner and easier to make a knot with it.
  
This Origami paper is one sided and the back is white, so the head on one side and the tail on the other side of the knot end up white. I used coordinating Copics to color the white ends.  You trim one end to be the head and you trim the other end to be the tail.

Cut a tiny triangle out of black card for the beak and glue it on - use a black marker to make the eye.
Your bird can be used facing either way as both sides work.

I made my birds with strips 5 7/8" x 3/4".  
My origami paper is 5/78" x 5 7/8" so that's why I made it that length.
I did later buy some Origami paper printed on both sides but haven't used it yet.
Here is the flock of birds I whipped up in a short time -  and some bird affirmation quotes I found by Google-ing.

I smooshed the panels and the card base on my craft mat using Ranger Distress Broken China spritzed with water.  It gives them a white cloud -  blue sky look!
I die cut the quotes with rectangle dies.
I adhered the quote to the card base, adhered the bird on a foam strip, drew her legs with a fine black marker and added 3 blue enamel dots!  

Please join us and show us how Shades of Blue inspired you to create!  Link up your creation over at the Inkspirational Blog where you will also find some lovely inspiration by the rest of the DT!

This challenge ends on Jan 30th!

Also sending my card to:

anything goes ends 1/31

Use Paper with a Pattern  ends 1/25

anything goes  ends 1/30

Always anything Goes  ends 1/29

First time using this Knot Bird pattern and this Origami paper

ends 1/29


Paper:  White, True Black - PTI, Yasutomo All Blue Origami Paper (I found it on Amazon, Blick also has it).
Ink:  Ranger Distress Broken China
Accessories:  Blue Copics to cordinate with the paper colors, computer generated Bird Quotes, Rectangle dies - Nestabilities, Stitched Mat Rectangles - Lil Inker Designs (retired), craft mat, water mister, enamel dots - Altenew, heat tool to dry the smooshed panels.

Saturday, October 28, 2023

Group of Seven Cardmakers - Oct Technique Stencil over Heat Embossing

 It's time for the October Group of Seven Cardmakers technique!  This month we are stenciling over a heat embossed background stamp.  

There is a video on this technique as well as written step by step instructions over at The Group of Seven blog.

Here are two cards I made using this interesting technique followed by a few creation photos for each card.


For the Christmas card - I white embossed a text background stamp Twas the Night Before (it's the whole story of 'The Night Before Christmas"!) from Rubbernecker.
Then I stenciled over the white embossed text using Frosty Flakes Stencil from the Greetery using Ranger Distress Stormy Sky and Salty Ocean
and here is the resulting panel
To finish my card, I die cut the Santa and Sleigh and the Merry Christmas out of blue glitter paper and adhered them over the embossed text.
I used all the same steps for my first card, white embossing the Windowpane Plaid background stamp from The Greetery
and then stenciling over the embossed panel using the Lupines Stencil from ArtPlorations and Distress Inks Mowed Lawn and Seedless Grapes.
And here is the resulting panel
To finish my card, I added a Small Talk Sticker Sentiment, rubbed the edges of the panel with Gold Pigment Ink and splattered over the panel with a Black POSCA pen.


Note:  As with most techniques, you have to experiment with what background stamp works well with what stencil.  Think about how much un-embossed white will be left on your panel when you go to stencil over it. 

We hope you'll give this technique a try!  If you do - please link up your card over at The Group of Seven blog so we can all see it!


I'm linking my Christmas card to:


first time using Frosty Flakes Stencil


Not a Creature was stirring
flying reindeer!


Linking my Stenciled Lupine card to:

Orange or anything goes
ends 11/4


Christmas Card
Stamps:  Twas the Night background stamp - Rubbernecker
Paper:  White - PTI, Bermuda Bling Glitter Paper - Core-dinations (Michaels)
Ink:  Stormy Sky, Salty Ocean - Ranger Distress, Versamark.
Accessories:  white embossing powder, embossing pillow, Dash Away All Dec 2021 Stamptember die - Tim Holtz/Sizzix, Special Merry Christmas Die - Memory Box, Frosty Flakes Stencil - The Greetery, blender brushes, heat tool.

Lupines Card
Stamps: Windowpane Plaid background stamp - The Greetery.
Paper: white - PTI
Ink: Ranger Distress Mowed Lawn and Seedless Preserves, Versamark, Gold Pigment Ink - Color Box
Accessories: Lupines Stencil - ArtPlorations, finger sponges, Small Talk Stickers: Occasions - Tim Holtz/Idea-ology, Black POSCA Pen, white embossing powder, embossing pillow, heat tool.

Sunday, May 28, 2023

Group of Seven Cardmakers - May Technique - Ink Blending on Colored Card

 The May Group of Seven Cardmakers post is up!  This month Loll has chosen the technique for us to play with -  Ink Blending on Colored Card.  You'll find full instructions as well as a link to a YouTube Video over on the blog.

I found that I had to try a lot of different outline images to find ones that worked the best.  I also tried light and dark colors of card stock - and found the lighter colors worked best as we then blend darker ink over the panel and blend around the outside edges with black ink.  If your base card is too dark - the blended ink won't show up.

My first two samples (these are actually my 3rd and 4th try with the technique!) are the same image, embossed in gold on Hawaiian Shores cardstock (a light tealy/blue).  I sponged over the panel with a darker blue, starting from the outside edges up to, but not over, the embossing.  Then I sponged just over the edges of the panel with black ink.  I splattered white with a POSCA pen, embossed the sentiment in white on a black strip and adhered it over the card with foam dots.  You also can splatter with water but I didn't do that on any of my cards today.

Here's the exact same embossed stamping on the exact same Hawaiian Shores card panel and sponged with the same inks as above.  This time I sponged more over the embossed flowers (not on purpose!) so there's just a small bit of light in the center.  I sponged around the edge with black, splattered white with a POSCA pen, and this time, gold embossed the sentiment on a black strip.

This card below was the first card I tried with the technique - the base is a a light yellow, but as you can see, I sponged entirely too much Russet Orange over the gold embossed image so there is hardly any noticeable lightness in the center!  I sponged black around the edges, splattered with a white POSCA pen, layered it over a metallic gold panel and layered that over a Hammered white panel with foam dots.

This was my second attempt at the technique.  I started with a light pink panel, embossed the image in gold, and then sponged with a darker pink inside the rose by mistake (!) and also around the edges, totally forgetting the black!  I splattered this one with Metallic Gold water color paint. 


So - you don't have to follow the instructions exactly if you don't want to! 
The point is to experiment with the technique!

You'll find full instructions, inspiration from the rest of the team and a link to the video over at The Group Of Seven Cardmakers blog here.  

We invite you to try this fun technique for yourselves and you can link your card over at the blog just so everyone can come and see them!

I'm linking my sympathy card to:
Inspired by Nature

Linking my Birthday card to:

Keep it Simple
easy to make - emboss image, sponge, layer to panels

Anything stamped - In the Garden option
Gold embossed stamped flower


Sympathy Cards
Stamps:  Layered Poppy Stamp - Rubbernecker, sentiment from Beyond Basic Borders - PTI (retired).
Paper:  Hawaiian Shores, True Black - PTI
Ink:  Blue Lagoon Elements - Lavinia, Nocturne Versafine Clair, Versamark
Accessories:  White POSCA Pen, foam dots, Gold Embossing Powder, heat tool, sponges.

Sunflower Birthday
Stamps: Botanical Blocks, Birthday Basics - PTI 
Paper:  Harvest Gold - PTI, Kraft Stock Gold - Tim Holtz/Idea-ology, Hammered White card - Amazon.
Ink:  Russet Orange - Elements Lavinia, Versafine Clair Nocturne, Versamark.
Accessories:  Gold Embossing Powder, Heat Tool, foam strips, white POSCA Pen, sponges.

Rose Birthday
Stamps:  Botanical Blocks, Birthday Basics - PTI
Paper:  Pale Peony - PTI, Kraft Stock Gold - Tim Holtz/Idea-ology, Hammered white card - Amazon.
Ink:  Picked Raspberry - Ranger Distress, Versamark, Versafine Clair Nocturne.
Accessories:  Gold Embossing Powder, Heat Tool, foam strips, Metallic Gold Watercolor paint for splatter, sponges.

Friday, April 28, 2023

Group of Seven - April Technique - AI's on Round Gel Plate

 It's time for the April Group of Seven Cardmakers Technique Post.   Christine suggested we try Alcohol Inks on a Gel Plate.  A supply list and instructions are all listed over at the blog.

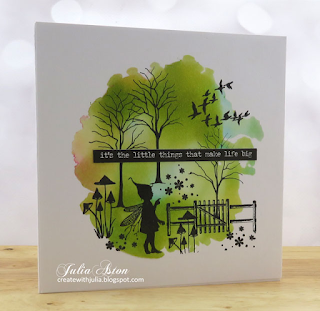
Here are some cards I created using this technique for the backgrounds!


Below are a few photos of how I made a gel print.

Drop some 91% rubbing alcohol onto the 4" Round Gel Press Plate.  Then drop your chosen ink colors onto the Gel Plate.  I used Pink Sherbet, Citrus and Lemonade AI's on this one.
Blow the inks around the Gel Plate.
Place a panel of white card over the plate and press over the panel.  Here you can see some ink seeping through the card - which is normal.
Pull the panel off the Gel Plate and you have your print!  
Every time you do it, it will look different!
Two prints using Citrus, Glacier and Raisin AI's.
Two prints - Top one using Sunshine Yellow and Pink Sherbert , bottom adding Citrus, to Sunshine Yellow and Pink Sherbert.AI's.
Two prints using Citrus, Aqua and Dijon AI's
Once you start making prints - it's hard to stop!


I'm linking this card to:
Option: real birds

Linking this card to:
Things that Fly
And
First time using the numbers and dragonfly stamps


Linking this card to:
Anything Goes


You'll find more lovely samples from the rest of the Seven over at the blog as well as a Mr. Linky for you to link up your cards using this technique.  We look forward to see what you create as well!


It's the Little Things
Stamps:  Rory and Dory, Small Trees, Ducks in Flight, Mini Flowers, Mini Slender Mushrooms, Gate and Fence - Lavinia.
Paper - White - Papertrey Ink
Ink:  Alcohol Inks - Aqua, Citrus, Lemonade and a little bit of Fiesta (that was on the plate from a prior pull), Nocturne Versafine Clair.
Accessories:  4" round Gel Press Plate, air bulb - Ranger, 91% Rubbing Alcohol, Clear Glitter Wink of Stella, Small Talk Stickers - Tim Holtz/Idea-ology

Make a Wish Upon Your Birthday Star
Stamps:  Star Gazer Additions - Papertrey Ink (retired).
Paper:  White - Papertrey Ink
Ink:  Alcohol Inks - Citrus, Glacier, Raisin, Nocturne Versafine Clair, Ranger Distress Broken China.
Accessories:   4" round Gel Press Plate, air bulb - Ranger, 91% Rubbing Alcohol, Clear Glitter Wink of Stella, Milky Way Stencil - Colorful Life Design, Silver Star Confetti - Honey Bee, blender brush.

It's Time to Celebrate
Stamps:  Dragonfly and Hare - Carabelle Studio,  Sentiment Suite: Birthday - The Greetery.
Paper:  White - Papertrey Ink.
Ink:Alcohol Inks - Citrus, Sunshine Yellow, Pink Sherbet, Wendy Vecchi/Ranger Die Ink Fern Green, Nocturne Versarine Clair.
Accessories: 4" round Gel Press Plate, air bulb - Ranger, 91% Rubbing Alcohol, Clear Glitter Wink of Stella, Tuxedo Hearts - Honey Bee.