Monday, February 25, 2019

A Floral Storage Box for the Craft Room

This month Eileen Hull's Inspiration Team is making hearts and flowers projects using her Sizzix Dies.   
Today I'm sharing an open storage box that will use for craft storage in my craft room.  
I love to have artistic storage on my shelves!  
It makes me happy just looking at it!
I used Eileen's new Treasure Box die but didn't use the hinges or the top of the box that is included with the die.
I have some photos to share showing how I put this all together!

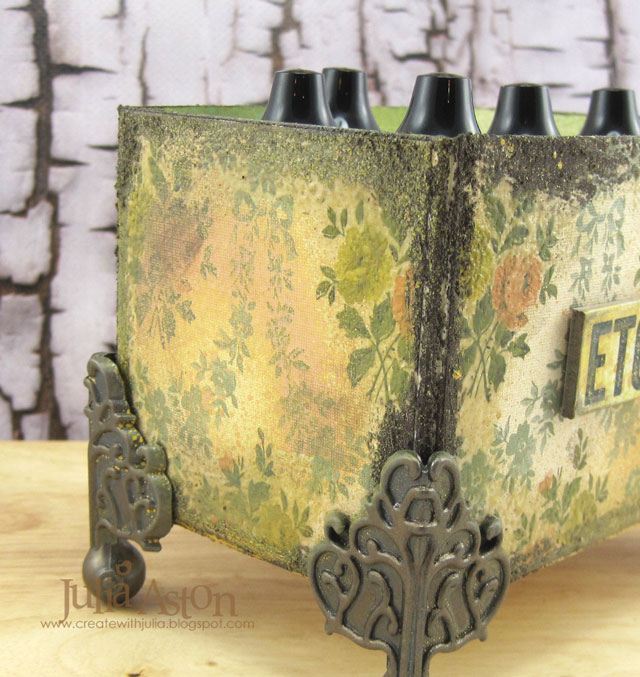
First I cut the pieces I needed out of Little Sizzles Mat Board.  Then I measured the panels and cut pieces of  Tim Holtz Worn Wallpaper to adhere to the sides.
I glued the tabs on the sides with Tombow Glue and let it dry a few minutes being held with clothespins.  Then I adhered the bottom piece to the tabs.
I wanted to age the look of the paper and so rubbed all the edges with Versamark Ink and poured on Vintage Beeswax Baked Texture - shaking off the excess and heating with my heat tool.  I did one side at a time.


Then I rubbed Brown Rust Effect Paste from Prima on all the outside edges with my finger and let it dry overnight.
I added Idea-ology Clawfoot Corners with long brads to the bottom corners piercing the holes with a piercing tool.
I sprayed the inside of the box with both Peeled Paint and Fossilized Amber Distress Oxide Sprays just so it wasn't stark white in there as I knew most of it would be covered with whatever I stored in there!
I also sprayed Fossilized Amber Distress Oxide Spray on all the outside panels
(rather tentatively as I was afraid I'd cover all the flowers!
Sometimes one more thing is too much, right??! )
I also sprayed the Quote Chips then adhered them to the sides with Tombow Glue.
I rubbed Prima Alchemy Bronze Age Metallic Wax over all the feet just to add another tone to the metal and I also rubbed just a little of the wax over the Quote Chip corners and some of the wallpaper.

I was able to fit 10 small bottles of Acrylic Paint inside the box which measures 5" x 3" x 3"  on the inside but I was also thinking it might be a good place to hold word dies?


Please check out Eileen's Blog where all of the Inspiration Team's projects have been posted this month!

Paper:  Little Sizzles Matboard - Sizzix, Worn Wallpaper - Idea-ology/Tim Holtz.
Ink:  Versamark
Accessories:  Treasure Box Die - Eileen Hull/Sizzix, Vintage Beeswax Baked Texture - Emerald Creek, Rust Effect Paste Brown Rust - Prima/Finnabair, Ranger Distress Oxide Spray Peeled Paint and Fossilized Amber, Quote Chips, Foundations Clawfoot Corners, Long Fasteners - Idea-ology, Alchemy Metallic Wax Bronze Age - Prima, Piercing Tool - Sizzix.

Monday, February 18, 2019

Mid Month Reminder - Feb CAS Stencil Challenge - Powdered Inks

I'm here today to remind you about the Feb CAS Stencil Challenge - you still have time to enter - the link is open until Feb 24th!
For my card today - I again used Brushos (Lemon) which I sprinkled over my stencil and then spritzed with water.  You'll find links to technique videos over at CAS Stencil if you need some inspiration.

The stencil is Bold Florals from ARTplorations, the sentiment is from Perfect Match by PTI, the hearts were cut with Mix and Mat Hearts Die from PTI.
I cut the stenciled panel in two and made two similar cards. 
The Lemon Brushos has a little bit of red/orange in it so I could use red for the framing and sentiment strip for Valentine's day!

After I did the stenciling -  I turned my wet-with-Brushos stencil over and pressed it onto another panel of watercolor paper, covered it with a piece of computer paper and rubbed over it.  This gave me a negative print of the stencil, shown on the bottom of the photo below.
I used that negative print to make a sympathy card - I used the whole panel since it had a lot of white on it - I feel that it is still CAS. 
 (I think I like the look of the negative stenciling better than the stenciling?!)
So please join us and show us how you use powdered inks with your stencils!  You'll find the challenge info as well as creative inspiration from the Design Team over at the CAS Stencil blog here.

I'm also linking my card to:
I used water and Brushos through and on my stencil for positive and negative prints


I used a new stencil


Stamps:  Perfect Match - PTI, Words of Comfort - PTI
Paper:  Watercolor paper - Canson, white, Pure Poppy, Summer Sunrise  - PTI
Ink:  True Black - PTI
Accessories:  Lemon Brushos, water mister, Bold Florals Stencil - STAMPlorations, Mix & Mat Confetti Die - PTI, foam dots.

Tuesday, February 12, 2019

Three for Luck!

So I need to make some St. Patrick's Day cards for a sale at my church next month -  people mostly buy the chocolate shamrock pops my friend Jeannine makes but some also want to buy cards.

I looked to the challenges out in blog land for inspiration for my designs and, of course I found some!

My first card design was inspired by the February CAS Mix Up Card Challenge.
 The Love Notes die from Reverse Confetti has score lines on it so the edges can be folded up to make the die dimensional - sort of little tray!  I die cut it out of Translucent Alcohol Ink Yupo.  I colored it by pouncing one the new Alcohol Pearl Inks called Sublime onto it.  I stamped the sentiment from Irish Blessings (retired from Waltzingmouse) on a white strip and added a die cut Memory Box clover - both up on foam dots.

My second card was inspired by the Sunday Stamp Challenge.
 I die cut a scallop heart Nestability and layered a die cut clover over it.  I put a strip of washi tape behind it.  I used the Pierced Feature Frame Rectangle die from PTI for the background and framing. The sentiment is another one from Irish Blessings. 
My third card was inspired by the Country View Challenges: Black and White Plus One color.

So this is very similar to my first card above but I stamped the circles on the white card die cut and added a piece of washi tape behind it.   The sentiment is from Irish Blessings and the dots are from Off Beat Backgrounds - both retired from Waltzingmouse.

So now I have 3 St. Patrick's Day cards for my church sale! 

Hinges of Friendship
Stamps:  Irish Blessings - Waltzingmouse (no longer in business)
Paper: White, Pine Feather - PTI, Translucent Yupo - Ranger
Ink:  True Black - PTI
Accessories:  Ranger Alcohol Pearl Ink Sublime, Lucky Leaves Die - Memory Box, Love Notes Die - Reverse Confetti, foam dots.

Slainte
Stamps:  Irish Blessings - Waltzingmouse (no longer in business)
Paper:  White, Simply Chartreuse, Pine Feather - PTI
Ink: True Black - PTI
Accessories: Scalloped Heart Nestability, Lucky Leaves Die - Memory Box, Pierced Feature Frames: Rectangles - PTI, washi tape, foam dots.

May the Road Rise
Stamps:  Irish Blessings - Waltzingmouse (no longer in business)
Paper:  White, New Leaf, True Black- PTI
Ink: True Black - PTI, Ranger Distress Mowed Lawn.
Accessories: Lucky Leaves Die - Memory Box, Love Notes Die - Reverse Confetti, washi tape, foam dots.

Monday, February 11, 2019

Stars for Two

Today I'm participating in Darnell's Twofer Challenge.
I used the same Seeing Stars Die from Neat and Tangled for my stars but I used the negative piece for one and the positive piece for the other.   That is the only thing that is the same on my cards.
I sponged the watercolor paper panel, that I cut the stars out of, with Ranger Distress Wilted Violet, Blueprint Sketch, Broken China and Black Soot.
I stamped tiny stars and cluster stampings around the cut out stars and layered the panel over a piece of Kraft Stack Metallic Silver.   I embossed the sentiment on black using Silver Embossing powder, layered it to a slightly larger metallic silver panel and popped it up on foam dots.
For my Twofer, I cut apart the positive stars from the die cut so I could place them around my sentiment from Impression Obsession.  I layered the stars onto a piece of Bitty Big Lilac Grace patterned paper and added some white and clear sequins.  I stamped a sympathy sentiment on the inside.


We're expecting snow Tuesday night - so glad I'm retired now and don't have to try and get out to work!   But then on Wednesday afternoon it's supposed to get into the 40's and everything will melt.  Crazy weather here in New England this winter!
Birthday Stars
Stamps:  Star Gazer - PTI
Paper:  White, True Black - PTI, Kraft Metallic Silver - Idea-ology/Tim Holtz, Water color paper - Canson.
Ink:  Ranger Distress Wilted Violet, Blueprint Sketch, Broken China, Black Soot; Versamark, True Black - PTI.
Accessories:  Seeing Stars die - Neat and Tangled, silver embossing powder, heat tool.

Gentle Thoughts 
Stamps: With Gentle Thoughts - Impression Obsession.
Paper:  White, Winter Wisteria, DP Bitty Big Lilac Grace - PTI, watercolor paper - Canson
Ink:  Ranger Distress Wilted Violet, Blueprint Sketch, Broken China, Black Soot; Versamark, Hero Hues Black.  
Accessories:  Seeing Stars Die - Neat and Tangled, Winter Blend Sequins - Avery Elle, Tombow Glue.

Sunday, February 10, 2019

A Magical Unicorn Birthday

I always see things (dies, stamps, inks) that I want.   And then I purchase them.  They arrive, I put them in a drawer for another day - and often forget to get them out and use them.

Case in point -  the wonderful Lawn Fawn Reveal Wheel dies and stamps and the Neat & Tangled Magical Day stamps and dies which I purchased months ago thinking I'd use them to make a card for my unicorn-loving youngest grand niece.
So yesterday was the day I got them out -  inspired by two challenges.

And here is the fun card I made for Madelyn -  who will be 5 in April 
(shhh - don't tell her about the card!)

I personalized the top of her card using my Brother Label Maker.   
And the birthday sentiment stamp really says "wishing you a wonderful birthday", but I only inked the Wishing You A and the Birthday and then stamped the MAGICAL in the space that happened to be just big enough!

I took 4 pictures to show you the 4 words from the sentiment set that I stamped on the wheel so you see each one as you turn the wheel.    FABULOUS  AMAZING  AWESOME  MAGICAL
I colored the unicorn using Tombow Markers pushing the color around the area with a Clear Glitter Wink of Stella -  below you can hopefully see the wonderful glittery shine!  
Jennifer McGuire has a YouTube Video on this coloring technique here.

My inspiration from the Splitcoaststampers Inspiration Challenge was this unicorn from the web store Accessorize

Make an interactive card.

Stamps:  Reveal Wheel Sentiments - Lawn Fawn, Neat & Tangled Magical Day.
Paper:  white, Hibiscus Burst, DP Bitty Big Pale Peony - PTI, Strathmore Bristol Smooth Surface.
Ink:  Hero Hues Black
Accessories: Reveal Wheel Die Set - Lawn Fawn, Magical Day Dies - Neat & Tangle, foam dots, Brother Label Maker, Tombow Markers, Clear Glitter Wink of Stella, tiny brad.  

Saturday, February 9, 2019

A Love Pillow

Today I'm joining in with the Card Concept Challenge - they have the perfect image for Valentine inspiration!
I'd say my card design is Clean Layered.
I was inspired by the red love pillow, the stripes in the tan pillow and texture  in the sofa.
I used a red rubber stamp (unknown) for the LOVE, embossing it in white on a red panel.  I added a white die cut heart to the center of the O (in my bits bin left over from a die cut).
I die cut a square out of Soft Stone striped paper and layered it over the red panel with lots of foam dots.  
I embossed a piece of Rustic Cream cardstock with a chevron embossing folder, die cut it with a Wonky Rectangle Nestability (sort of like the pillow shape,  and texture on the sofa), trimmed the outside edges  to fit over my card and layered it on with more foam dots.
This could be a Valentine or an Anniversary card depending on what I stamp inside!

I'm also linking my card to:


Stamps:  Love red rubber stamp - unknown
Paper:  White, Pure Poppy, Rustic Cream, DP Bitty Big Softstone - PTI
Ink:  Versamark
Accessories:  Wow Bright White Embossing Powder, heat tool, Stitched Mats Squares die - Lil Inker Designs, Wonkey Rectangles - Nestabilities/Spellbinders, foam dots, Chevron Embossing Folder - Provocraft.

Friday, February 8, 2019

Hello Circles!

Today I'm playing along with the Freshly Made Sketch Challenge.
I started my card by sponging 3 colors of Distress Ink over a panel of watercolor paper - Salty Ocean, Spiced Marmalade and Candied Apple. Then I laid a handmade circles stencil over the panel and wiped over the circles with a slightly damp baby wipe to remove the ink. Sort of like the look of Bokeh?! 
I white embossed the hello sentiment on a black strip and layered it over the panel with foam dots.. 
While I had out all the supplies for this card, I decided to make another one using the same colors but this time using a Retro Circles Stencil from ARTplorations.  
I sponged over the stencil this time - using Hickory Smoke Distress Ink.  I white embossed the sentiment on a black strip and popped it up on foam dots.
I like how the Spiced Marmalade Distress ink blended with both the blue and red inks to create some green and yellow shades in the middle!  I hope these are considered a clean enough design for the challenge even though they are covered with color.
Stamps:  Ways to Say: Hello Mini Stamp Set, Sentiment Staples: Birthday Mini Stamp Set - PTI
Paper:  White, True Black - PTI, Watercolor paper - Canson.
Ink:  Versamark, Ranger Distress Candied Apple, Spiced Marmalade, Salty Ocean, Hickory Smoke.
Accessories:  Wow Bright White Embossing Powder, form dots,  Retro Circles Stencil - ARTplorations, baby wipe, handmade circles stencil (acetate and circle punch).