Sunday, November 30, 2014

Waltzingmouse Dec Release - Preview Day #2

Welcome friends to Day 2 of the Dec Waltzingmouse Release Previews!  Today the Design Team is using a fun set Claire has designed called Vintage Post Cards.  I was inspired by the set to become Santa's helper and make some little post cards to send to my Grand Nephews and Nieces on Santa's behalf!
The Santa postage stamp in the corner and the post card design are stamps from Vintage Post Cards.  The sentiment stamps (in red and green) are from an older WMS set called Santa's Coming To Town.  I die cut the little postcards using the Gift Card It die - that just happen to fit this post card stamp perfectly!! (there are larger stamps in the Post Card set too) These little cards measure 3 3/8" x 2 1/8".
I stamped the ornament stamp from Santa's Coming to Town on the back of the postcard and then sponged all the edges with Vintage Photo Distress Ink.
Then I die cut envelopes using the Gift Card It Envelope die - stamping with more stamps from Santa's Coming Town (the Santa heads in this set match the Santa Head on the postage stamp in the Vintage Post Cards set -  Claire is SO clever coordinating her sets!)  I sponged all these edges too -  and slipped the post cards inside!  I think the kiddies will be excited and surprised to get these little postcards from Santa in the mail!
I'm entering my little Santa cards in the Addicted to Stamps and More Challenge - Holiday

and the Try It on Tuesday Challenge - Christmas is Coming

I'll be back tomorrow at 2 pm with Day 3 of the Previews - hope you can stop by then!
Here are the links to the rest of the Design Team - where you will find lots more inspiration for this Vintage Post Card set! 
You'll find all of the DT projects in one place at the WMS Team Talk Blog here.
Stamps:  Vintage Post Cards (available 12/2) and Santa's Coming to Town - Waltzingmouse
Paper:  Rustic Cream - PTI
Ink:  Soft Suede - SU, Fired Brick and Vintage Photo - Ranger Distress, New Leaf - PTI
Accessories:  Gift Card It Die and Gift Card It Envelope Die - Waltzingmouse, Scotch Quick Dry Adhesive.

Saturday, November 29, 2014

Waltzingmouse - Dec Release Preview Day #1

Welcome to Day 1 of the Waltzingmouse December Release Previews!  Today the Design Team has made projects using a beautiful floral set being released on Dec 2nd - called Old Country Roses.  Each bloom and leaf in the set includes 3 stamps so you choose 3 colors for each bloom and each leaf - which adds a wonderful depth to the stampings.
For my card today -  I stamped 3 sets of leaves, cut them out, and adhered them to the panel with foam tape.  I stamped the blossom stamp, cut it out and layered it over the leaves with foam tape.   I stamped the sentiment from the set in the bottom corner in black ink and added three Winter Blend Sequins.  Don't you just love the look of the 3 colors on each stamping??!!
Here's a close up - showing the beautiful detail of the blooms. I used Cameo Coral, Calypso Coral and Soft Suede on my blooms and on the leaves I used Handsome Hunter, Kiwi Kiss and Certainly Celery.  To figure out what 3 colors looked well together for the stampings - I first tried them out on a piece of scrap paper.  It took me a couple of tries to get the look I wanted.
Below are links to the rest of the Design Team where you will find more inspiration using this lovely new set - Old Country Roses.

I'm entering this card in the Seize the Birthday Challenge - Toppings/Leaves.

I'll be back tomorrow with Day 2 of the Previews- hope you'll stop by then!
Stamps:  Old Country Rose - Waltzingmouse (to be released on 12/2)
Paper:  White, Simply Chartreuse - PTI
Ink:  Cameo Coral, Calypso Coral, Soft Suede, Handsome Hunter, Kiwi Kiss, Certainly Celery - SU, Memento Tuxedo Black.
Accessories:  Winter Blend Sequins - Avery Elle, Glue N Seal - Ranger, Foam dots.

Thursday, November 27, 2014

A Vintage Journey #20 - Birds of a Feather

First off - may I wish everyone in the USA a most blessed Thanksgiving!  We were the hosts for dinner this year with my sister and her husband, and one of her daughters (my niece) with her husband and their two sweet kids, Landon and Mila.  My other niece and family are in northern Maine with her husband's family - and my son and his lady are celebrating with some friends.

And now - may I welcome you to this fortnight's A Vintage Journey Challenge -  two weeks really fly by don't they?  And speaking of flying - here is the challenge that Creative Guide Chris has for us this week!
#20 Chris - Birds of a feather Now you've seen our line up it's time for YOU to get busy. Get out your inks, paints, chalks, Gelatos etc and grab your bird dies, stencils, masks, stamps, whatever avian stash you have and conjure up something that sings of our feathered friends. Whatever you create, we want to see Tim's influence clearly identified. Let's see your magic!  >:o)

While cleaning my craft room recently I not only found the instructions for the fabric basket I made for the last AVJ challenge seen here -   I also found a kit I had purchased a few years ago for needle felting a little owl.  I thought it was going to be difficult to make - so put it away (and lost it until recently!)  Come to find out - it was easy peasy to make and only took me about 10 minutes! HOW CUTE is this little guy???!!!
I made a pretty little woods hollow for him to live in.
Here's how it started and the steps I took to finish it.  I had purchased Tim's 5.5" x 5.5" Configurations Box on sale a Joann's quite some time ago.
I removed all the inside boxes and used just the cover and bottom of the box.
I sprayed the bottom of the box with Antiqued Bronze Spray Stain (design note - I first used the Tea Dye spray stain - but it ran right off whatever coating is on this box -  the Bronze Spray Stain must be made a little differently because it adhered to the surface).  I brushed a coat of Gesso on the top of the box.
I wanted to try out the Art Anthology Stone Effects/Sandstone paint I purchased a while ago.  I brushed it on with a stiff brush wanting to get a nice texture on the cover.  This paint really feels like rough sand when it's dry!
I lined the bottom of the box with a piece of Wallflower paper that I had sponged with Vintage Photo Distress Ink.
I embossed  Letterpress letters with Wendy Vecchi Archival Tree Branch ink and embossing powder. Then I stamped over the embossing with Wendy's Spatter Background stamp using Wendy's Archival Potting Soil ink.  Wendy showed this technique on her blog.
I wanted to get another tone on the cover and so I dabbed some Tarnished Brass Distress Paint randomly.  It has a little bit of a green tint which I liked for the woodsy look I was trying for.
I sponged over the cover with Ranger Distress Vintage Photo Ink and the sand paint practically tore apart the sponge applicator!.... so I brushed Matte Glue N Seal over the whole cover to try and seal it a bit. When it had dried - I found that it did make it feel much smoother - still rough but not sharp!
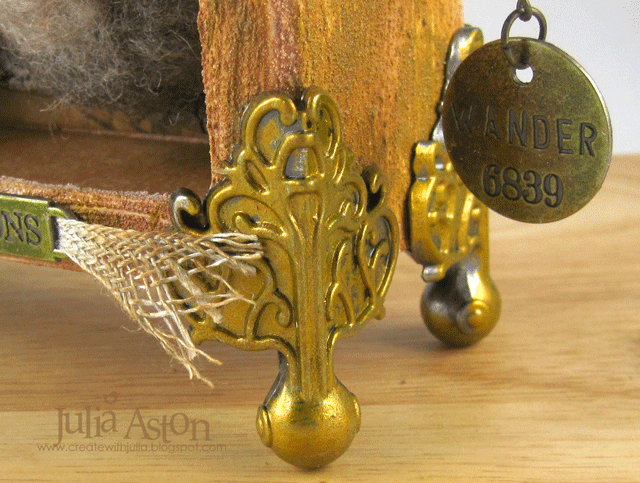
When I showed this to Kent - he thought it was a wooden frame I had painted so I guess I got the look I wanted!  I embossed the Clock Key with the Tree Branch embossing powder.  I inked the Philosophy tag (that says "Wander") with Archival Orange Blossom Ink and the Word Band (that says Observations) with Archival Fern Green ink.  I hit them with my heat tool for a minute to dry them. I wove a piece of Linen Ribbon through the Word Band. I used a Swivel clasp to connect the key with the tag.
I used a branch from my backyard for the little owl to sit on - gluing all the pieces in the box  with Glue N Seal.  I had inked the Compass Coin and Game Spinner with Archival Orange Blossom Ink.
I sponged some Mirrored Stars with Archival Orange Blossom Ink and dabbed the Foundation Box Feet with Tarnished Brass Distress Paint.  I didn't try to thoroughly cover the feet - leaving some bare spots.
I wanted to add some things to the outside frame of the cover without getting too cluttered.  I stamped the feather from Tim's Bird Feather stamp set by coloring the stamp with Walnut Stain and Brushed Corduroy Ranger Distress Markers - spritzing the stamp with a little bit of water and stamping it on rustic white card stock.  I cut it out and adhered it to cover edge.
I used Tim's Butterfly Frenzie die with some Wallflower paper to create a flutter of butterflies in muted tones.  Just enough to fill the space and complement, but not detract from, the scene inside the box.
Here you can see the wood look of the paints
I just glued the legs to the box with Glue N Seal. 
You can see here where I placed the inked Mirrored Stars. 
I placed one butterfly inside the box - fluttering on the branch.
I screwed the Clock Key into the side and the Curio Knob into the top of the cover before placing it over the box - as the legs curve around the back and the cover can't be removed after the legs are attached.
I love the little wood hollow I created for my sweet little owl - I think it's the perfect home for him where he can be happy sitting on his tree top branch and I can be happy just looking at him!
What will you create to illustrate "Birds of a Feather??  I can't wait to see what you link up!

Our challenge sponsor is Country View Crafts.  They are offering one winner, chosen by the Creative Guides, a £10 voucher to spend in their on-line shop.  

 I hope you will be inspired to play along with us -  you have 2 weeks - you will find all the details at the A Vintage Journey Blog - along with some wonderful "Birds of a Feather" inspiration by several of my very talented fellow Creative Guides!

Stamps:  Splatter Background Stamp - Wency Vecchi/Stampers Anonymous, Bird Feather - Tim Holtz/Stampers Anonymous
Paper:  Rustic White - PTI, Paper Stash/Wallflower - Tim Holtz.
Ink:  Ranger Distress Vintage Photo, Archival Wendy Vecchi Tree Branch, Potting Soil, Orange Blossom and Fern Green.
Accessories:  Idea-ology - Word Bands, Compass Coins, Mirrored Stars, Letterpress, Game Spinners, Philosophy Tags, Clock Keys, Swivel Clasps, Linen Ribbon, Curio Knobs, Foundations; Butterfly Frenzie Die - Alterations, Glue N Seal - Ranger,  Mini Mister - Ranger, Ranger Distress Markers Walnut Stain and Brushed Corduroy, Tree Branch Embossing Powder - Wendy Vecchi, heat tool, White Gesso, Antiqued Bronze Spray Stain - Ranger, Art Anthology Stone Effects/Sandstone, Tarnished Brass Distress Paint - Ranger, Needle Felted Owl Kit from Fancy Tiger Crafts.com., branch from backyard.

Tuesday, November 25, 2014

A Jar of Christmas Cheer

Once again - life has gotten in the way of my stamping for fun time!   but today I was inspired by a few Christmas challenges out there and snuck away to my craft room to play as I knew (in my head!)  just what I wanted to create!
I filled an apothecary jar with glittery ornaments in red, white and green.
I die cut the jar out of Art Parts Clearly for Art Modeling film, brushing the edges with Picket Fence Distress Paint to give it a little definition.  I adhered the jar to the patterned paper from Merriment/Tim Holtz by gluing just the cork to the paper - as adhesives seem to always show up on clear materials!  Some of the ornaments are up of foam dots.  They are punched from glitter card stock from Michaels.
I painted the cork stopper with Brushed Pewter and Picket Fence Distress paints drying each layer with my heat tool to make it bubble a bit.  I made the enamel dots by melting Perler Beads and scattered them throughout the jar.
I stamped Christmas Greetings from Tim Holtz Mini Holidays 5 set in the top corner and added two ornaments outside the jar.

I was inspired to make this card by these fun challenges:
The Mixed Media Monthly Challenge - to use stamps in your project.

Try it on Tuesday:  Christmas is coming

Fusion - Sparkly Christmas
Stamps:  Mini Holidays 5 - Tim Holtz/Stampers Anonymous
Paper:  White, Smokey Shadow - PTI, Glitter card stock - Michaels, DP - Merriment/Tim Holtz Idea-ology, Cork, Art Parts Clearly for Art Modeling Film - Wendy Vecchi/Stampers Anonymous
Ink:  Archival Jet Black
Accessories:  Ranger Distress Paint Picket Fence and Brushed Pewter, circle punches 1 1/4", 1", 3/4" - EK Success, Glue N Seal - Ranger, home made enamel dots from Perler Beads

Thursday, November 20, 2014

Fusion Challenge Nov 20

Welcome to this fortnights Fusion Challenge!  Thanksgiving for us in the USA is next Thursday - but  for many, our thoughts and creative juices (not to mention the music at the Malls!) are already turning towards the beautiful winter/Christmas holiday season.  And this week's Fusion inspiration is going there right with us!
I was inspired by the photo this week ( although it almost fits the sketch as well - on it's side and without the banner!)  When I saw the beautiful bell wreath I immediately thought of my Tim Holtz Holiday Wreath Die.
I used a wonderful Aged Silver embossing powder from Stampendous on the wreath and a beautiful red glitter card stock for the layered bow.  To make the barnboard background, I simply scored some lines on white cardstock and then dragged a gray ink pad over the scored panel.I layered the wreath over the panel with foam dots.  I stamped the sentiment from the Mini Holidays set by Tim Holtz in black on white cardstock and used a 1 3/4" circle punch on it.
Here's a close up so you can see how this wonderful embossing powder looks - so thick and with a little speckle in it to give it the aged look.
So what inspires YOU this week from the Fusion Challenge??  The photo or the sketch??  Or will you do a FUSION and combine the two??!  I can't wait to see what you link up.  You will find all the details at the Fusion Challenge Blog
I hope you might take a minute to check out the rest of the Design Team to see how they were inspired this week!

Michelle Folland 
Michelle Lupton

Stephanie Severin

Stamps:  Mini Holidays #5 - Tim Holtz Stampers Anonymous
Paper:  White - PTI, Glitter Red - Michaels
Ink:  Versamark, Archival Jet Black, Memento Gray Flannel
Accessories:  Aged Silver Frantage Embossing Powder - Stampendous, Holiday Wreath Die - Alterations/Tim Holtz, Antique Enamel Dot - My Minds Eye, foam dots, Glue N Seal - Ranger, ScorPal, 1 3/4" circle punch - EK Success.

Monday, November 17, 2014

CC3C - Cabinet Cards

I have been SO out straight at work these last few weeks -  I've either had no time or been too tired to create for some of the challenges I usually do - but I'm excited to say that I finally found time (before the deadline!) to get the latest Compendium of Curiosities 3 challenge done!

For CC3C #15 we are working from Page 38 of Tim's book using Cabinet Card Pockets.  Usually we cannot say what techniques we use - but since this challange was to use a specific item howver you wanted -  we can tell you what we did!   
I was going to use a Found Relative Card -  but then my niece sent me the Snapfish album of their recent outing to see Santa - and I knew I'd use one of her photos of my delicious grand nephew James and his baby sister Madelyn.  James is old hat at visiting Santa as he is 3 years old -  but this is the very first visit for Madelyn - and you can see her looking curiously up at this jolly old elf!  I printed the photo on my computer printer in sepia ink to make it look vintage.
Here's a close up of the top portion.  I've got lots of Idea-ology products here - Black Paper String, Chit Chat Stickers that I rubbed with Archival Orange Blossom Ink , Remnant Rubs/Christmas Time, a Snowflake adornment that I embossed in Tree Branch embossing powder, Mirrored Stars that I sponged with Orange Blossom Ink , Alpha Tiles to spell out Santa and Label Letters I used to show the year.
and the bottom portion
And a view of how I die cut and attached Tim's Small Easel to the back so that my Cabinet Card Frame would stand up for display.   I cut it out of Grunge Board so it would be sturdy.
  I think Christie and Nate will love this card of Madelyn's first visit to see Santa with her brother!  Now I'm off to eat supper before watching The Voice - and then dropping into bed!
Thought I'd share the photo in full color -  to show how different it looks

This week's challenge is sponsored by Inspiration Emporium.  I hope you'll check out the challenge and join us!  You still have a few days to get it done!

Sunday, November 16, 2014

Golden Blooms for the Bride and Groom

My husband asked me to make a wedding card for a friend's son and his bride to be so off I skipped to my craft room!  Kent likes clean and simple designs - so this is the card I came up with.
I chose to use the elegant colors of vintage cream and gold.  I off set the stamped panel on the gold panel just for a little visual interest.
I used stamps from Waltzingmouse for my wedding card - the flowers are from Big Bloom Poinsettia and the beautifully scrolled sentiment is from Big Day Additions.  The flowers are gold embossed with a gold half pearl in the center of the largest bloom.  You can see the embossed gold a little better at this angle.
My card design was inspired by these challenges
Virginia's View - All Things Metallic

Stamps:  Big Bloom Poinsettia, Big Day Additions - Waltzingmouse
Paper:  Vintage Cream - PTI, Brushed Gold - SU
Ink:  Versamark, Memento Tuxedo Black
Accessories:  Gold embossing powder, gold half pearl - Michaels.

Friday, November 14, 2014

Waltzingmouse November Pajama Party!

It's the 14th of the month and that means it's time for the Waltzingmouse Pajama Party!  Around the 1st of every month Claire posts the 4 challenges for the party over at the Waltzingmouse Blog - so we can all get cracking on the challenges and have them ready to post on the 14th at the PJ Party!
Here are the 4 challenges for this month's party - along with the creations I made for them!
1. Scandi tags - Make a tag or set of tags featuring simple clean design - think Scandinavian style. 
For my tag I used stamps from the Nordic Winter set using red ink on a pretty almond colored dotted patterned paper.  I added an enamel dot to the center of the flower on the front and looped a piece of bakers twine through the hole.  I cut my tag with the Folding Tag Die.
 I'm entering my tag in the CASology - Festive challenge.
 And Addicted to Cas - Tags

2. Wrap it up warm - Show us your best gift wrapping - make a gift bag or box with a 'cozy' feel,
 I just love so many of Claire's wonderful templates have you checked them out??  For my gift box today I used her little Fairy House Box - which is one of her FREE templates. I cut it out using my Silhouette Cameo.
 The row of trees and row of stars stamps are from the Flurries Set.
 The snowflake and Merry Christmas are from the Alpine Christmas Set.  I cut the tag with a die from the Stitched Tag die set and the snowflake with a die from the Alpine Christmas Die Set.
 The roof lifts off the little house - and I tucked a gift card inside - and there's still plenty of room for either some candy treats or a another small gift.  I added Tiny Twinkles around the trees, stars and snowflake for a little sparkle.
 3. Old Pajamas -  Make a project using any of your older Waltzingmouse Christmas sets. (Claire asked the Design Team members who were coming to the party to use the Candy Jar Christmas sets)
I used stamps from Candy Jar Christmas  and Candy Jar Christmas Fillers as well as dies from the Jar Essentials Die Set for my card.  I stamped the Vintage Christmas Backgrounder on my background panel.  Doesn't it look just like old wallpaper?! When I stamped it - I didn't press all over the stamp so it left some un-stamped spots.  I colored the gingerbread men and the label with Copics and covered them with a layer of Glitter Glaze for some sugar coated sparkle!  I sponged all the edges with Vintage Photo Distress Ink.  I colored the faces and buttons with a black Glaze Pen.
 Here's what I stamped on the inside of my card.
4. Bedtime Story Sketch - Here is sketch no.8 -
 For my sketch card I used stamps from Flurries and Seasonal Flourish.  I cut out the center with the Pretty Panels #1 die.  The blue panel is popped up over the card base with foam tape and I added some rhinestones for sparkle.
Here's what I stamped on the inside of my sketch card using stamps from the same two sets as on the front.  Don't you just love the wonderful flourishes on these sentiments??!!
You have 24 hours to link up your creations over at the Waltzingmouse Blog where you will also find all the details as well as information on how you can win a prize!   I hope to see you at the WMS Pajama Party!

Tag:
Stamps:  Nordic Winter - Waltzingmouse
Paper:  DP - Almund Dot/BoBunny
Ink:  Archival Red Gerranium
Accessories:  Maraschino Bakers Twine - The Twinery, Folding Tag Die - Waltzingmouse, Enamel Dot - Home made from Perler Beads, Glue N Seal - Ranger.

Gift Box
Stamps:  Flurries, Alpine Christmas - Waltzingmouse
Paper:  Green and Blue - Bazzill, white - PTI
Ink:  Archival Jet Black and Coreflower Blue
Accessories:  Alpine Christmas Die Set (snowflake), Stitched Tag Set - Waltzingmouse,  Fairy House Box Template - Waltzingmouse, Tiny Twinkles - Taylored Expressions, Silhouette Cameo.

Gingerbread Card
Stamps:  Candy Jar Christmas, Candy Jar Christmas Fillers, Vintage Christmas Backgrounder - Waltzingmouse
Paper:  Rustic cream - PTI
Ink:  Archival Watering Can and Cornflower Blue, Ranger Distress Vintage Photo
Accessories:  Copics - YR24, E19, BG10, Black Glaze Pen - Sakura, Jar Essentials Die Set - Waltzingmouse, Glitter Glaze Sheer Sparkle - MFT, foam dots.

Joy to the World
Stamps:  Flurries, Seasonal Flourish - Waltzingmouse
Paper:  White, Blueberry Sky - PTI
Ink:  Archival Cornflower Blue and Jet Black
Accessories:  Rhinestones - Kaiser, Pretty Panels #1 die - Waltzingmouse, foam dots.