Saturday, July 27, 2019

Paradise Found!

I have another project to share using some of Eileen Hull's new products -  House Ornament Die from Sizzix and 3 of her new Molten Dimensions Embossing Powders from Emerald Creek.

My project was inspired by the Inspiration Challenge over on Splitcoaststampers today -  hostess Brenda shared one of her Pinterest Boards - Needle Minders.

I was inspired by this Needle Minder.  

I made an ATC using one made of MDF that I purchased at Top Flight Stamps.

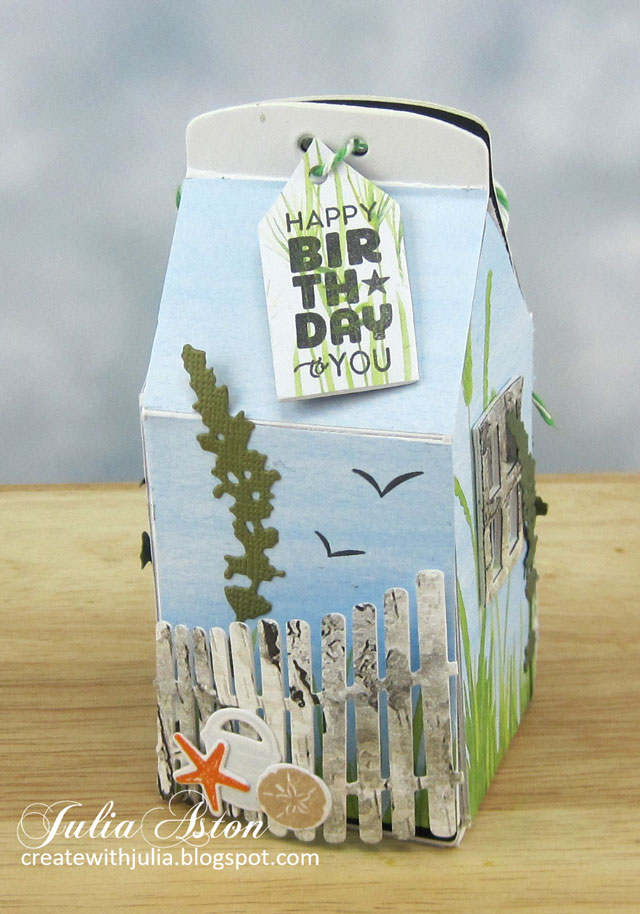
The little beach cottage is part of Eileen's House Ornament Die - the little house is used for a tag on her bigger house ornament.  I colored it by sponging her  Bay color Blends2 Ink onto the matboard house.  After it was dry I drew the clapboard lines on with a Gray Copic. I adhered a piece of yellow cardstock behind the windows and drew around two edges of each window with a yellow Copic to create shadow.   I added an enamel star from Altenew at the peak and tiny shells (from Sanibel Island!) along the bottom.  The sentiment is a Small Talk/Occasions Sticker.
I used an electric pancake griddle set at 300* to emboss the ATC.   Check out this post of mine that shows more photos and details about embossing with a griddle!  This technique works well with Eileen's Molten Dimensions as they are very coarse.

Basically, I laid my craft mat onto the heated griddle, put the ATC on the mat and added a thick coat of Eileen's Glistening Glass as a base.  When that was melted (just a couple of minutes!) I added Eileen's Molten Dimensions in White Wonder, Aqua Splash and Golden Rod.  After they melted (another few minutes!) I swirled the colors with a pick
 (the powders stick a little to the pick but can be easily broken off the pick when they harden)

Please check out Eileen's blog where she is posting her Inspiration Team's projects using her new products this month!

I'm linking my ATC to:
Blues and Greens


Paper: little sizzles Matboard - Sizzix, ATC MDF - That's Crafty (Top Flight Stamps)
Ink: Bay Color Box Blends 2 - Eileen Hull/Clear Snap
Accessories: House Ornament Die - Eileen Hull/Sizzix, Molten Dimensions White Wonder, Aqua Splash, Golden Rod, Glistening Glass - Eileen Hull/Emerald Creek, craft mat, electric pan, Small Talk Stickers -Idea-ology, Copics N2, YR21, tiny shells from beach, enamel star - Altenew

Sunday, July 21, 2019

Eileen Hull's Sizzix Gift Card Folder Die - An Evening to Yourself

A week ago, I posted a project using Eileen Hull's new House Ornament and this week I'm back using her 2nd new die - Gift Card Folder and Label #2.  Eileen's Inspiration Team is creating all month with these new dies and Eileen will gather all the projects on her blog - so be sure to check it out!
The tag piece fits inside and you can either stamp a sentiment on it - as I did - or you can actually slip a gift card under that tab at the top of the tag.  These stamps are from a set called Gift Card It - by Waltingmouse (unfortunately out of business now)
Here's how the folder looks from the back.
The folder is about 3/8" deep so you could put several tags inside it, a little folder, photos, etc!
I have a few process photos to share with you as well.
I colored the front and back of the folder piece (cut from matboard) using Eileen's new Color Box Blends 2.  Beach for the outside......
Leaf on the inside.  
I love using this method of mixing some of the thick ink on my craft mat, spritzing with water and then pouncing the watery mix on with a sponge.  It results in a great splatter look with light and dark shades of the same ink!
I used the same patterned paper on the tag piece that I used on my Cottage by the Beach.  I love how summery it looks and it coordinated with the inks perfectly!
I die cut two of the medium and small petals from Eileen's Pansy Flower die, sponged over them with her Clear Color Box Blends to serve as an adhesive for her new White Wonder Molten Dimensions embossing powder.  I didn't want to have the powder cover the complete petal so I could add color with some inks after I melted the powder.
I sponged on the inks in the same manner as the folder - mixing with water and pouncing with a sponge.  I love the way the color only soaked in where there wasn't any embossing powder.
I layered the 4 pieces of the flower over one another and held them together with a clear light green flower brad from my stash.  Another perfect match!  I adhered it a little off center 
(I don't always like things lined up perfectly!)
A nice little gift package.
This would be a fun and welcome gift for new parents don't you think?!  The gift of babysitting for them and it could also include a gift card to a restaurant or movie.


Stamps:  Gift Card It - Waltzingmouse (retired)
Paper:  White Little Sizzles Matboard - Sizzix, water color paper - Canson, DP Clouds and Grass Paper Pad - JoAnn.
Ink:  True Black - PTI, Clear Color Box Blends, Beach and Leaf Color Box Blends 2.
Accessories:  Gift Card Folder and Label #2 Die, Pansie Flower Die - Eileen Hull/Sizzix, White Wonder Molten Dimensions Eileen Hull/Emerald Creek, heat tool, craft mat, water mister, sponge, flower brad, Tombow Glue, foam dots.

Thursday, July 18, 2019

Mid Month CAS Stencil Challenge Reminder! Alcohol Inks

Just a reminder that you still have time (until 7/24!) to link up your CAS Stencil Challenge card!  This month Cathy is our hostess and she is asking us to use Alcohol Inks and/or the Alcohol Lift Technique!
I wanted to do some more Alcohol Lifting with my card today!  I took a panel of Yupo White Heavy Stock and pounced over it with a felt pad on my applicator inked with Alcohol Pearls in Splendor (orange), Enchanted (pink) and Sublime (green).  Then I dropped some Alcohol Blending Solution over the panel to move the colors and again pounced on it with the inked felt to add some more color.  When I was happy how it was blended, I let it dry.  

Then I laid two different Tim Holtz/Stampers Anonymous mini stencils, a grid and a floral (one at a time!) over my panel.  I added a drop of Alcohol Lift Reinker to a foam circle on my applicator, rubbed it off onto my craft mat (as you only want a bit!) then pounced over the stencil to remove the ink.  I laid a paper towel over the stencil each time and pressed over it to remove some of the Alcohol Lift Reinker.  I removed the stencil and then laid a paper towel over the panel and pressed over it again to remove more Alcohol Lift Reinker.  When the panel was dry, I rubbed over it to remove any more of the Lift ink.
I die cut the Winterland Fairy from Poppy Stamps out of black card stock and her wings out of vellum.  I adhered her wings to her back and adhered the fairy to the panel with foam dots.  I die cut the white panel using Pierced Feature Frames from PTI.  I stamped the sentiment from Paper Angel and adhered the inked piece onto the white.
Hopefully you can see the shimmer from the Alcohol Pearls below.
You'll find lots of inspiration  from the Design Team and our July Guest Designer Janet as well as links to tutorials using Alcohol Inks and the lift technique over at the challenge blog.   

I was remiss on my first July CAS Stencil Post in not welcoming Viv as a new member to our Design Team!  We are so happy to have you join us Viv!

Also linking my card to:
using stamping, alcohol ink lift and die cuts.

Stamps:  Wishing You Joy -  Paper Angel
Paper:  Yupo White Heavy Stock  - Ranger, Vellum, White, True Black - PTI
Ink:  Alcohol Pearls Splendor, Enchanted, Sublime, Hero Hues Black
Accessories:  Floral and Grid Mini Stencils - Tim Holtz/Stampers Anonymous, Winterland Fairy Die - Poppy Stamps, Pierced Feature Frame Die - PTI, foam dots, felt pad, foam pad, applicator - Ranger, Alcohol Blending Solution.

Tuesday, July 16, 2019

Today is All About You

Today I'm sharing a Birthday card I made for my lovely blogging friend Bonnie - we've known each other for years through Splitcoaststampers and now have worked together on Loll's and her CAS challenges!  Her birthday is today -  so hopefully she has already received this card in the mail!
I colored these lovely coneflowers (Dancing Daisies from Penny Black) using Ranger Distress Markers in Shabby Shutters, Mowed Lawn, Worn Lipstick, Spun Sugar, Gathered Twigs and Tea Dye, spritzed the stamp with water and pressed it into a watercolor panel using my Stamp Positioner.  I repeated the process one more time to make the colors a little darker.

I die cut the panel with Pierced Feature Frames: Rectangles from PTI and stamped the sentiment from Offbeat Birthday from PTI in black ink.  I adhered the outside of the frame to the white card base using foam dots and adhered the inner panel inside the frame.  I added the die cut Tied Trio ribbon from Impression Obsession to gather my stems into a bouquet!

I hope you have a lovely birthday today Bonnie!  Today is All About YOU!

I'm linking my card to:

Stamps:  Dancing Daisies - Penny Black, Offbeat Birthday - PTI
Paper:  Watercolor - Canson, white, Raspberry Fizz - PTI
Ink:  True Black - PTI
Accessories:  Pierced Feature Frames: Rectangle - PTI, Tied Trio Die - Impression Obsession, Stamp Positioner, water mister, Ranger Distress Markers Shabby Shutters, Mowed Lawn, Worn Lipstick, Spun Sugar, Gathered Twigs and Tea Dye, foam dots.

Monday, July 15, 2019

A Cottage by the Beach - Eileen Hull's new Sizzix House Ornament Die

Eileen Hull's Inspiration Team is creating all this month using her wonderful new dies - House Ornament Die and Gift Card Folder and Label.  I'm showcasing the House Ornament today.
The house measures 4 1/2" tall to the peak and 2" wide x 2" deep.  It opens from the bottom so a treat can be placed inside.
I have a few creation photos and then more views of each side of my cottage by the beach!  The house is die cut from white matboard (this one is black on the inside).  I added a little piece of lace to the top of the windows for curtains blowing in the ocean breeze!
I decided to cover my cottage with some pretty patterned paper from a pad I got at JoAnn called Clouds and Grasses $1.99!)  I love the green of grasses and soft blue sky/ocean!
I have this older Sizzix die that just cuts windows - and it matched pretty well to Eileen's die so I used it to cut window frames out of matboard.  I also die cut the frames out of a birch bark wrapping paper and adhered it over the matboard.  
(I now realize the window frame in Eileen's House Pocket Die fits this window! Duh??!!)
So here is a view of the framed window and lace curtains!
On the first piece of patterned paper I die cut to match one side, I left it as a whole piece and after I glued it on and then bent it on the scoreline - the paper tore as seen below on the left edge. So for the next panel I cut the sections apart at the score lines and then adhered them.
So that made me decide to cut some Tim Holtz Wildflowers to complement the ones on the paper and also add some dimension while covering the tears!  And that led to adding a fence and seagull from PTI.
The fence was wider than the side of the cottage, so as I was holding it, it bowed out a bit and I thought "that would be a fun look!"  So I just cut off one of the pickets and then adhered the fence to the side with foam dots just on the outside edges!
I tied green twine through the hole at the top which also loops through the tag on the other side.


I love the look of the lace curtains!
I added another fence on the opposing side, stamped some seagulls in the sky, added a pail, starfish and sand dollar.

I cut another sheet of patterned paper from the same pad to adhere over the tag and stamped the sentiment from The Greetery onto it.  Tying it on with the green/white twine.
Here is the bottom closed.
And open - so you can add a little gift!
My husband said I should have added a fence on all sides -but my creative plan was that the sides with the windows are  where we are looking at the cottage and the sides with the fence are where we are looking from the fenced yard of the cottage out to the ocean!
 So please check out Eileen Hull's blog during the month of July to see all of the wonderful creations the Inspiration Team has created using Eileen's new dies!

I'm linking my little beach cottage to:
Country View Challenges
July:  Blues and Greens


Stamps:  Fence Line Summer - Papertrey Ink, Sentiment Suite: Birthday - The Greetery.
Paper:  Little Sizzles Matboard - Sizzix, DP Clouds and Grass Paper Pad  - JoAnn, Birch Wrapping Paper - Pier 1 Imports, Greens Kraft Core-dinations, white - Papertrey Ink.
Ink:  True Black, Smokey Shadow, Soft Stone, Spring Rain Orange Zest, Classic Kraft - Papertrey Ink.
Accessories:  House Ornament Die - Eileen Hull/Sizzix, Windows Die - Where Women Cook/Sizzix (old), Fence Line Summer Dies - Papertrey Ink, Wildflowers Thinlits - Tim Holtz/Sizzix, Peapod twine - the Twinery, red line tape, lace from stash.

Saturday, July 13, 2019

Talk to the Moon

I'm joining in again with the Lavinia World Challenges, which is always anything goes and you can win a gift certificate to Lavinia World.
I used one of the lovely Scene Scape panels Misty Morning for my background,  Talk to the Moon Sentiment Stamp and this beautiful Winterland Fairy die by Poppy stamps -  all sold at Lavinia World. 

I die cut one fairy out of black card and the wings and two more fairies out of vellum paper.  I adhered the wings to the back of the black fairy and layered her under the moon with foam dots.  I adhered the vellum fairies in the tree with Multi Medium Matte.  I stamped the sentiment on a white strip an adhered it onto the panel under the fairies foot.

I'm not usually a fantasy kind of girl - but I'm loving all of these Lavinia World stamps, dies and papers, I think its the whimsy of them that appeals to me!

I'm linking to the following challenges:


Stamps:  Talk to the Moon - Lavinia Stamps
Paper:  White, True Black, Vellum - Papertrey Ink, Scene Scapes Misty Morning - Lavinia Stamps.
Ink:  True Black - PTI
Accessories:  Winterland Fairy Die - Poppy Stamps, foam dots, Multi Medium Matte.