Showing posts with label Wedding. Show all posts

Thursday, November 28, 2024

Nov 2024 Group of Seven Textured Backgrounds with Die Cuts

 This month, the Group of Seven Cardmakers are creating textured backgrounds using die cuts in tone on tone colors.  You will find links to several Videos using die cuts as backgrounds over at the GO7 blog.

I created two cards with the die I used - using positive and negative cuts.
I used 2 of the positive pieces of the die cut on top and bottom of this card.
I used white tone on tone.

I used the two negative cuts on my second card.
This is the die I used - Spring Floral from Pink Fresh -  it's a two part die, and the bottom piece shows how it looks with both dies used -  but I only used the top detail piece for the positive and negative pieces on my two cards, cutting it twice for each card.

My second attempt was to have a dark green card base layered with a stand of pine also in dark green which didn't look too great (!)

I added some splatter with white, black and orange POSCA pens and then a double layer of the pine trees but they still didn't show up very well -  so I lightly rubbed a Gold Pigment ink pad over the trees and  I liked the look - so this is a slight deviation from the original instructions for the technique - but here it is!


We hope you will check out the videos over at The Group of Seven Cardmakers blog as well as checking out what the rest of the GO7 did with this technique!  We'd love you to link up your card using this background technique!


Wedding Cards
Stamps:  Love and Marriage - Papertrey Ink (retired)
Ink:  Nocturne - Versafine Clair
Paper:  Hammered White - Amazon
Other Supplies:  Spring Floral Die - Pink Fresh, foam dots, enamel hearts - Altenew.

Stand of Pines Christmas
Ink:  Gold Pigment Ink
Paper:  Pine Feather - PTI, Kraft Metallic Gold - Tim Holtz/Idea-ology
Other Supplies:  orange, white, black POSCA Pens, Metallic Sticker - Holiday Talk - Tim Holtz/Idea-ology, Forest Shadows Thinlit Dies - Tim Holtz/Sizzix.

Monday, February 8, 2021

A Wedding and a Valentine

This month Eileen Hull's Design Teams are continuing to create with her new dies.  Today I have two cards to share using her beautiful Mandala Die.

First up, a Wedding card.
I die cut the Mandala out of Vintage Cream cardstock and layered it over a piece of white cardstock that I had cut with a crimped frame die.  The hearts were cut with Eileen's Journaling Cards: Hearts die and the LOVE is from her Journaling Words.  The wedding couple (unknown die) was cut out of white and layered over the Mandala with foam dots..  The card base is Vintage Cream.
Next up, a Valentine
For this card, I die cut the Mandala out of red glitter cardstock.  I cut up a paper heart doily and adhered the heart outline onto the mandala - fortunately, the dip in the top of the heart fit perfectly under the top circle and the point fit into the point on the bottom of the mandala!  I added the stamped die cut  ribbon label across the center with foam dots and adhered several tuxedo clay hearts.
My card ended up being 5x5 so instead of making it a folded card - I made it a special card that stands up on a die cut easel - which makes is so easy to display!
Helpful Tip:  Sometimes it is hard to get a clean die cut when using detailed dies even when you run it through your machine several times.  A year or so ago,  I purchased a  Sizzix Chrome Precision Base plate for Intricate Thinlits.  The photo below shows the back of the plate where it tells you the sandwich to use - it is shiny silver on the front part.
Here is the sandwich -   Multipurpose platform for the Big Shot, the Precision Base Plate (silver side up), the material to be cut - face up; the die, cut side down and then your regular cutting plate. 
This shows my original paper heart doily and how I cut out the center of it.  It also shows my ribbon banner die (old Spellbinders).
And this shows how the doily heart fit perfectly on the Mandala!


I'm linking my Valentine card to:

Please check out Eileen's blog every Wednesday this month, where she will feature all the designs her Inspiration Team has created using her Mandala, Folio Page Pocket and Flowers, and Folio Journal newly released dies!

Wishing you a Happy Valentines Day this Sunday!


Wedding Card
Paper: White, Vintage Cream, True Black - Papertrey Ink
Accessories: Mandala Thinlit Die, Journaling Words Thinlit Dies, Journaling Cards: Hearts dies - Eileen Hull/Sizzix, Crimped Frames Die - The Greetery, Bride and Groom Die - no brand, foam dots.

Valentine's Day Card
Stamp: unknown red rubber stamp
Paper: White, True Black - PTI, red glitter cardstock - Michaels.
Ink: Obsidian - Altenew
Accessories: Mandala Thinlit Die - Eileen Hull/Sizzix, Ribbon Banner Die - Spellbinders, Small Easel Bigz Die - Sizzix, Ultra Bond Adhesive - iCraft, Heart Paper Doily - JoAnns, Chrome Precision Base Plate for Intricate Thinlits - Sizzix, Tuxedo Clay hearts - Honey Bee Stamps.

Wednesday, February 3, 2021

Eileen Hull Chapter 1 New Sizzix Dies Blog Hop

Today members of Eileen Hull's Inspiration and Education Teams are participating in a blog hop showcasing her new Chapter 1 Sizzix Dies.  


I made a Valentine using several of the  dies from her new Folio Page Pocket and Flowers set.  

The flower pieces layer together beautifully with such dimension. This is a 4 1/4" square card.
I used her beautiful new Mandala Thinlits die front and center on my wedding card below-  die cutting it out of a piece of glitter cardstock so it's quite sparkly IRL!  
The die cut LOVE is from her Journaling Words Thinlit die set.
Look at the beautiful detail on this die cut!  
The background was made smooshing watercolor paper into Distress Inks (Candied Apple and Frayed Burlap) rubbed on my craft mat and spritzed with water.

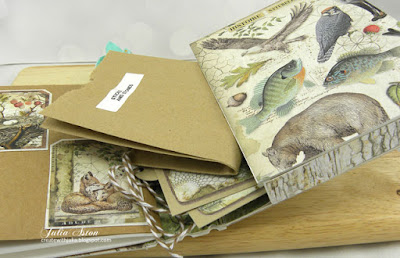
And finally, here is the Folio Journal I made.   

I will have a full tutorial for this  Nature Folio Journal on my blog in March.


Labeled bags tucked in here to put pretty things found on the trail and tags to write notes on.


Please hop through the blogs and be inspired by the work of the talented Inspiration and Educator teams! 

Leave a comment for each designer and you could win a Folio Journal die (as soon as it arrives!)

Join Eileen and specials guests on Eileen's  Facebook Live on Wednesday, Feb. 3 at noon Eastern.
Comment on the Facebook Live and be eligible to win either the Mandela die or the Folio Pages, Pockets and Flowers die - two winners!

Winners will be announced on the Facebook Live show on February 9 at 6:00 pm  EST. 

Here is the blog hop list of the Inspiration and Education Team's participating today!


Valentine Card
Stamps:  red rubber stamp no name on it.
Paper:  DP - Sweet as Sugar - Taylored Expressions, white - Papertrey Ink
Ink: Obsidian - Altenew
Accessories:  Folio Page Pocket and Flowers Thinlits dies - Eileen Hull/Sizzix, Sentiment Strips die - MFT, clay hearts - Honey Bee Stamps, foam dots.

Wedding Card
Stamps:  Keep it Simple: Wedding - Papertrey Ink
Paper:  watercolor - Canson Cold Press, white - Papertrey Ink, red glitter paper - Michaels.
Ink:  Ranger Distress ink Candied APple, Frayed Burlap, True Black - Papertrey Ink.
Accessories:  Mandala Thinlit Die, Journaling Words Thinlits - Eileen Hull/Sizzix, craft mat, water mister, Precision Base Plate used with Vagabond.

Nature Folio Journal
Paper:  White Little Sizzles Matboard - Sizzix, Kraft - Papertrey Ink, DP - Forest - Stamperia.
Accessories:  Folio Journal Bigz Die, Credit Card Sleeve and Tags Thinlits - Eileen Hull/Sizzix, Alphanumeric Tiny Type Upper thinlits - Tim Holtz/Sizzix, Stick It Adhesive Sheets, ScorTape, classine envelopes, small brown bags, bakers twine, leaf charm,  Clippings Stickers - Tim Holtz/Idea-ology, Elastic Cord - Cousin, Brother Label Maker.

Wednesday, October 21, 2020

Zoom Class Using Embossing Folders Blog Hop

I recently met on Zoom for a creative craft class with some of my fellow CAS Christmas Card Challenge design team friends - Loll, Marcia, Coleen, and Linda to learn some fun techniques using Embossing Folders.   Nancy was unable to join our zoom but did work with the techniques we discussed.

Here are the cards I made.

Embossing Folder Stamping

For both cards below, I inked the inside top of the embossing folders with a Distress Oxide Ink, spritzed liberally with water  then laid a panel of watercolor paper over the watery inking.  I put a piece of computer paper over the water color panel on the open EF and rubbed gently over the whole piece so the water color panel would absorb the watery ink.  Then I lifted the water color panel off the EF to see how it looked.  Some embossing folder designs work better than others so it can be a hit or miss.   

For the card above I used Peeled Paint DOX ink pad and Holly EF from Provo Craft.  I love how the ink pooled creating darker areas in some spots. You can't control how it will look so it's always a surprise and never the same twice!
For the card above, I used Vintage Photo DOX ink pad and Tall Pines EF from Tim Holtz/Sizzix.  Love how the ink on this one shows bare patches and swirls of lighter and darker color.

Double Dry Embossing

For this technique I embossed a white panel with one embossing folder and then embossed it with another one.  Again you have to play with your various embossing folders to see which ones work best when layered over each other.

For the card above, I embossed with 3D Texture Lumber EF from Tim Holtz/Sizzix and then embossed with Holly EF from Provo Craft.
For the card above, I embossed with Script EF from Provo Craft and then embossed with Tall Pines EF from Tim Holtz/Sizzix
For the card above, I embossed with Dots EF from Darice and again used the Tall Pines EF.  The pines seem to work well as they have a blank space on the right so you can really see the first embossing.
 
I die cut all three cards using Pierced Feature Frames Rectangles from PTI.  And used Small Talk: Occasion Stickers from Tim Holtz/Idea-ology for the sentiments.

Embossing Toilet Paper

We never would have tried this technique in March when there was no TP available!   

I folded over toilet paper to make 4 layers (4-6 layers work well).  I spritzed water over the top of the folded pile, flipped it over and spritzed over the other side and then put it aside to dry thoroughly. Then I embossed it.  It comes out feeling and looking like home made paper!  

I used the same embossing folder on both of my cards using this technique.  The embossing folder is Flower Heart Doodle from Sizzix.   I left the top card plain.   I sponged over the bottom card with Ranger Distress Seedless Preserves and Tumbled Glass.
 

Faux Patina

For this technique you choose 3-4 colors of ink pads to use - I used a light tan ( River Rock - SU), a blue (Taken with Teal - SU), and a green (Always Artichoke - SU).  

First you rub your light ink pad over the inside of the top piece of your embossing folder put a panel of white card in the folder and emboss it.   Then you sponge over the embossing with the other 2 or 3 colors you have chosen.  The last step is to press Versamark ink lightly and randomly over some raised areas and then emboss with gold or silver embossing powder.  

Note: Be sure the ink is dry on your panel and go over it with a powdered Embossing Buddy pillow before putting on the Versamark and embossing powder.  You can brush off any powder that sticks in areas you don't want the gold/silver on before using your heat tool.

Below shows the layers after using each ink -  on the left is the result inking the inside of the EF cover and running the panel of white card in the EF through your machine.  The panel on the right shows the 2nd step of sponging lightly over random areas with the blue.
Below, the left the panel has now been sponged with the darker green.  On the right it has been heat embossed in random areas with gold embossing powder and it's done!
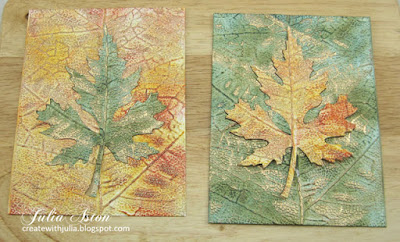
As a variation, I made two more panels using Leaf Veins 3D Embossing Folder from Sizzix. I used Ranger Distress Scattered Straw, Wild Honey and Fired Brick (in that order) on the panel to the left below. I used the same inks as my FA LA LA card on the panel on the right.
Then I used Layered Leaf Die from Sizzix and cut out a leaf on each panel - I tried to line up the center vein on the panel with the center of the leaf as best I could.
Then I laid the green leaf inside the cut out on the yellow panel and the yellow leaf inside the cut out on the green panel.
I really like how both cards look!
I layered both the panel and the gold embossed sentiment strip to metallic gold card

I hope you have found new ways to use your embossing folders here today and will get some of your own EF's out and make some cards!  

You'll find inspiring samples from the other ladies on their blogs linked here!

Loll

Linda

Colleen

Marcia

Nancy


Saturday, April 4, 2020

April CAS Stencil Card Challenge - Gilding Flakes

Happy April everyone!  The new CAS Stencil Card Challenge is up over at the blog!  Cathy is our creative hostess this month and she would like us to use gilding flakes with our stencils!
 
One of the technique videos on the blog uses a Xyron laminator - which I just happened to have in my craft room - purchased at least 10 years ago and haven't used for quite some time.  I inserted the adhesive cassette into the machine and ran a panel of black cardstock through it.
I peeled off the clear cover and my cardstock now has sticky adhesive on one side.
I laid my Feathered Leaves Stencil from Altenew over the sticky surface and covered it with Cosmic Shimmer Inka Gold Gilding Flakes -  another thing I just happened to have in my craft room that I must have bought for something years ago - and then forgot why I bought it - so it was sitting there waiting for me when I needed it for this challenge! 
The next step is to spread the gilding flakes over the whole stencil, pressing it into the openings with your fingers.
When it's all covered, you remove the stencil.  Now all the black spaces left are still sticky so you need to put something in those spaces.
The video I watched suggested black glitter be applied to stick to these open spaces.  I didn't have any (shocking, I know!) so I used some black micro beads I did have.  I poured them over the panel and pressed them into the open spaces.
They seemed to stick in the larger open spaces - but there are still beads rolling off it that didn't stick!
I added the Love die cut over the panel and added a wedding sentiment inside.
This is the first time I've used gilding flakes and I was happy to be 'forced' to learn this new technique for Cathy's great challenge!  

You'll find links to several Gilding Flake technique videos, details of the challenge and lots of awesome inspiration from the Design Team as well as our talented April Guest Designer Mac at CAS Stencil here.
You have through April 24 to link up you CAS cards!


Paper:  white, True Black - PTI, Kraft Stock Metallic - Tim Holtz/Idea-ology
Accessories:  Inka Gold Cosmic Shimmer Guilding Flakes, Feathered Leaves Stencil - Altenew, black glitter beads, Love Die - PTI, Xyron Laminater and Adhesive cassette.