Showing posts with label Arty Divas. Show all posts

Tuesday, August 4, 2020

Tiny Book - Junk Journal

For August, Eileen Hull's Design Team is making Junk Journals focusing on embellishing the pages.  I used her Tiny Book Die to make my journal and I decorated the pages with recycled cardboard slide frames,  a fun technique I learned from this YouTube Video.
I used a piece of Belagio Cork Fabric for the cover and for the slide on the cover.
I covered and decorated a recycled slide for each page, adding various Chat stickers and rub ons to the pages.
I colored the Paper Dolls with Ranger Distress Markers.
I left the slide below uncovered since it was red and went with my patriotic theme.
I left the last pages blank accept for a butterfly rub-on and a Small Talk Sticker
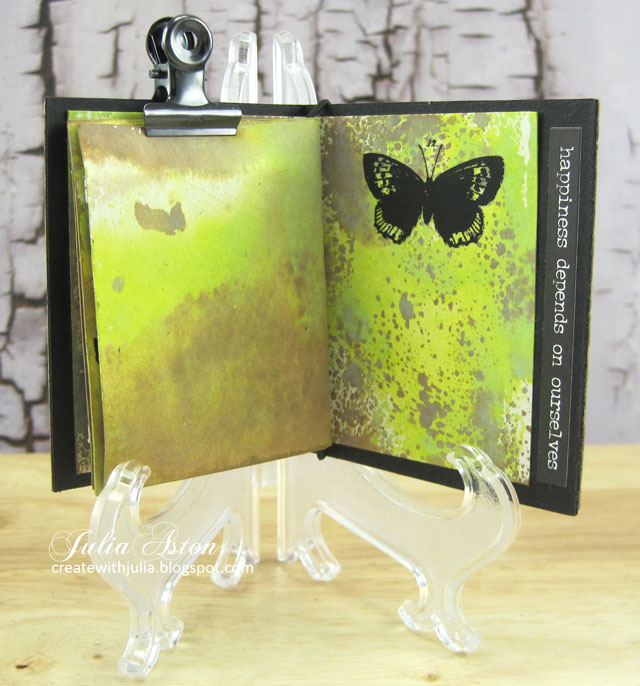
The Sizzix Hinge Clip was just the right size to use as a closure for my Tiny Book Junk Journal!
I learned how to do the slides on this YouTube video. 
 She used slides that you could easily separate the front and back.  
The front and back frames of my slides  (old slides inherited from my parents attic) were glued together.  The only issue with this would be if I wanted the back to be clean, but I attached the slides to a page so it didn't matter for me.  
First you just push out the negative - it comes out easily.
Then I cut a piece of what I wanted to cover the slide with (I used Balagio Cork Fabric and Tim's Floral Collage Tissue Paper).  I adhered the slide to the material and clipped the corners as shown.
I put glue on the flaps and folded them onto the slide.
I cut the fabric covering the slide opening with an x-acto knife, corner to corner.
Added glue and folded them over the slide frame.
If you had a slide that easily separated - you would then glue the back of the slide back on, covering the material.
 Here's the back of a slide covered with the Floral Collage Tissue Paper (with the negative adhered onto the front of the slide cover)
And here's your covered slide frame!
After I covered the slides, I adhered the negative back onto the front so the sprockets show,  you can also adhere it to the back - if you don't want to see the sprockets.  For my cover - I didn't use the negative at all - I just let the book cover show through.
 
These are the 5 slides I made for my journal 
(the one used on the cover - top left  wasn't covered yet!)
Three are covered with Tim Holtz Floral Collage Tissue Paper and one is left uncovered as I liked the red!
I die cut the Tiny Book out of Matboard that I had adhered a piece of Belagio Cork to using a sheet of ScorTape. 
I show two pages below, but actually ended up using 3 pages - cut 4 1/2" x 2 3/4" scored at 2 1/4".
I colored the pages using Distress Oxide Inks in Twisted Cintron and Frayed Burlap, rubbing the inks on my craft mat, spritzing with water and then pressing the pages into the inks.
I looped a black elastic cord through the center of the 3 stacked pages and knotted it on the outside of the binding.
 The binder clip holds the book closed nicely.
My Tiny Book - Junk Journal is a small 2 1/4" x 3". 
 Please check out Eileen's Blog every Wednesday in August to be inspired by the rest of the Design Teams Junk Journals!  

You'll also find inspiration with Eileen on her twice weekly Facebook Live shows at Eileen Hull Designs – Tuesdays at 6:00 pm EST and Thursdays at 4:00 pm EST. Become a member of the Eileen Hull Fan Club-  a friendly, talented and encouraging community of crafty folks. 
You can also find Eileen on FacebookInstagram and Pinterest.

I'm also linking my Tiny Book to:
Anything Goes


Paper:  Black Matboard - Sizzix, Rustic Cream and Midnight Blue Cardstock - PTI.
Ink:  Ranger Distress Oxide Twisted Cintrol and Frayed Burlap.
Supplies:  Tiny Book Die - Eileen Hull/Sizzix, old slides that were my dad's, Paper Dolls, Small Talk Occasions, Floral Collage Paper, Big Chat Stickers, Quote Chips, Remnant Rubs Special Delivery and Botanicals, Industrious Stickers:Borders, Hinge Clip - Tim Holtz/Idea-ology, Belagio Cork Fabrics, black elastic cord, Beacon 3 in 1 Glue, iCraft Ultra Bond Adhesive, Ranger Distress Markers Worn Lipstick, Ripe Persimmon, Forest Moss, Carved Pumpkin Tea Dye, Stormy Sky, Brushed Corduroy, Spiced Marmalade, Pumice Stone, Spun Sugar, Peeled Paint, ScorTape 6x6 sheet, black Stabilo Pencil, Gold Stargazer Star Confetti - Honey Bee Stamps, star punch - Sizzix.

Saturday, June 20, 2020

A Bike Card for Lucas

A friend asked me to make a card for her grandson who is turning 9 this month - and he's getting a bike (which they are frantically looking for because everyone is sold out due to the Corona Virus stay at home edict - more families are riding bikes together and didn't own them prior to this spring apparently!)

So I also found out that I didn't have ONE bicycle stamp in my craft room (shocking!! I later found a bicycle die but still no stamps!)  so I ran over to recently re-opened Michaels and found they had just ONE 3D sticker package of bicycles and bike paraphernalia!  And it was perfect for what I needed!
I brought it home and made this fun pop up box card for Lucas!
The Scalloped Box Card Pop Up Die is from Lawn Fawn and is really easy to put together - they have videos on YouTube showing how it's done. The photo below shows the 3 inside sections where you can attach die cuts, stickers or sentiments to create a dimensional scene.
 I put a white panel on the back so my friend can write her birthday message to Lucas.
 Another view of the dividers inside.  I used a grass die from MFT for the grass on each divider.
 A view from the bottom
 The balloon image and die are from Mama Elephant.  The bike, sign and helmet are from a 3D sticker set by Paper House (Michaels).  The Keep Calm and Bike On sentiment is from a set called Live to Ride by Jillian Vance Designs.   I adhered the strip with LUCAS on it to a thin strip of acetate and adhered the bottom of the strip to the back of the first divider so it appears to 'float' in the air.
 The box card folds flat and fits in a regular A2 envelope but will require additional postage as it is thick.  The thickness depends on what you attach to all of the dividers.  
(The stickers I used are 3D and also have thick foam dots on the back of them which made them even thicker.)
 So when it's first opened you just lift it up, hold it loose in your hands and let it open up like a box.
 Then you fold down the sides and front

My friend loved this personalized card for Lucas and I think he will like it too!  And hopefully his parents find a real bike for him soon!  I wonder if it will be green?!?


I'm linking my birthday Box Card to the following challenges:
Summer

Summer Activities


Anything Goes

Anything Goes

Stamps:  Half Pint Heroes (happyBirthday) - Waltzingmouse (retired), Live to Ride - Jillian Vance Designs (retired), Snap Stamps Alphabet and Numbers - Karen Foster (retired)
Paper:  Water Color Paper - Canson, Leaf Green, Pure Poppy, Clear Acetate - PTI, Knock On Wood 6x6 paperpad - Lawn Fawn, Grass DP sheet, FireFly DP Sheet - Michaels.
Accessories:  Scalloped Box Card Pop Up Dies - Lawn Fawn, 3D Bike Stickers - Paper House (Michaels), Grass Die - MFT, Copics BG49, YR09, YG23, Y38, Sentiment Strips Die - MFT, 1" circle punch - EK Success, ScorTape, Tombow Glue.

Saturday, June 6, 2020

Butterflies for the Graduate

A friend of mine asked if I could make a Graduation card for her 11 year old granddaughter, Lila, who is graduating from 5th grade -  I guess 6th grade must be Middle School, hence the graduation out of Elementary School!   
My friend is giving Lila a butterfly bracelet as a graduation gift so she asked if I could put butterflies on the card.

So I searched on Pinterest for a butterfly card to get ideas for a creative design and I found this wonderful Double Diamond Fold card. 
It looks pretty impressive sitting here like an award or something doesn't it?! It was really easy to fold - the hardest part was figuring out what papers and butterflies to use!

Here is the tutorial on flutterbyheidi's blog which includes a YouTube video

I used Vintage Cream cardstock for the base, Royal Velvet for the frames and white card stock covered with Painted Fantasy wide Washi Tape from Altenew on the smallest panels. 
I used Tim Holtz/Sizzix Detailed Butterflies/Mini die for the big butterfly, cutting it out of vellum, a light purple DP and Metallic Gold - adhering the 3 layers just at the center body piece using Tombow Glue.
The butterfly and tiny butterflies on the sides are two separate Martha Stewart punches.
View from the back -  there's plenty of space to write a message on the two back panels and that middle area.
The whole thing flattens down easily for mailing - limited only by how high your butterfly at the top is.
Mine will actually fit (snugly) into an regular A2 envelope as shown below, but the top wing might get a little bent so I gave my friend a A7 (5 1/4" x 7 1/4") invitation size envelope to use if she is mailing it.
I just love how this card stands up and can be proudly displayed by the graduate!  
It would be lovely for any special occasion when you want a little more than just a flat card!

I'm entering my graduation card into the following challenges:
Optional Twist - Success (graduation!)
Anything Goes


Stamps:  Keep It Simple: Graduation - PTI, You Did it!  from A Year of Sweet Sentiments - Taylored Expressions (retired), Karen Foster mini letter and number snap stamps (retired).
Paper:  Vintage Cream, White, Royal Velvet, Vellum - PTI, Metallic Gold Kraft Stock - Tim Holtz/Idea-ology.
Accessories:  Dienamic Sentiment Strips - MFT, Detailed Butterflies Mini dies - Tim Holtz/Sizzix, Painted Fantasy Washi Tape - Altenew, butterfly detailed punch,  3 butterflies punch - Martha Stewart, Tombow Glue