Tuesday, December 30, 2014

Make It Monday 2014 A la Carte

I made this card for the PTI Make It Monday 2014 A la Carte challenge -  to choose any of the past years' challenges.  I was inspired by Laura Bassen's Camouflaging Die Cuts challenge.
I love the abrupt line of color, the layered word die cuts and great contrast with the black sentiment strip.  I made mine a wedding card - using the PTI Together die and stamps from the Love and Marriage set.

I really cannot believe that the year is over and we are about to enter 2015!  The older I get, the shorter the years seem to be!
Wishing everyone a Happy, Healthy and Crafty New Year!   I'd like to thank each and every one of you that visit my blog and leave me lovely notes and I look forward to our continuing 'stamping' friendship in the coming year!

Stamps:  Love and Marriage - PTI
Paper:  White, True Black - PTI
Ink:  Ranger Distress Mustard Seed and Wild Honey, Archival Jet Black, Versamark.
Accessories:  Together Die - Wonderful Words - PTI, Winter Blend Sequins - Avery Elle, Word Window Punch- SU, Eclipse tape (for masking), Glossy Accents, foam dots, white embossing powder.

Saturday, December 27, 2014

PTI Make It Monday - A Stamped Border with Sympathy

Today I made a card for the Papertrey Ink - Make It Monday challenge.   Melissa has a fun technique for us to try - stamped borders -  you will find her tutorial here.
I used 2 stamps from  Damask Designs for my border - and a sympathy sentiment from Mega Mixed Messages.
I made a bow using Melissa's technique layering 2 short pieces of ribbon and a piece of lace that I tied around the middle with light twine. I adhered it to the tag with glue dots. I layered a vellum tag over the white card stock tag and a vellum butterfly over the pink dots butterfly and punched a small heart to place in the center.  I attached them all to the tag with a staple. 
I sell cards to friends at work - so while I had all the supplies out - I made 4 sympathy cards.  This was a fun technique and I'm going to try it again using other stamps in the border!

You have until 7 am EST Monday to link up your card  on the PTI Blog.

Stamps:  Damask Designs, Mega Mixed Messages - PTI
Paper:  White, Lavender Moon, Text Style 2008 Bitty Dot Basics - PTI, Vellum - SU
Ink:  Lavender Moon, Lemon Tart, Berry Sorbet - PTI, Archival Jet Black.
Accessories:  Lemon Tart and Berry Sorbet Ribbons - PTI, lace from stash, Butterfly punch - Martha Stewart, heart punch - McGill, Tag Sale #2 die - PTI,  twine from stash, Tiny Attacher - Ranger.

Thursday, December 25, 2014

A Vintage Journey #22 - Ring Out the Old - Ring In the New

I hope everyone celebrating had a joyous Christmas Day!  At A Vintage Journey - we are looking forward to the new year with this fortnight's challenge -  Brenda is our host today and this is the challenge in her words: 
“Ring out the old, ring in the new,
Ring, happy bells, across the snow:
The year is going, let him go;
Ring out the false, ring in the true.” Alfred Tennyson
Focus on these key words from the poem - old, new, bells, snow, year and interpret one or more of them in anyway you like. So for instance use something old/new on a project; include bells or snow on a card; design a new year card/project/invitation etc. Just tell us what your links are to the key words from the poem.
I focused on a couple of things -  a bell, and letting the old year go and embracing a shiny clean new one.  For me, this means striving to be a better person, to live the way God wishes us to live.  I copied a portion of The Prayer of St. Francis and placed it front and center on my creation.

 I have a few pictures of how I started putting this together.  First I die cut the Arch Frame, Crescent Moon and Stars out of grungeboard.  Then I painted the arch and the moon with Distress Paints using my finger. I sanded the edges and inked them with Ranger Distress Walnut Stain Ink.
I inked the stars with Versamark and then poured Frantage Aged Gold Embossing Powder over them.  Here you can see how the powder looks before and after heating.  I love the bubbly thick look of it when it's melted.
Then I sort of got carried away in putting it together and didn't take photos.  I covered the arch with Tim's adhesive backed Frosted Film after adhering a photo copy of a portion of The Prayer of St. Francis to the front.  I cut panels of 2 different Kraft pieces of Paper Stash Motif - one with rows of numbers and one with dots - I sponged all over the papers which made the image part show up (it's clear embossed on the kraft paper so you don't see it much until you sponge over it).  I framed the pieces with Brushed Gold card stock. The largest piece is 7" x 7".  I covered the moon with Glue N Seal and sprinkled Clear Rock Candy Glitter over it.  I punched a hole in the top of the moon and knotted a piece of Tinsel Twine  through it.  Then I added the rusted bell with a Jump Ring.  You can see the foam tape I put on the back of the Arch - I used it double thick on the moon - so they both are popped up.
I added some Industrious Stickers/Frames and Trims to the corners and around the prayer.  There's a little Calendar Page 1 image inside the circle on the File Tab.  I used Label Letters and Chit Chat Stickers for RING IN THE NEW.
  I knotted Linen Ribbon through a Philosophy Tag that I rubbed Distress Paint on with my finger,  and adhered it with foam tape.  I added a Mini Gear with a Mini Fastener as an eye for the moon.
The Remnant Rubs are from Words and Botanicals.  I was surprised it would adhere to the embossed star - gotta love those Remnant Rubs!
And since my project is a panel and not a card - I needed to use my Small Easel Die to cut out a stand from Grungeboard so I could stand it up and display it!  I should have inked or papered the back but at least it's clean and not all inky!! 
 We hope you will join us by creating a project showing what Ring Out the Old - Ring In the New means to you!  Our challenge sponsor is Country View Crafts.  They are offering one winner, chosen by the Creative Guides, a £10 voucher to spend in their on-line shop.   
You will find all the details of the challenge, all of the wonderful inspiration from the other Creative Guides participating this week -  and the link up over at A Vintage Journey.  Brenda is also announcing the winner of our Secret Santa Blog hop so be sure to check it out to see if you won!
Thank you so much for stopping by today!
Here's what I used:
Paper:  Grunge Board, Frosted Film with Adhesive, Paper Stash Motif - Ranger,  Brushed Gold - SU.
Ink:  Ranger Distress Walnut Stain, Versamark.
Accessories:  Alteration Dies - Arch Frame, Crescent Moon and Stars, Small Easel; Ranger Distress Paint Scattered Straw, Weathered Wood and Brushed Pewter; Idea-ology - Mini Fasteners, Mini Gears, Philosophy Tags, Label Letters, Chit Chat Stickers, Industrious Stickers/Frames and Tim, File Tabs, Tinsel Twine, Linen Ribbon, Remnant Rubs Words and Botanicals; Ranger - Clear Rock Candy Distress Glitter, Glue N Seal, Glossy Accents;  Frantage Aged Gold Embossing Powder- Stampendous, ScorTape, foam tape, bell; portion of Prayer of St Francis - photocopied from a book of quotes.

For Unto us is Born this Day a Savior

"For unto us is born this day, a savior, which is Christ the Lord!"


Wishing you all a very Blessed Christmas Day!

Tuesday, December 23, 2014

Owls and Gnomes

I've learned a new craft this year - Needle Felting.  It all came about after I ordered a kit from Fancy Tiger Crafts to make an owl  (I think I bought it on Blitsy?)  more than a year ago.  Anyway - I didn't make it right away after I purchased it - as I looked quickly at the directions and thought it was going to be difficult - so I put it away and then lost it in my craft room (you know how that goes!).  Then when I was cleaning up my room a bit a month or so ago - I found the Owl Kit - and ended up making an owl in about 10 minutes while watching TV!!!  You may have seen the project I made using that first owl here.
So - I decided to make a few more of them to give as Christmas gifts. Aren't they sweet??!! Every time you make one it comes out a little bit different - just like in real life!
 I love them so much - they just crack me up - and it's so hard to part with them - even though I know I can make more.
 So then I ordered the Gnome Kit and made these little guys
I made the bodies different lengths so they'd be different heights.
Another little craft creation that I find hard to part with!
I bought this lovely bird and nest piece in a craft shop in Wolfeboro, NH a couple of years ago. It was the perfect prop for my creations!  The owls are about 2" tall and the gnomes are  3" - 4" with their tall hats!
And since I'm on the topic of Owls and Gnomes -  here are couple of cards I've posted in the last few months on the topic!
 Owl stamp and die from Great Big Owl set by Waltzingmouse
 Gnome, pine branch and sentiment stamps from Jolly Old Elf set by Waltzingmouse
 It's almost Christmas!!!

Owl Switchplate cover Stamps:  Great Big Owl Paper:  Kraft - PTI Ink:  Versamark, Vintage Photo Ranger Distress Accessories:  Brown Embossing Powder - Ranger, ScorTape, Xyron 510, Double Sided Laminate for Xyron, x-acto knife, Zutter Corner Rounder.

Fall Blessings Stamps:   Great Big Owl, Peace and Plenty - Waltzingmouse Paper:  White and Smokey Shadow - PTI,  DP Pyrus Paper Pad - Basic Grey. Ink:  Versamark, Archival Orange Blossom, Potting Soil and Jet Black. Accessories:  foam dots, Tiny Twinkles - Taylored Expressions, glue pen, Ranger Distress Markers Stormy Sky and Dried Marigold.  Big Owl Die set - Waltzingmouse.

Have Your Elf
Stamps:  Jolly Old Elf - Waltzingmouse
Paper:  White, Dark Chocolate, Simply Chartreuse - PTI
Ink:  Wendy Vecchi Archival Potting Soil and Fern Green
Accessories:  Winter Blend Sequins - Avery Elle, Glue N Seal - Ranger

Gnome for the Holiday
Stamps:  Jolly Old Elf - Waltzingmouse
Paper:  White, Summer Sunrise - PTI, DP Christmas House Paper Pad - Teresa Collins
Ink:  Archival Jet Black, Wendy Vecchi Archival - Dandelion and Fern Green

Sunday, December 21, 2014

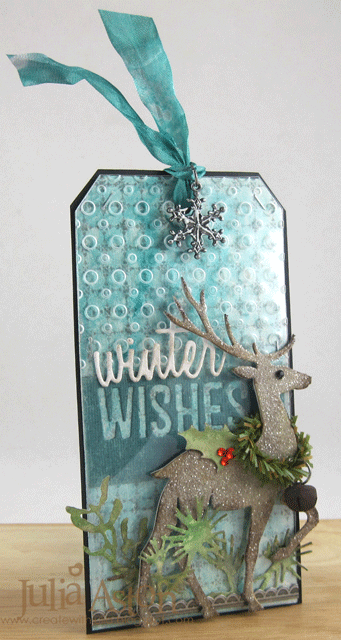
Tim's December 2014 Tag

I missed the November tag and did not want to miss the last one of 2014 -  especially since I had almost everything Tim used on his tag!  (that's pretty scary and indicates I've been shopping TOO much!)
So - here is Tim's Tag and you'll find his tutorial for it here.
I changed a few things - not quite having everything Tim used -  I used clear Shrink Plastic instead of Frosted.
I used a Wendy Vecchi Ornate Dots stamp instead of a snowflake stamp on the background, you can see it behind the embossed bubbles above!  I used different colors of blue and green, a different foliage die and a different embossing folder on the clear panel.  
I stapled the clear panel to the tag instead of sewing it - and I added a piece of holly with 3 red berries to my deer as well as a rhinestone eye - but all in all - I ended up with pretty much the same result - which I love and I learned some new techniques for coloring my tag, ribbon and the piece I used for the foliage! Whoo hoo!
I'm also linking this to the Simon Says Stamp Wednesday challenge -  Winter Inspiration


Stamps:  Wendy Vecchi - Ornate Dots
Paper:  White, True Black - PTI, Clear Shrink Plastic, Specialty Stamping Paper, Grunge Board, 8" Manilla Tag- Ranger, Coredinations Distress Collection.
Ink:  Archival Watering Can, Ranger Distress Walnut Stain.
Accessories:  Dies - Prancing Deer, Holiday Words/Script, Holiday Words/Blocks, Tag & Bookplate, Festive Greenery - Alterations; Idea-ology - Industrious Stickers/Frames and Trims, Jump Rings, Crinkle Ribbon, Adornments/Snowflakes;  Dots Embossing Folder - Darice; Tiny Attacher, Glue N Seal, Rock Candy Distress Glitter, Glossy Accents, Distress Paints Scattered Straw, Frayed Burlap, Distress Spray Stains Peacock Feather, Brushed Pewter, Mowed Lawn, Mini Mister - Ranger; bell from stash, wreath twine from stash, glue gun, foam tape, rhinestones - Kaiser Craft.

Saturday, December 20, 2014

Not a Creature was Stirring - accept maybe a cookie Mouse!

My contribution to the family Christmas Dinner this year is a dessert and since we have 4 little ones now - I wanted to make something special for them.  I have a folder of recipes that I have cut out over the years of things to make at Christmas time and in looking through it - I found the recipe for these cute little critters!
Here they are ready to pop into the oven - before they were given the gift of sight.
And here they are with chocolate eyes and nose added after they cooled - a whole nest of Christmas Mice! (I googled to find out what a group of mice is called - and it's called a nest - so I also learned something new today!)
Here's the recipe for the mice -  it was posted over at Split Coast Stampers (scroll down to page 2) way back in Aug of 2012.  It took me this long to actually make them!  It was posted by Cindy (Mothermark) but was a recipe from Elizabeth (I Love Rubber).  
With butter being the only liquid in these cookies - they are rather dry and crumbly when you first take a bite - but it quickly melts into a wonderful buttery spice taste (Kent and I had to test one - that's how I know this!)

Spicy Mice Cookies (makes 25 mice)
1 cup unsalted butter, room temperature
3/4 c. icing sugar  (this is Confectioners Sugar here in the US)
2 1/4 c. all purpose flour
1 1/2 tsp ground ginger
1 tsp ground cinnamon
1/2 tsp ground allspice
1/4 tsp ground nutmeg
1/2 tsp sea salt
hand full of natural sliced almonds (ears)
a few chocolate melts or chips to melt for eyes and nose

Preheat oven to 325. Line a baking sheet with parchment. Beat butter and sugar until creamy. In another bowl whisk flours with spices. Gradually add flour mixture to creamed butter and sugar. If it becomes hard to mix everything together finish the blending by hand kneading until you have a smooth dough. Measure out level tablespoons and separate. Take each tablespoon of mixture and roll into a ball then shape the ball so it is elongated and shape one end with a bit of a point (to resemble a mouse shape with a nose shape end). Take two slices of almonds and push them in for ears. Line them all up on the baking sheet about an inch apart then bake for about 20 minutes. Cool completely. Melt the chocolate (I melted 1/4 cup of chocolate bits in the microwave per directions on the package). Dip a skewer or toothpick into the chocolate and dot on the eyes and nose. 


I think they will be a hit with the kids as well as adults - don't you?

And since we're talking about Christmas mice -  here's a re-post of a card I made this year. Stamps are from Waltzingmouse.
 
A Vist from St. Nick 
Stamps:  Twas the Night Before Christmas - Waltzingmouse
Paper:  White, true black - PTI
Ink:  Archival Jet Black
Accessories:  Copics - B00, BG49, B05, foam dots, washi tape - Omiyage.ca, 

Thursday, December 18, 2014

Snowy Noel

I seem to have suddenly gotten all caught up with shopping, wrapping and baking - and was happy to have some time to make a card for some challenges!
A little clean and simple number -  I used snow flakes from the WMS set Flurries - and the beautiful sentiment is from Tis the Season set also by Waltzingmouse.  I stamped them in Archival Cornflower Blue ink and simply added clear rhinestones to the center of each snowflake.

I'm linking my card to the following challenges:

Less is More Challenge - One Layer focus SNOW

and Merry Monday - create a winter themed Christmas card

How are your preparations for Christmas going?  Are you able to relax and enjoy the season yet??!!

Stamps:  Flurries, Tis the Season - Waltzingmouse
Paper:  White - PTI
Ink: Archival Cornflower Blue
Accessories:  clear rhinestones - Michaels.

Tuesday, December 16, 2014

Celebrating Hanukkah

Today I'm wishing all those who celebrate - a most happy first night of the 8 days of Hanukkah!
 I work for 3 surgeons who celebrate  - so every year I make each of them a gift basket of some sort.  Here is what I filled their baskets with this year.
 I'm always on the lookout for blue containers to put their treats in.  I found these lovely baskets this past summer at The Christmas Tree Shop.  I always make the sweet little Pecan Rum Cakes for them -  their families tell me how much they love them every year!  I also made some homemade fudge and Chocolate Covered Coffee Beans (see the recipe for the coffee beans on this post)
I made the tags using a Waltzingmouse tag die,  the silver star around the hole at the top of the die is from another Waltzingmouse tag die, a sentiment strip die from MFT, and the Star of David die is from PTI.  The little star and dreidle stamps are from Casual Fridays Stamps.
 I found this Hanukkah information on the Web

Hanukkah Traditions

Hanukkah is the story of a great victory of the Jews over the Syrian-Greeks. In 165 BCE, led by the Hasmonean family of Mattathias the High Priest and his youngest son, Judah, the Jews succeeded in evicting the Syrian-Greeks from Israel and restored the Temple.

According to the Talmud, after the Temple had been cleaned and the Priests were ready to light the Temple menorah, they could find only one jug of oil that was fit to use. This was only enough for one day, but it lasted for eight. This is why Hanukkah is eight days long. For eight days beginning on the twenty-fifth day of the month of Kislev we light the menorah to celebrate the victory and the miracle of Hanukkah.

Hanukkah comes from the Hebrew word "Khanu" meaning 'and they rested,' and from the Hebrew date Kaf Hey which equals 25. That is why we celebrate Hanukkah beginning on the 25th of the month of Kislev.


You will find other Hanukkah projects I've posted over the years here.

In case you are interested - here is the recipe for the Pecan Rum Cakes - I found it in a magazine many years ago!  They are SO easy to make - and SO delicious!  (they taste best if heated a bit in the microwave before eating!)


Bert's Rum Cake
Makes 1 large bundt cake or 12 Bundtlette cakes 
1/2 cup chopped pecans
1 box yellow cake mix
1 box (3.4 oz) vanilla instant pudding mix
1/2 cup light rum
1/2 cup vegetable oil
1/2 cup water
4 eggs
GLAZE
1 cup sugar
1 stick unsalted butter
1/4 cup light rum
1/4 cup water
Preheat oven to 350.  Spray a 12 cup bundt pan or 2 - six bundtlette pans with cooking oil spray with flour.  Sprinkle chopped pecans over bottom.  Stir cake mix and pudding together in large mixing bowl.  Add rum,  water, oil and eggs.  Beat for 2 minutes with an electric mixer.  Pour cake batter over nuts and bake for 45-50 minutes.  If you are making the smaller cakes, spoon batter evenly into each mold (about 2/3 cup each) and bake for 20 minutes.
5 minutes before cake is done, prepare the glaze.  Place sugar, butter, 1/4 cup rum and 1/4 cup water in a saucepan and boil for 3 minutes, stirring occasionally. 
Remove cake(s) from oven and slowly drizzle the glaze over the top while cake is still hot.  It will take several applications to use all the glaze.  Cool cake in pan for 30 minutes before unmolding.  Finish cooling on a wire rack.

Sunday, December 14, 2014

Waltzingmouse December Pajama Party!

Tonight I'm happy to be attending the WMS Pajama Party - are you coming as well??  Around the 1st of each month, Claire posts the challenges for the party so we have lots of time to get creating and bring our offerings to the PJ Party on the 14th of every month.
Here are Claire's challenges for us for December (you have 24 hours to link up your projects!)

1. Put up the Tree  - Make a 3D paper tree.
 Here's what I started out with - I stamped the Vintage Christmas Background twice - to cover  a 5 1/2" x 8 1/2" piece of white card stock using Wild Wasabi ink,  die cut circles with my Nesties and sponged all the edges with Iced Spruce Distress ink
I folded each circle in half 4 times scoring each fold with my bone folder, and punched a hole in the center with my Cropadile.  Then I layered the circles from smallest to largest on a wooden skewer adhering each piece underneath with my glue gun.
 I layered my pieces closer together and didn't crease them as tightly as Martha so my tree is wider than hers.  I stamped Merry Christmas from Alpine Christmas on a banner die from Good Egg Dies - and die cut a Nestie star from gold paper for the top.  I attached my tree to a Sizzix die cut Block/Cube by Eileen Hull  and adhered patterned paper to the sides.
I'm linking my Tree box to Eileen Hull's Art With Heart December Challenge - Holiday Traditions.

 2. Deck the Halls - create tree ornaments
 For my ornament I used a clear glass ornament from Michaels filling it about 1/3rd full with metallic shred.  I used my Fine Feathers dies and stamp set to cut feathers and gold emboss them on vellum.  I curled each one a little bit using my bone folder and dropped them into the ornament. I gold embossed the sentiment from Fine Feathers on vellum and fussy cut around it.
 I moved the feathers around a little bit using a tooth pick so you could see them through the ornament - the basket shred helps hold them in place - like a little nest!

I punched holes in the sentiment and two of the smaller feathers - looped a gold cord through them and tied the cord around the top of the ornament.  I LOVE how this came out!  I never would have made this if it wasn't for this challenge!  so Thank You Claire!  I love this verse from Psalm 91 - this ornament could be displayed all year round!
I'm linking my golden feathers ornament to the Inkspirational Color challenge - Anything goes with Gold

 and the Simon Says Stamp Wed Challenge - Bling it on.

3. Old Pajamas -  Make a project using any of your older Waltzingmouse Christmas sets - 
Claire asked the  Design Team coming to the party to dig out our Country Labels 4 set.  I also, once again, used one of my fav WMS background stamps - Vintage Christmas Backgrounder.
4. Bedtime Story Sketch  
I thought I wasn't going to get to the sketch - but I found a little free time this afternoon and got it done!  Here's the lovely sketch.
And here's my card - I did it all up gold and silver! 
All the stampings are gold embossed -  Art Deco Background, trees from Frosty in the Pines and the sentiment from Flurries.  The silver panel is die cut with Pretty Panels #2 , the snow flake is Snowflake 2 die.  

I'm going to send this to a friend who has a birthday in February -
so I'm linking this card to Crazy4Challenges - Winter Themed Birthday card

PJ Party Schedule:
The PJ party post and all challenge links will go live at 11:45pm (6:45 pm EST) on the 14th Dec.
The PJ party winner will be announced at 11.45pm (6:45 pm EST)  on the 15th Dec.
Prizes:  There will be one overall winner chosen at random from the 4 challenges. The prize winner will receive £30GBP store credit for Waltzingmouse Stamps.


You will find all the Pajama Party details and Mr. Linky over on the WMS blog here.  
I hope to see you at the party !! 

Tree:
Stamps:  Vintage Christmas Backgrounder and Alpine Christmas - Waltzingmouse
Paper:  White - PTI, Brushed Gold - SU, DP Christmas Home - Teresa Collins, Little Sizzles black double sided mat board.
Ink:  Wild Wasabi - SU, Ranger Distress Iced Spruce
Accessories:  Sizzix Die - Blocks/Cubes 3D, wood skewer, glue gun, Nestability Circles and Stars, Banner Die from Good Egg Die Set - Waltzingmouse, foam tape 

Feather Ornament
Stamps:  Fine Feathers - Waltzingmouse
Paper:  Vellum - PTI
Ink:  Versamark
Accessories:  Fine Feathers Dies - Waltzingmouse, gold embossing powder, Metallic Shred Basket Fill - Michaels, 3.26" glass ornament - Michaels, gold cord - from stash.

Happiness is Home Made
Stamps:  Country Labels 4 and Vintage Christmas backgrounder - Waltzingmouse.
Paper:  White and Blueberry Sky - PTI
Ink:  Marina Mist, Soft Suede and Calypso Coral - SU
Accessories:  Glue N Seal - Ranger, Enamel Dots - Home made from Perler Beads, Dies - Labels 4 and Mega Rectangles - Nestabilities,  

Sketch card - Winter Wishes
Stamps:  Frosty in the Pines, Art Deco Background, Flurries - Waltzingmouse
Paper:  White - PTI, Brushed Silver and Brushed Gold - SU
Ink:  Versamark
Accessories:  Dies - Snowflake #2, Pretty Panels #2 - Waltzingmouse,  Sentiment Strips - MFT, Gold Embossing Powder, Gold pearls - Michaels, foam tape.