Showing posts with label Embossing. Show all posts

Thursday, October 2, 2025

Card Chain Challenge - September 2025 Reveal

 Today all of the cards exchanged for the September Card Chain Challenge are revealed over at the blog.

This month I sent a card to Ellie in Illinois and I received a card from Greta in Oregon.

For my card this month - I used the suggested colors and the theme option Flamingo.


I have about 10 of Tim Holtz Colorize dies of wonderful animals.  Some of them I've used a lot and a few haven't been used yet - including this wonderful flamingo Gladys!

I embossed the teal background card using Monstera Frame Embossing Folder from Altenew and I die cut the Monstera leaf using a die set from The Greetery.  The sentiment is preprinted from a set by Waffle Flower.

I die cut an easel to attach to the back of the panel so it can stand up for display.
We hope you will join us for the October Card exchange - you'll find all the instructions and the sign up for October here.

The link closes on 10/6

Also linking my card to:

first time using Gladys

ends 10/8

Anything Goes with Critters
ends10/23


Paper:  Tropical Teal, True Black, Pale Peony, White, Lemon Tart, dotted vellum - Papertrey Ink, metallic gold from stash.
Other Supplies:  Gladys Colorize Thinlit die - TH/Sizzix, Large Leaves Monstera Die - The Greetery, Monstera Frame Embossing Folder - Altenew, glue dots, foam dots, enamel dots - Altenew, printed sentiment - Waffle Flower.  Small Easel Die - Sizzix (retired).

Sunday, September 15, 2024

An Embossed Stenciled Ornament

It's time to start making our Christmas cards right??!! If we haven't already!!  We don't want to be out straight when it gets to be December!

I made this card using the technique of embossing over stenciling.  First I inked over the Christmas Snowflake Flourish Bauble stencil from Sweet Poppy Stencils using Dusk ink from Altenew onto a white panel.  

Then I embossed the panel using an older Snow Flakes Embossing folder from Provo Craft.    I die cut a frame out of silver paper and adhered it over the panel.  I silver embossed and die cut the sentiment and popped it up on foam dots over the ornament,  I used a Silver Leafing Krylon Pen to color the top of the ornament.

I'll add this to my box of Christmas cards that is luckily filling up!

I'm joining in on the following challenges with my card:

ends 9/30

ends 9/20


Stamps: Penned Elegance: Christmas - PTI (retired).
Ink:  Dusk - Altenew, Versamark.
Paper:  White - PTI, Kraft Metallic - Tim Holtz/Idea-ology.
Accessories:  Penned Elegance dies - PTI (retired), Snow Flakes Embossing Folder - Provo Craft, Christmas Snowflake Flouish Bauble Stencil - Sweet Poppy Stencils, blender brushes, silver embossing powder, heat tool, foam dots, silver leafing Krylon Pen..

Saturday, June 22, 2024

Snow Globe Snowman in Pink

 Today I'm joining in on  The Color Hues Challenge #89

And here's my card - oddly enough, a Christmas card, even though we just had 3 days of 90 degree weather!  But I do need to get those Christmas cards done!

The snowman and flower star are vellum stickers from Taperlogy - with the sage holly and mitten, and pink scarf, hat and star flower.   I embossed the background using a newly purchased embossing folder Sprinkle Snow Globe from Simon Says Stamp.  The stickers are up on foam dots.


Also linking my card to: 
first time using the embossing folder and the Christmas Vellum stickers


Stamps: Christmas Cheer - PTI (retired)
Paper: Linen Vellum, White - PTI
Ink: Nocturne - Versafine Clair
Accessories: Sprinkle Snow Globe Embossing Folder - Simon Says Stamp, Pink Christmas Vellum Stickers - Taperlogy, foam dots.

Saturday, June 17, 2023

Inkspirational #292 - Designer's Choice - Emboss your Background

I am the hostess of the Inkspirational #292 Challenge
and I am asking everyone to Emboss Your Background!
either using embossing powder (wet embossing) or using an embossing folder (dry embossing!)

I used wet embossing, inking my stamp with Versamark Ink, stamping the image on the card panel,  covering the panel with black embossing powder, shaking off the extra powder and then heating with my heat tool!

I used the same beautiful floral cover stamp on my three card samples, Daisy Days, from Unity. 

Love, love, love this stamp!

For my first card - I embossed the image on a white panel using black embossing powder.  Then I sponged over the blooms with Ranger Distress Inks in Mustard Seed and Carved Pumpkin.  I added gold to the flower centers and gold splatter over the panel using a gold Paint Marker.  I also splattered with a black POSCA Pen.  I trimmed down the panel and layered it over a black panel die cut with Nested Rectangle with Square Holes die from Rubbernecker.

I used the same technique as above for this second card but I didn't add any color to the petals,
just the gold and black splatter.

For my third card, I embossed the image with white embossing powder over a black card panel.  I added orange, green and pink splatters with POSCA pens and used a Raspberry Fizz card panel for the framing.


Please join us and link up your embossed cards!  You'll find the challenge and lots of inspiration from the rest of the Design Team at Inkspirational
You have until June 30th to link up your card!


I'm linking the black and white birthday card to:
My sentiment is on a strip but not really a banner shape so it's anything goes!


Linking the Sympathy card to:

favorite flower - daisy!


Stamps: Daisy Days - Unity, Sentiment Suite: Birthday - The Greetery, sympathy - Beyond Basic Borders - Papertrey Ink (retired)
Paper: White, True Black, Raspberry Fizz - Papertrey Ink.
Ink: Versamark, Ranger Distress Mustard Seed and Carved Pumpkin, Nocturne - Versafine Clair.
Accessories: White and Black Embossing powders, heat tool, Nested Rectangle with Square Holes die - Rubbernecker, gold Paint Marker - Top Notch, black, pink, green and orange POSCA pens, enamel dots - Altenew, foam dots.

Tuesday, March 28, 2023

March Group of Seven Cardmakers - Technique: Embossed Gilding Flakes

 It's time for the March Group of Seven Cardmakers Post!  This month we are playing with the Embossed Gilding Flakes technique.

Here are the two cards I created.  
This card uses the debossed panel.
I bought these Museum Bust Fancy dies from Hero Arts after Kent and I went to the King Tut Show in Boston last year.  I used the classic busts on these cards but the set includes two Egyptian busts as well.  I think they worked perfectly with the panels I created using the gilding flakes!

This card uses the embossed panel.

The black panels are embossed with Lumen Embossing Folder from Simon Says Stamp.

I die cut the statues out of Distress Woodgrain Card and then rubbed Lost Shadow Distress ink lightly over them to try to simulate marble.

Here are a few process photos creating the embossed gilding flakes panels.

I covered 2 panels of white card stock with Stick It, a double sided adhesive sheet.

I removed the top of the Stick it Sheet from the card panels and laid the panels, sticky side up, inside a pizza box to help contain the flying of the gilding flakes!  I spread the Autumn Gilding Flakes over the panels and pressed it onto the panel with my fingers.  Then I brushed the gilding flakes off with a stiff brush.  

Note:  She uses 3 colors of gilding flakes on the video but my Autumn Flakes are already a mix of colors so I just used that.

I took the gilded panels and put them together with the gilding flaked sides facing out and placed them inside the 3D Texture Fades Botanical folder from Sizzix.  Then I ran the embossing folder through my Big Shot twice to give a good impression.  That gave me an embossed panel and a debossed panel.

(The white line and spots on the panels below are places the double sided adhesive paper didn't stick- I colored over those spots with a gold metallic pen.)
I die cut arches out of the panels using A2 Arches from the Greetery.  

The final step is to rub a black ink over the panels.  On the embossed panel it hits the raised image and on the debossed panel it hits the background.  

Note:  The tutorial says to use a permanent ink like StazOn or Archival -  but I found those inks made the panels very sticky and it never seemed to dry, maybe due to whatever the flakes are made of?? maybe my inks were old?  Anyway, I decided to make two new panels.

So after trying ALL my various kinds of black inks unsuccessfully (ie they all felt sticky), I tried Memento Tuxedo Black ink and that seemed to dry. I also noticed that all the black inks seem to fade a little as they sit on the flakes.
You will find a link to a YouTube video with this technique over at The Group of Seven blog.

So please check out the rest of the Seven's creations, and if you decide to give this technique a try please link your card up over at The Group of Seven Blog

I'm interested to hear what black ink you were successful with on the embossed gilded panels!


I'm also linking my card to:

my sentiment Make each day your masterpiece.

die cuts

anything goes


Stamps:  Motivational Center Mona Lisa Moments - Cornish Heritage Farms (retired)
Ink:  Memento Tuxedo Black, Ranger Lost Shadow Distress (rubbed over statures), Versamark.
Paper:  White Distress Woodgrain Card - Tim Holtz/Ranger, white and True Black - Papertrey Ink,  Metallic Gold - Parklane/JoAnn.
Accessories:  Stick It Double Sided Adhesive Sheets, Autumn Leaves Gilding Flakes - Cosmic Shimmer, Fancy Dies Museum Busts - Hero Arts, A2 Arches die - The Greetery, 3D Texture Fade Botanical Embossing Folder - Tim Holtz/Sizzix, Lumen Embossing Folder - Simon Says Stamp, Gold Embossing Powder (for sentiment), heat tool

Tuesday, February 28, 2023

February Group of Seven Cardmakers: Technique - Resist Debossed Background

It's time for the February Group of Seven Cardmakers post, playing with the Resist Debossed Background technique. 

Our group met for a zoom call in early February to try out a recent video tutorial from Splitcoaststampers (created by Anna-Karin Evaldsson).  

I love how this came out and I think blues and browns are my favorite colors to use with this technique!

So, basically, you lightly run a Versamark ink pad over the raised, inside, back of your embossing folder. (3D embossing folders seem to work best because they give a deeper impression).  

Take a piece of water color paper (or any water friendly paper like Mixed Media), rub over the paper with an Embossing Buddy (powder), put it in the embossing folder powder side down (over the Versamark inked side) and run it through your machine.

Take the panel out and cover the back side (the debossed side with the Versamark ink on it) with white embossing powder.  If the powder sticks to too much of your panel background, you can brush some off gently with a paint brush.  You want the powder to be on the design which is 'debossed' since you are using the back of your panel.

Then heat emboss the panel.  

To add color to the parts not white embossed on my panel, I pulled out two Distress Inks - Tumbled Glass and Frayed Burlap and two Distress Oxide Inks Salvaged Patina and Walnut Stain (DOX inks leave a darker color than the regular Distress inks).  You want to use water based inks.  I rubbed the inks (one at a time and do the Distress first, then the DOX since they are darker) onto my craft mat, spritzed with water and then pressed the panel randomly into the ink, then looking where there were open spaces and pressing that section into the ink.  

Notes: 

1.  You can just use one or two water based inks. 

2.  You should try several different embossing folders, as some work well and some not so well?!


A close up:
I added the die cut sentiment and some enamel dots to the panel.

I made a second card (below) using the same technique, embossing folder, white embossing powder and inks - and you can see it looks very different.  

The white embossing powder stuck to more of the card rather than just the debossed image and so just small bits of the panel absorbed the smooshed inks. (I didn't brush off the excess white powder on the flat bits!)  But it still makes for a pretty and interesting background I think?!

I'm linking my birthday card to:


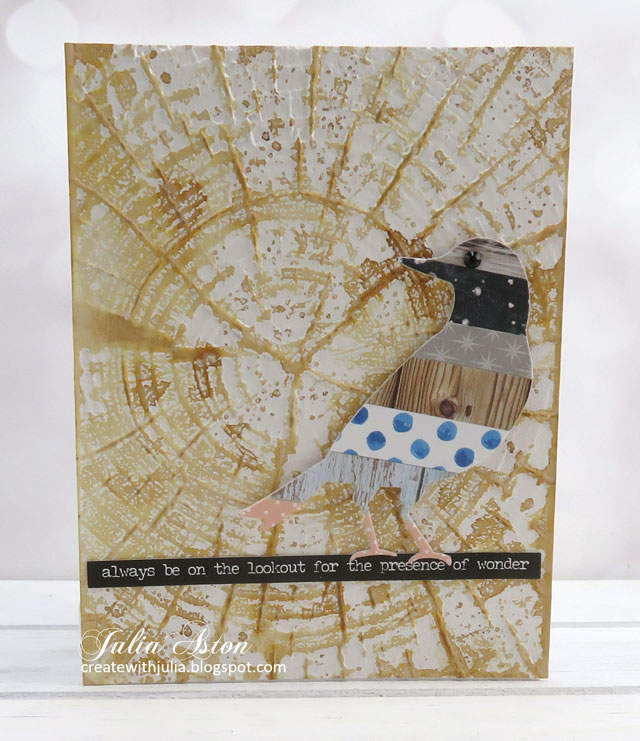
Three more cards I made using this technique.
Embossing folder:  Tree Rings - Tim Holtz/Sizzix.  White Embossing Powder/Distress Oxide Vintage Photo Ink.  The bird is Feathered Friends Thinlit dies - Tim Holtz/Sizzix covered with strips of DP.

I'm linking my tree ring card to:

anything embossed - optional things with wings


Embossing Folder:  Vintage Button - Eileen Hull/Sizzix.  White Embossing Powder, Distress Tumbled Glass and Frayed Burlap Inks.  The horse is an old wooden stamp by Judith, colored with markers.

I'm linking my Baby card to:
Feb - anything stamped


Embossing Folder: Circuit - Tim Holtz/Sizzix.  White Embossing Powder/Distress Lost Shadow Ink. Die: Voltage Bigz Die - Tim Holtz/Sizzix

I'm linking my voltage card to:

First time using both the circuit Emb Folder and the Voltage Die


For the full tutorial of this Resist Debossed Background and inspiring samples from the rest of the Seven Cardmakers, please pop over to the Group of Seven Cardmakers Blog.

We post a new technique on the 28th of each month that we hope will inspire you to try it out as well!

  We've added a Mr. Linky to the post - so you can link up your creations if you try this technique -  It's not a challenge, just a place you can put your card so everyone can see it and be inspired! 


Birthday Card
Paper:  Water color - Canson Cold Press, Tropical Teal - Papertrey Ink.
Ink:  Ranger Distress Tumbled Glass, Frayed Burlap, Ranger Distress Oxide Ink Salvaged Patina, Walnut Stain, Versamark.
Accessories:  Gracious Leaves Embossing Folder - Memory Box, white embossing powder, heat tool, water mister, craft mat, Happy Birthday Die - Simon Says Stamp, Happy Birthday Poe Script Die - Poppy Stamps, Enamel Dots - Altenew.

Saturday, January 28, 2023

Group of Seven Cardmakers - Creative Heat Embossed Backgrounds

Every month, for the past couple of years, a group of us has been meeting on  Zoom to try out new techniques, revisit older techniques, as well as to discuss art products we might not have used before, or that we have but don't remember what to do with them?! 

We decided to share our experiences on a blog and that blog is called,


This is our Group of Seven!


For our first post - we are showcasing the Creative Heat Embossed Backgrounds technique.  You'll find the full tutorial over at Group of Seven Cardmakers but I will show you how I made my cards below.

I made two cards using the same powder for each background.  First I'll show you the cards and then I'll walk through a few steps on how they were made.


For my background, I used Frantage Embossing Powder - Shabby Blue which is already a mix of fine sparkly blue, thicker white and gold bits. (there are some Frantage powders still available on Amazon)

I applied my Versamark with a crumpled up piece of Saran Wrap, pressing it into the Versamark pad and then dabbing the Saran Wrap on the cardstock - I found that gave a better smooth random pattern than using a piece of sponge (which I tried first!).
Because this embossing powder has some light and some heavy bits, I heated the card from underneath so it didn't just blow all the powders off the panel.   Once the powders were starting to melt, I finished melting the powders with the heat tool facing the front of the card.
I made two panels -  as you can see, when you dab randomly you get different coverage each time.  I used the one above on the birthday card and the one below on the butterfly card.

The Butterfly card
I die cut this (large) beautiful Perspective Butterfly from TH/Sizzix out of Robins Egg Bazzill card, randomly dabbed Versamark over it and embossed with the same Frantage Shabby Blue Powder.  

The larger pieces of powder didn't stick to the small areas of the butterfly, so I just used my heat tool on the front to melt the powder as it would not blow away.
I adhered the butterfly over the embossed panel and clipped off the pieces that went over the edges of the card.

The Birthday card

I die cut the sentiment out of a bronze paper and the 'happy birthday' from the Robins Egg Bazzill used on the butterfly.  I die cut 3 balloons, embossing one with the Frantage Shabby Blue and two with Frantage Shabby white for contrast.  Two of the balloons and the sentiment are up on foam dots.


This close up shows the thin gold threads I tied onto the balloons and laid beneath the sentiment.


Then I tried embossing on a black background with Frantage Shabby White Embossing powder and created this card using the same technique as above for sponging the Versamark on the card and heating up the powder.

The snowflake and skate are both from Sizzix and they are up on foam dots.
Close up of the mix of colors and textures in the Shabby White Frantage Embossing powder.  
It really sparkles as well!

You'll find a complete tutorial for the technique as well as beautiful creations by the rest of the Seven Cardmakers using Creative Heat Embossed Backgrounds over at the Group of Seven Cardmakers blog!

We'll be posting a new technique on the 28th of each month!  We hope they will inspire you to try the technique out every month as well!

I'm linking my Birthday Balloon card to:


I'm linking my Ice Skate card to:
Winter Fun

Snow


Butterfly and Birthday Cards

Stamps: unknown
Paper: White - Papertrey Ink, Robins Egg - Bazzill, Bronze from stash
Ink: Versamark
Accessories: Perspective Butterfly die - Tim Holtz/Sizzix, Happy Birthday die - Simon Says Stamp, Birthday Balloons die - Papertrey Ink, Saran Wrap crinkled up, Frantage Embossing Powder in Shabby Blue and Shabby White - Stampendous, gold thread from stash, foam dots, heat tool.

Snowflake Skate Card

Paper: Mixed Media Black - Strathmore white - Papertrey Ink.
Ink: Versamark
Accessories: Ice Skates Bigz Die, Snowflake 3D Embosslits Die - Tim Holtz/Sizzix, Frantage Shabby White Embossing Powder - Stampendous, silver embossing powder on skate, black marker (coloring sole and heel of skate), foam dots, Metallic Stickers Holiday Talk - Tim Holtz/Idea-ology, red/white twine