Wednesday, August 28, 2024

August Group of 7 Cardmakers 8/24 - Product Spotlight - Embossing Vellum

 The Group of Seven Cardmakers post for August is up - and this month we are playing with embossing Vellum.  There are links to videos for several different ways to emboss on vellum over at the blog so be sure to check them out for some new ideas.

It is recommended to use a thicker vellum (they come in several thicknesses) as the vellum can crack when you emboss with a folder if it's thin.  

The vellum I used on the Monstera card was dotted and a little thinner than the plain vellum I have and it did 'punch through' on a few spots - but nothing that ruined it!  So you just need to try it out on the vellum you have.

  The dots on the vellum show up on the embossed green inked leaves.

Just a few photos of how I made my card.

Emboss the vellum using Monstera Frame 3D embossing folder from Altenew.  I used a white dotted vellum.

Die cut the Monstera leaf from The Greetery out of hammered white card.  Rub ink pad over the leaf to color.  The hammered cardstock gives it a nice mottled effect. Glue the vein piece over the leaf.

Rub ink pad over the embossed areas of the vellum - dry with heat tool (don't hold over one area for too long or you might burn the vellum.  Heat from both front and back.)  It didn't matter that some ink got on the center of my vellum since it was covered with the die cut leaf.

I gold embossed the sentiment on a 3/4" x 4 1/4" strip of plain vellum and adhered it below the leaf with Glue Dots.  I adhered the monstera leaf to the center with foam dots and used Glue Dots to adhere the panel to the white card base.

I made this Christmas Snowflake card by simply embossing a panel of vellum and layering it to a blue panel that was die cut with a scalloped frame. I adhered the vellum panel to the blue card with Glue Dots. The blue card shows through the embossed vellum giving it a subtle color. I layered the panel to a white card base. 

My next 4 cards show how different a card can look using the same stamp with different color Copics.  I used the same technique on all 4 - stamping an image with Nocturne Ink on vellum and embossing it with clear embossing powder - turning the panel over and coloring the image from the back with Copics.

For the two cards below, I stamped the Daisy Days cover stamp from Unity onto two vellum panels using Nocturne Versafine Claire ink and embossing with Clear Embossing Powder.  I used a pink and teal Copic on the first card coloring over the image on the back of the panel and a yellow and orange Copic on the 2nd card..  I adhered these panels to the white card base with Glue Dots on the corners, sides and center.
I adhered a panel of vellum to an Adhesive Sheet from Sizzix and die cut the two sentiments.  I peeled off the back  and adhered the sentiments to the cards.

I used the same technique on the floral cards below -  stamping  the floral from Dearest Friend by Altenew in Nocturne ink, embossing with Clear Embossing Powder and coloring with Copics on the back of the panel. 
For these two cards,  I adhered the inked panels to Adhesive Sheets and then die cut the frame.  Then I removed the backing and adhered the panels to white card bases.
I used 3 colors on this one.
I used just two colors on this one.

We'd love to see what you create with any of the ways of embossing vellum.  There are links to YouTube videos showing several techniques over at the blog.  You will find the videos, lovely creations by the rest of the GO7 team and link up over at The Group of Seven


I'm linking my Monstera card to:

first time using the Monstera Embossing Folder

I'm linking my Christmas card to:

ends 9/6

Anything Christmas Goes  ends 9/7

ends 8/29


I'm linking my pastel floral card to:

ends 9/2


Monstera Card

Stamps: Ways to Say: Get Well Soon - PTI
Ink: Vintage Jadeite - PTI, Versamark
Paper: Hammered White - Amazon, Sheer Basics Vellum (dots/stars/stripes) - PTI, clear vellum from stash.
Accessories: Monstera Frame Embossing Folder - Altenew, Large Leaves - Monstera die - The Greetery, gold embossing powder - Ranger, heat tool, embossing pillow, glue dots, foam dots, enamel hearts - Altenew.

Snowflake Christmas
Stamps: Christmas Cheer - PTI (retired)
Ink:  Blueberry Sky - PTI
Paper:  white, Blueberry Sky, Vellum Card Stock - Papertrey Ink, Hammered White - Amazon
Accessories:  Winter Snowflakes 3D Textured Impressions embossing Folder - Sizzix,  Christmas Cheer Die - PTI (retired), Nested Stitched Scallop Dies - Amazon, glue dots, Enamel Dots - Altenew.

Thinking of You and Thank You
Stamps: Daisy Days - Unity
Ink:  Nocturne - Versafine Clair
Paper:  Vellum, - PT
Accessories:  sentiment dies - Amazon, Copics Y02, Y38, R32, BG18, glue dots, Adhesive Sheets - Sizzix, clear embossing powder, heat tool.

Thinking of You and Feel Better Soon 
Stamps:  Dearest Friend - Altenew
Ink:  Nocturne - Versafine Claire, Versamark
Paper:  Vellum , White - PTI
Accessories:  Copics BG18, R32, Y38, Adhesive Sheets - Sizzix,  clear embossing powder, heat tool, Strip Sentiments - Waffle Flower, sentiment dies - Amazon


Saturday, August 24, 2024

Inkspirational #323 - CAS with Optional Twist: Animal

 Today I'm sharing my DT card for Inkspirational Challenge #323 which is Clean and Simple 

with the optional twist of animals.


I decided to go CAS with the twist!    I stenciled the background lightly with Mint Julip ink over the Fern Fronds Stencil from Stencil Girls.   I added the deer which is a rub-on from the Wildlife Set by Taperlogy and stamped the Happy Birthday in Portabello Ink.  A lovely 1 layer card with a masculine design!


So please join us in this challenge and show us your CAS design and if you're in the mood - use an animal!  You'll find lots of inspiration from the rest of the team as well as Mr. Linky at Inkspirational!

Challenge ends 9/6.

I'm linking my card to:

Summertime   ends 8/31
walk in the woods

ends 8/31

First time using this stencil that I've had for years!!

ends 8/28


Stamps:  Sentiment Suite: Birthday - The Greetery
Ink:  Portobello - Versafine Clair, Mint Julip - Papertrey Ink
Paper:  Hammered white - Amazon
Accessories:  Deer rub-on from Wildlife set - Taperlogy, Fern Frond Stencil - Stencil Girl, finger sponge.

Monday, August 19, 2024

Snowing Down on the Snowman

 I got this idea from a card over at Splitcoast stampers by Ubetcha.   The snowman is mounted on a clear acetate card.  I used a different hat and face, than Ubetcha , as well as different twig arms and different size circles.

I put the same size circle as the base of the snowman, on the inside,  where I stamped my sentiment and there is a little room to write a note to the receiver -  you could add another circle on the back of the card or on the inside over the back of the snowman.  I used glue dots to adhere the circles to the acetate.

I'm linking my card to:

Anything Goes Christmas  ends 8/25

inspired by the snow!  ends 8/27


Stamps: Go to Gift Card Holder:Snowman Accessories - PTI, Alpine Christmas - Waltzingmouse (retired).
Paper: Hammered White - Amazon, Clear Acetate, True Black, Pine Feather, Pure Poppy - PTI
Ink: Nocturne - Versafine Clair, Misty Morning - Altenew, Orange Zest - PTI
Accessories: Circle Nestabilities, Woodland Branch die - Memory Box, Winter Wardrobe dies - Tim Holtz/Sizzix, Glue Dots, Foam Dots. finger sponge, red enamel dot - Altenew

Tuesday, August 13, 2024

Love sitting by the Fire!

 A friend aske me to make an anniversary card for her son and daughter-in-law. I asked what kind of activities they like -  and she said they love sitting in their yard around the fire pit.  So this is the card I made for them.  

They have two young children involved in all kinds of sports and activities - so I'm sure they really enjoy getting out into the backyard to enjoy the fire either with the kids or by themselves after the kids go to bed!

The Immense Love Die is from Penny Black.  The chairs and fire pit  stamps and dies are from Better at the Beach by Papertrey Ink. The lovely floral paper is Untamed Meadow from Unity.


I'm entering my card in the following challenges:

Camping/Outdoor activities ends 8/19

Summer Days  ends 8/23

ends 8/14


Stamps:  Better at the Beach - PTI
Ink:  Mocha, Olive, Snapdragon, Misty Morning, Dark Night, Mocha, Fire Brick - Altenew.
Paper:  Fine Linen, Soft Stone, Tropical Teal - PTI, DP  Untamed Meadow - Unity.
Accessories:  Immense Love die - Penny Black, Better at the Beach dies - PTI, foam dots.

Saturday, August 10, 2024

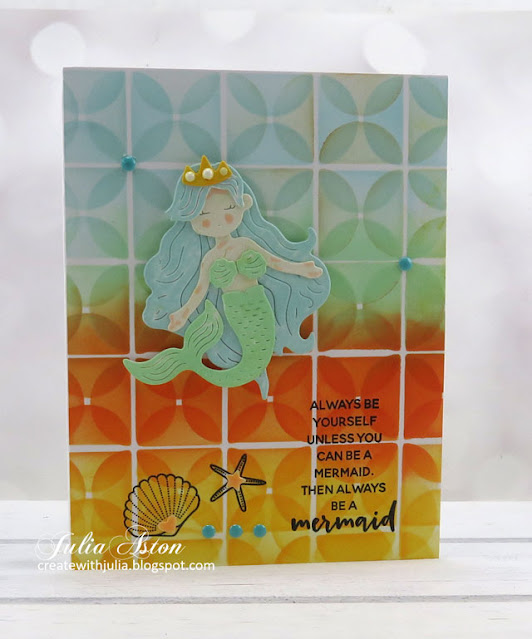
Inkspirational #322 - Moodboard - always be a mermaid

 This is my DT card for Inkspirational #322.  This week we have a lovely Mood Board to inspire us.

Source: https://butterflyreflectionsink.blogspot.com/2015/08/august-mood-board.html

I was inspired by the left panel with the layers of colors - and generally all of the colors!

I stenciled the background using Semicircles Med Century Modern stencil by Claire Brennan Designs.  The mermaid die is unbranded from Amazon  and the stamps are Inner Mermaid from Ellen Hutson (retired)  I added enamel dots, heart and star as well as three drops of Nuvo Gloss Simply White on the crown.

So please ponder the Mood Board and see what it inspires you to create.  We'd love to have you link up over at Inkspirational.  You'll also find lots of inspiration from the rest of the creative DT!

You have until 8/23 to link up!


I'm also linking my card to the following challenges:

First time using the mermaid die and stamps


It's Summertime Somewhere
Ends 8/14

Summertime  ends 8/31

Thinking of You   ends 8/21


Stamps:  Inner Mermaid - Ellen Hutson (retired)
Ink:  Marigold, Chamomile, Misty Mint, Sea Glass - Altenew, Nocturne - Versafine Clair
Paper:  White - PTI, Watercolor Paper - Canson Cold Press.
Accessories:  Semi Circles Mid Century Modern Stencil - Claire Brennan Designs, Mermaid Die - Amazon, blender brushes, enamel dots, star and heart - Altenew, Nuvo Drops - Gloss Simply White, Copic E02.

Sunday, August 4, 2024

We're Not Old - We're Mid Century Modern

 Today I have a masculine card to share  -  it's always hard to pick a masculine subject/design and it was equally hard to photo this black background card!    

I ended up going into the back yard and setting the card on the arm of our Adirondack chair with the outside wall of the garage in the background - well that actually adds to the masculinity right??!!


I gold embossed the stamps from the Mid Mod City set by Claire Brennan Designs onto black card.  I embossed the We're Not Old sentiment on a scrap of black, fussy cut it and added it to the top left corner with foam dots.  I added Tim Holtz Droplets/Halloween to the top of the three tower buildings.

I like that it says "We're Not Old" and "We're Mid Century Modern"  since I can include myself in that sentiment on any card I send now (!)
 
Inside I stamped: 
Happy Birthday
Hope your Day is Fabulous

I'm linking my card to:

Metals - colors. hardware  ends 8/5


Season's Delight - a trip to the city  ends 8/9

Krafty Chicks  ends 8/7

ends 8/6

first time using this stamp set


Stamps:  Mid Mod City Stamp Set - Claire Brennan Designs
Ink:  Versamark
Paper:  True Black - Papertrey Ink
Accessories:  Gold Embossing Powder - Ranger, heat tool, powder pillow, Droplets - Halloween, Tim Holtz/Idea-ology, foam dots.