Thursday, January 30, 2020

Tag Friday at A Vintage Journey

Whenever there is a 5th Friday in a month - A Vintage Journey has a Tag Friday Post and as one of the Creative Guides,  I signed up to make one this month.
My creative juices are moving towards Valentines day and I used some old and new products to create my tag today.

I finally 'cracked' and purchased the 3D Texture Fade Crackle embossing folder and used that for the base of my tag.  I sprayed a piece of  Kraft Stock paper with water and embossed it.  I dried it with my heat tool and then sponged over it with Vintage Photo DOX ink which really highlighted the wonderful crackle achieved!
Then I used a newly released die - Heart Beat Thinlits by Tim Holtz/Sizzix - cutting it out of a piece of black Classic Kraft and the heart piece out of red.  I sanded over both pieces lightly to expose some of the kraft beneath the colors.  I layered the heart frame over the panel with foam dots and then added the red heart in the center with foam dots.  I adhered a Chit Chat Sticker, a Clippings Sticker and tiny white clay hearts from Honey Bee Stamps onto the piece.
I used an older Stacked Words: Valentines die from Tim Holtz/Sizzix to cut the XO out of red Kraft Stock, sanding it a bit and layering it on with foam dots.  I added black clay hearts around it.
I stamped the sentiment from an older Saying Stuff stamp set by Tim Holtz/Stampers Anonymous on a sentiment strip from My Favorite Things, sponging the edges with the Vintage Photo Dox.  I cut a piece of black card slightly larger than my tag and adhered the tag to it.  I punched the hole out, looped a piece of satin ribbon through it and adhered a little bit of vintage lace along the top edge. (Adding the lace immediately made it feminine  - so if I was making this for a male, I might not add the lace!)
So please join us over at A Vintage Journey and link up your own tag - we'd LOVE to see what you create!  You'll find Tag Friday here.


I'm also linking my tag to:


Love

Stamps:  Saying Stuff - Tim Holz/Stampers Anonymous
Paper:  kraft tag, Classic Kraft  papers Tim Holtz/Idea-ology, water color paper - Canson.
Ink:  Ranger Distress Oxide Vintage Photo
Accesories:  Heart Beat Thinlit Die, Stacked Words: Valentines Die - Tim Holtz/Sizzix, Dienamics Sentiment Strips - My Favorite Things, Crackle 3D Texture Fade Folder - Tim Holtz/Sizzix, Tuxedo Clay Hearts - Honey Bee Stamps, Chit Chat Stickers and Clipping Stickers - Tim Holtz/Idea-ology, satin ribbon, vintage lace, form dots, Tombow Glue, mini sander.

Wednesday, January 29, 2020

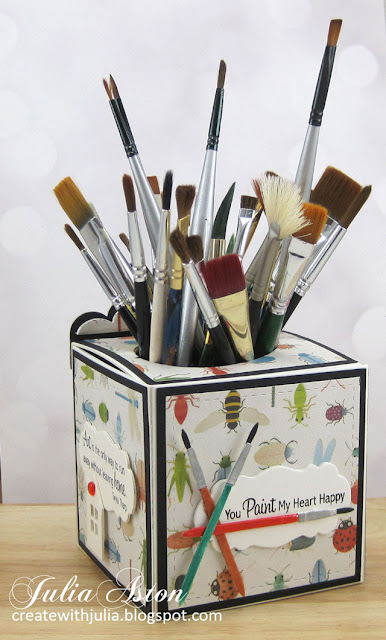
You Paint My Heart Happy - a Box to Hold My Brushes

I love making artistic things to hold my craft supplies in my craft room.  
Today I have a box to put my paintbrushes in on my work table and I used Eileen Hull's newly released Chapter 2 Gift Box with Scalloped Edges Die to make it!

I have had the cute paintbrush die from My Favorite Things for years and this is the first time I've used it (!!) - I knew I had it and was thankful I could find it in my craft room.  It is no longer available but they have a similar one here.  
I die cut the 3 pieces of the brush out of watercolor paper 3 times, painted the handles and the brushes with watercolor paints and used a Silver Pen to color the 'metal' pieces.  I glued the layers on each brush and then arranged them over the sentiment label with glue and foam dots.
I cut the die pieces twice out of matboard to make my box.  I cut an extra scallop out of black matboard.  I cut 5 squares out of the bug patterned paper using a Stitched Square Die then layered them to slightly larger squares cut from black card stock for each panel on the box.  I die cut one of the smaller scallops out of the bug paper and adhered it to the matboard scallop.  I layered that over the larger scallop cut out of black matboard.
All of the sentiment stamps are from an older set Clearly Sentimental About Art from My Favorite Things.  I cut the little house tag from Eileen's House Ornament Die - cut some off the bottom and added an acrylic heart at the top
This fun bug paper (can bugs be fun??!! yes, when they are colored like this!) is from American Crafts that I purchased at JoAnn.
I added a little globe charm from my stash to the quote stamp below.
I used an older Tim Holtz/Sizzix Movers and Shapers Sized Oval Medium Die to cut out the oval in the top.  I wanted a big opening for the brushes but not so big that the brushes would fall all over the sides of the box - so an oval seemed like a good shape to use here  I added a large and small scalloped piece on the back edge to, again, limit how far the brushes might fall back and it also adds a design element to the back edge of the box.
 This box will paint my heart happy when I see it while I'm working at my craft table and when I reach for a brush to watercolor something!

Here's a review of the projects I've made this month using these two new dies 
from Eileen Hull/Sizzix
(Click on the Title to see the post)
Don't forget to CREATE TODAY!!

Please check out Eileen's blog for more creative ideas from the Inspiration Team, using her newly released Chapter 1 dies - Gift Box with Scalloped Edges and Display Stand Die.


Stamps:  Clearly Sentimental About Art - MFT (retired)
Paper:  White and Black Little Sizzles Matboard - Sizzix, True Black cardstock - PTI, watercolor paper - Canson (used for die cut paintbrushes), Bug DP American Crafts - Joann.
Ink:  Obsidian - Altenew
Accessories:  Gift Box with Scalloped Edges Die, House Ornament Die - Eileen Hull/Sizzix, Movers and Shapers Sized Oval Medium Die - Tim Holtz/Sizzix, Dienamics Paint Brushes Dies - MFT (retired), Stitched Mat Squares - Lil Inker Designs, Kuretake Water Color paints Black, Red, Burnt Sienna, Veridian, Red Hot Acrylic Hearts - Honey Bee Stamps, Tombow Glue, Red Line Tape, Silver Leafing Pen - Krylon, foam dots.

Wednesday, January 22, 2020

Create Today Magnetic Sign Board - Eileen Hull's Display Stand Sizzix Die

Today I'm sharing another project I made using Eileen Hull's just released Display Stand die.  I thought it would be fun to create a magnetic sign board!  
I purchased the colorful plastic magnetic kids alphabet from Amazon.  There are all shapes, sizes and colors of magnetic letters available.
I die cut the Display Stand out of matboard.  Then I cut a Wafer Thin Magnetic Die Storage Sheet to fit the panel.  I rounded the corners with my Zutter Corner Rounder and adhered it to the matboard with Multi Medium Matte
I cut 2 pieces of DP to adhere to the front and back of the top panel.  I stamped 2 sentiment strips with art sentiment stamps.   I also put a few enamel dots over the circles on the front strip.
 In case you didn't see my previous posts using this die - here are some photos of how to fold it to create the display stand.  It's just one piece and easy peasy once you've done it the first time.
Fold on score lines
Press right panel down into the opening
The tab will click into the slot in the middle piece.
Fold left panel over and corners will snap under the narrow piece.
Here's how it looks from the bottom when assembled.
 How happy would this make you sitting on your work table reminding you to create?! Or, you could let the kids learning their alphabet and spelling words play with it!
AND -  of course, you can change the words every day!
 My magnetic Sign Board will be posted over on Eileen's Blog this week (she and several of the Team have been at Creativation in Phoenix, AZ this week, so the post may be Thurs or Friday rather than the usual Wednesday!) along with projects by others on her Inspiration Team!  Check it out and be inspired!  

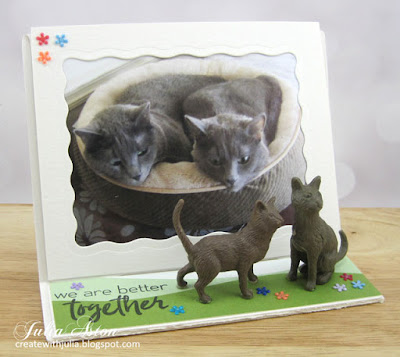
See my Cat Display Stand here.
See my Succulent 2020 Calendar Display Stand here.

I'm linking my display stand to the following challenges:

Through the Craftroom Door
Anything Goes

Arty Divas
Anything Goes

Everybody Art
Anything Goes

Simon Says Stamp Monday
Home Decor

Path of Positivity
Character Traits

Stamps:  Clearly Sentimental About Art - My Favorite Things (no longer available)
Paper:  White Little Sizzles Matboard - Sizzix, White Cardstock - PTI, DP Rainbow Paper Pad - Ms Sparkle and Co - JoAnn.
Ink:  True Black - PTI
Accessories:  Display Stand Die - Eileen Hull/Sizzix, Double Ended Banners Die - PTI, Wafer Thin Magnetic Die Storage Sheets - Ellen Hutson, Plastic Magnetic Letter and Numbers - First Classroom purchased on Amazon, Zutter Corner Rounder, enamel dots - Altenew, Multi Medium Matte. 

Wednesday, January 15, 2020

January Mid Month Reminder Post - CAS Watercolour and CAS Stencil!

So, since I'm now on the Design Teams for both the CAS Watercolour Card Challenge AND the CAS Stencil Card Challenge, I have two reminder cards to share with you today to let you know you still have time to play along with both challenges!
I just realized that my Brusho watercolour background looks very similar to the challenge notice above!
To make my background, I sprinkled Turquoise, Sea Green, Ultramarine and Olive Green Brushos onto a water color paper panel and spritzed with water. 
I die cut the Candles Die and Make a Wish out of watercolor paper and layered them over the panel - coloring the flames on the candles with a Copic. 
I adhered the die cuts over the panel and layered the panel to a slightly larger piece of Enchanted Evening card stock and then to a white card base.
Reminder:  there are prizes to be won for entries to the CAS Stencil 1st Birthday Celebration!

I used a brand new 12 x 12 stencil ATC Mix Up: Toadstools from Stencil Girls for my reminder card.  This stencil has 9 small designs on it and I just realized I should cut them up into individual  stencils!  
My card is 3 3/4" x 3 3/4".
I used Blender Brushes from Picket Fence to rub the Distress Oxide inks through the stencil.  I've had these brushes for quite some time - but this is the first time I've used them!?!   
First I inked over the mushroom stems with Antique Linen, then I colored the mushroom heads with Candied Apple and then I realized some of the pieces by the stems were grasses - so I brushed over them with Evergreen Bough - not worrying if the green overlapped onto some the the stem pieces.
(I could have masked the stencil if I wanted each color pristine but I liked the look of it blended, it adds more depth!)  

I added Vanilla Flower Sequins from Simon Says stamp along the bottom of the stems.  I die cut the stenciled panel with a square Nestability die and layered it to my card base cut with Noted Scalloped Square Die from PTI.
You have until Jan 24th to link up your cards to either challenge.
CAS Watercolour and CAS Stencil.
Please join us!

I'm linking my birthday card to:
Happy Little Stampers

I'm linking my mushroom card (new stencil) to:
Die Cut Divas


Make a Wish
Paper:  White, Enchanted Evening - PTI, Water Color Paper - Canson.
Accessories:  Brushos - Turquoise, Sea Green, Ultramarine, Olive Green, water mister, Candles Die - Alexandra Renke, Birthday Top Edgers Dies - Impression Obsession, Copic Y38

Mushroom
Paper:  Water Color Paper - Canson
Ink:  Ranger Distress Oxide Ink - Antique Linen, Candied Apple, Evergreen Bough, Blender Brushes - Picket Fence, ATC Mix Up: Toadstools Stencil - Stencil Girls.

Have a Beautiful Day Calendar - Eileen Hull Sizzix Display Stand Die

Today I'm sharing my 3rd project using one of Eileen Hull's fun new Chapter 1 Dies -  The Display Stand.  I'm also posted over on Eileen's Blog today where other Inspiration Team members will also be showing their projects!  I can't wait to see all of the creative ideas they have for this die!

For this project I used the die to create a calendar stand for my desk - with a sentiment from Botanical Bounty Sentiments set by Papertrey Ink to remind myself to look forward to a great day every day of every month!  
I love how pretty this came out! And it is SO sturdy using matboard.
I cut and adhered botanical papers from a Greenery Paper Pad from Joann to the base and top - I thought the potted plants and colors would look nice during any month of the year!  I purchased the 3" x 2 1/4"  2020 mini tear off calendars from Taylored Expressions.
I die cut the potted plant out of water color paper using Hanging Planter Dies from Sizzix.  I colored it with water color paints and when it was dry, I added Glossy Accents as well as 2 more layers of die cuts to make it more durable.  I added Vanilla flower sequins from Simon Says Stamp to the pot while the Glossy Accents was still wet.
I added a stamped panel on the back as well, just as a reminder to feel good about myself! And just in case it was in a spot where someone could see the back of it!
Just a quick photo review of how to fold this one piece die!
Fold on the score lines
Push the piece on the right down through the center
The little tab will click into the opening on that center piece.
Fold the left panel (above, under my thumn), over to the right covering all the openings and the corners snap into the upright piece (under my thumb below) on both sides.
Here's how it looks from the back -  cool right??!  
You don't need ANY adhesives to hold the die cut together!
 

 So please check out Eileen Hull's blog every Wednesday in January where the Inspiration Team will be posting creative and inspiring projects using both Eileen's Chapter 1 dies -Display Stand and Gift Box with Scalloped Edges!

Stamps:  Botanical Bounty Sentiments - PTI
Paper:  Little Sizzles White Matboard - Sizzix, Simply Chartreuse - PTI, Greenery Paper Pad - Joann.
Ink:  True Black - PTI
Accessories:  Display Stand Die - Eileen Hull/Sizzix, Hanging Planter Die - Olivia Rose/Sizzix, 2020 Mini Tear Off Calendar - Taylored Expressions, water color paints, paint brush, water, Glossy Accents - Ranger, Vanilla Flower Sequins - Simon Says Stamp, Tombow Glue.