Saturday, November 19, 2022

Like a Hug in a Mug

After an unusually warm fall here in New England, it's finally turning colder (I'm happy! some people aren't?!)  and our minds are turning to warm winter beverages!

I pulled out the wonderful Cozy Cup stamps and dies  as well as the Coaster die for my card today - all from the Greetery!

I stamped and die cut the images and die cut the coaster - then I sponged over all the edges with Frayed Burlap Distress Ink.  I layered all the images over a panel of Wood Panel designer paper, stamped the sentiment from Hug in a Mug set from SU and added red acrylic hearts.  The saucer and foamed cocoa are up on foam dots.

I'm linking my card to:


Stamps:  Cozy Cup - The Greetery, Hug in a Mug - SU.

Paper:  Water color paper - Canson Cold Press, DP Wood Textures - Craft Consortium.

Ink:  Archival Distress Vintage Photo and Faded Jeans - Ranger, Ranger Distress Frayed Burlap, Versafine Clair Nocturne.

Accessories:  Cozy Cup and Coaster dies - The Greetery, finger dauber, acrylic red hearts - Honey Bee Stamps, foam dots.

Friday, November 18, 2022

Home is Where.....

 I have a lot of friends with dogs (and cats) and so I like to have pet cards on hand.  This card was so easy to put together - I just used papers from My Dog paper pad from Echo Park.  It has lots of  different dog images pages, and coordinating plaids, dots and solid color pages.  There are also pages of coordinating image/sentiments like the one I used on my card today.

I used two different papers from the paper pad as well as the sentiment piece which is framed in brown card and popped up on foam dots.

I'm linking my card to:
I was inspired by all the dogs on the top piece of the bag in the photo.

The winner of this challenge will receive the lovely bag shown as the photo Inspiration - made by DT member Kim!


Paper:  White, Cocoa Bean - PTI, DP My Dog 6"x6" paper pad - Echo Park
Accessories: foam dots.

Thursday, November 17, 2022

Blue Santa

 I recently started playing with the wonderful Tartan Builder Stencil Set from the Greetery and decided to pair the plaid background with a Tim Holtz/Sizzix Retro Santa Die I recently purchased.

I just used one color on the 4 plaid stencils that I used - Ranger Distress Candied Apple.  I applied the ink with a blender brush.  And I gave Santa a blue suit for contrast.   The sentiment was made using Penned Elegance stamps and dies from PTI which may not be available now.  The sentiment is up on foam dots.


I'm linking my card to:
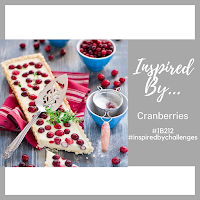
I was inspired by the red striped towel and the blue dishes

this is the first time I'm using the Santa die.


My background is stenciled.

Stamps:  Penned Elegance: Christmas - Papertrey Ink.
Paper:  White - PTI, blue - Park Lane (JoAnn)
Ink:  Ranger Distress Candied Apple, Versafine Clair Nocturne.
Accessories:  Retro Santa Die - Tim Holtz/Sizzix, Penned Elegance: Christmas dies - PTI, Tartan Builder Stencil Set - The Greetery, blender brush, foam dots

Monday, November 14, 2022

Bake it Merry!

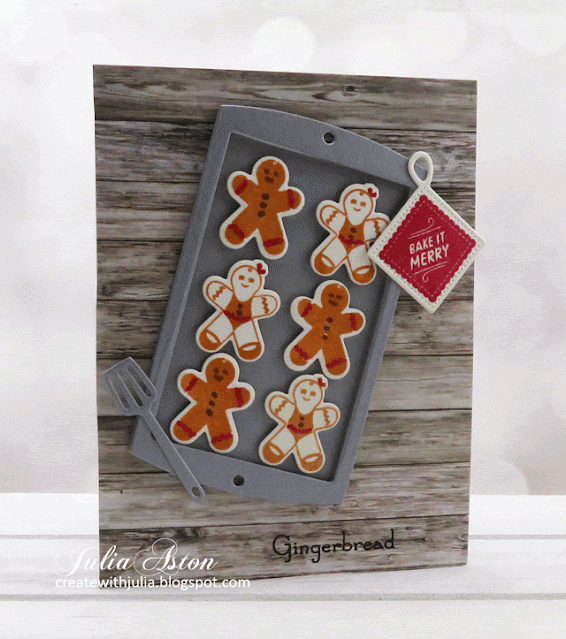
 My card today is celebrating all of the wonderful baking that will be going on in November and December for Thanksgiving and Christmas.

Gingerbread men (and women!) are my very favorite to bake during the season and remind me of my childhood the most, as my mother always made them for Christmas!

The cookie pan, spatula and pot holder are stamps and dies from Bake It Merry from The Greetery.  The gingerbread boy, girl, and sentiment stamps and dies are from Gingerbread Joy - retired from Waltzingmouse.

I'm linking my card to:

Fusion Challenge

I was inspired by the gingerbread cookies on the tray inside the mug as well as those standing outside the mug


Christmas

First time using the Bake it Merry Stamps and dies


Stamps:  Bake It Merry - The Greetery, Gingerbread Joy - Waltzingmouse (retired)
Paper:  White - PTI, Brushed Silver - SU, Water color paper - Canson Cold Press, DP - Wood Textures - Craft Consortium.
Ink: Versafine Clair Nocturne, Caramel Toffee, Ruby Red - Altenew
Accessories:  Bake it Merry Dies - The Greetery, Gingerbread Family Dies - Waltzingmouse (retired), Copics E37, R29, foam strips and dots.

Sunday, November 13, 2022

Snowman Snow Globe

I just love snow globes - I have a small collection of real ones, and several stamp/dies of them!

 I used an older set from Papertrey Ink called Winter Snow Globe with a sentiment from Flurries - a retired set from Waltzingmouse.  The snowflake was cut with Snowflake 3D Impresslits from Tim Holtz/Sizzix. 

I embossed the snowflakes in the globe with white embossing powder and the base with silver embossing powder.

The die cut snowflake and snow globe are both up on foam dots.

I layered a piece of clear acetate over the  snow globe but it doesn't really show in the photo! 

I'm linking my card to:

Inkspirational


Christmas


Stamps: Winter Snowglobe - Papertrey Ink, Flurries - Waltzingmouse (retired)
Ink: True Black - PTI, Versamark
Paper: White, True Black, Clear Acetate - PTI
Accessories: Winter Snowglobe dies - PTI, Snowflake 3D Impresslits - Tim Holtz/Sizzix, orange Copic, foam dots, white and silver embossing powders, heat tool.

Saturday, November 12, 2022

From Our Gnome to Yours

 Working on the Christmas cards now.  Although I already have enough made for this year I keep buying new things and want to use them!

For this card I used some purchases from Charlie and Paulchen, a company in Germany that I found through Chrissie Stokes' posts.

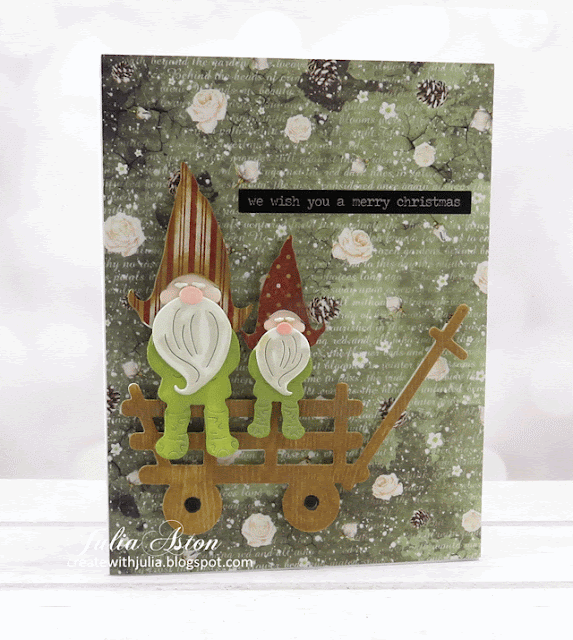
I die cut the gnomes, colored the pieces with Copics and die cut the hats again in patterned paper.  I die cut the cart out of woodgrain paper and inked over it with Dox Frayed Burlap.  I layered the cart over the patterned paper on foam strips and layered the gnomes onto the card with foam dots.  I added a Holiday Talk Sticker for the sentiment.

I love how fun these guys are!

I'm linking my card to:

first time I've used the hand cart die

Wood Red Animal/Elf

Winter


Paper:  Water Color - Canson Cold Press, Distress Woodgrain Card - Tim Holtz/Ranger, DP - Paper Stash-Tidings - Tim Holtz/Idea-ology, Frozen Roses - Ciao Bella.

Ink:  Ranger Dox - Frayed Burlap, Peeled Paint

Accessories:  Big and Small Wights, Hand Cart dies - Charlie and Paulchen, Copics N10, W2, R20, R00, Metallic Stickers Holiday Talk - Tim Holtz/Idea-ology.

Friday, November 11, 2022

A Pop Up Birthday

 I wanted to make a special 17th Birthday Card for my Godchild, Eden whose birthday is coming up on Saturday.   I decided it was time to get out the Platform Pop Up dies and Platform Pop Up Add On dies that I purchased a few months ago and get a card made!

Lawn Fawn has a wonderful YouTube video with step by step instructions on how to put it together.  It's really easy once you know what piece to put where!

I used a white cardstock for the base and back piece (the Platform Pop Up Add On die sold separately).  You can make a perfectly lovely card with out the back piece - just the base - and that will fit in a regular A2 envelope.  With the back piece on the pop up box, you need a 5 1/2"x5 1/2" envelope.

Here's a view from above where you can see the 3 layers for your scene.  The die includes grass and landscape dies to use on the sections.
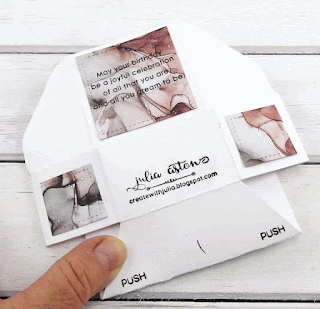
Here's a view of it folded to mail.  I added PUSH stamps to the bottom so in case the receiver couldn't figure out what to do with it (?) - they would try pushing up on the bottom - and it really does just POP up!
Here's a view of the back.  I added a birthday sentiment here and panels of DP.  The die sets include the squares and angled piece dies that you use to cut the pieces on the panels.

I'm linking my platform pop up birthday card to:


I have many animals on my card!


Stamps: Backyard Party Stamp and Die Set - Essentials by Ellen Hutson, Ella and Friends - Mama Elephant, Sentiment Suite: Birthday - The Greetery, Simple Strips Birthday - Taylored Expressions, Interactive Labels - MFT.

Paper: White - PTI, DP Ink Drops Dusk and Ink Drops Earth -Craft Consortium, Silver Metallic Paper - Park Lane/JoAnn.

Ink: Versafine Clair Nocturne

Accessories: Platform Pop Up Die, Platform Pop Up Die Add On - Lawn Fawn, Simple Strips - Taylored Expressions, Alphanumeric Tiny Type Upper Case Dies - Tim Holtz/Sizzix, Copics, Acrylic Hearts - Honey Bee Stamps, 1" circle punch, Clear Glitter Wink of Stella.

Monday, November 7, 2022

Today and Always

 A clean and simple card design today using a Layered Poppy Stamp set from Rubbernecker that I purchased quite some time ago and hadn't used yet.  It's a two piece set - one is the outline of the poppies and stems that I stamped in black  and the other is solid shapes that line up with but don't quite fill in the blooms that I inked in red - giving it a water colored look.

I stenciled around the poppies, added the sentiment and dots of black Nuvo Drops to the center of each poppy.

I'm linking my card to:

Poppies - Remembrance

First time using the Poppy Stamp


Stamps: Layered Poppy Set - Rubbernecker, Military Hero - PTI (both retired)
Paper: White - PTI
Ink: Rusty Red - Altenew, Ranger Distress Old Paper, Versafine Clair Nocturne.
Accessories: mini stencil - Tim Holtz/Stampers Anonymous, finger sponge, Black Nuvo Drops.

Sunday, November 6, 2022

Turkey by the Fence

I'm in full Thanksgiving mode for my cards now.   I got out my favorite fence die and a turkey stamp/die set that I purchased last year but never used (duh).  

Both the Picket Fence Die and the Turkey stamps and die are from Papertrey Ink.  I absolutely LOVE this big fence!  The turkey comes with lots of little stamps for all the sections and colors - so I die cut 6 of the turkey shape and stamped all 6 of them at one sitting since I had all the inks out and the stamps  on blocks.

I sponged over the fence and the edges of the turkey with Ranger Distress Tea Dye ink.

The sentiment and strip die are from Taylored Expressions.  The patterned paper is Autumn Leaves from Rubbernecker.


I'm linking my card to:

First time using the turkey stamps/die.


Stamps: Feathered Friends Mini 17 - PTI, Mini Strips Harvest - Taylored Expressions
Paper: White - PTI, DP Autumn Leaves 6x6 pad - Rubbernecker
Ink: Tea Dye - Ranger Distress, Espresso, Ruby Red, Sunkissed, Cloudy Sky, Mountain Mist, Coral Bliss, Jet Black - Altenew, Cocoa Bean - PTI
Accessories: Feathered Friends Mini 17 die, Picket Fence Die - PTI, Mini Strips Die - Taylored Expressions, foam dots, finger sponge

Saturday, November 5, 2022

Snowy Pinecones

 I seem to be jumping right into winter with my card today!


I made my pinecones and pine cough using Botanicuts: Pine Bough Dies from The Greetery.  I layered the pieces of the pine cone and then colored along the top edges of each piece of the pine cone with orange and brown colored pencils. I layered two pine boughs over the wood branch and inked over parts with Evergreen Bough Distress Ink.  I added Distress Grit Paste: Snowfall to bits of the pinecones and bough.

I adhered the bough onto the woodgrain patterned paper and the cones over the bough with foam dots.  I added a Remnant Rub: Christmas sentiment .  I masked the bottom half of the card and splattered the top with a white POSCA pen.

I'm linking my card to:

Pinecones

Trees:  I hope a pine bough counts?!
Anything Goes


Paper: Kraft, New Leaf , Cocoa Bean - PTI, DP Wood Textures Craft Papers - Craft Consortium.
Ink: Ranger Distress Evergreen Bough
Accessories: Botanicuts: Pine Bough - The Greetery, Grit Paste Snow Fall - Tim Holtz/Ranger, Remnant Rubs Christmas - Tim Holtz/Idea-ology, foam dots, brown and orange colored pencils, white POSCA Pen.

Friday, November 4, 2022

Tartan Birthday

 I'm trying to start using all of the products I keep purchasing and then storing on a shelf or in a drawer in my craft room -  soon to forget I even bought them!  Participating in all the fun challenges out there encourages me to look through all of the stamps, dies and embossing folders I have and to use them!

So that's the story for the creation of my tartan plaid birthday card.

I purchased the Tartan Builder Stencil set from the Greetery when it first came out in May 2021 and I'm finally playing with it! It's so easy to use and what a great plaid it creates!  You can create so many wonderful plaids just by changing the colors you use.  They can be bold or softly colored, you can use different shades of the same color

I used three colors on my plaid.  Betsy Veldman, owner of The Greetery, has a YouTube video that shows you which stencil to use first (there are 5 layers but you don't have to use them all) and to start with the lighter colors first

  I started with Sunflower for the first layer, then Garden Patina for the second two layers, then Watering Can (dark grey) for the final two layers. I used Archival inks for this, but Ranger DOX inks work well too.  (I played with the stencils with DOX inks too!)

I die cut the birthday sentiment from Poppy Stamps out of black twice, adhered them together for a little more depth and then adhered them over the plaid.  I added some enamel dots to finish it off.

I'm linking my card to the following challenges:

I chose my colors using the Color Hues challenge!

November Stencil Fun
Fall colors or anything using a stencil


Seize the Birthday
anything goes


NBUS
First time using my plaid stencils


Paper: White - Papertrey Ink
Ink: Sunflower, Garden Patina, Watering Can - Wendy Vecchi Archival Inks.
Accessories: Tartan Builder Stencils - The Greetery, Happy Birthday Poe Script Die - Poppy Stamps, blender brushes, enamel dots - Altenew.