Thursday, October 30, 2014

A Vintage Journey #18 - Bountiful Harvest

I'm excited to be participating in my second A Vintage Journey challenge as one of the newbie Creative Guides on the team. 
Here's the challenge in Host Sandie's words:  With Halloween's passing we step into fall.  For this challenge let's think about the harvest.  It seems that pumpkins, wheat, corn and even the Harvest Moon could be in order. For us in the US -  a Thanksgiving theme could work but not necessary.  
I decided to focus on the Thanksgiving aspect of fall and I used an Art Parts Create a Container to make this lovely box.
 Here are all the pieces that come in the Art Parts Create a Container Kit.  I inked the back piece with Wild Honey Distress Ink and then stamped it with Ornate Dots in Archival Jet Black.  I inked the square with Tumbled Glass Distress Ink and then stamped it with From A-Z background stamp in Archival Watering Can Ink.  Then I stamped the sentiment from Say it With Art in Archival Jet Black.  I sponged the edges of both pieces with Chipped Sapphire Distress Ink.  The stamps are all Wendy Vecchi.
I made some cards stamped with Bible Verses (described below) to tuck inside my container, clipping them together with an embossed Hinge Clip, looping a Swivel Clasp through the hole and attaching a Heart Charm to the end of the chain.  It says 'heart songs' inside the heart.
 I embossed the Keyhole with Tree Branch Embossing Powder - add the brads and glued it over the hole on the back piece of the container.
I embossed the Art Parts Leaf with Fern Green embossing powder - and then stamped it with a linear stamp from Large Collage in black.  I embossed the flower with Tree Branch embossing powder and  stamped over it with a dots stamp from Large Collage with Archival Potting Soil Ink.  I added a Blossom Bucket Button  to the center.  I embossed the scalloped edge with Tree Branch embossing powder and then stamped it with Ornate Dots using Archival Potting Soil Ink.  I drew on the faux stitching with fine black marker.
Although we certainly should be thankful all year long - celebrating the Thanksgiving Holiday in the US - reminds me how much I have to be thankful for in my life - family, friends, a home to live in, a husband to share my life with, and the knowledge that it is God's grace that has given me all these things.   SO....  I filled my little container with cards - made from 2 1/2" x 4" pieces of Paper Stash Wallflower paper that I stamped with Bible Verses from Beautiful Blessings by Papertrey Ink..
 I love how they look stamped on this paper.  I sponged around all the edges with Vintage Photo Distress Ink.
 I clipped the cards together with a Hinge Clip that I had embossed in Tree Branch Embossing Powder and slipped them right into the container.
 
 Here's a top view to see the little opening in the container
 And I couldn't let the back go bare-naked!  so I stamped this lovely lacey stamp from Say It With Art by Wendy Vecchi  twice.  The metal pieces come with the Art Parts container - they add strength to the box part.  Looking at this now  - I'm thinking I just might emboss them with Watering Can embossing powder to age them!  Don't know why I didn't think of that when I was putting it together!?!
 So - there it is - my fall/thanksgiving project.
As always, our sponsor is Country View Crafts who is offering one winner, chosen by the Creative Guides, a £10 voucher to spend in their on-line shop.  

 I hope you will be inspired to play along with us -  you have 2 weeks - you will find all the details at the A Vintage Journey Blog - as well as a multitude of glorious projects from my wonderfully talented fellow Creative Guides!

I'm also entering this in the Frilly and Funkie Challenge -  Gratitude

Stamps:  Ornate Dots Background, From A-Z Background, Large Collage Background, Say It with Art - Wendy Vecchi Studio 490; Beautiful Blessings - Papertrey Ink
Paper:  Paper Stash/Wallflower - Tim Holtz
Ink:  Wendy Vecchi Archival Fern Green, Tree Branch, Watering Can and Potting Soil: Ranger Distress Tumbled Glass, Wild Honey and Chipped Sapphire; Archival Jet Black.
Accessories:  Idea-ology - Keyholes, Hinge Clips, Heart Charm, Swivel Clasp; Art Parts Create a Container - Wendy Vecchi; Button - Wendy Vecchi Blossom Bucket; jump ring, Scotch Quick Dry Adhesive, Bic Z4 Black Marker, Wendy Vecchi Embossing Powder Fern Green and Tree Branch.


Tuesday, October 28, 2014

Waltzingmouse Oct Release Day and DT Blog Hop!

The Waltzingmouse October Release day has finally arrived -  today you will be able to purchase the new stamp sets - Flurries, Jolly Old Elf and Elf Made as well as the beautiful new dies - Pretty Panels #1 and Pretty Panels #2.
To celebrate the release - the Design Team is having a Blog Hop -  I am first on the hop this time - but you can always find the list over on Claire's WMS blog if you lose your way.

I have two final cards to share -  first up I used stamps from Flurries along with some Winter Blend Sequins to make this snowy starry winter sky scene. I just LOVE this row of trees!  I stamped the little panel of stars stamp many times over the panel to fill the sky around the trees.  
This card is 4 1/4" x 4 1/4".
And for my final offering using the new stamp sets -  here's a fun '10 days to Christmas countdown' card using stamps from Elf Made.  I stamped the numbers on some grid paper that made it easy to stamp everything straight (!) and layered the strips and punched sentiment over a panel of patterned paper with foam dots.
Next stop on the hop is Sandie Dunne
Details on how you can win a stamp set are on the WMS blog.
Thanks so much for joining us for the Waltzingmouse October release!  Now you can GO SHOPPING so you can get started on all those holiday cards that need to be stamped!!!
Warm Winter Wishes
Stamps:  Flurries - Waltzingmouse
Paper:  White, Smokey Shadow, Enchanted Evening - PTi
Ink:  Archival Jet Black
Accessories:  winter blend sequins - Avery Elle, Glue N Seal - Ranger

Sleeps til Christmas
Stamps:  Elf Made
Paper:  white, smokey shadow, white grid sheets - PTI, DP Christmas Home - Teresa Collins
Ink:  Archival Jet Black, Fern Green, Red Geranium
Accessories:  Pure Poppy Twill Tape - PTI, foam dots, Winter Blend Sequins - Avery Elle, Key Tag Punch - SU. 

Monday, October 27, 2014

Waltzingmouse Oct Release Sneak Peek Day #3

We've made it to Day #3 of the Waltzingmouse October Release Sneak Peeks -  tomorrow Claire will be releasing all three sets and the Design Team will be having a blog hop to celebrate.  Today we are showing you creations made with the third set of the release -  Elf Made.
I used the Stitched Tag dies for both tags on the card front and the one inside.  The heart and star are cut from craft metal using dies from the Folding Tag die set.
I colored my little girl elf (who is holding a piece of mistletoe!) with Copics and used a silver Wink of Stella to outline some of the edges on her outfit and to color the bell -  it's very shimmery IRL - you can see it a bit in this photo.
I used another stamp from the set on the tag inside the card.
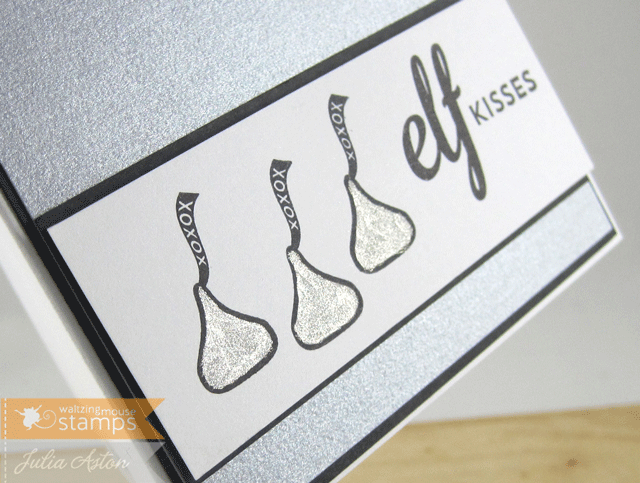
For my next card - I stamped the sweet little 'kisses' from the set in black and colored them with my silver Wink of Stella.  I layered the panel onto a brushed silver cardstock.  This card is 4 1/4" x 4 1/4"
Here you can hopefully see the shimmer on both cardstock and kisses.
I used another of the sentiments from the set on the inside of my card that coordinates nicely with the kisses on the front!
There are tons of stamps in this Elf Made set - I have used just a few of them today - I hope you'll check out the rest of the DT linked below to see what stamps they have used from the set!  I'll be back tomorrow for the DT blog hop at 2 pm and the new stamps will all be available to purchase! Whoo hoo!


Santa Told Me
Stamps:  Elf Made - Waltzingmouse
Paper:  White, Vintage Cream, Scarlet Jewell, DP Textstyle Holiday Flourishes and Swirls - PTI
Ink:  Archival Watering Can, Scarlet Jewell - PTI, Ranger Distress Antique Linen
Accessories:  Maraschino Twine - The Twinery, Linen Ribbon - Idea-ology/Ranger, rhinestones - Kaiser Craft, Dies - Stitched Tag Die and Folding Tag Die (star and heart) - Waltzingmouse, Silver Wink of Stella, Copics - G28, R59, E00, R20, YR24, 100, BG18, foam dots,  baby blue craft metal sheet - Add a Little Dazzle.

Elf Kisses
Stamps:  Elf Made - Waltzingmouse
Paper:  white, true black - PTI, Brushed Silver - SU
Ink:  Archival Jet Black
Accessories:  foam dots, Wink of Stella - Silver.

Sunday, October 26, 2014

Waltzingmouse October Release - Sneak Peeks Day #2

Welcome to Day 2 of the Sneak Peeks for the Waltzingmouse October Release.  All three sets will be available on October 28th -  The Design Team showed you Flurries yesterday - and today we are working with a cute set called Jolly Old Elf.  
For my first card I used one of the 3 elves from the set -  two of the 8 sentiments and 3 of the 10 little foliage stamps in the set! (can you tell this is a BIG set chock full of stamps?!)  I love, love, love the little pine sprigs and pine cones!
Here's what I stamped inside.
One of the elves in the set has a separate stamp for feet, legs, body and hat so for my 2nd card - I just inked the hat and the feet - along with another of the sentiments from the set! - oh - and I used the bells too!
Here's a little close up view of the stampings!
Inside I stamped the same sentiment that I used on the front of my first card.
I used the Freshly Made Sketch for the design of this card.
 I hope you will check out the rest of the Design Team linked below - to see what stamps from this adorable Jolly Old Elf set they have used  There are some lovely stockings and more sentiments that I'm sure you will see!  I'll be back tomorrow at 2 pm EST for Day 3 of the peeks!

Becca Feeken
Jeanne Jachna
Julia Aston - me!
Karin Ã…kesdotter
Laurie Schmidlin
Tosha Leyendekker
Claire Brennan  - owner/Designer


Have Your Elf
Stamps:  Jolly Old Elf - Waltzingmouse
Paper:  White, Dark Chocolate, Simply Chartreuse - PTI
Ink:  Wendy Vecchi Archival Potting Soil and Fern Green
Accessories:  Winter Blend Sequins - Avery Elle, Glue N Seal - Ranger

Gnome for the Holiday
Stamps:  Jolly Old Elf - Waltzingmouse
Paper:  White, Summer Sunrise - PTI, DP Christmas House Paper Pad - Teresa Collins
Ink:  Archival Jet Black, Wendy Vecchi Archival - Dandelion and Fern Green


Happy Birthday Shirley Bee!

Today is my fellow Mixed Media Card Challenge Design Team member, Shirley Bee's,  Birthday - and Maria (another DT member from MMCC) is hosting a blog birthday party for her! Shirley is a card maker/stamp designer extraordinaire -  if you haven't seen her blog  - you must check it out here.

Shirley has been using some beautiful watercolor techniques on her cards most recently - and I decided I would CASE one of her own cards to honor her birthday today.

Happy Birthday Shirley!   This card is winging it's way to you over the Atlantic Ocean!
I used a two step stamp set from Rubbernecker - Watercolor Poppies - The set includes the solid blossom stamp as well as an outline stamp. I didn't color the blooms like poppies -  I used several different colors of Ranger Distress Markers on the solid floral piece - spritzed the stamp with a Mini Mister and then stamped it on a watercolor paper panel.  I let it dry for a few minutes and then stamped the outline stamp over the florals using Archival Jet Black ink.  The sentiment is from WPlus9.  I added a little splatter with a Ranger Distress Marker spritzer and a Distress Marker as well as a few Lemonade Blend sequins from Avery Elle.

I'm linking my card over at Maria's blog here. If you'd like to join in helping Shirley celebrate her birthday - you'll find all the details there.

While I was making this card for Shirley -  I thought this stamp would be great for sympathy cards - which I needed for my stash - so I quickly made 8 of them similar to these 2!  The sympathy stamps here are from SU and PTI
Stamps:  Happy Birthday - Strictly Sentiments - WPlus9, Watercolor Poppies - Rubbernecker
Paper:  Watercolor paper from stash,  Vintage Cream and Summer Sunrise - PTI
Ink:  Archival Jet Black
Accessories:  Ranger Distress Markers - Spiced Marmalade, Mustard Seed, Stormy Sky, Peeled Paint, Worn Lipstick, Lemonade Blend Sequins - Avery Elle, Ranger Distress Marker Spritzer

Saturday, October 25, 2014

Tim Holtz - 12 Tags of 2014 - October

I finally made my October Tim's Tag - I knew exactly what I wanted to do with it - but couldn't seem to find the time to sit down and do it!
Here is Tim's tag
And below is my version.  I used black embossing paste on the Halloween Stencil.  I also dabbed on Distress Stains - not having any of the new Distress Stain Sprays yet - so the colors look much brighter - I also forgot to mist the tag with water before staining - so that probably had something to do with it as well!  But I like the result!
Instead of a stamped pumpkin and spider - I used the Candlelight Fright die for my spooky candlestick and spider. 
When I was moving around the BOO Alpha Chips to see how they could fit on the tag - I realized it looked like the spider was grabbing the first O when I moved it up a bit, so that's how I placed it.  I colored the rope of the Tinsel Twine with a black marker since I didn't have the black tinsel.  I embossed the spider with Watering Can and a sprinkle of Tree Branch Embossing Powders and then rubbed some Clear Rock Candy Distress Crackle on him.  I added 2 orange rhinestones for eyes.  I added dots to the corners of the letters with a Black Glaze Pen.
I embossed the base of the candlestick with Wendy Vecchi Watering Can embossing powder and the flames with Tree Branch embossing powder.  I rubbed some dried up Snowcap Adirondack Acrylic Paint on the candles - (it was really thick being dried up!) - then I rubbed some Clear Rock Candy Distress Crackle paint over them and let them dry.  I added 2 Remnant Rubs/Apothecary on the candlestick.  Then I rubbed over the whole thing with Vintage Photo Distress Ink.
I added the Monocle with Remnant Rubs on the front and white distress paint on the back and attached it to the trimmings with a Wire Pin.  I layered my tag to a slightly larger tag cut out of Smokey Shadow card stock and called it done!
You'll find lots of tags linked up over at Tim's post - are you making one?  You have until Oct 31st!

Paper:  Manila tag - Ranger,  Smokey Shadow - PTI
Ink:  Wendy Vechi Archival Watering Can and Tree Branch, Ranger Distress Vintage Photo.
Accessories:  Idea-ology - Monocles, Alpha Chips/Elementary, Wire Pin, Remnant Rubs/Apothecary, Tinsel Twine, Jute String, Trimmings Naturals/Black/Cream; Clear Rock Candy Distress Crackle - Ranger, Candlelight Fright Die - Alterations/Tim Holtz/Sizzix, Black Sharpie, Black Glaze Pen- Sakura, rhinestones - Kaiser Craft, Ranger Distress Stains - Picked Raspberry, Marmalade, Salty Ocean, Halloween Stencil - Tim Holtz, Wendy Vecchi Embossing Powders - Watering Can and Tree Branch, Wendy Vecchi Black Embossing Paste.

Waltzingmouse Oct Release Sneak Peek - Day 1

Hi everyone -  Claire has her Waltzingmouse October Release all set to go on Oct 28th -  but for the next 3 days, prior to the release, members of the Design Team will be sharing Sneak Peeks to wet your appetite!!  Today we are working with a beautiful little set called Flurries - that includes several beautiful snowflakes but also some lovely little trees, a panel of stars, some foliage sprigs and two sentiments.
For my first peek -  I made a New Year's card using the row of trees, strip of stars and one of the sentiments. I also used a new die being released in October -  called Pretty Panels #2
Here's a close up to show you the wonderful crispness of the stampings. I used Archival Inks.  I cut the Pretty Panel die twice - once in white and once in Summer Sunrise - then separated the outside border from each (it pulls right off) and put the Summer Sunrise border on the white panel.  I layered them both to another die cut from white so I could pop it up on foam dots over the linen ribbon.  I inked the ribbon with the New Leaf ink that I used on the trees.
Next I used two of the snowflakes from the set and the other sentiment.  The background panel is from an older WMS set called Nordic Winter.  I popped up the snowflake panel on foam dots over the background and added Rhinestones to the centers of the snowflakes.
Here's a close up of the snowflakes so you can see the wonderful detail on each one!
This is just a lovely wintertime set - perfect for so much more than holiday cards.  Please take a look at the rest of the Design Teams creations linked below - using the Flurries set.   I'll be back tomorrow at 2 pm EST with Day 2 of the Sneak Peeks - hope you can stop by!!


Happy New Year Card
Stamps: Flurries - Waltzingmouse
Paper:  White, Summer Sunrise, New Leaf - PTI, DP Christmas Home - Teresa Collins
Ink:  Archival Fern Green and Dandelion
Accessories:  Pretty Panel Die - Waltzingmouse, Linen Ribbon - Idea-ology/Tim Holtz, foam dots.

Snow Flake Card
Stamps:  Flurries and Nordic Winter - Waltzingmouse
Paper:  White - PTI
Ink:  Archival Cornflower Blue
Accessories - Foam dots, rhinestones - Kaiser Craft

Thursday, October 23, 2014

Fusion Card Challenge - October 23rd

Happy Thursday my friends!  -  there's a new Fusion Challenge up today!  Just in time for Halloween with this lovely photo for inspiration -  or you can just be inspired by the colors and not the theme -  and what a fun and easy sketch to use for inspiration - chose one or both - and do a FUSION!
Being on the Fusion Design Team - I of course wanted to make a card for the challenge - but I was a little short on time with some other obligations this week - but being short on time should never deter us stampers from making a card - right??!!
The only thing stamped on my card is the 'be Witched' sentiment - the rest of the design is a piece of patterned paper from DCWV The Ghosts and Goblin Matstack!  How easy was that??!!  Then I just added 3 orange rhinestones and stamped a sentiment inside seen below.  Both stamps are from a wonderful Halloween set from Waltzingmouse called Hocus Pocus
My card is 4 1/4" x 4 1/4".  I was inspired by the Halloween theme and colors for my creation.
So if you are short on time - but still want to create - try going CAS! (clean and simple!)  I can't wait to see what you link up over at the Fusion Challenge!

I hope you might take a minute to check out the rest of the Design Team to see how they were inspired this week!

Michelle Folland
Michelle Lupton
Stephanie Severin

Stamps:  Hocus Pocus - Waltzingmouse
Paper:  white, smokey shadow - PTI, DP - DCWV The Ghosts and Goblin Mat Stack.
Ink:  Archival Jet Black
Accessories:  rhinestones - Kaiser Craft.

Thursday, October 16, 2014

A Vintage Journey - Halloween: to die for!

 With this post - I am over the moon excited to tell you that I was selected to be a Creative Guide for the A Vintage Journey challenges!  I have been participating in their challenges for some time now - and I am SO excited (and nervous) to be working with so many creative vintage designers.  I know I'll learn so much about this genre being on this team.
So today I have my first project to share as a Creative Guide.  I was influenced by Tim's techniques - embossing my bottle, dying my ribbon with Distress Stains - using two of his dies and several Idea-ology pieces as I'll describe below.
 
Anne is our Host for this fortnight (do you love how I've become British!?! That's every other week for us State side folks!)  
And here is the challenge in her words  "Halloween is one of my favourite times of year, I love when the children come to the door, in their costumes, to 'trick or treat'. You do not have to make anything scary (but it would be fun if you did!) but you must use at least one die on your creation and it must be strongly influenced by Tim Holtz.  It can be a tag, card, canvas or mixed media piece."
  I have lots of photos to show you my creative process.
 I embossed an inexpensive clear glass bottle that I picked up at Michaels using Wendy Vecchi embossing powders in Orange Blossom with a little sprinkle of Watering Can.  I sponged Archival Orange Blossom ink all over the bottle (instead of Versamark) so the powder would stick to the glass. This is a technique I learned from Wendy Vecchi on her blog.
 I die cut the pieces below using Tims Halloween Shadows  die.  I inked the pieces with Watering Can Archival Ink and embossed with Wendy Vecchi Watering Can Embossing powder.  I didn't worry about getting total coverage with the powder - I actually brushed some off of the edges to give a more distressed look.
 Here's a close up of how it looks after embossing - you can see the spaces that were brushed off.
 I inked the cork of the bottle with Archival Orange Blossom ink and just sprinkled a little bit of Watering Can Embossing Powder over it - and it came out like this.
 I slipped the trunk of the die cut tree into a Memo Pin and stuck the pin through the cork - cutting off the point so no one would prick their finger on it if they removed the cork from the bottle!  I had glued one die cut bat and the owl onto the tree and added orange rhinestones for the owls eyes. I colored the Crinkle Ribbon by dabbing Walnut Stain and Spiced Marmalade Distress Stains on my Kraft Mat - spritzing with water and dragging the ribbon through the puddle.
 I did cut the gravestones using Tim's Graveyard die.  I added a skull and crossbones from Remnant Rub/Apothecary and a rhinestone to two of the stones.  I adhered it to the bottle with ScorTape and adhered the die cut Trick or Treat sentiment over the stones with foam dots
 I let the fun die cut row of Halloween Shadows run along the bottom of the bottle.  I adhered it with foam dots placed on the 4 heads in the center of the group.
 Of course, I couldn't leave the back of the bottle undecorated!
 I embossed the Alpha Parts Framed numbers with Orange Blossom just scattering a little bit of powder over the pieces after I inked it with Orange Blossom ink to hold the powder on (you have to be careful melting the powder on the plastic as the plastic can melt!).  I added a couple of Remnant Rubs/Apothecary and Label Letters to spell BOO.
 I hope I've given you a little inspiration with my Halloween - To Die For project today!

As always, our sponsor is Country View Crafts who is offering one winner, chosen by the Creative Guides, a £10 voucher to spend in their on-line shop.  

I hope you'll consider joining in on this Halloween challenge - you will find all the challenge details and the link up over at A Vintage Journey.  (Not to mention some MARVELOUS spookiness from the rest of the Creative Guides!  You MUST check them out!!

Paper:  True Black - Papertrey Ink
Ink:  Archival Orange Blossom and Watering Can.
Accessories:  Idea-ology - Memo Pins, Alpha Parts Framed, Remnant Rubs/Apothecary, Crinkle Ribbon, Label Letters; Ranger Distress Stains - Walnut Stain and Spiced Marmalade; Alterations dies - Halloween Shadows and Graveyard Die; clear bottle - Michaels, Mini Mister - Ranger, foam dots, ScorTape, Wendy Vecchi Embossing Powders Orange Blossom and Watering Can.