Showing posts with label Snow. Show all posts

Saturday, December 20, 2025

Inkspirational Challenge #357 - Designer Choice: Cold

 Inkspirational Challenge #357 is up over at the blog - It's Designer Choice this time and Marlena has chosen COLD!


I went with 'snow' as it certainly needs to be cold to snow!  AND I got to use my recently purchased Holiday Moose die and stencil set from Waffle Flower -   he cracks me up just being shown from the snout up - SO clever!!  And he's so easy to color using the stencils.
I layered him over a panel of a dark snowy sky DP and I added Glitter Dust to his antlers just to show how REALLY cold out it is!  The sentiment is from a retired set by PTI.

We'd love to see what you create using COLD!  Please link up your creation over at the Inspirational Blog where you will also find inspiration from the rest of the team!

This challenge ends January 2nd!

Also sending my card to:

1st time using the Moose die and stencil set.


ends 12/31


Christmas/Winter


Stamps:  Christmas Cheer - Papertrey Ink (retired)
Ink:  Nocturne - Versafine Clair, Ranger Distress Tea Dye, Vintage Photo, Peeled Paint.
Paper:  White, True Black - Papertrey Ink, DP Winter 6"x6" Paper Pad - Echo Park.
Other Supplies:  Holiday Moose Die and Stencil Set - Waffle Flower, Glossy White Snow Flakes - This Calls for Confetti, Glitter Duster - Stampers Anonymous.

Saturday, December 6, 2025

Inkspirational #356 - Stencils - Optional Twist of Snowflakes

 Here's my card for the newest Inkspirational Challenge - #356 Stencils -  optional twist -Snowflakes!


I used the Optional Twist with snowflake PP and a snowflake stencil!
I used a 'new to me' technique called Stenciling over Patterned Paper - that I saw on FB - there are several tutorials on YouTube if you'd like to see more examples.

This is a pic of the patterned paper I used on the left - the snowflake stencil placed over the patterned paper and inked with Stormy Sky Distress Ink on the right
Here is a photo of the stencil removed - and the snowflake pattern revealed.

I used a light enough ink that the pattern of the paper showed through the sponging as well as under the area of the stencil.    

I die cut the sentiment twice and adhered it to the middle of the card,  I die cut the edge with a frame die and added 3 sequin snowflakes.

We hope you will join us over at Inkspirational - and show us how you use stencils on your card design! 

This challenge ends Dec 19th.

Also sending my card to:

1st time using this stencil that went with a Make it Market Kit from PTI I bought over 10 years ago! I had the box up on a shelf! I used other things from the kit - but never the stencils and, of course forgot what was in the box!

optional winter related
ends 1/3

ends 12/31


Paper:  white - Papertrey Ink, DP - The Magic of Winter 6x6 paper pad - Echo Park.
Ink:  Ranger Distress Stormy Sky
Other Supplies:  Let It Snow Die - Christmas Cheer Die Collection - Papertrey Ink (retired), Nested Stitched Scallop Rectangle Frame die - Amazon, Snow Flake Sequins - This Calls for Confetti, blender brush.

Saturday, January 18, 2025

Inkspirational #333 - Word Prompt - Snow

 Here is my DT card for today's Inkspirational Challenge - Snow!   We just had a lovely 4" snow fall in MA last Saturday - falling on freezing bare ground.  That small amount is enough for me to feel warm and cozy when I look out the window!


I just received these snowflake dies from a sale over at The Greetery - So I made two cards using different snowflakes.  The snowflake below is from Snipped Showflakes #3.  The DP is from Charlie and Paulchen on both cards and I also added snowflake sequins from This Calls for Confetti on both cards.   The sentiment is from Paper Artsy Alison Bomber EAB05 set.
The snowflake below is from Snipped Snowflakes #2 from the Greetery.
I brushed Clear Glitter Wink of Stella over both of the large snowflakes - so they are shiny IRL but it doesn't show up in the photo.
Here's a close up where maybe you can see the sparkle a little bit?

So we hope you will join us and show us 'SNOW'!  You will find Mr. Linky and some beautiful inspiration from the rest of our talented team over at Inkspirational.

Link up by 1/31!

I'm also sending my card to:

First time using the die cut snowflakes and the DP

The Christmas Song -  Line: Jack Frost nipping at your nose

ends 1/31

ends 1/25


Stamps:   Alison Bomber EAB05 set - Paper Artsy
Paper:  White - Papertrey Ink, Alpaca - Bazzill, DP - Charlie and Paulchen.
Ink:  Stormy Sea - Papertrey Ink
Other Supplies:  Snipped Snowflakes #3, Snipped Snowflakes #2 - The Greetery, snowflake sequins - This Calls for Confetti, foam dots, Clear Glitter Wink of Stella.

Thursday, January 2, 2025

Dec Card Chain Challenge Reveal - Tic Tac Toe

 Today's the reveal of all the cards exchanged in December over at the Card Chain Challenge!  

This month it was a doozy - a 5 block Tic Tac Toe with all S words - ugh.  

I sent my card to Gail in Canada (not sure she received it yet due to the postal strike) and I received a lovely card from Arlene in California.   You will find all the cards exchanged here.


After reading each column over and over, trying to think about what I would do with the row of words,  I finally settled on the 4th vertical column from the left -  Squirrel, Sassy, Snow, Sparkle and Shrubbery.

I decided on that column after looking through a booklet I  have of 3" x 4" patterned paper from Kawaii Pen Shop.  

As you can see below - the patterned paper scene includes Snow and Shrubbery.   

Then I added a Rub-On Sassy Squirrel - from Rub On Christmas Collection from Taperlogy.   

I framed the patterned paper with two layers of Sparkle glitter card stock in black and silver, then layered it all over a hammered white card base. 

Easy Peasy Tic Tac Toe, right?   I was in a panic until I found that patterned paper!


So we hope you will come join us for the January Card Chain Challenge - you have until Jan 6th to sign up.  You'll find all the info on how to sign up over at The Card Chain Challenge!  

I'm also sending my card to:

Something new - fresh falling snow ends 1/7


Your fav challenge for 2024
challenge #218 Use your Patterned paper ends 1/12


Paper:  Hammered White - Amazon, Metallic Glitter Card (black and silver) - Recollections (Michaels), Snowy Night Papers - Kawaii Pen Shop.
Accessories:  squirrel from Christmas Collection Rub-Ons - Taperlogy

Saturday, September 28, 2024

Group of Seven Cardmakers - Stencil Monoprinting - Sept 2024

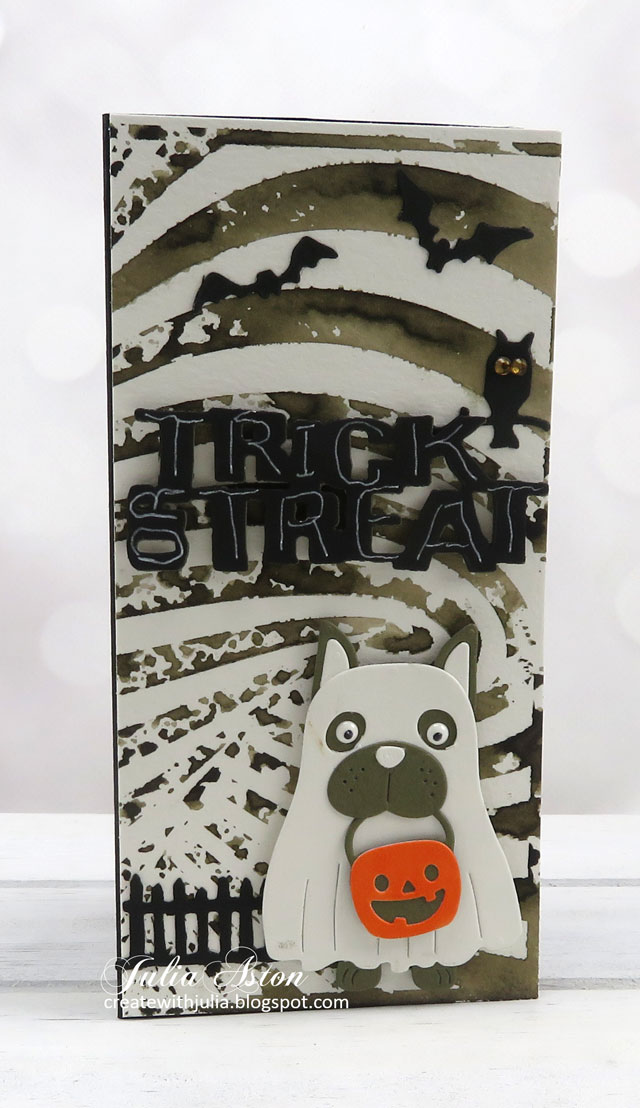
 It's time for the Group Of Seven Cardmakers September post.  This month we are playing with the technique of Stencil Monoprinting.  You will find links to how to videos over at The Group of Seven Cardmakers blog.

You can create beautiful backgrounds or focal points for your cards, depending on the design of the stencil.  Basically you are using the background of the stencil to create your panel.  You can leave it as is on your card, or you can place the stencil back over top to add different ink colors or embossing paste to fill in the design.

Due to the larger/longer sizes of the stencils I used, I made all my cards Mini Slimline size - 3" x 6".

Rosette Stencil from Tim Holtz/Stampers Anonymous - Salty Ocean Ranger Distress Ink
Gondola dies are Alexandra Renke
Illusion Twist Stencil from Altenew - Scorched Timber Ranger Distress Ink
Succulent Stencil from Stencil Girl - Mowed Lawn and Forest Moss Ranger Distress Inks
A few photos of how I made my backgrounds.
  
Rub water reactive ink (like Ranger Distress inks) over stencil and spritz liberally with water. For this panel I used two colors - Mowed Lawn and Forest Moss.  
This stencil is  6"x6" so I was able to make 2 mini slim line cards from it (3"x6")
Flip the stencil over onto a panel of watercolor paper and press over the stencil to help the watery ink absorb into the paper.
Remove the stencil and again press over the panel with paper towel or cloth to absorb any pools of watery ink.

We hope you'll give this stenciling technique a try!  We have a Mr. linky over at The Group of Seven blog so you can share your card with everyone.  We'd love to see what you create!


I'm linking my Halloween card to:
Fall Frenzy - anything Fall ends 9/28

First time using the ghost dog die


Linking my Gondola card to:
red and blue colors
ends 10/1

Linking my plant card to:
ends 10/2


Gondola Ski Christmas Card

Stamps: Two Feet Deep - PTI (retired)
Paper: Watercolor - Canson Cold Press, White, Pure Poppy, True Black - PTI
Ink: Salty Ocean - Ranger Distress, Nocturne- Versarine Clair
Accessories: Rosette Stencil - Tim Holtz/Stampers Anonymous, Die - Small Cable Car - Alexander Renke, foam dots, twine, paper towels or cloth, water mister.

Dog Ghost Halloween Card

Paper: Watercolor - Canson Cold Press, Olive Twist, True Black - PTI, hammered white (on ghost) - Amazon.
Ink: Scorched Timber - Ranger Distress.
Accessories: Illusion Twist Stencil - Altenew, Ghost Dog die - Amazon, Halloween Shadows - Tim Holtz/Alterations, orange Copic, foam dots, tiny gold gems - Gina Marie Designs, white enamel dots - Altenew, Black sharpie pen (pupil on eye), water mister, paper towels or cloth.


Succulent Cards

Stamps: Plant Kindness - Stampotique, Way to Grow - The Greetery.
Paper: Water color - Canson Cold Press.
Ink: Mowed Lawn, Forest Moss - Ranger Distress, Nocturne - Versafine Clair
Accessories: Succulents Stencil - Stencil Girl, Dimensional Plant Stickers - Recollections, water mister, paper towels or cloth.

Sunday, September 15, 2024

An Embossed Stenciled Ornament

It's time to start making our Christmas cards right??!! If we haven't already!!  We don't want to be out straight when it gets to be December!

I made this card using the technique of embossing over stenciling.  First I inked over the Christmas Snowflake Flourish Bauble stencil from Sweet Poppy Stencils using Dusk ink from Altenew onto a white panel.  

Then I embossed the panel using an older Snow Flakes Embossing folder from Provo Craft.    I die cut a frame out of silver paper and adhered it over the panel.  I silver embossed and die cut the sentiment and popped it up on foam dots over the ornament,  I used a Silver Leafing Krylon Pen to color the top of the ornament.

I'll add this to my box of Christmas cards that is luckily filling up!

I'm joining in on the following challenges with my card:

ends 9/30

ends 9/20


Stamps: Penned Elegance: Christmas - PTI (retired).
Ink:  Dusk - Altenew, Versamark.
Paper:  White - PTI, Kraft Metallic - Tim Holtz/Idea-ology.
Accessories:  Penned Elegance dies - PTI (retired), Snow Flakes Embossing Folder - Provo Craft, Christmas Snowflake Flouish Bauble Stencil - Sweet Poppy Stencils, blender brushes, silver embossing powder, heat tool, foam dots, silver leafing Krylon Pen..