Showing posts with label Techniques. Show all posts

Saturday, September 13, 2025

Inkspirational Challenge #350 - Word Prompt Trees

 Today, I'm sharing two cards I made for the newest Inkspirational Challenge that posted today.


I created my backgrounds using two different Northern Lights tutorials on YouTube which I've linked below if you are interested in trying them.

For my first card I found this YouTube Video by Ciara T Designs  - Beautiful Northern Nights.  She sponges vertical lines of blues and green for the sky along with a darker blue and black around the edges.

I used Ranger Distress Inks on this one, stamped the trees in Nocturne Versafine Clair and splattered with water.


For my second card below I watched this YouTube Video by Marilyn G - Northern Light Demo.  She uses two curved horizontal patches of green and purple color along with dark blue and black.

I used Ranger Distress Oxide inks on this one accept for the black which is Ranger Distress.  I stamped the image with Nocturne Versafine Claire.   I splattered this panel with water as well -  but it made a more muted splatter since the inks were Oxides so I then added "star" dots with a white Gel Pen.  


So please join in our challenge and link up your card inspired by TREES over at the Inkspirational Blog where you will also find creative inspiration by the rest of the talented DT!

This challenge ends on 9/26


I'm sending my Oh, Holy Night card to:

Inspired by the blues and trees ends 9/18

Winter nights

Trees, leaves, plants
ends 9/26


Oh Holy Night Card
Stamps:  Silent Night - PTI (retired), 3 Tree Group - Stamp Oasis (Rubbernecker)
Paper:  White, True Black - Papertrey Ink.
Ink:  Tumbled Glass, Broken China, Chipped Sapphire, Evergreen Bough, Wilted Violet, Black Soot - Ranger Distress, Nocturne - Versafine Clair (for sentiment)
Other Supplies:  Blender Brushes, water mister.

Wishing You Peace
Stamps:  Lakeside Cabin - Stamp Scapes, Christmas Greetings - Lavinia Stamps.
Paper:  White, True Black - Papertrey Ink.
Ink:  Chipped Saphire, Wilted Violet, Cracked Pistachio - Ranger Distress Oxide, Black Soot - Ranger Distress, Nocturne - Versafine Claire (for sentiment)
Other Supplies:  Blender Brushes, water mister.

Saturday, June 28, 2025

June Group of Seven Cardmakers - Second Generation Stamping

 Here is my 1st card for the June Group of Seven Cardmakers post.  

This month we are playing with Second Generation Stamping -  when you stamp an image fully inked then stamp it again without reinking either once or twice.  You'll find a link to Videos on the technique over at the GO7 Blog.

 It creates a wonderful depth to your card design.

I went very CAS with this card, simply stamping the image on the left fully inked with Portobello Versafine Clair Ink then stamping again to the right of that stamping and a bit higher, without reinking.

Next,  I stamped the image off the bottom and half off the right side fully inked - then stamped above it (only the left half of the stamp) again way over to the left off the edge with the right half of the stamp.

   My card base is watercolor paper and the sentiment is from Paper Artsy.

Trees seem to be the first thing I grab when I think of Generation Stamping (or off stamping) so I wanted to stretch myself and use other stamps and also add some color!
   
So this card was born (after about 5 aborted attempts using various Lavinia stamps!)
I started by stamping a text background - inking the stamp and stamping it off on paper before stamping on the card panel as I wanted it just to be a shadow.

Then I stamped the dandelion in black and off stamped it - repeating again and the same with the leaf.  And finally I stamped and off stamped the Orchard Grass along the bottom.

To add color (after I made sure the black ink was dry!) -  I sponged over the top with Distress Speckled Egg and over the bottom with Shabby Shutters.

I stamped the sentiment on white card and punched it with an oval punch.  I sponged the edges with the Speckled Egg and popped it up on the card with foam dots.


We hope you'll give this technique a try 
(you probably have done this already at some point in your stamping career?! but maybe not for a while?)
   
You'll find Mr. Linky and lovely inspiration from the rest of the GO7 team over at the blog.
We'd love to see how you use this technique!


Also sending my card to:
4th week - A - Anything Goes

Nature Inspired ends 7/1

CAS  ends 7/5


Tree Card
Stamps:  Silhouette Trees #1 - Rubbernecker (retired), Sentiment from Paper Artsy Alison Bomber set EAB01.
Paper:  Water color paper - Canson Cold Press
Ink:  Portobello Versafine Clair

Dandelion Card
Stamps:  Background Script, Orchard Grass, Tall Dandelion - Lavinia, Dandelion Wishes Sentiment set - Papertrey Ink.
Paper:  White - Papertrey Ink
Ink:  Nocturne, Morning Mist - Versafine Clair, Ranger Distress Speckled Egg and Shabby Shutters.
Other Supplies:  oval punch - SU, foam dots, blender brushes.

Wednesday, May 28, 2025

May Group of Seven Cardmakers - Batik

 This month, the Group of Seven Cardmakers are playing with the technique of Faux Batik.  

There are lots of YouTube videos on the technique all using slightly different methods! Several are linked over at the Group of Seven blog.


Here are some photos of the steps.


I have to say, I found it difficult to choose colors and stamps that ended up with something I liked - it all ends up a bit dark for me.  
The rest of the Group of 7 Cardmakers had greater success than me with this technique!

Please give Faux Batik a try and link up your creations over at The Group of Seven Cardmakers blog.  I'd love to see what colors and stamps you used!  


Also sending my card to:

By the Numbers - use at least one number ends 6/2

Week 4  Anything Goes
clear embossing


Stamps:  Sparkler Background Stamp - The Greetery, 4th of July stamp/Let Freedom Ring - PTI (retired),  Freedom and Liberty stamp/Army - The Greeting Farm (retired)
Ink:  Warm Breeze, Strawberry, Verdant, Portobello, Nocturne - Versafine Clair, Versamark.
Paper:  White - PTI
Other Supplies: Heat Tool, blender brushes, clear embossing powder, embossing pillow, 1 38" circle punch - SU.

Monday, April 28, 2025

Group of Seven Cardmakers - April Technique - Gilding Flakes on Acetate

This month, the Group of Seven Cardmakers is playing with Gilding Flakes on Acetate.

I watched this YouTube Video to learn this technique - it is also linked to, over at The Group of Seven Cardmakers blog.

This was my first try with the technique.

I'm not sure everyone looking at my card would immediately realize it's King Hopkins (a frog!) sitting on a pile of stones?
You can see how clear and detailed the stamp is below.
I found with both of my cards - you couldn't really see detail and might not know what you were looking at, on first glance.     
So, for my second try, I went a little rogue and created my own technique - Stamping on Acetate with Gilding Flakes and a Shadow Behind It -  I have to work on the title - it's a bit long!?!  

So I thought I'd try stamping the image on a white panel and layer the acetate panel with the gilding flake image over it - slightly off set.   And I really love the dimensional look it gives it!  It shows some of the detail of the stamp that didn't show up on the stamping with gilding flakes on the acetate.


A few pics on how I did it:
On the video I watched, the woman had a stiff net-like sponge to apply the tacky glue and to rub off the Gilding Flakes.  I did not have an item like that so I used a sponge brush, pressing it into a pool of tacky glue and then pressing the sponge lightly over the stamp - the idea is to just get the glue on the image, not down into the crevices.  I recommend pressing your gilding flakes over the stamping and then quickly washing the stamp off  before the tacky glue dries on your stamp.  Then I rubbed off the gilding flakes with the clean side of the foam sponge and my fingers.  I scrubbed it pretty hard so that just the image is left.

photo on right shows the stamped image in glue on the acetate

So - gilding flakes -  still not my favorite thing to use - it flies everywhere - and for this technique it was difficult to find an image that would work well, but I am happy with my two acetate panels -  particularly the one I shadow stamped behind!
  
We'd love to see cards you make trying this technique!  There's a Mr. Linky over at the blog!


Also sending my Kiss Me card to:

first time using King Hopkins

Sending my trees card to:

ends 4/29


Week 4  A - Anything Goes


I just have 2 more weeks of wearing the sling after my shoulder surgery! Then I'll be back to full blown crafting!


Kiss Me 
Stamps:  King Hopkins - Lavinia, Kiss me stamp from Heroines Fairy Princess - Waltzingmouse (retired).
Ink:  Gold Pigment Ink - Color Box
Paper:  Acetate, True Black - Papertrey Ink, Kraft Metallic Gold - Tim Holtz/Idea-ology.
Other Supplies:  Inca Gold Gilding Flakes - Cosmic Shimmer, embossing powder brush, Stitched Rectangle Scallop Frame Die - MFT, Tombow Tacky Glue, foam brush.

The Creaking of Trees
Stamps:  Silhouette Trees #1 - Rubbernecker (retired), Creaking Trees - Technique Junkies.
Ink:  Nocturne - Versafine Clair.
Paper:  Clear Acetate, White - PTI, Hammered White - Amazon.
Other Supplies:  Inca Gold Gilding Flakes - Cosmic Shimmer, embossing powder brush, Stitched Rectangle Scallop Frame Die - MFT, Tombow Tacky Glue, foam brush, foam dots

Friday, February 28, 2025

Group of Seven Cardmakers - Feb 2025 Technique - Floating Frames

 This month, the Group of Seven Cardmakers are playing with the technique - Floating Frames.

There are several tutorials for this on YouTube -  two of them are linked to over at GO7.  I looked at both of them and because I just happened to have Press N Seal Glad Wrap in my cabinet - I went with this tutorial. Floating Die Cut Frame by Jennifer McQuire. 


Side view to see the depth of the 'floating' frame.
I used Antique Roses stamps and dies from Altenew.  I chose 3 shades of green ink for the leaves and 3 shades of blue and black for the two blooms.  I used my Misti and stamped all the layers of leaves and blooms on a white panel - four times so I had 4 panels of each bloom and leaves to use on my card.
I die cut all the pieces and laid them over a 4 1/4" x 5 1/2" white panel.
I laid a piece of Press'n Seal over the panel and pressed over all the pieces with my fingers - it is slightly tacky on one side (be sure to have the tacky side down!) so holds all the pieces in their places on the white panel.
I cut around the edges of the white panel so nothing went over the edge..
I removed the white panel and the pieces remain stuck to the Pres'n Seal
Then I die cut a rectangle out of the center of the panel - So I had two pieces to work with - still stuck to the Press'n Seal.
I added pieces of thick foam tape all over the back of the pieces.  Thick foam makes the frame 'float' higher off the card base.
I removed the backs of the foam tape, flipped over the panel and carefully pressed it onto the white panel, removed the Press'n Seal and there's my floating frame!  I adhered the inside of the frame cut- out onto a white card front for my 2nd card and removed the Press'n Seal!  I added 3 clear Fairy Drops to each card.


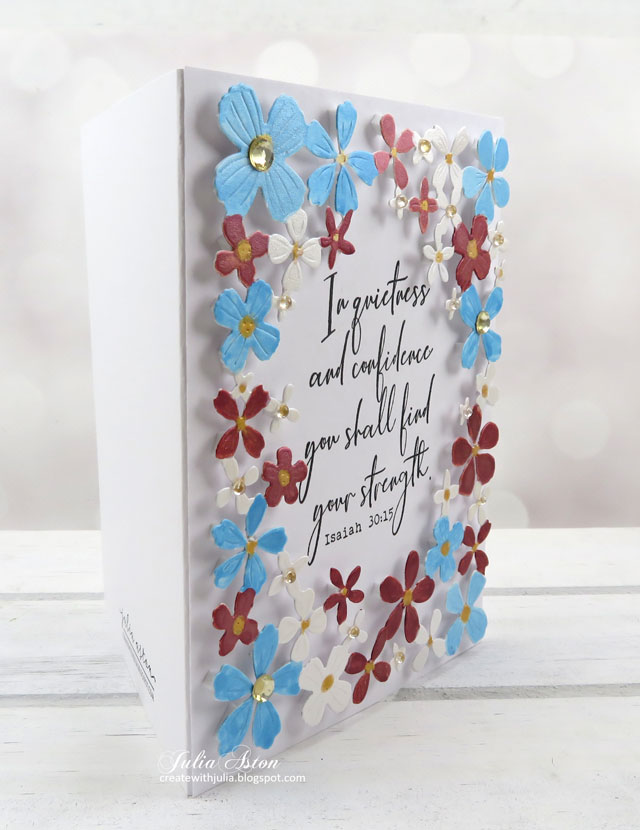
A couple of days after I made the above cards - I was looking through my box of cover dies and came upon this Flower Field Frame die from Poppy Stamps - I've had this for at least a year and it's the first time I've used it!
A faux floating frame so to speak!  It's all one piece - just has to be colored and adhered to a card base with lots of little bits of foam strips!  I used Metallic Water Color Paints to color the blooms and added gems to the center of some of the flowers.


Notes:  
1.  Depending on what stamps you choose (my first card blooms had 4 stamps for each bloom to create the 3D look) it can take a couple of hours just to stamp everything and then die cut the pieces for these two cards.   But it does create a beautiful look for a special card for someone.  I would suggest you do all the stamping one day - die cutting the next day and placement the third day and to stamp/cut enough for several cards!
2.  You could hand color your stampings or stencil the colors over your stampings depending on what kind of sets you have in your craft room.  That would save a lot of time.

3.  Maybe you'll find a cover die similar to the one I used for my last card that works as well!  Check out all the corners of your craft room!


We'd love to see what you do with this technique and to let us know what was easy/difficult for you.  You'll find some beautiful inspiration from the rest of the Group of Seven as well as Mr. Linky to show us what you do over at Group of Seven Blog!

 
I'm sending my one piece floating frame card to:

first time using the Flower Field Frame die

something tiny/small   My flowers are small on this floating frame. 
ends 3/4

Sending  my You're Amazing card to:

Cardz 4 Galz - embellishments
clear Fairy drops   ends 3/4


Antique Roses Card
Stamps: Antique Roses - Altenew, Isaiah 30:15 - Impression Obsession
Paper: White, True Black - Papertrey Ink.
Ink: Light Spruce, Medium Spruce, Dark Spruce - Gina K Designs, Persian Blue, UIltramarine, Sapphire - Altenew, Nocturne - Versafine Clair.
Other Supplies: Antique Roses Dies - Altenew, Rectangle Die - Nestabilities, Press'n Seal - supermarket, foam tape, Fairy Drops - Memory Box.

Flower Field Card
Stamps: Antique Roses - Altenew, Isaiah 30:15 - Impression Obsession
Paper:  White - Papertrey Ink
Ink:  Nocturne - Versafine Clair
Other Supplies:  Flower Field Frame Die - Poppy Stamps, Metallic Water Colors Paints - Yasutamo, paint brush, water, foam strips, gems - Park Lane, Clear Fairy Drops - Open Studio