Sunday, June 30, 2013

WMS June Release and Design Team Blog Hop!

We've finally arrived at the big day!  Today all of the new Waltzingmouse Stamps the Design Team has been previewing for the past 3 days are available for purchase!  And we are having a Design Team Blog Hop to celebrate -  Be sure to leave a comment on each blog you visit for a chance to win a WMS stamp set - see details at the end of my post.

You should start the hop at Claire's blog (she will have the full list if you lose your way!)  If you came from Sandie's blog you are in the right place.

Did anyone else see a turkey wishbone when they looked at the cherry stem from the Big Berry - Cherry set???!!
I used the Mini Crackle Background Reverse stamp, the stem from Big Berry - Cherry and the sentiment is from an older set - Peace and Plenty.  I embossed a piece of Kraft Glassine Paper with the Thankful background folder from Tim Holtz for the background.
For my next card I again used the Mini Crackle Background Reverse stamp (LOVE this stamp!) along with a feather from Funky Feathers and a sentiment from a prior release - Words of Wisdom.
  I used this week's Cas(e) this Sketch for my card.
And for my last project -   here is a card I made using a special set called Charmed
Claire will be giving this set free to the first 50 people whose orders are over £60 GBP at  the store.  After the first 50 orders are reached -  the set will be available to purchase.  
See all the details on Claire's blog.
Look how the little black stamp over the holes on the buttons really looks like thread with the irregular edges!  The button is stamped, cut out, and layered over one of the patches with foam tape.
There will be a prize of a stamp set of choice from a random drawing from comments left on all of the Design Team blogs. You will have until July 2nd at 11:59 pm  (GMT), 5:59 am Central (July 3), 3:59 am Pacific and 6:59 am Eastern to leave comments. The winner will be posted on Claire’s blog on July 4th.

Next on the hop is Laurie!


Wishing You Peace
Stamps:   Waltzingmouse - Mini Crackle Background Reverse, stem from Big Berry - Cherry, sentiment from Peace and Plenty.
Paper:  Rustic White - PTI, Kraft Glassine - Tim Holtz Ideology
Ink:  Ranger Distress Frayed Burlap, Archival Coffee
Accessories:  foam dots, glue dots, embossing folder - Sizzix Tim Holtz Thankful Background and Borders set, Adornit Gems.


Fear Knocked at the Door
 Stamps:  Waltzingmouse - Funky Feathers, Mini Crackle Background Reverse, Words of Wisdom
Paper:  White, fine linen - PTI, DP Brioche - Memory Box
Ink:  Versafine Onyx Black, Ranger Distress Pumice Stone
Accessories:  Zutter Corner rounder, foam dots.


Thanks Sew Much
Stamps:  Waltzingmouse - Charmed (special set)
Paper:  white, fine linen - PTI
Ink:  Ranger Distress Victorian Velvet, Weathered Wood, Shabby Shutters, Scattered straw, Versafine Onyx Black
Accessories:  foam dots, Houndstooth Embossing Folder - Provo Craft.

Saturday, June 29, 2013

WMS June Release - Sneak Peek Day 3 - Big Cherry and Country Labels

Welcome to Day 3 of the Waltzingmouse June Sneak Peeks!  Today we are showing you two mini sets -  Big Berry - Cherry, (joining her sister  Big Berries - Strawberry) and Country Labels 14 (they fit the Labels 14 Nesties).

I seem to be making a lot of crafties rather than cards for this release (no big surprise from me though I guess!)  and today is no exception.

First up -  I used the wonderful cherry set to decorate a cute die cut bag.  I sanded the bag a little (it's Coredinations kraft core paper) and added some Washi tape strips.  I stamped the stem, two patterned cherries and the leaf on white and then cut it out close to the edges.  I layered it onto the bag with foam tape.
Here's a close up view.  I inked the leaf with two different greens and stamped the sentiment right on the leaf.
Next is a project using stamps from Country Labels 14 a mini set of 3 labels, 6 sentiments and To: and From:  I decorated a felt bucket that I got at Target for $1.00 last year (I knew I'd use it sooner or later!)  I stamped the biggest label from the set on white Sticky Back Canvas, colored it with Copics and stamped one of the sentiments in the center.  I made some flowers using a fringe die and adhered them with the label onto the felt bucket with a fabric adhesive.
I baked up some chocolate chip oatmeal cookies, tucked them into a frosted bag and put that in the bucket just 'for YOU"!!.
I stamped the label again on a piece of card stock and colored it with the same colors as the first one.  I scored it in the middle and folded it in half.  I placed it over the top of the bag like a gift topper....... but I didn't attach it because....
 
 it is actually a magnetic bookmark.  I placed sticky magnets inside the label.
Here's the front of the bookmark - in use!
and here's the back!  I love magnetic bookmarks because you can attach them to mark the line you stopped reading at.
And here's a look at the back of my little felt bucket!

Time to check out the other ladies on the Design Team.   Here are their links!
Tomorrow is the big release!  The Design Team will be having a blog hop - starting at 2 pm EST - you could win a stamp set by leaving your comments -  so please stop by!

 Julia Aston - me!


You're the Cherry Best!
Stamps: Waltzingmouse -  Big Berry - Cherry (to be released 6/30)
Paper:  White - PTI, tan Cordinations Kraft Core - Tim Holtz
Ink:  Archival Coffee, Ranger Distress Aged Mahogany, Memento Cottage Ivy and Bamboo Leaves.
Accessories:  Foam tape, Washi Tape - Freckled Fawn, In the Bag Die - Tim Holtz Alterations, sand paper.

I Made This for You bag
Stamps:  Waltzingmouse - Country Labels 14
Paper:  white - PTI
Ink:  Versafine Onyx Black
Accessories: felt bucket - Target $1 bin, black saddle stitched ribbon - PTI, white Sticky Back Canvas - Claudine Helmuth Studio, fringe die - Memory Box, Labels 14 Nestabilities, sticky magnet - Michaels, felt - Michaels, Copics:     Aleenes' Fabric Adhesive, Scor Pal

Friday, June 28, 2013

WMS June Release - Sneak Peek Day 2 - Feathers and Crackle!

Welcome to Day 2 of the Waltzingmouse Sneak Peeks -  did you just love the doll stamps yesterday? (if you missed them - just scroll down!)  

Today we're showing you feathers and crackles!  Claire has designed two gorgeous large sets of feathers -  I'm using Funky Feathers on my samples today - (some of the other ladies are using Fine Feathers) - and I'm working with Mini Crackle Background Reverse (there's a large version, and a mini and large version of Crackle Background)

In preparation for a new release - I often wander around Michaels and/or JoAnn's - maybe Target dollar aisle or the Christmas Tree Shop, to see if anything catches my eye to use with the new stamps -  maybe patterned paper, or a new die, or a box or container.   This time I was at JoAnn's and found a sweet little wooden easel ($1.99) and an equally sweet little 3"x3" canvas  (also $1.99!)and I was inspired!
First I brushed white Gesso onto the canvas to seal it and give it a surface that wouldn't absorb.  After the gesso dried -  I inked up the mini crackle background reverse stamp, laid the canvas over the stamp and pressed on it with my fingers.  You can also see the crackle of the stamp in this close up.
Claire has created cut files for the feather sets -  so I stamped the Funky Feathers and sentiment on the matching cut files.  I layered them over the canvas with foam dots.  Then I laid a piece of bakers twine across the canvas adhering it to the feathers and canvas with dots of glue to hold it in place.

Here's a little side view  - I'm entering this into this week's Cas-ology challenge - Cue Card Free (free to dream without fear!)
I also made a card today - again combining one of the feathers from Funky Feathers and the Mini Crackle Background Reverse.  I inked the crackle stamp with 3 Ranger Distress inks - you can see where the colors blended some where they overlapped.  I stamped the feather right over the crackle.  I punched the sentiment with a word window punch and added a blue gem at the tip of the feather.
Here's a close up so you can really appreciate this wonderful reverse crackle!  What a great little background stamp!
Now let's check out all the inspiration to be found on the blogs of the other participating Design Team Members linked below!  I want to see the Fine Feathers and the large Crackle Backgrounds - don't you??

Please stop by again tomorrow for Sneak Peek Day #3 and the new release is Sunday 6/30!

Dream Without Fear Easel
Stamps:  Waltzingmouse - Funky Feathers, Mini Crackle Background Reverse (available 6/30)
Paper:  White - PTI
Ink:  Versafine Onyx Black, Ranger Distress Salty Ocean, Spiced Marmelade, Festive Berries, Mustard Seed.
Accessories:  White Acrylic Gesso, 3x3 canvas and wooden easel - JoAnn's, lemon drop bakers twine - the Twinery, foam dots, Scotch Quick Dry Adhesive, Adornit Gems.

Just A Note:
Stamps:  Waltzingmouse - Funky Feathers, Mini Crackle Background Reverse (available 6/30)
Paper:  White- PTI
Ink:  Versafine Onyx Black, Ranger Distress Festive Berries, Spiced Marmelade, Salty Ocean
Accessories:  word window punch - SU, Adornit Gems.

Thursday, June 27, 2013

WMS June Release - Sneak Peek Day 1 - You're A Doll

Welcome to the first day of sneak peeks at the Waltzingmouse June Release!  The release will be on Sunday June 30th.  Today the Design Team is sharing creations using the new sets -  You're a Doll and You're a Doll Additions.
 
The You're a Doll set is a gigantic set with several versions of the wonderful Matryoshka - Russian Nesting Dolls - mix and match tops, bottoms and center designs - large, medium and baby size along with several face options.  It has flowers and leaves and one sentiment.

I couldn't resist making a little trio of the dolls.  I stamped them side by side on a panel - leaving just a bit of space between them - then cut them out leaving a connection in the middle.  I scored along those sections and folded them (one forward and one backward) so they would stand up.  The large dolls are about 2 3/4" high.

Here's a close up of the smaller 2 where you can see the connections a little better.  I did them up in bright inks and Copics like many of the 'real' Russian Nesting dolls are.
Next I stamped on a 6 1/2" x 4 1/2"  linen bag - stamping the flowers directly on the bag.  I stamped the doll on Sticky Back Canvas, cut it out and adhered it to the bag with fabric adhesive.  I added an epoxy brad to the center.
The sentiment 'You're a Doll' is from this new set -  the sentiment 'Just wanted to say Thank You' which uses the same font - is from the March release set - Folk Art Medallion.  I die cut them with Nested Lacey Banners Nestabilities and attached them to the bag with a small flower brad.

Next I made a card using the doll face and one of the sentiments from the mini set - You're a Doll Additions.  This set includes 3 sentiments, a heart and the pretty 1 1/2" size doll face.
I wanted to quickly show you how I stamped the floral wreath to frame the face.  First I stamped and punched out the face with a 1 1/2" circle punch.  I traced the circle on the panel where I wanted my wreath to be.  I stamped the sentiment first so I could judge where I'd have enough room.
Then I stamped the flower from "You're a Doll" set in different colors -  stamping the center of the flower slightly to the outside of the circle as I stamped around it.
I stamped the leaves from "You're A Doll', adhered the face over the wreath with foam dots and added Tiny Twinkles to the centers and around the sentiment.

I'm excited to see what  the Design Team members below have created with these lovely sets aren't you?   Let's go check them out!
 Julia Aston - Me!
I hope you can  stop by tomorrow for Sneak Peeks Day 2!

3 Russian Dolls
Stamps:  You're a Doll - Waltzingmouse(to be released 6/30)
Paper:  white - PTI
Ink:  Memento Tuxedo Black, Ranger Distress Festive Berries, Spiced Marmalade
Accessories:  Tiny Twinkles - Taylored Expressions, Copics - E00, E31, B24, R20, R29, RV11, YG95, YR04, B21, Scor Pal.

 Thank You Linen Gift Bag
Stamps:  doll and You're a Doll sentiment from You're A Doll set (to be released 6/30), Thank you sentiment from Folk Art Medallion set - Waltzingmouse
Paper:  kraft - PTI
Ink:  Versafine Onyx Black, Ranger Distress - Festive Berries, Mowed Lawn, Spiced Marmalade, Salty Ocean.
Accessories:  Linen bag - Pouch Mart, Copics - E31, B21, R20, epoxy brad - Die Cuts with a View, Aleene's Fabric Fusion Adhesive, paper piercer, Natural Sticky Back Canvas - Claudine Helmuth Studio, metallic mini flower brad - Making Memories, Nested Lacey Pennants - Nestabilities.

You Are Beautiful
Stamps:  face and sentiment from You're a Doll Additions, flowers and leaves from You're a Doll - Waltzingmouse (to be released 6/30)
Paper:  white - PTI
Ink:  Memento Tuxedo Black, Ranger Distress - Peeled Paint, Crushed Olive, Festive Berries, Salty Ocean, Spiced Marmelade, Mustard Seed.
Accessories:  Copics - E31, E00, B21, R20, 1 1/2" circle punch - SU, Tiny Twinkles - Taylored Expressions.

Wednesday, June 26, 2013

WMS May Release Inspiration - Country Labels 4

Today I'm joining fellow Waltzingmouse DT members, Edna, Kelly and Belinda in sharing more inspiration for you using the WMS May Release stamps.  I'm using Country Labels 4 on my creations.

First up is a clean and simple faith card using the dotted frame and 'give thanks to the Lord above' sentiment from the set.  I also used the lovely Celtic Cross from one of Claire's original WMS sets - Celtic Heritage.  I love how this decorative cross looks inside the dotted frame.  I embossed the card base with Swiss Dots after stamping the sentiment and added a purple rhinestone to the center of the cross.

Many of the sentiments in this lovely set just screamed 'PLACE CARDS' to me - so I made one using this fun label that has 4 different designs on it's edges. It creates the perfect 'quilt' look when you use different colors on each section - perfect for the Thanksgiving table - or for any gathering! I stamped the sentiment on a Wonky Rectangle, laid it in the center of the label and stamped the stem so it was on the rectangle and the label.  Then I removed the rectangle and stamped a leaf on the other side that would be under it when I adhered the rectangle with foam tape.  I added 3 Tiny Twinkles for a little shimmer! 

I'm entering this place card with it's mixed patterns and colors  into the Moxie Fab World Mixy Matchy challenge.

To make the place card stand up -  I die cut another Labels 4 piece, scored it along the top about 1/2" down and adhered it to the front piece above the score line using Scor Tape.
I just love how bright and sunny my next card looks!  I used the little wreath stamp to create my background and stamped it again on the inside of my circle 'sun' and then added a pretty rhinestone to the center.
 I inked the label blue like the sky on the top and one side and green like the grass on the other side and bottom, die cutting it with Labels 4 Nestabilities.  I die cut some grass out of tissue paper and layered it over the label with foam tape. 
I finally pulled out the Action Wobble Springs I purchased quite some time ago and popped up the 'sun' over the label with it. It gives a fun spring action at the lightest touch!  Every time I touch it I think it should make the noise 'boing, boing'!! LOL!!  You can see how dimensional it is on the pic below.
Now let's waltz over to Edna, Kelly and Belinda to see what fun things they have created today to inspire us with these new stamps!

And BIG NEWS!   The Waltzingmouse June Release Sneak Peeks start TOMORROW - right here!  so be sure to stop back and see what fun stamps Claire has designed for June!!

Give Thanks to the Lord:
Stamps:  Waltzingmouse - sentiment from Country Labels 4, Cross from Celtic Heritage Set
Paper:  White - PTI
Ink:  Memento Sweet Plum
Accessories:  Swiss Dots Embossing folder - Provo Craft, Labels 4 Nestabilities - Spellbinders

Welcome to Our Table Place Card:
Stamps:  Waltzingmouse - Country Labels 4
Paper:  White - PTI
Ink:  Memento Rhubarb Stock, Potters Clay, Sweet Plum, Cottage Ivy, Espresso Truffle
Accessories:  Foam Tape, Scor Pal, Wonky Rectangle and Labels 4 Nestabilities, Tiny Twinkles - Taylored Expressions, glue pen.

You Are My Sunshine:
Stamps:  Country Labels 4
Paper:  white - PTI, green tissue paper
Ink:  Memento Teal Zeal, Bamboo Leaves, Tangelo, Cantaloupe
Accessories:  foam tape, ScorTape, Action Wobble Spring - Ellen Hutson,  Circle and Labels 4 Nestabilities - Spellbinders, grass die - MFT, small rhinestones - Kaiser Craft, large rhinestone - from stash.


Monday, June 24, 2013

Need a Lift?

 
 I made this card for Saturday's inspiration challenge over on Split Coast  - I was inspired by this Elephant Box from the thomaspaul web shop.
The adorable vintage circus elephant on my card is a free vintage image from The Graphics Fairy .  I printed it from  my computer in sepia ink to be more like my inspiration. (the original is in colors)

My sentiment is from Half Pint Heroines by Waltzingmouse

Claire is releasing some new Waltzingmouse Stamps on June 30th -  and I will be sharing sneak peeks along with the rest of the Design Team starting on Thursday 6/27 so be sure to stop by!

I'll also be showing some more projects using stamps from the May release along with several DT members on Wed 6/26!   lot's going on  this week!!

Stamps: sentiment from Half Pint Heroines - Waltzingmouse, vintage elephant image from The Graphics Fairy
Paper: white - PTI
Ink: Versafine Onyx Black
Accessories: foam dots, computer, printer

Friday, June 21, 2013

Get Your Ducks in a Row

In the beginning of June,  I got an e-mail from a K K Yuen in Hong Kong who has two fairly new Etsy shops - Stampcow where he sells hand made rubber stamps and Craftpon where he sells craft supplies.   He said he had seen my blog and he asked me if I would be interested in receiving some items of my choice from his Etsy Shops at no cost if I was willing to post creations that I made with those items on my blog.  After looking through the shops and finding some fun things- I said 'Yes' - I'd be happy to! 

So with that full disclosure - here is my first post using a sweet little duck stamp I received from Stampcow.

The sentiment is from Taylored Expressions - from a stamp set that I just won when I guessed Taylor was having a second girl!  How lucky am I?!

I used this weeks Cas(e) this Sketch for my card design today.
And just for good measure -  I made a second card in blues for the boy babies!
These will go into the box of cards I keep under my desk at work - I have several co-workers who buy my cards - and it's usually for birthday, baby or sympathy!
Today is Kent's and my 16th wedding anniversary and tonight we're going out to dinner and a play with my college roommate and her husband.  We made the plan to get together coincidentally but it will be a nice way to celebrate!

The play is called "These Shining Lives" - here is a brief description of this true story - " In the 1920s, The Radium Dial Corporation employed some 4,000 girls and produced watches with brightly lit dials. These were jobs for girls that had never worked before. They didn't just make money; they made friends. But the radioactive paint they were using made them terribly ill. These Shining Lives tells the story of four women who rejoiced in their new-found camaraderie and found the courage for each other to stand up to the employers that endangered their lives."     Sounds interesting doesn't it?

Stamps:  Duck - Stampcow.com etsy shop, Sentiment from Welcome Little One Set -Taylored Expressions.
Paper:  white - PTI, DP Sidewalk Paper Pad - October Afternoon.
Ink:  Versafine Onyx Black, Mountain Rose - Adirondack Brights, Memento Teal Zeal
Accessories:  black rhinestones - Kaiser Craft, foam tape, blue Adonit Gems, wrinkled seam tape - Prairie Bird Boutique Etsy Shop.


Wednesday, June 19, 2013

Jumping into Mixed Media!


Today I have something totally new from me to share!  I've been watching all of the Mixed Media posts around in Blog Land - as well as seeing all of the funky products being sold on line and in craft stores.  I've been interested and intrigued - and have picked up various things along the way in preparation for my jumping into this new art.

Then comes along my former WMS  DT buddy, and 'honored to call' my blogging friend, Mona Pendleton, posting a new Mixed Media Color challenge blog -  and I knew it was time to get out all the things I'd been gathering and try to create something. I have long admired Mona's artistic skills in this area and appreciate how she describes just what she has done on her creations - so that I thought - 'well, maybe I can give this a shot!"
It's quite a change from my usual CAS style cards -  and I think my first try here is still a little CAS in the amount of 'stuff' I put on it - as in 'not that much'....  but I think I'll get braver with each creation!

For this week's challenge - Mona and Sue asked us to use light pink, silver and black and to combine at least two types of mediums other than just an inked image.

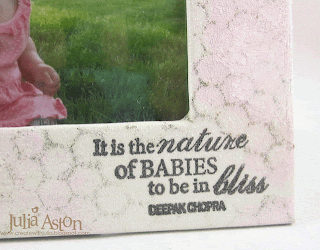
Here are the layers in the order I put them on.  I stenciled some flowers in pink acrylic paint on the left side and just painted some pink brush strokes on the right side.  I stamped my sentiment in black ink on the bottom right corner.  I stenciled a mini burst using antique silver acrylic paint on the left side and mini chicken wire along the right side.  I added Magic Mesh to two corners.  Then I painted over the whole frame with Clear Rock Candy Ranger Distress Crackle Paint and went to eat supper (ie had to leave the room so it would dry - I'm not good with patience!!)  I wanted to tone down the shininess a bit - so I brushed on some white Picket Fence Crackle paint here and there.  And finally - I die cut some flowers and adhered them in the corner - adding more white crackle paint on their petals.

Here are close ups so you can hopefully see what I described above.


 I think you can just see the pink stenciled flowers on this pic below


And I used my cute as a bug grandniece, Mila, as the center of attraction for my frame.
I'm really pleased with my first attempt at Mixed Media -  thanks Mona and Sue for the push to get into something new!    So -  how about you trying it too??!!  If I can do it - you certainly can as well!  Each challenge runs for two weeks so you have plenty of time to make something and let it dry!! LOL!!  Check it out here.

Stamps:  Fiskars Precious Baby Quotes.
Paper:  Authentique Uncommon, Text Style Bitty Dot Basics - PTI
Ink:  Versafine Onyx Black
Accessories:  Dienamics Flowers - MFT, Mini Burst Stencil and Mini Chicken Wire Stencil- Crafters Workshop, Wild Flowers Stencil - Claudine Helmuth Studio.  Ballet Slipper Pink and Antique Silver Glitter Acrylic Paints - Martha Stewart, Silver Magic Mesh, Silver sticky pearls - Michaels, Ranger Distress Crackel paint - Clear Rock Candy and Picket Fence, canvas frame - Michaels.

Tuesday, June 18, 2013

Cowabunga


I made today's card for two CAS challenges.
I used the sketch from the CAS challenge over on Split Coast  - 
 
I thought the surfboards fit the 'teenager' bill!  I dry embossed the Nestability banner along the top, stamped the sentiment inside the banner and then simply stamped the standing surfboards under it.

And since there's still time to enter:  I'm also linking this to the WMS blog party - theme - Summertime Fun!

And in case you were wondering (like me!) where the word 'cowabunga' came from - I googled it and found this:  

"Cowabunga!" - most recently immortalized by the Teenage Mutant Ninja Turtles - was the greeting used between Buffalo Bob Smith and Chief Thunderthud on the Howdy Doody Show during the 1950's. Later, the term became widely used in the Gidget surfer movies, and also in the Peanuts cartoon strip."

My stamps are from two great boy sets -  Free Spirit Boy and Free Spirit Sentiments by Waltzingmouse

Oh- and just a head's up -  Claire will be releasing 6 new WMS sets on June 30th with sneak peeks starting on June 27th - watch for them right here!


Stamps: Waltzingmouse - Free Spirit Boy, Free Spirit Sentiments
Paper: white - PTI
Ink: Ranger Distress - Salty Ocean, Mowed Lawn, Ripe Persimmon
Accessories: Lacey Pennant Nestabilitis