Showing posts with label Country View Challenge. Show all posts

Sunday, April 3, 2022

Easter Egg Blessings

 I'm in full Easter card mode now that it's April.    I made a card similar to this a month or so ago, but used darker colors and no framing and this time I layered the stems over an egg!

I die cut a panel of watercolor paper with the beautiful Quilted Backdrop die from Lawn Fawn and then cut it with the largest Nestability egg.  I die cut the stems out of Pale Rose and Soft Stone card stock using Alexandra Renke's Magnolium die.  
The looped bow is Fit to be Tied from The Greetery.  
I glued the stem pieces together and layered them over the egg with foam dots.  I die cut the scalloped frame using Stitched Rectangle Scallop Frames from MFT and adhered the frame and the egg to the white card base.  
The stamped sentiment is from Mini Strips: Easter  stamped on a sentiment strip die - both from Taylored Expressions.

I really love this Pale Rose color with the Soft Stone!

I'm linking my card to:


Spring is Coming

Stamps:  Mini Strips - Easter - Taylored Expressions.
Paper:  white, Soft Stone - PTI, Pale Rose - Bazzill, water color paper - Canson Cold Press.
Ink:  Obsidian - Altenew
Accessories:  Fit to be Tied die - The Greetery, Magnolium Die - Alexandra Renke, egg die - Nestability, Quilted Backdrop - Lawn Fawn, Stitched Rectangle Scallop Frames - MFT, Mini Strips die - Taylored Expressions, foam dots.

Wednesday, July 22, 2020

Let's Celebrate

Playing around today with some products, inspired by Tim Holtz recent Saturday videos.


The base of my panel is Matte Black Alcohol Ink Card Stock (which I've had for ages and never tried using it!).   The pattern was made using Ranger Distress Oxide Spray in Mermaid Lagoon and Fossilized Amber and Dylusion White Linen Ink Spray.

I poured (not sprayed) some of each of the sprays onto my craft mat close to each other but not mixing. Then  I smooshed the black AI cardstock onto the colors.   I lifted up the card to see how it looked and then smooshed some areas that hadn't gotten covered into the sprays on the mat again.

The cardstock was twice the size as this panel - so I got two cards (both slightly different looking!) from the one smoosh.   Obviously every time you do this it will come out differently!

The sentiment is Metallic Sticker/Quotations from Idea-ology.

I'm linking my card to:


 Country View Challenges - Do What Makes You Happy
Using products I've had sitting in my craft room untouched makes me happy!


Paper:  Matte Black Alcohol Ink Card Stock - Ranger, white - PTI
Accessories:  Ranger Distress Oxide Sprays Mermaid Lagoon, Fossilized Amber, Dylusion White Linen Ink Spray, craft mat, Metallic Stickers/Quotations - Tim Holtz/Idea-ology.

Thursday, March 5, 2020

March A Vintage Journey Challenge - Let's Celebrate Our Art

There's a brand new challenge over at A Vintage Journey today.  We are celebrating 6 years at AVJ this month and Brenda is our hostess.  This is the challenge in her words:

"Yes! let's celebrate our 6th Birthday.
Do you remember the words from the Kool and the Gang song?
There's a party goin' on right here
A celebration to last through the years
So bring your good times, and  your laughter too
We gonna celebrate your party with you.

So show us what you are celebrating in your art and craft work at the moment. Don't forget to link us into your blog post and if it's not really obvious share with us how your project relates to the challenge theme. Just remember to create your project in one of our preferred styles: vintage, shabby, mixed media, art journaling, industrial, timeworn or steampunk."
 -----------
I decided to make a mixed media canvas.  I have seen these made on so many blogs on canvas, on journal covers, on wall hangings, and I always wanted to try it.  I've purchased all the supplies over the past few years that I thought I'd need for it but still never sat down to work on one.
I think it's because I'm basically a clean and simple crafter (!) and this is anything but clean and simple!

So, today I'm celebrating that my art journey has gone into areas unknown - and I am happy to share my first effort with you!
First, several views of the finished product.  My canvas is a small 4"x4".

Close ups to show the crackle and all the dimensional bits.
And a few photos of how I created it!
I had a 4"x4" canvas that I had made years ago that I wasn't happy with but kept it to redo some day.  I ripped off the decorations I had on it, leaving the bit of lace along the bottom.  I got out a few things I thought I might use for my collage.
I made the face pieces from some molds and Model Magic from Crayola. The other pieces were in my stash.
I placed various pieces on the canvas and when I was happy with the design, I adhered them to the canvas with 3D Transparent Matte Gel.  I added some Carnelian Gem Stones, Copper Micro Beads and Art Stones and left it all to dry overnight.
 (I found out you need to have patience in making something like this as each layer has to dry, usually overnight!)
Then I brushed Black Gesso over the whole canvas being sure it got into all the little crevices. Another overnight drying session!
I forgot to take a photo of my next step, which was to rub Bronze Age Metallic Wax and Patina Effect Brass Paste over most of the canvas.  That really gave all the pieces a definition on the black canvas.  Then I covered it liberally with Clear Crackle Texture Paste and left it once again - overnight to dry,  hopefully to crackle!
(mind you, I really have no idea what I'm doing - but I'm sort of following steps I've seen other people do!!)  
With every layer I thought  "Gosh, I hope I'm not ruining this now!"
And once again - the final result!
 I also took a photo of it out in my yard in front of the base of our Japanese Maple where it practically blended right into nature!  
(spring has not yet arrived here in New England!)
So we are looking forward to you joining us this month in celebrating our 6th birthday at AVJ and to celebrate where you are in your art journey!

You'll find lots of inspiration from the Creative Guides over at the challenge here

I'm also linking my canvas to:
The Eyes Have It (my moon has big eyes!)


Accessories:  Sculpey Art Doll Faces Molds, White Model Magic -Crayola, lace, 4"x4" canvas, metal star, metal flower, plastic flower from stash, Typography Letters - Tim Holtz/Idea-ology, 3D Transparent Matte Gel, Texture Paste Clear Crackle, Art Stones, Copper Micro Beads - Finnebair/Prima, Metalique Wax Bronze Age, Patina Effect Paste Brass - Prima, Carnelian Quarry Gem Stones - Emerald Creek, Black Gesso - Dina Wakley/Ranger.

Thursday, January 30, 2020

Tag Friday at A Vintage Journey

Whenever there is a 5th Friday in a month - A Vintage Journey has a Tag Friday Post and as one of the Creative Guides,  I signed up to make one this month.
My creative juices are moving towards Valentines day and I used some old and new products to create my tag today.

I finally 'cracked' and purchased the 3D Texture Fade Crackle embossing folder and used that for the base of my tag.  I sprayed a piece of  Kraft Stock paper with water and embossed it.  I dried it with my heat tool and then sponged over it with Vintage Photo DOX ink which really highlighted the wonderful crackle achieved!
Then I used a newly released die - Heart Beat Thinlits by Tim Holtz/Sizzix - cutting it out of a piece of black Classic Kraft and the heart piece out of red.  I sanded over both pieces lightly to expose some of the kraft beneath the colors.  I layered the heart frame over the panel with foam dots and then added the red heart in the center with foam dots.  I adhered a Chit Chat Sticker, a Clippings Sticker and tiny white clay hearts from Honey Bee Stamps onto the piece.
I used an older Stacked Words: Valentines die from Tim Holtz/Sizzix to cut the XO out of red Kraft Stock, sanding it a bit and layering it on with foam dots.  I added black clay hearts around it.
I stamped the sentiment from an older Saying Stuff stamp set by Tim Holtz/Stampers Anonymous on a sentiment strip from My Favorite Things, sponging the edges with the Vintage Photo Dox.  I cut a piece of black card slightly larger than my tag and adhered the tag to it.  I punched the hole out, looped a piece of satin ribbon through it and adhered a little bit of vintage lace along the top edge. (Adding the lace immediately made it feminine  - so if I was making this for a male, I might not add the lace!)
So please join us over at A Vintage Journey and link up your own tag - we'd LOVE to see what you create!  You'll find Tag Friday here.


I'm also linking my tag to:


Love

Stamps:  Saying Stuff - Tim Holz/Stampers Anonymous
Paper:  kraft tag, Classic Kraft  papers Tim Holtz/Idea-ology, water color paper - Canson.
Ink:  Ranger Distress Oxide Vintage Photo
Accesories:  Heart Beat Thinlit Die, Stacked Words: Valentines Die - Tim Holtz/Sizzix, Dienamics Sentiment Strips - My Favorite Things, Crackle 3D Texture Fade Folder - Tim Holtz/Sizzix, Tuxedo Clay Hearts - Honey Bee Stamps, Chit Chat Stickers and Clipping Stickers - Tim Holtz/Idea-ology, satin ribbon, vintage lace, form dots, Tombow Glue, mini sander.

Wednesday, January 8, 2020

We are Better Together- Eileen Hull's new Sizzix Display Stand Die

Today I'm sharing my 2nd project for Eileen Hull - using the 2nd of her new Chapter 1 Sizzix Dies - called Display Stand.   
I used it today to create a  photo frame with a little a display platform along the bottom 
(you can turn it upside down to design with as well - but I'll show that on my next project using this wonderful die!)
This project features my two sweet sister cats, Scout and Boo, as well as little plastic kitties that I got in a package of dogs and cats at the Dollar Store!  In the photo Scout is on the right and she's a little smaller than her sister, Boo, on the left.  

First I die cut the Display Stand out of matboard.  It's all one piece and looks like this.
I'm going to show you how it folds together - it can seem tricky at first, but once you do it - it's really easy!
So first you just fold it on the score lines
Then you push the top piece  on the right above, down through the opening in the middle.  Here I have just started pushing it through and when you push it further - that tab in the middle......
will slip right into the slot on that piece in the middle there
Then you fold over the piece under my thumb above on the left - and the slight tab pieces tuck right under the corners on right and left -  see the area under my thumb below. 
(hint:  this is the other way you can hold the Display Stand)
Here's how it looks from the back - such a clever design!
So - to make the frame piece on the front - I used one of the frame dies from Eileen's Journaling Cards: Flowers and Leaves die.  I cut a piece of watercolor paper 4"x5" and cut out the center with the wavy frame die.
I ran 1/8" Scortape along three sides of the frame - right on the outside edges - leaving the top open.  I adhered it to the top part of the Display Stand.
I cut the photo down to 4 3/8" x 3 3/4" and it slipped right into the frame - so I can switch it out for another photo at any time!
I cut a piece of patterned paper to adhere under the plastic kitties. I adhered the kitties with a hot glue gun to hold them on securely.  I stamped the sentiment from the Better Together stamp set from Altenew.  I glued on little flower sequins around the kitties as well as on the top left corner of the frame.
 This sweet photo Display Stand measures 5 1/4" x 4" with the stand piece coming out 1 1/2" in the front. The perfect size for display on a desk or shelf!
All of Eileen's Inspiration Team are creating this month using her two wonderful new dies - Display Stand and Gift Box - so be sure to check our Eileen's blog every Wednesday in January to see all the creative ideas for using these dies!

I'm also linking my project to:
Country View Challenge: January
Love

Try it on Tuesday:
What a cutie - make someone smile

Die Cut Divas
New Things (a new die!)


Stamps:  Better Together - Altenew
Paper:  Little Sizzles Matboard - Sizzix, watercolor paper - Canson, DP - Petite Places Patterned Paper Pad - PTI
Ink:  True Black - PTI
Accessories:  Display Stand Die,  Journaling Cards: Flowers and Leaves die - Eileen Hull/Sizzix, photo, plastic cats - The Dollar Store, Mixed Flower Sequins - Simon Says Stamp, hot glue gun, 1/8" Scortape, Tombow Glue.

Monday, December 9, 2019

Tag #6 - Ellen Hutson's 12 Tags of Christmas - It Came Upon A Midnight Clear

Today, I'm sharing my 6th tag for Ellen Hutson's 12 Tags of Christmas Challenge.  The theme for #6 is 'It Came Upon a Midnight Clear'.   I was inspired by both Ardyth's and Sandy's tags with their dark midnight skies.
Here's my tag:

I covered a square of white card with Galaxi Washi tape from Altenew to create my midnight sky and layered the Wisemen die cut over it - with the front piece layered up on foam dots.  I rubbed over the edges of the Wisemen die cut with a QTip that I inked with Hero Hues Sea Salt Ink to give the shapes definition.  I die cut the star and peace out of metallic gold paper and layered it all onto the Tag Sale Quilted die cut.

We're half way through the 12 tags of Christmas- and I'm so happy to have made so many pretty tags already for the gifts I will be giving this year- 6 more to go!   You'll find  Ellen's challenge here.

I'm also linking my tag to:
Country View December Challenge
Stars

Word Art Wednesday
Anything Goes

Christmas Kickstart Challenges
#25  The Christmas Story

Simon Says Stamp
Traditional Christmas

Paper:  White True Black - PTI, Kraft Stock Metallic - Tim Holtz/Idea-ology.
Ink:  Hero Hues Sea Salt Reactive Ink.
Accessories:  Galaxi Washi Tape - Altenew, Tag Sale Quilted Die and Peace die - PTI, Wisemen Die - Tim Holtz/Sizzix, foam dots, gold ribbon from stash.

Saturday, July 27, 2019

Paradise Found!

I have another project to share using some of Eileen Hull's new products -  House Ornament Die from Sizzix and 3 of her new Molten Dimensions Embossing Powders from Emerald Creek.

My project was inspired by the Inspiration Challenge over on Splitcoaststampers today -  hostess Brenda shared one of her Pinterest Boards - Needle Minders.

I was inspired by this Needle Minder.  

I made an ATC using one made of MDF that I purchased at Top Flight Stamps.

The little beach cottage is part of Eileen's House Ornament Die - the little house is used for a tag on her bigger house ornament.  I colored it by sponging her  Bay color Blends2 Ink onto the matboard house.  After it was dry I drew the clapboard lines on with a Gray Copic. I adhered a piece of yellow cardstock behind the windows and drew around two edges of each window with a yellow Copic to create shadow.   I added an enamel star from Altenew at the peak and tiny shells (from Sanibel Island!) along the bottom.  The sentiment is a Small Talk/Occasions Sticker.
I used an electric pancake griddle set at 300* to emboss the ATC.   Check out this post of mine that shows more photos and details about embossing with a griddle!  This technique works well with Eileen's Molten Dimensions as they are very coarse.

Basically, I laid my craft mat onto the heated griddle, put the ATC on the mat and added a thick coat of Eileen's Glistening Glass as a base.  When that was melted (just a couple of minutes!) I added Eileen's Molten Dimensions in White Wonder, Aqua Splash and Golden Rod.  After they melted (another few minutes!) I swirled the colors with a pick
 (the powders stick a little to the pick but can be easily broken off the pick when they harden)

Please check out Eileen's blog where she is posting her Inspiration Team's projects using her new products this month!

I'm linking my ATC to:
Blues and Greens


Paper: little sizzles Matboard - Sizzix, ATC MDF - That's Crafty (Top Flight Stamps)
Ink: Bay Color Box Blends 2 - Eileen Hull/Clear Snap
Accessories: House Ornament Die - Eileen Hull/Sizzix, Molten Dimensions White Wonder, Aqua Splash, Golden Rod, Glistening Glass - Eileen Hull/Emerald Creek, craft mat, electric pan, Small Talk Stickers -Idea-ology, Copics N2, YR21, tiny shells from beach, enamel star - Altenew

Monday, July 15, 2019

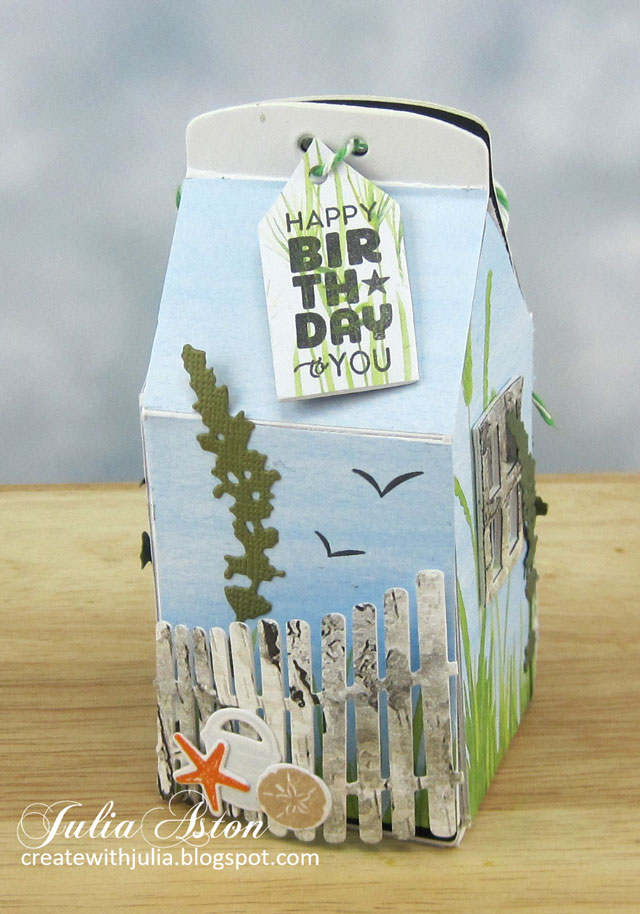
A Cottage by the Beach - Eileen Hull's new Sizzix House Ornament Die

Eileen Hull's Inspiration Team is creating all this month using her wonderful new dies - House Ornament Die and Gift Card Folder and Label.  I'm showcasing the House Ornament today.
The house measures 4 1/2" tall to the peak and 2" wide x 2" deep.  It opens from the bottom so a treat can be placed inside.
I have a few creation photos and then more views of each side of my cottage by the beach!  The house is die cut from white matboard (this one is black on the inside).  I added a little piece of lace to the top of the windows for curtains blowing in the ocean breeze!
I decided to cover my cottage with some pretty patterned paper from a pad I got at JoAnn called Clouds and Grasses $1.99!)  I love the green of grasses and soft blue sky/ocean!
I have this older Sizzix die that just cuts windows - and it matched pretty well to Eileen's die so I used it to cut window frames out of matboard.  I also die cut the frames out of a birch bark wrapping paper and adhered it over the matboard.  
(I now realize the window frame in Eileen's House Pocket Die fits this window! Duh??!!)
So here is a view of the framed window and lace curtains!
On the first piece of patterned paper I die cut to match one side, I left it as a whole piece and after I glued it on and then bent it on the scoreline - the paper tore as seen below on the left edge. So for the next panel I cut the sections apart at the score lines and then adhered them.
So that made me decide to cut some Tim Holtz Wildflowers to complement the ones on the paper and also add some dimension while covering the tears!  And that led to adding a fence and seagull from PTI.
The fence was wider than the side of the cottage, so as I was holding it, it bowed out a bit and I thought "that would be a fun look!"  So I just cut off one of the pickets and then adhered the fence to the side with foam dots just on the outside edges!
I tied green twine through the hole at the top which also loops through the tag on the other side.


I love the look of the lace curtains!
I added another fence on the opposing side, stamped some seagulls in the sky, added a pail, starfish and sand dollar.

I cut another sheet of patterned paper from the same pad to adhere over the tag and stamped the sentiment from The Greetery onto it.  Tying it on with the green/white twine.
Here is the bottom closed.
And open - so you can add a little gift!
My husband said I should have added a fence on all sides -but my creative plan was that the sides with the windows are  where we are looking at the cottage and the sides with the fence are where we are looking from the fenced yard of the cottage out to the ocean!
 So please check out Eileen Hull's blog during the month of July to see all of the wonderful creations the Inspiration Team has created using Eileen's new dies!

I'm linking my little beach cottage to:
Country View Challenges
July:  Blues and Greens


Stamps:  Fence Line Summer - Papertrey Ink, Sentiment Suite: Birthday - The Greetery.
Paper:  Little Sizzles Matboard - Sizzix, DP Clouds and Grass Paper Pad  - JoAnn, Birch Wrapping Paper - Pier 1 Imports, Greens Kraft Core-dinations, white - Papertrey Ink.
Ink:  True Black, Smokey Shadow, Soft Stone, Spring Rain Orange Zest, Classic Kraft - Papertrey Ink.
Accessories:  House Ornament Die - Eileen Hull/Sizzix, Windows Die - Where Women Cook/Sizzix (old), Fence Line Summer Dies - Papertrey Ink, Wildflowers Thinlits - Tim Holtz/Sizzix, Peapod twine - the Twinery, red line tape, lace from stash.