Showing posts with label Altenew. Show all posts

Thursday, October 2, 2025

Card Chain Challenge - September 2025 Reveal

 Today all of the cards exchanged for the September Card Chain Challenge are revealed over at the blog.

This month I sent a card to Ellie in Illinois and I received a card from Greta in Oregon.

For my card this month - I used the suggested colors and the theme option Flamingo.


I have about 10 of Tim Holtz Colorize dies of wonderful animals.  Some of them I've used a lot and a few haven't been used yet - including this wonderful flamingo Gladys!

I embossed the teal background card using Monstera Frame Embossing Folder from Altenew and I die cut the Monstera leaf using a die set from The Greetery.  The sentiment is preprinted from a set by Waffle Flower.

I die cut an easel to attach to the back of the panel so it can stand up for display.
We hope you will join us for the October Card exchange - you'll find all the instructions and the sign up for October here.

The link closes on 10/6

Also linking my card to:

first time using Gladys

ends 10/8

Anything Goes with Critters
ends10/23


Paper:  Tropical Teal, True Black, Pale Peony, White, Lemon Tart, dotted vellum - Papertrey Ink, metallic gold from stash.
Other Supplies:  Gladys Colorize Thinlit die - TH/Sizzix, Large Leaves Monstera Die - The Greetery, Monstera Frame Embossing Folder - Altenew, glue dots, foam dots, enamel dots - Altenew, printed sentiment - Waffle Flower.  Small Easel Die - Sizzix (retired).

Friday, February 28, 2025

Group of Seven Cardmakers - Feb 2025 Technique - Floating Frames

 This month, the Group of Seven Cardmakers are playing with the technique - Floating Frames.

There are several tutorials for this on YouTube -  two of them are linked to over at GO7.  I looked at both of them and because I just happened to have Press N Seal Glad Wrap in my cabinet - I went with this tutorial. Floating Die Cut Frame by Jennifer McQuire. 


Side view to see the depth of the 'floating' frame.
I used Antique Roses stamps and dies from Altenew.  I chose 3 shades of green ink for the leaves and 3 shades of blue and black for the two blooms.  I used my Misti and stamped all the layers of leaves and blooms on a white panel - four times so I had 4 panels of each bloom and leaves to use on my card.
I die cut all the pieces and laid them over a 4 1/4" x 5 1/2" white panel.
I laid a piece of Press'n Seal over the panel and pressed over all the pieces with my fingers - it is slightly tacky on one side (be sure to have the tacky side down!) so holds all the pieces in their places on the white panel.
I cut around the edges of the white panel so nothing went over the edge..
I removed the white panel and the pieces remain stuck to the Pres'n Seal
Then I die cut a rectangle out of the center of the panel - So I had two pieces to work with - still stuck to the Press'n Seal.
I added pieces of thick foam tape all over the back of the pieces.  Thick foam makes the frame 'float' higher off the card base.
I removed the backs of the foam tape, flipped over the panel and carefully pressed it onto the white panel, removed the Press'n Seal and there's my floating frame!  I adhered the inside of the frame cut- out onto a white card front for my 2nd card and removed the Press'n Seal!  I added 3 clear Fairy Drops to each card.


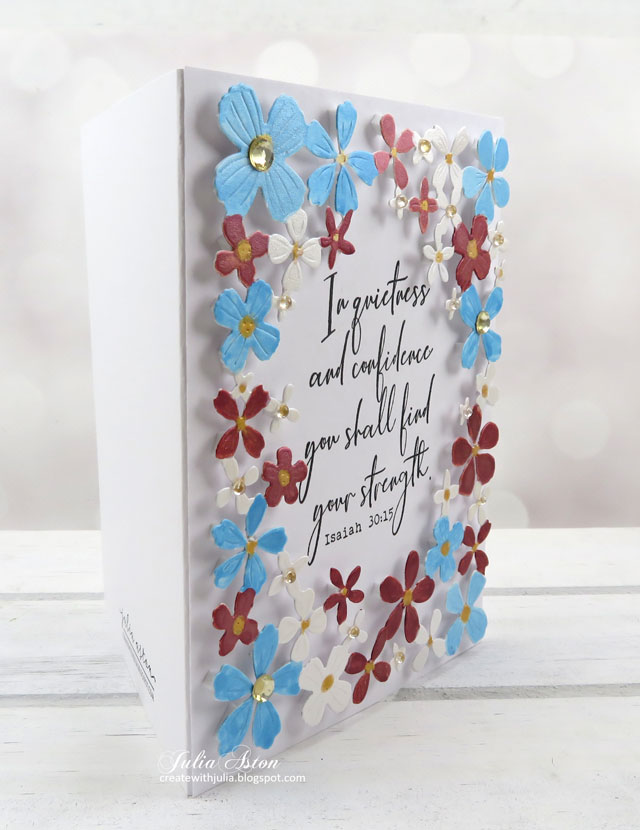
A couple of days after I made the above cards - I was looking through my box of cover dies and came upon this Flower Field Frame die from Poppy Stamps - I've had this for at least a year and it's the first time I've used it!
A faux floating frame so to speak!  It's all one piece - just has to be colored and adhered to a card base with lots of little bits of foam strips!  I used Metallic Water Color Paints to color the blooms and added gems to the center of some of the flowers.


Notes:  
1.  Depending on what stamps you choose (my first card blooms had 4 stamps for each bloom to create the 3D look) it can take a couple of hours just to stamp everything and then die cut the pieces for these two cards.   But it does create a beautiful look for a special card for someone.  I would suggest you do all the stamping one day - die cutting the next day and placement the third day and to stamp/cut enough for several cards!
2.  You could hand color your stampings or stencil the colors over your stampings depending on what kind of sets you have in your craft room.  That would save a lot of time.

3.  Maybe you'll find a cover die similar to the one I used for my last card that works as well!  Check out all the corners of your craft room!


We'd love to see what you do with this technique and to let us know what was easy/difficult for you.  You'll find some beautiful inspiration from the rest of the Group of Seven as well as Mr. Linky to show us what you do over at Group of Seven Blog!

 
I'm sending my one piece floating frame card to:

first time using the Flower Field Frame die

something tiny/small   My flowers are small on this floating frame. 
ends 3/4

Sending  my You're Amazing card to:

Cardz 4 Galz - embellishments
clear Fairy drops   ends 3/4


Antique Roses Card
Stamps: Antique Roses - Altenew, Isaiah 30:15 - Impression Obsession
Paper: White, True Black - Papertrey Ink.
Ink: Light Spruce, Medium Spruce, Dark Spruce - Gina K Designs, Persian Blue, UIltramarine, Sapphire - Altenew, Nocturne - Versafine Clair.
Other Supplies: Antique Roses Dies - Altenew, Rectangle Die - Nestabilities, Press'n Seal - supermarket, foam tape, Fairy Drops - Memory Box.

Flower Field Card
Stamps: Antique Roses - Altenew, Isaiah 30:15 - Impression Obsession
Paper:  White - Papertrey Ink
Ink:  Nocturne - Versafine Clair
Other Supplies:  Flower Field Frame Die - Poppy Stamps, Metallic Water Colors Paints - Yasutamo, paint brush, water, foam strips, gems - Park Lane, Clear Fairy Drops - Open Studio

Saturday, February 15, 2025

Inkspirational #335 Mood Board - Inspired Flowers

 Inkspirational Challenge #335 has just posted and it's a lovely Mood Board!

I was inspired by the aqua colors and the florals.


Still trying to follow my New Year's resolution to use things I've had for ages and never used,
I pulled out the Craft-A-Flower Lily die set from Altenew.  And boy, aren't these pretty blooms?!  I didn't think they would still have them, I bought them so long ago - but they do!   I added Silver Wink of Stella on the stamens but it doesn't show much on the photo.  The flower on the right is popped up on foam dots.


This challenge ends on Feb 28th so we hope you will join us before then and link up your card inspired by our Moodboard!   

You'll find more inspiration from the rest of the Design Team as well as Mr. Linky over at Inkspirational!


I'm also sending my card to:

1st time using these Altenew Lily dies!

did not use optional red ends 2/27

Flowers make me smile ends 2/17

ends 2/28


Paper:  Robins Egg - Bazzill, Aqua Mist, Hawaiian Shore, Tropical Teal, True Black - PTI, DP: Untamed Meadow - Unity two shades of textured green from my stash.
Other Supplies:  More Sentiments Hot Foil Plate and die set - Spellbinders, Silver Hot Foil, Glimmer Hot Foil System, foam dots, Silver Wink of Stella.

Tuesday, January 28, 2025

Group of 7 Cardmakers - January 2025 Technique

 Today the Group of 7 Cardmakers are playing with the technique of Dry Embossed Highlights over Ink Blending.

You'll find links to a couple of YouTube Videos over at the Group of Seven Blog.

I tried two of the techniques with varying success depending on the embossing folder and lighter colored ink I used over the panel.  

The instructions say to use a white pigment ink to rub over the embossing. All of my white ink pads seem to dry out by the time I go to use them?! I used the one I had on the heart card below this card - but it wasn't very 'juicy' and also picked up the pink from the background.

So, I used Antique Linen Distress Oxide over the embossing on the two cards below.  I used Distress Oxide Seedless Preserves, Squeezed Lemonade and Salvaged Patina on the backgrounds.


A few creation photos for these two using the same embossing folder.


I used an old Colorbox Frost White Ink rubbed over the embossed hearts on the card below -  the pad wasn't very 'juicy' and picked up some of the Festive Berries Distress Oxide ink so the white was not very 'white'!  But I liked the result.  This older embossing folder was not very deep. 
I rubbed my Squeezed Lemonade Distress Oxide ink pad over the embossing, using Speckled Egg Distress Oxide inside the rectangle.

Notes:  I decided to use light Distress Oxide Inks to rub over the embossing on 3 of my designs instead of white (accept on the Valentine) since I didn't have a 'fresh' White Pigment Ink.

I found if the embossing wasn't deep enough, the ink pad I rubbed over the embossing would also get ink onto the un-embossed areas of the card.

I tried 4 other embossing folders that didn't work out either with the colors I used on the background or the thinner depth of the embossing - so keep playing!


We'd love to see what you create using this technique.  You can link up your card over at the Group of Seven Cardmakers blog so we can all come and see them!

I'm linking my Thank You card

 to:

anything goes with embossing ends 2/5

optional: Close to Nature (flowers) ends 1/31


Thank You and Sympathy Cards
Paper:  White - Papertrey Ink, Gold foil, Silver Foil
Ink:  Ranger Distress Oxides - Seedless Preserves, Squeezed Lemonade, Salvaged Patina, Old Paper.
Other Supplies:  Masking Tape, Flowers and Leaves Embossing Folder - Altenew, Way with Words Hot Foil Stamps (Thank You) - Ellen Hutson, Classic Frame Foil Set (Sympathy)- Waffle Flower, foam dots, blender brushes.

Valentine Card
Paper:  White - Papertrey Ink, gold foil
Ink:  Ranger Distress Oxide - Festive Berries, Frost White - Color Box.
Other Supplies:  Masking Tape, Hearts 3D Embossing Folder - Sizzix, Way with Words Hot Foil Stamps (Love You) - Ellen Hutson, foam dots, masking tape, blender brushes.

Congratulations Card
Paper:  White - Papertrey Ink, gold foil
Ink:  Ranger Distress Oxides - Speckled Egg, Squeezed Lemonade.
Other Supplies:  All Star Burst Embossing Folder - Simon Says Stamp, masking tape, foam dots, blender brushes, Way with Words Hot Foil Stamps (Congratulations) - Ellen Hutson.