Showing posts with label AAA Cards. Show all posts

Saturday, March 28, 2026

Inkspirational #364 - Clean and Simple - Optional E is for.....

 It's time for the next Inkspirational Challenge #364!

And there is an Optional Twist -  E is for ...???

So I made my card CAS and it's an Easter Card!

I simply stamped the bunny and sentiment from Hipster Stamp and Stencil Set from Tim Holtz/Stampers Anonymous onto a panel of water color card.

I used my Misty to stamp it as water color card has a texture and you usually need to stamp a couple of times to get good coverage.

I used Sand Dune Versarfine Clair ink on my first card - thinking 'brown bunny'!
Then I wanted to try some brighter 'Eastery' colors and used Hawthorn Rose and Arctic Versafine Clare on these two below.


We'd love to have you join us and show how you do CAS and maybe use the Optional Twist: E is for....?

You'll find Mr. Linky and some lovely inspiration from the rest of the team 

This challenge ends on April 10.

Also sending my card to:

ends 3/29

Cute Critters  ends 3/31

ends 3/28

ends  4/11


Stamps:  Hipster Stamp and Stencil Set - Tim Holtz/Stampers Anonymous.
Paper:  Water color card - Spellbinders
Ink:  Sand Dune, Arctic, Rose Hawthorn - Versafine Clair.
Other Supplies:  Misty

Saturday, June 28, 2025

June Group of Seven Cardmakers - Second Generation Stamping

 Here is my 1st card for the June Group of Seven Cardmakers post.  

This month we are playing with Second Generation Stamping -  when you stamp an image fully inked then stamp it again without reinking either once or twice.  You'll find a link to Videos on the technique over at the GO7 Blog.

 It creates a wonderful depth to your card design.

I went very CAS with this card, simply stamping the image on the left fully inked with Portobello Versafine Clair Ink then stamping again to the right of that stamping and a bit higher, without reinking.

Next,  I stamped the image off the bottom and half off the right side fully inked - then stamped above it (only the left half of the stamp) again way over to the left off the edge with the right half of the stamp.

   My card base is watercolor paper and the sentiment is from Paper Artsy.

Trees seem to be the first thing I grab when I think of Generation Stamping (or off stamping) so I wanted to stretch myself and use other stamps and also add some color!
   
So this card was born (after about 5 aborted attempts using various Lavinia stamps!)
I started by stamping a text background - inking the stamp and stamping it off on paper before stamping on the card panel as I wanted it just to be a shadow.

Then I stamped the dandelion in black and off stamped it - repeating again and the same with the leaf.  And finally I stamped and off stamped the Orchard Grass along the bottom.

To add color (after I made sure the black ink was dry!) -  I sponged over the top with Distress Speckled Egg and over the bottom with Shabby Shutters.

I stamped the sentiment on white card and punched it with an oval punch.  I sponged the edges with the Speckled Egg and popped it up on the card with foam dots.


We hope you'll give this technique a try 
(you probably have done this already at some point in your stamping career?! but maybe not for a while?)
   
You'll find Mr. Linky and lovely inspiration from the rest of the GO7 team over at the blog.
We'd love to see how you use this technique!


Also sending my card to:
4th week - A - Anything Goes

Nature Inspired ends 7/1

CAS  ends 7/5


Tree Card
Stamps:  Silhouette Trees #1 - Rubbernecker (retired), Sentiment from Paper Artsy Alison Bomber set EAB01.
Paper:  Water color paper - Canson Cold Press
Ink:  Portobello Versafine Clair

Dandelion Card
Stamps:  Background Script, Orchard Grass, Tall Dandelion - Lavinia, Dandelion Wishes Sentiment set - Papertrey Ink.
Paper:  White - Papertrey Ink
Ink:  Nocturne, Morning Mist - Versafine Clair, Ranger Distress Speckled Egg and Shabby Shutters.
Other Supplies:  oval punch - SU, foam dots, blender brushes.

Saturday, March 23, 2024

Inkspirational #312 - The White Bunny

 Inkspirational Challenge #312 has just gone live over at the blog.  It's a Designers Choice!  I am  the designer this time and my choice is use White on White!    


And here's my card - just in time for Easter which is SO early this year on 3/31/24!

I used only white with a touch of neutral black just for the eyes, nose and sentiment!  I recently purchased this wonderful layered bunny die from Magnolia Ink - a company in Germany.  I just love how this bunny looks with all his layers. I used a simple embossed frame background of white.  I popped the layers of the bunny up on foam for even more dimension, but it looks great without using foam too!

I hope you will join us in this fun White on White challenge!  You'll find inspiration from the rest of the DT and Mr Linky over at the Inkspirational blog.

This challenge ends 4/5/24


I'm also linking my card to:

first time using the bunny die


CAS/Spring  ends 3/30

Anything goes using dies  ends 3/31
CAS  ends 3/27


Stamps:  Mini Strips: Easter - Taylored Expressions
Ink:  Nocturne - Versafine Clair
Paper:  White, True Black - Papertrey Ink, hammered white - Amazon.
Accessories:  Rabbit Die - Magnolia Ink, Mini Strips Die - Taylored Expression,  Heritage Bundle Embossing Folder - Cutlebug, foam dots.

Saturday, February 24, 2024

Inkspirational #310 Cake on a Plate

 Here is my DT card for Inkspirational Challenge #310 which is a lovely Mood Board -  what great colors to give us hope that winter will soon be over!


I'm sure you can tell which photo above inspired my card design!

I purchased the Takes the Cake Mini die set from The Greetery several months ago (it's just $9!) and was happy to get it out and use it!   The gold letters are puffy stickers from Michaels.

There's so much to inspire you on our Mood Board - we can't wait to see what you create from it.  You'll find some lovely inspiration from the rest of the DT over at Inkspirational - along with Mr. Linky.  

The challenge is open through 3/8.

I'm also linking my card to:


CAS Optional: Birthday
ends 3/2

Anything Goes
ends 3/5


first time using cake die set


Paper:  Mint Julip, Vintage Cream Linen, Sheer Basics Vellum - Papertrey Ink, white hammered cardstock - Amazon (England).
Accessories:  Takes the Cake Mini Dies, Garden Bits (flowers) - The Greetery, Half Circle Cross Stitch Edge Dies - Amazon, Wicker Weave Embossing Folder - Provo Craft, Gold Puffy Stickers - Recollections/Michaels, foam dots.

Sunday, July 16, 2023

Woof Woof!

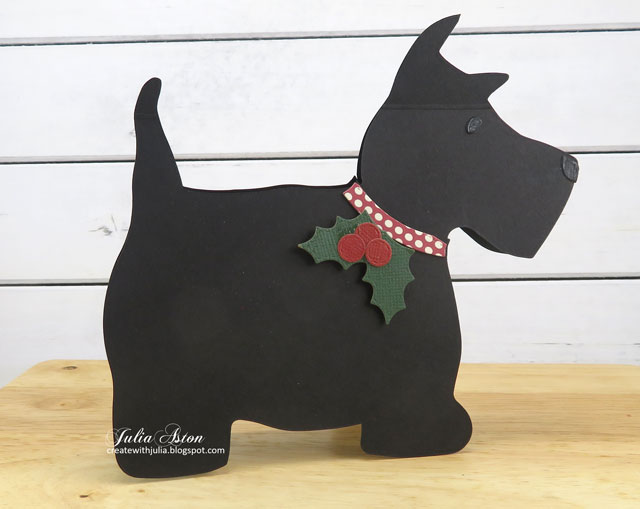
How cute is this little Scottie dog??!!  I've had this Sizzix Bigz Die for a few years (bought on sale) and then never created with him.  (seems to be a common theme with me??!!)

I was going to put him 'on' a card - but when I took out the die - I realized he was a bit bigger than an A2 size card - so I made him a stand up Scottie dog!  He measures 5 1/2" nose to tail, 5 1/4" ear to foot so he'll fit in a 5x7 envelope or a 6x6.  Maybe he'll need one extra stamp if mailed?!

The eye and nose are little die cuts and I colored them a bit with a white pencil so they would show up.   The collar is also part of the die and I cut it out of black and then patterned paper and glued them together and then on his neck.   I die cut the the holly, layered the berries and leaves and adhered it with a foam dot. The Woof Woof is gold embossed.

I cut him out twice and adhered the front to the back along the tip of the tail and the forehead below the ears.  
Here he is from the back

I scored below the adhesive on the inside piece along the forehead and tail so it would fold back cleanly and he could stand up!  
I added this sentiment inside and will either write on it with a white pen or add a panel of white.

I'm linking my Scottie dog card to:

first time using the Scottie die

Christmas in July

Dogs/puppies


Stamps: Dogs - Inkadinkadoo, inside sentiment: Mini Strips: Christmas - Taylored expressions.
Paper: True Black - PTI, Core-dinations Kraft core green and red, DP Text Style Holiday Cheer - PTI
Ink: Versamark
Accessories: Scottie Dog Bigz Die - Sizzix, Patchwork Holly Die - Impression Obsession, Mini Strips Die - Taylored Expression, foam dots, white pencil, gold embossing powder, heat tool

Tuesday, April 4, 2023

The Shape of Bunnies

 One more for Easter this year!  I sent these to my great nieces and nephews with a one dollar bill tucked inside. (cheap rabbit!)


I'm linking my bunny to:

3rd Vertical Row
Die cuts, Pastel Colors, Easter


Stamps: Tear Strip Tags: Spring Stamp Set - The Greetery
Paper: Papertrey Ink
Accessories: Carrot Bunny Die - Sizzix, Tear Strip Tag Die - The Greetery, Twine.

Monday, January 30, 2023

A White Candle Birthday

 I made this all white slimline clean and simple Birthday card for four different challenges today!

It's a 8 1/4" x 3 1/4 inch slimline card.  The candles and sentiment are die cut out of Distress White Woodgrain Paper from Ranger which gives them some texture against the plain white card base while still being white!  

I also brushed Clear Glitter Wink of Stella over the die cuts so there is a little shimmer when the light hits the card - MAYBE you can see the glittery shine on the candles above?   It's hard to photograph.

I'm linking my card to the following challenges:

White on White

Sketch

Candles

CAS Birthday

Paper:  White - PTI, Distress White Woodgrain Paper - Tim Holtz/Ranger
Accessories:  Candle Die from Candle Light set - Altenew, It's Your Birthday Die - Simon Says Stamp, Slimline Nested Stitch die - Rubbernecker, Clear Glitter Wink of Stella Brush.

Wednesday, January 11, 2023

Adventures with You

 I have a CAS card to share today that is definitely a masculine design (but could be used for any outdoor-loving person!) and would work for a birthday or anniversary.  I haven't put a sentiment on the inside yet - waiting to see just who I'll send it to and for what occasion!

The tree and bear stamps are from the Great Outdoors set from Tim Holtz/Stampers Anonymous.  The sentiment is from a new stamp set I just got Happy Camper from MFT. 
(the Happy Camper stamps and die set are on sale right now! - just sayin')

The card base is textured, which you can see on the bear - he usually would be totally black accept for the larger clear spots which are part of the stamp.  I stamped the sentiment on a plain card strip so it was clear to read and also grounded the bear!

I'm linking my card to:


Stamp Act - must use stamps

The sentiment is from a new stamp set


Stamps:  Great Outdoors - Tim Holtz/Stampers Anonymous, Happy Camper My Favorite Things.
Paper:  Precision Cardstock - Parklane/JoAnn, smooth tan - Michaels.
Ink:  Nocturne Versafine Claire.