Tuesday, June 28, 2016

Acrylic Galaxy Background with Paper Landscapes - Wanderlust

This month the Eileen Hull Inspiration Team is working with Crescent Art Products along with Eileen's new Sizzix collection Paper Flower Party
The Inspiration Team will be focusing on two Crescent Art Products, RENDR paper and Photo Mat Art Board.
RENDR Paper is 100% no-show through.  This means you can ink, stamp, spray, paint and color to your heart’s content with absolutely no bleed through.
Photo Mat Art Board is another fantastic Crescent product being showcased this month.  Photo Mat Art Boards make it easy to create professional quality photo projects with your own artistic style. 
I used both products on my project today. My design was created from the latest class over at Wanderlust - Acrylic Galaxy Background with Paper Landscapes by Jennifer Lee. And I am just THRILLED with how it came out!
I started with an 8"x10" Crescent Photo Mat Board and painted it with black acrylic paint. I wasn't worried about making smooth brush strokes as the idea is to create layers with the paints.
When that layer was dry - I added three more dark colors - I can't give all the details since it was from a class but I'll show you photos.  I sort of pounced the colors on - then you pounce over it all with a damp sponge.
When this layer was dry I added some light colors in soft swirls with a rounder brush, adding black again if it got too light.
then came the stars - some dotted on with a paintbrush and then splattered on with a toothbrush. (toothbrush splatter not shown accept on final photo)
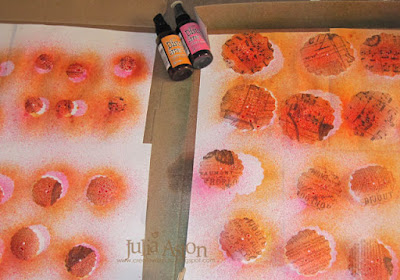
To make the paper landscape I sprayed a piece of RENDR paper with Ranger Distress Spray Stains
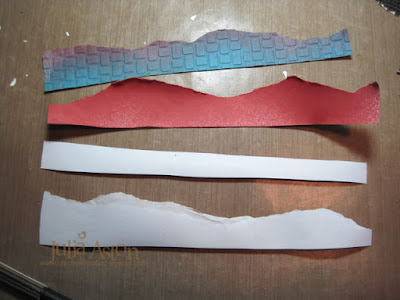
And tore strips off to look like mountains, tearing it towards me so the white edge shows.
The beauty of RENDR paper is that nothing you put on one side will bleed through the paper.  Here you can see how even the Spray Stain did not come through on the back.
I embossed a few of the landscape layers using Eileen Hull's new Textured Expressions Embossing Folders - Honey Comb, Daisy Wreath and Basket Weave to add some extra dimension to the landscape.
The Planet Earth photo that I mounted inside the frame opening is from an old school book I had torn up for this Wanderlust class project - I saved some of the photo pages when I tore them out of the book - it was the perfect image for this project!  I white embossed the Bible Verse from Scripture Collection 1 by Our Daily Bread.
I added a die cut easel (Tim Holtz Alterations) to the back so this project could be displayed on a shelf or mantel.
I really love this acrylic galaxy background I learned to paint  - I'm sure I'll be trying this again!
I hope I've inspired you with my project using the Crescent Photo Mat Artboard, the RENDR paper as well as Eileen's new embossing folders!  Please check Eileen's Blog for more ideas from her Inspiration Team all month long!

I'm also linking my project to:
Mixed Media Monthly Challenge - 2nd Anniversary - #18 Texture

Stamps:  Scripture Collection 1 - Our Daily Bread
Paper:  Crescent Photo Mat Board, Crescent RENDR no show thru paper, chipboard easel - Funkie Junkie Boutique.
Ink:  Versamark
Accessories:  Textured Expressions Embossing Folders - Honey Comb, Daisy Wreath, Basket Weave - Eileen Hull/Sizzix,  Dina Wakley Heavy Body Acrylic Paint White, Blackberry Violet, Magenta and Sky, Liquitex Heavy Body Acrylic Paynes Grey, Manganese Blue Hue, White Embossing Powder, heat tool, glue stick - Ranger, Ranger Distress Spray Stains Fired Brick, Broken China and Rusty Hinge, sponge, Fine Tip Black Sharpie, White Sharpie Paint Pen, planet Earth photo from old science school book.

Saturday, June 25, 2016

Papertrey Ink - June Blog Hop

I thought I wasn't going to get a card done for this month's PTI blog hop -  but I woke up this morning inspired to create!
This was the artwork we were to use for our inspiration.
I decided to use the Meadow Greens stamps and dies for my card. I was inspired by the colors, the shapes and the 'cover all' design.
I die cut the flowers out of vellum, stamped them and layered them over the background stampings with thick foam dots so they were held up high above the background - if they were too close, the background showed through.
I usually design with the rule of threes -  but three flowers looked too busy on this already busy design - so I went with 3 enamel dots to draw the eye around the card!
Now I'm off to check out all the creative inspiration others have left over at the PTI blog hop - are you joining in today??
It's a gorgeous summer's day in the 80's here in MA today -   my son, Josh, is coming over for lunch on the deck - and then Kent and I are going for a walk along Lynn Beach - hope you are having a lovely weekend!
Stamps:  Meadow Greens - PTI
Paper:  White, Aqua Mist, Vellum - PTI
Ink:  Aqua Mist, Pure Poppy, Tropical Teal, Hibiscus Burst, True Black - PTI
Accessories:  Meadow Greens Dies - PTI, enamel dots, thick foam dots.

Sunday, June 19, 2016

Coffee Lovers Summer Blog Hop - May Your Cup Be Full

I've made another card for the Coffee Lovers Summer Blog Hop
So my summer theme for this card is reading along with my cup of coffee -  I love to read year round - but especially out in the yard in a comfy chair getting a little bit of tan (with the sunscreen on, of course!) in the summertime.
So the book toting Miss is cut from an Idea-ology Found Relative card.   The girl is a black and white photo - so I colored her dress, corsage, lips and the book she is holding with Ranger Distress Markers.  I added a sticky pearl necklace (they look like white dots in the photo - but they are little pearls!).  The sentiment is from Literary Caffeine-ations,  the mug is from Sketchy Cups both sets by Stamplorations.
The girl and mug are popped up on foam dots.  I stapled a strip of Idea-ology lace across the bottom.  The floral panel is an Idea-ology Pocket Card, the yellow patterned paper is from Sidewalks paper pad from October Afternoon.
We have until June 24th to link up our summertime coffee cards to the blog hop -  there are TONS of prizes to be won - so be sure to check it out!

I'm also  linking my card to the Frilly and Funkie Challenge - Pastels and Pearls
My found relative's dress is colored with Spun Sugar and she is wearing a pearl necklace!
Stamps:  Literary Caffeine-ations and Sketchy Cups - Stamplorations
Paper:  white, true black - PTI,  DP Sidewalks/October Afternoon.
Ink:  Archival Jet Black
Accessories:  Ranger Distress Markers Barn Door, Spun Sugar, Shabby Shutters, Rusty Hinge, Idea-ology Pocket Cards, Found Relatives, Trimmings Lace,  Mini Attacher - Ranger, foam dots.

Friday, June 17, 2016

Coffee Lovers Summer Blog Hop - I just wanna dunk you in my coffee!

Have you heard??? It's time for the Coffee Lovers Summer Blog Hop!  
You'll want to get out your coffee stamps and create a summer card as there are TONS of companies offering prizes to random winners - you'll find them all listed at the blog hop.
I used summertime watercolors on my card - mixing pink, yellow and orange like sunshine and beautiful flowers growing in our gardens!
 First I brushed water over a panel of Arches Water Color Paper - then I painted on the watercolors, mixing with some more water, and drying with my heat tool. The stamps are from the We Go Together set by Gina K Designs (designed by Claire Brennan) as well as the dies which were from Waltzingmouse (no longer available).   I stamped the sentiment with Archival Jet Black Ink.
I die cut the donut and coffee cup out of  Arches Water Color Paper, brushed them with water and then with watercolor paints.  I added two Tiny Twinkles to the donut cheeks and popped them both up on foam dots.
I'm also linking my card to the CAS Mix Up June Challenge
I used stamps, die cuts and watercolor paints.
So lets go check out all of the Summer Coffee cards shall we?!! We have until June 24th to link up our cards!
Stamps:  We Go Together - Gina K Designs (designed by Claire Brennan)
Paper:  white, true black - PTI, Arches Watercolor
Ink:  Archival Jet Black
Accessories:  watercolor paints, brush, water, Dies - We Go Together - Waltzingmouse (no longer available), Tiny Twinkles - Taylored Expressions, Fine Tip Glue pen - SU, foam dots.

Tuesday, June 14, 2016

Framed Kitchen Message Center

This month the Eileen Hull Inspiration Team will be working with Crescent Art Products along with Eileen's new Sizzix collection Paper Flower Party
The Inspiration Team will be focusing on two Crescent Art Products, RENDR paper and Photo Mat Art Board.
RENDR Paper is 100% no-show through.  This means you can ink, stamp, spray, paint and color to your heart’s content with absolutely no bleed through.
Photo Mat Art Board is another fantastic Crescent product being showcased this month.  Photo Mat Art Boards make it easy to create professional quality photo projects with your own artistic style.

Today I'm sharing a project using the 11" x 14" Crescent Photo Mat Artboard.  
I also used several of Eileen's Sizzix new dies -  Flower Romance, Flower Pocket and Leaves Spring.
 I made a Kitchen Message Center.
 I purchased the gray woodgrain frame from Michaels (at 60% off!) and the mat fit in it perfectly!)
Here are some photos of my creative process:  Using Eileen's Flower, Romance die - I die cut 8 of each of the 4 blossom layers out of Tissue Wrap/Melange.  The tissue is so thin I just folded it over so I got all of the cuts with one roll through my Vagabond machine.  I also cut a base piece of white card stock to give a firm base for my layered pieces.
I laid all the pieces on some computer paper in my trusty pizza box that I use for spraying things.  I sprayed all the petals with Ranger Distress Spray Stain in Picked Raspberry and Spiced Marmelade.
When they were dry, I scrunched up each piece - keeping them in piles by size!  I then opened them up and fastened them all together with a pearl brad
I pulled up all of the circles to the center to fluff them - then gently pulled the outside ones open.
 I added the bloom to the white card stock piece I had cut and stained.  I also glued the leaves, described below, under the tissue flower.
I die cut two leaves using Eileen's Leaves, Spring die out of Core'dinations Tim Holtz Distress paper.  I added dimension with this flower tool, pressing it over the centers of petals and stems to break down the fibers of the paper.
I used the pizza box again to lay the white Crescent Photo Mat Artboard in and sprayed it with Ranger Distress Spray Stain in Peacock Feathers.  I ended up adding a little more spray than shown here -  but still had some white showing.  Then dried it with my heat tool. 
You will see below, how it got blended into a more solid color when I brushed on the Collage Medium - an unintended blending of color!)
I die cut Eileen's Flower Pocket out of Little Sizzles Matboard, put it together, and sprayed it with Ranger Distress Spray Stain in Peeled Paint.  I sprayed it a little heavy handed so blotted up the excess with a paper towel!
I wanted to seal both the Photo Mat Board and the Flower Pocket so brushed on Ranger Distress Collage Medium - Crazing.   
And as stated above - it reacted with the spray stain and made the color blend out and I lost my white patches.
The Collage Medium gave the added benefit of some subtle crackle!  Here's a close up of the Photo Mat
and the Flower Pocket.
Since I was making a message center - I decided to add a little black board inside the cut out frame area.  I simply traced the size of the mat opening onto my purchased frame back, cut a piece of  Blackboard Contact Paper larger than the cut out and adhered it over my outline.  I removed the glass from the frame, added the colored Crescent Photo Mat and placed the backing piece behind it.
I thought this little Idea-ology Vial would hold the piece of chalk nicely upright inside the Flower Pocket.  I adhered it into the pocket with a thick clear adhesive dot.
I added an Idea-ology Fastener/Dapper to the Pocket as well as the flower, adhered the pocket to the Crescent Photo Mat using Scotch Quick Dry Adhesive and added the chalk (in the vial), a pen, chalk board eraser and mini Post It Notes.
 I added Idea-ology Alpha Parts Numeric to the Photo Mat Frame.
I adhered a square of corkboard from Joann to the Crescent Photo Mat.  I added more Alpha Parts/Framed (Note to Self) and some clear pushpins - all set to hold the notes of things I need to remember!
And here it is again -  on the wall in my kitchen!
I hope I've inspired you with my project using the Crescent Photo Mat Artboard as well as Eileen's lovely new dies!  Please check Eileen's Blog for more ideas from her Inspiration Team all month long!

I'm linking my project to the following:
Anniversary -  #15 Get Texty, #18 Texture, #23 Dimension, #24 Butterflies or Blooms.

(mine is subtle - but it's there!)

 Paper:  Crescent Photo Mat Artboard 11" x 14", Cream Little Sizzles Matboard 6" x 12" Sizzix, Chalk Board Contact Paper, White card stock - Papertrey Ink, Idea-ology Tissue Wrap/Melange, green Core'dinations Tim Holtz Distress.
Accessories:  Eileen Hull Sizzix Dies - Flower/Romance, Flower Pocket, Leaves/Spring, Distress Collage Medium Crazing - Ranger, Ranger Distress Spray Stains Picked Raspberry, Spiced Marmelade, Peacock Feathers, Peeled Paint, cork board - Staples, ScorTape, Scotch Quick Dry Adhesive, Idea-ology Fasteners/Dapper, Vials, Alpha Parts Framed, Alpha Parts Numeric, Wood grain frame - Michaels.