Tuesday, November 20, 2018

Wishing You Peace and Joy

I have two Christmas cards to share today.

I created my positive and negative backgrounds using Tim Holtz Cracked Embossing Folder.  I sponged Antarctic Fresco Finish Chalk Paint over one side of the inside of my embossing folder, spritzed heavily with water and pressed a panel of watercolor paper into it and rubbed over it for a minute or two to be sure the watery ink absorbed into the paper.  I removed the panel and washed the EF.  I used the same technique on the other side of the EF.  

I thought the light blue paint made a rather artistic snowy background for my stamping of Tim Holtz Scribble Woodland stamps.

I'm linking my cards to:
Embossing Folder, Acrylic Paint, stamping, Clear Glitter Wink of Stella


Stamps:  Scribble Woodland - Tim Holtz/Stampers Anonymous
Ink:  Hero Hues Black, Ranger Distress Oxide Stormy Sky.
Paper:  Water color paper - Canson, White and Blueberry Sky - PTI
Accessories:  Cracked Embossing Folder - Tim Holtz/Sizzix, Antarctic Fresco Finish Chalk Paint - Paper Artsy, water Mister, Clear Glitter Wink of Stella.

Monday, November 19, 2018

Winter Wonderland - Eileen Hull's Dies for the Holidays

This month members of Eileen Hull's Inspiration Team are creating holiday decorations using a variety of Eileen's Sizzix dies.
Today, I have a project using her fun Cupcake Stand and Pennant die, using the pennant piece to make trees!
First I cut out all the pieces from Little Sizzles Matboard.  Then I cut out pieces from patterned papers to adhere to the matboard.
I was thinking I'd use little bottle brush trees for my scene, but then, when I was looking at the pennants they suddenly looked like trees to me!
I colored the "trees" by smooshing them onto my craft mat where I had rubbed some Distress Inks (Shabby Shutters and Evergreen Bough) and spritzed them with water.
I kept pouncing the "trees" into the inks until I was happy with the coverage.
and I inked them on both sides.
Here are the three trees - all inked and folded in half and glued
I wanted the top of the stand to look snowy and so I got out my Frantage Shabby White embossing powder.  I rubbed Versamark just over a portion of the top using a small round sponge to keep it 'snow like' and not in straight lines, sprinkled on the powder and hit it with my heat tool.
I love the lumps and pieces of gold in the Frantage  powders.
Then, I just had to glue the legs under the top of the Cupcake Stand, and glue the trees and little 
Idea-ology deer to the top.  I sponged Walnut Stain Distress Ink over the edges of the trees, the edges of the table and legs as well as rubbing some on the deer.
I added a Metallic Stickers/Holiday Talk to each side of the table.
It's fun to see if you can use a die for a different purpose than it was intended for!  
Please check out Eileen's blog all this month for creative ideas for the holidays using her dies!

Paper:  White Little Sizzles Matboard - Sizzix, Paper Stash/Tidings - Tim Holtz/Idea-ology.
Ink:  Ranger Distress Shabby Shutters, Evergreen Bough, Walnut Stain,  Versamark.
Accessories:  Cupcake Stand and Pennant - Eileen Hull/Sizzix, Decorative Deer, Metallic Stickers/Holiday Talk - Idea-ology, heat tool, craft mat, water mister, sponge and sponge applicator - Ranger, Frantage Shabby White Embossing Powder - Stampendous, Tombow Glue.

Thursday, November 15, 2018

November Mid Month Reminder - CAS Mix Up Challenge - Embossing Folders

I'm here today with a reminder post for the November CAS Mix Up Challenge!  You have until Nov 24th to link up your CAS creations!  Bonnie is our hostess this month and she wants us to use embossing folders in new and different ways.

Who knew there were so many ways to use an embossing folder?
Dry embossing can add wonderful texture to a background or stamped design, 
but don't stop there.  
Check out some or all of the videos over at CAS Mix Up to find 
new and exciting ways to use those folders.
I was again inspired by this embossing folder technique video for my cards today. The same technique I used on my Nov 1st post.   And, again,  I made two similar cards as the technique I used involved sponging over either one or the other insides of the opened embossing folder.
This time I used a Holly embossing folder from Cuttlebug/Provo Craft along with Golden Acrylic Paints in Cobalt Turquoise and Quinacridone Magenta.
 
I sponged the two colors of paint on one side of the open embossing folder, spritzed liberally with water and then pressed a panel of watercolor paper over it - pressing down for a minute or two to be sure the paper absorbed the water. 
Then I lifted off the panel and washed off the embossing folder.  
I repeated the same steps on the other side of the open embossing folder.
 
So I ended up with a negative print on the left and a positive print on the right!
Here's the card I made with the negative print
and here's the card I made using the positive print.
All the same supplies with such a different look by using a different side of the embossing folder!
I die cut the image using Pierced Feature Frames:Oval Dies from PTI, adhering the outside frame with foam dots and adhering the inside piece recessed inside the frame.  I die cut the sentiment strip from MFT and stamped it with Merry Christmas from a retired Waltzingmouse Set.  I adhered the strip on the edges of the frame and added little white flowers.
Here they are again - side by side.
So, you still have time to get out all of those embossing folders you have and try out some of the new ways to use them!
I envite you to hop on over to the CAS Mix Up Blog to see how all of the talented Design Team and our wonderful Guest Designer Cornelia (Stempel Spass) have used embossing folders in different ways!  You have until 11/24 to link up your creation!   Remember to keep it CAS!


Stamps:  Alpine Christmas - Waltzingmouse (retired)
Paper:  Water color - Canson, white and Raspberry Fizz - PTI
Ink:  True Black - PTI
Accessories:  Golden Acrylic Paint in Cobalt Turquoise and Qunacridone Magenta, water mister, sponges, Holly Embossing Folder - Cuttlebug/Provo Craft, sentiment strip die - MFT, Pierced Feature Frames Ovals - PTI, Vanilla Flowers - Simon Says Stamp, foam dots.
 

Tuesday, November 13, 2018

Christmas Shaker Tags

I've been making lots of cards and crafts the past month, as I have a table at a craft sale this coming weekend.

Here are some fun shaker Christmas Tags I made using the new PTI Make It Market Kit: Fairy Tale Christmas.  
The kit includes dies for tags and little book/boxes, stamps, the clear bubbles, a packet of patterned papers and a downloadable booklet showing how to make all the things you can with the kit!
This tag has a lovely country home and trees die cut inside along with snow crystals and golden beads (a gift from my friend Loll - thanks Loll!).   The sentiment is die cut from the included papers and there is also a stamp for it in the kit.
I made 8 of these with two different patterns of paper.
I stamped To: and From: from the stamp set in the kit on the back
I made a few more shaker tags with a Santa and his sleigh flying over trees die cut inside - using papers from the kit for the framing.  I added snow crystals and silver sequin stars to these tags.  The sentiment is die cut from the patterned papers in the kit but there is also a stamp for it.
With the same thing stamped on the back.
These fun shaker tags are 2 1/2" diameter circles.

I'm linking my tags to:

 Loll's 12 Tags of Christmas found here.


Monday, November 12, 2018

Loll's Twelve Tags of Christmas - Day 8

Have you been following Loll's Twelve Tags of Christmas?
She's hosting them over at her blog again this year (her 5th and final year!)  and she has invited 12 friends to help her by making tags.
The twelve days are running from November 5 - 16th so we are about two thirds in and I am thrilled to be bringing you my tag for Day 8 today!  
You'll definitely want to check out her blog for all your Christmas/Holiday tag inspiration needs!  AND you can link up YOUR tag!  See details at the end of my post!


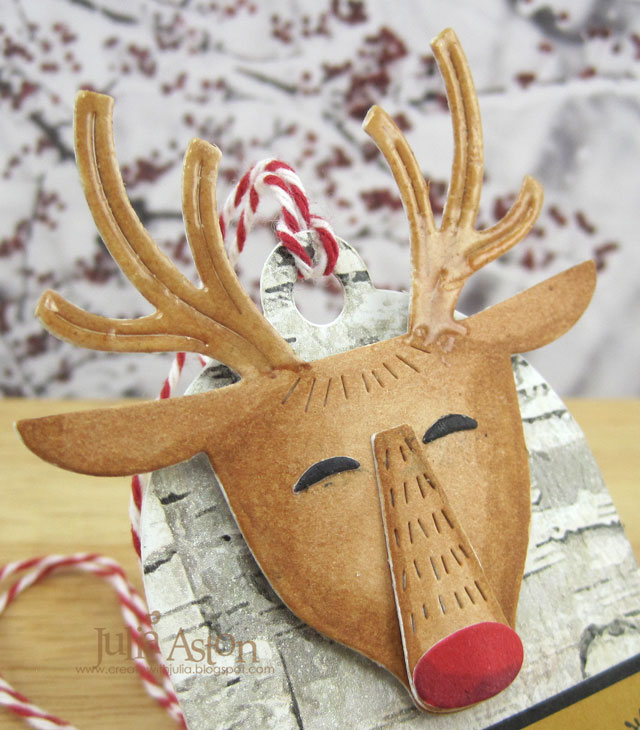
Here is my tag.
Gosh, this cute little reindeer and his hooves just make me smile!
My tag is 4 1/2" tall (including the antlers) and 2 1/4" wide.  I used PTI's Tag Sale Die #2 for the base - cutting it out of both white card and birch wrapping paper 
(I purchased the wrapping paper at Pier 1 Imports last Christmas season!).
The deer head and hoves are from Ellen Hutson - Animal Box Toppers Dies (there's also a bear!)  I die cut the pieces out of white card and colored them with Copics.  I put a foam dot under the end of his nose but the bridge is adhered flat to the face between the eyes!
To get more mixed media onto my tag I embossed the antlers and feet with Vintage Beeswax Baked Texture Embossing Powder from Emerald Creek which gives them texture and shine!
This fun sentiment and snowflakes are from a retired Waltzingmouse set - Around Christmas Time.  I stamped To: and From: on the back of the tag.  I added tiny rhinestones to the centers of the snowflake stampings and looped a piece of Maraschino twine through the top of the tag.
Be sure to check out Loll's Day 8 tag which is posted along with my deer tag here on her blog!
We hope you'll create a mixed media tag as well and link it up over at  Stamping with Loll!

 The guidelines for Loll's challenge are that it must be a mixed media Christmas tag (any style/any size) which includes stamping, plus two mixed media elements (techniques or products).

I used Copics, embossing, stamping, twine and rhinestones!
You can find all of the tags I've made for Loll's Twelve Tags of Christmas for the past 4 years here!

Stamps:  Around Christmas Time - Waltzingmouse (retired)
Paper:  white, True Black, Honey Nut - PTI, birch wrapping paper - Pier 1 Imports (from last Christmas season)
Ink:  True Black - PTI
Accessories:  Copics 100, E34, E37, R29, R59,  Maraschino Bakers Twine - The Twinery, tiny twinkles - Taylored Expressions, Vintage Beeswax Baked Texture Embossing Powder - Emerald Creek, foam dots.

Thursday, November 1, 2018

CAS Mix Up - November Challenge - Embossing Folders

It's the first of the month and time for the November CAS Mix Up Challenge!   Bonnie is our hostess this month and she wants us to use embossing folders in new and different ways.

Who knew there were so many ways to use an embossing folder?

Dry embossing can add wonderful texture to a background or stamped design, 

but don't stop there.  Check out some or all of the videos over at CAS Mix Up to find 

new and exciting ways to use those folders. 

I was inspired by this embossing folder technique video for my cards today.   I made two similar cards as the technique I used involved sponging over either one or the other insides of the opened embossing folder.

I used an embossing folder, stamps, die cuts, washi tape, little flowers, and a puffy heart!
So this is what happened when I sponged Guacomole Acrylic Paint over the inside of the front panel of Tim Holtz/Sizzix Cracked Embossing Folder, spritzed it liberally with water and pressed a panel of watercolor paper over it, pressing for a bit to allow the watery paint to absorb into the watercolor paper.  
I'd call this one the positive print from the embossing folder.  The green has colored the actual cracks of the design.
Stamps are from Thanksgiving Wishes by Lil' Inker Designs, Die cut frame is Pierced Feature Frames from PTI.
And here is my 2nd card that I used the same technique on but sponged the paint over the inside back panel of the embossing folder - getting what I would call a negative print.  The green has colored the spaces between the cracks of the design.
Stamps are from PTI  Forest Floor: Autumn.  The die cut frame is Pierced Feature Frames from PTI.  
The outside frames are popped up on foam tape.  I added little white flowers to the first card and a puffy heart sticker to the 2nd.  I wrapped a piece of washi tape - Lena's Pattern by Alexandra Renke - around the middle of both cards before adhering the print.

You can also try to get a 2nd print off each side.  Be sure you have your watercolor panels ready to press it right on the folder  -  a 2nd print comes out a little less defined since there is less watery paint on the folder.  Be sure to wash off your folder immediately so the paint doesn't dry on the folder.

I took one photo from my worktable showing the embossing folder, the paint, sponge and the two designs I got - the one on the left resulted from sponging over the inside of the back panel (my 2nd card) and the one of the right resulted from sponging over the inside of the front panel (my first card).
So two rather different looks from one embossing folder - used in a different way -  by sponging acrylic ink over either the front or back, spritzing with water liberally, and pressing watercolor paper over the panel!   Remember to wash your folder immediately so the paint doesn't dry on it!
We hope you'll get out all of those embossing folders you have and try out some of the new ways to use them!

Hop on over to the CAS Mix Up Blog to see how all of the talented Design Team and our wonderful Guest Designer Cornelia (Stempel Spass) have used embossing folders in different ways!  You have until 11/24 to link up your creation!   Remember to keep it CAS!

I'm also linking my card to:
Less is More
Cupcake Inspirations
Theme - Fall


Stamps:  Forest Floor: Autumn - PTI, Thanksgiving Wishes - Lil' Inker Designs.
Paper:  Water color paper - Canson, Vintage Cream - PTI
Ink:  Cocoa Bean - PTI
Accessories:  Guacomole Fresco Finish Chalk Acrylics - Paper Artsy, Pierced Feature Frame Dies - PTI, puffy heart sticker - Michaels, Vanilla flowers - Simon Says Stamp, foam tape, Washi Tape - Lena's Pattern/Alexandra Renke, sponge, water mister, Cracked Embossing Folder - Tim Holtz/Sizzix.

Tuesday, October 30, 2018

Potbellies for Christmas

I just got these fun Potbellie dies from PTI - and I couldn't wait to use them!  There are three different dies  reindeer, penguin and Santa -  this one is the Potbellies: Reindeer die.   
The way the die cuts under the arms - makes a perfect slot to fit in a gift card!   The gift card stamp is from Gift Card It by Waltzingmouse (retired) and the Merry Christmas is from Penned Elegance: Christmas stamps and dies from PTI.

All of the Potbellies dies are sold out -  but if you click on 'notify' over at PTI they will let you know when they are back in stock.
I also made some shaker cards using the Potbellies: Penguin die and clear bubbles large.  The stamp is from Around Christmas Time from Waltzingmouse (retired). On both cards, I cut an extra body and adhered it to the back at the head, scoring at the neck so it bends to stand up.
I'm linking my reindeer to:
inspired by the red and brown colors and the silver reindeer holding a place card in it's antlers!

 I'm linking my penguin shaker card to:


Reindeer
Stamps:  Penned Elegance: Christmas - PTI, Gift Card It - Waltzingmouse (retired)
Paper:  Dark Chocolate, Pure Poppy, True Black, White - PTI
Ink:  True Black, Pure Poppy - PTI
Accessories:  Penned Elegance: Christmas dies , Potbellies: Reindeer Die,  - PTI

Penguin
Stamps: Around Christmas Time - Waltzingmouse (retired)
Paper: White, True Black, Orange Zest, Summer Sunrise - PTI
Ink: True Black - PTI
Accessories:  Clear Bubbles Large, Potbellies: Penguin Die - PTI, Marigold Flower Sequins and Spring Sequins - Honey Bee Stamps, Tombow Glue.