Tuesday, March 12, 2019

Easter Stained Glass

I was excited to try the Faux Stained Glass technique when I saw it on the CAS Mix Up Card Challenge this month and I finally got some time to play!
I made an Easter card with two little bunnies either looking in the window from outside - or looking through the window from the inside?!
I've had these Window Pane dies for quite a while - almost forgot I had them - but found them when I was looking for a die that would work for Faux Stained Glass -  I guess a window is the perfect die!  So these dies just cut the window not an outside edge  (so you could actually cut a window in a panel if you were making a wall in a house or something) so I cut 4 rectangles out of watercolor paper 2" x 1 1/4" then placed the die on one piece at a time and die cut the window..
I took a 2" x 1 1/4" panel of Lupo Alcohol Translucent Paper and dabbed Aqua, Citrus and Coral Alcohol Inks over it with the felt pads and applicator tool.
After the alcohol inks were dry (they dry quickly!) I glued 3 of the window frames together and glued them over the Yupo panel.  I squeezed Glossy accents into each section of the window till they were full and I let it dry overnight.  Then I glued the last piece of the window on top.
 Here's a close up of the window.
I die cut the white panel using Mix and Mat Confetti Die.  The little bunnies (paper and die) are from the Make It Market Kit Fairy Tale Christmas .  The sentiment is from Easter Alleluias.  All from Papertrey Ink.
I love how my faux stained glass came out and will be looking for more dies I have to use with this technique!


I'm linking my card to:
I used faux stained glass, stamping and die cuts

Wednesday Challenge - Create a Scene

Stamps:  Easter Alleluias - PTI
Paper:  Watercolor paper - Canson, white and Spring Rain - PTI, Yupo Alcohol Translucent paper - Ranger.
Ink:  Cornflower Blue - Wendy Vecchi Make Art Ink, Alcohol inks Coral, Citrus and Aqua - Ranger.
Accessories:  Window Pane Dies - Simon Says Stamp, Mix and Mat Confetti Die - PTI, bunnys from Make it Market Kit Fairy Tale Christmas - PTI, foam dots, scor-tape, felt pads and applicator - Ranger, Glossy Accents - Ranger.

Monday, March 11, 2019

Easter Place Card Treat Boxes

All this month Eileen Hull's Inspiration Team will be posting creations using Eileen's Sizzix Dies with a Spring Things theme.

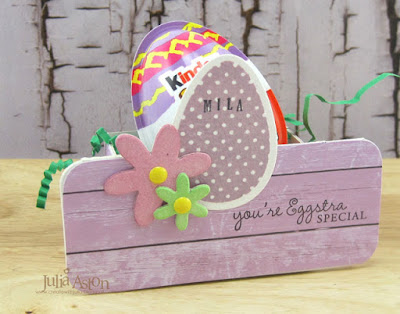
This was the perfect opportunity for me to make place card treat boxes for my grandnieces and grandnephews to have at their seats at the Easter Sunday table!

I used Eileen's Stacking Drawer die and her Place Card and Flowers die.

Landon is 8 and his sister Mila is 6 - children of my niece Katie
James is 7 and his sister Madelyn is 4 - children of my niece Christie
Here are a few photos showing how I put these together.

I cut out the pieces of each die from mat board
I used just the drawer piece from the stacking drawer die
(not the wrap around piece shown at the bottom of the photo)
as I wanted an open box to put treats in.
I cut apart the place card die-cut at the score line in the center so I could make two place cards from one die-cut (since I didn't need to have the place card stand up on its own) - the patterned paper and the egg cover up both the extended flower and the negative cut-out of the flower.  I die cut a piece of patterned paper - placing the paper just over the bottom half of the place card die - and adhered the paper to the mat board die cut.
I stamped the dotted eggs on watercolor paper and die cut them with a Nestability Egg die.  I sponged the flowers from the place card die in spring colors, stamped their name on the egg and added enamel dots to the centers of the flowers.
I adhered the egg onto the place card piece and layered the flowers over the egg.
I cut pieces of patterned paper to fit 3 sides of the drawer (one 2 3/4" x 1 1/2" and two pieces 2" x 1 1/2"), leaving the notched side plain as it would be glued to the back of the place card piece.  After gluing the sides together, I glued the bottom onto the drawer.  Then I glued the plain front of the drawer to the back of the place card.
I added paper grass to each box.  Here's the side view.
and the view from the back.
I placed a Kinder Joy egg in each box.
(the kids LOVE these and I was happy to see new Easter ones in the stores as they seem to already have all of the toys in the older eggs!)
They love to have things personalized with their names.


These will be a festive addition to the table at Easter Dinner!  
I'm already thinking about what I could put on them instead of an egg for other holidays!  

Here's a photo of me and the kids last Easter when I had brought Easter mazes I found on line and chick and bunny head pens that lit up like strobe lights when you tapped them on the table!!
Madelyn, Mila, Landon and James.
Please check out Eileen's blog during the month of March where you will see all of the Inspiration Teams Spring Things  projects gathered!


Stamps:  Spring Baskets, Nestie Eggs - Waltzingmouse (retired, no longer in business), Alphabet stamps - Karen Foster (retired)
Paper:  Little Sizzles Matboard - Sizzix, Wood Grain Paper Pad - Joann,  watercolor paper - Canson.
Ink:  Limeade Ice, Lovely Lady, Vintage Jadeite, Lavender Moon, Hibiscus Burst, Spring Rain, True Black - PTI.
Accessories:  Box Stacking Drawers die, Place Card and Flowers Die - Eileen Hull/Sizzix,  Nested Eggs die - Nestabilities/Spellbinders, enamel dots - Altenew, Tombow Glue.

Friday, March 8, 2019

A Little Irish Luck

Ok, so here is my final (I think!) St. Patrick's Day card.  The sale at my church is this weekend - so I think I'm done!

I just purchased this adorable little Irish Luck bear stamp set by Penny Black and the coordinating die set two weeks ago and with my Irish Luck -  it arrived in time to use this year!
I stamped him on Bristol Smooth Surface white paper with Hero Hues Black Ink and then colored him with Tombow Markers - moving the color around each section with a Clear Glitter Wink of Stella brush.
It's really shimmery IRL - hopefully you can get the idea from the photos below.

I'm linking my card to:
My card is clean and layered - I was inspired by the shamrock and the colors

Oh - and a BIG thanks to my wonderful stamping/blogging friend Loll Thompson for helping me doing all the work to create this new look for my blog!
Stamps:  Irish Luck - Penny Black
Paper:  White, Pine Feathers - PTI, Strathmore Bristol Smooth Surface.
Ink:  Hero Hues Black
Accessories:  Irish Luck Dies - Penny Black, Stitched Feature Frames: Ovals - PTI, foam dots, Tombow Markers green, brown, black, 5/9" circle punch - EK Success, Clear Glitter Wink of Stella Brush.

Thursday, March 7, 2019

Three for St. Patrick's Day!

Here are three more St. Patrick's Day cards that I made for a sale at my church.

For my first card, I pounced Alchemy and Sublime Alcohol Pearl Inks onto Translucent Lupo paper.  Then I layered die cut  Memory Box shamrocks over the panel with foam dots and added 3 rhinestones.  
The frames on all of my cards were made using Pierced Feature Frames - Rectangles from PTI. 

 The images above and below are digital that I printed from my computer using  Dover Holiday Vignettes - A book and CD of vintage holiday images for Halloween, Christmas, New Years, Valentines, St. Patrick's Day, 4th of July and Easter.
I'm linking my card to:
my cards are clean and layered 
Inspired by the shamrock

Stamps:  St. Paddy's Day from A Beary Good Year set - The Cat's Pajamas, St. Patrick's Day from Irish Blessings - Waltzingmouse (retired out of business)
Paper:  white, Pine Feather, New Leaf, Simply Chartruese - PTI, Translucent Lupo - Ranger.
Ink:  True Black - PTI
Accessories:  Lucky Leaves Die - Memory Box, Pierced Feature Frames: Rectangles - PTI, foam dots, rhinestones, Digital Vintage Images - Dover Holiday Vignettes, Alcohol Pearl Inks Alchemy and Sublime - Ranger.

Wednesday, March 6, 2019

St. Paddy's Day Shamrock Treats

Today I'm sharing some Hershey Kiss Shamrock Treats I made for a St. Patrick's Day sale at my church.  How cute are these??!!
 You cut the strips and loop them (see link to tutorial I found below) then slip the Hershey Kisses in each petal!  Cut and stamp the tag and tie it on with twine!


I found the tutorial for these here on Qbees Quest blog.  She has a 4 leaf clover version as well.  
She has both written and video tutorials for them on her post. They don't take long to make and are made very easily.  
I cut the strips all at once, then put them together while watching TV.
 
Perfect for St. Patrick's Day don't you think?!  Even for those that don't have Irish ancestry.  Everyone's Irish on St. Patrick's Day!


Monday, March 4, 2019

March CAS Stencil Challenge - Ghosting Technique

I'm excited to be the host of the CAS Stencil Card Challenge this month!    And my challenge for everyone is to do Ghost Stenciling!
Ghosting is a fun technique where you lay down water soluble crayons, inks or paints on watercolor paper - lay your stencil over the colored panel and rub over it with a baby wipe to remove the color - leaving a 'ghost' of the stencil image!  We hope you'll try it out this month!

You will find links to technique videos over at the challenge blog
I actually made 3 similar cards because I had such fun with the technique - I made 3 similar panels!  
Here are my cards as well as some photos of how I used the Ghosting Technique!
First I colored a watercolor panel using Weathered Wood, Shabby Shutters and Wild Honey Ranger Distress Crayons.
Next, with just a bit of water on my finger, I rubbed over one color at a time to blend the crayon.
I layered my stencil, Evolution from ARTplorations, over my panel, taping around the outside edges to hold it all flat over the panel.
I took a slightly wet baby wipe (if your wipe is dripping wet, squeeze it out a bit!) and rubbed over the stencil to remove some of the crayon color .
And here is the Ghost image of the stencil!
As I said above, I was so excited with my results, I ended up making 3 panels.  Every time you do this you will probably get a slightly different result, depending on your coloring, the blending and how much you remove through the stencil (as well as the positioning of the stencil).
I thought the Evolution stencil looked rather like fossils (especially in the colors I used) and that the Sizzix Prehistoric Thinlit dies would look perfect layered over the stenciling!  
I cut them out of Kraft core Core-dinations paper and sanded over it a bit to reveal the kraft.

Here's a Stegosaurus - the frame die is Mix and Mat Confetti Die from PTI.
Here is a  Brachiosaurus. Layering him on a smaller panel emphasizes his BIGNESS!
And a Tyrannosaurus.
I will use these for masculine (kids or men) cards - either birthday or maybe get well - I'll choose the sentiments for the appropriate occasions!

We can't wait to see your CAS card creations using the Ghosting Stencil technique!  You'll find lots of beautiful inspiration from the Design Team as well as the technique videos over at CAS Stencil!

We are also very exited to welcome our very first CAS Stencil Guest Designer this month
Ishani (Quillish)!

 You have until 3/24 to link up your cards!

I'm also linking my card to:
Simon Says Stamp Wednesday Challenge -  Anything Goes


Happy Little Stampers

Time Out Challenges

Inspired By


Paper:  watercolor - Canson, white and kraft - PTI, Kraft Core Coredinations.
Ink:  Ranger Distress Gathered Twigs
Accessories:  Ranger Distress Crayons Shabby Shutters, Wild Honey, Weathered Wood, Evolution Stencil - ARTplorations, Prehistoric Thinlit Dies - Tim Holtz/Sizzix, Mix and Mat Confetti Die - PTI, water.