Friday, January 25, 2019

Papertrey Ink January Blog Hop

Today I'm participating in the Papertrey Ink Blog Hop and here is our inspiration this month.
 I was inspired to create a birthday card using the December Freebie Set - Your Beautiful Birthday.  
I was inspired by the layers of the cake, the colors of the flowers and the black/white patterns.
I brushed water over a panel of watercolor paper and then stamped the cake stand, the layers of the cake and the candles which gave it all a watery look.  I dried it with my heat tool and then stamped the sentiments over the cake using True Black Ink.  I cut the panel using Pierced Feature Frame - Ovals and layered it over a striped panel from Bitty Big True Black papers.  I layered the striped layer to a slightly larger metallic gold layer,  The outside of the oval frame is popped up on foam dots.

I'm off to the Papertrey Ink Blog to see how others were inspired by this photo today!  


Stamps:  December Freebie - Your Beautiful Birthday - PTI
Paper:  White, Bitty Big True Black papers - PTI, watercolor paper - Canson, Metallic Gold - Foiled Card Stock Stack DCWV.
Ink:  True Black, Sweet Blush, Spring Rain - PTI
Accessories:  Pierced Feature Frames: Ovals - PTI, foam dots, water, water brush, heat tool.

Tuesday, January 22, 2019

Eileen Hull New Sizzix Treasure Box Die!

I'm excited to share with you today Eileen's new Sizzix Treasure Box Die just revealed at Creativation in Phoenix AZ!
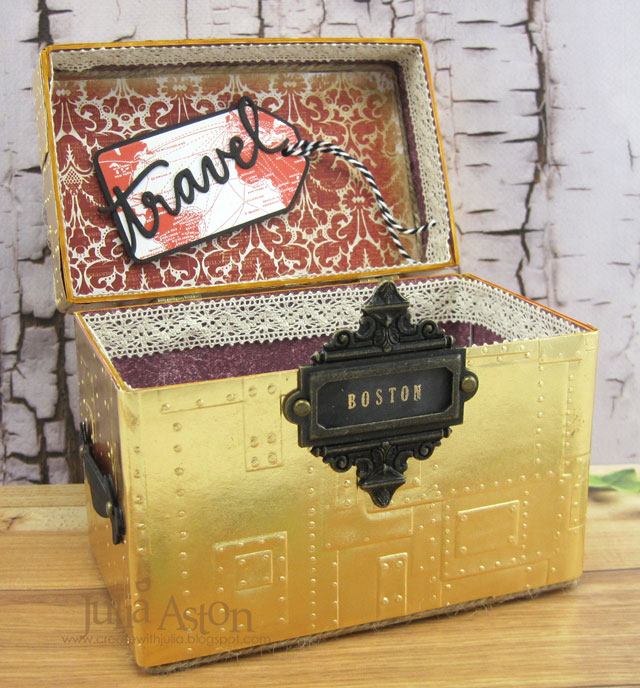
I made a travel trunk for my first project using these versatile new die.
First all the pieces needed were die cut out of matboard.
I measured and cut panels of Kraft Metallic Paper to wrap around the box and the cover, and embossed them using Tim Holtz 3D Texture Fade Foundry Embossing Folder - spritzing the paper with water before embossing to obtain a good deep impression.  Then I adhered all the panels to the box sides, bottom and cover.
I colored the die cut handle pieces with a black Tombow Marker.  I die cut 'wander' for the cover and 'travel' for inside the cover, (seen further below), from Eileens Journaling words set.
I curled the handle pieces a little bit over my finger so they wouldn't lay flat against the box.  I pierced a hole on the ends of both handles and  on the sides of the box where I wanted the handles and attached them with long brads.
I colored the edges of the box that showed white with a Pale Sepia Copic
To finish off the edge along the top of the cover and bottom of the box, I ran glue along the edges and pressed jute string into the area.  The photo below shows the cover edge.
The photo below shows jute string along the bottom edge. (box is upside down!)
I decided to add some lace along the top edge of the box and cover.
(I later decided to change the paper lining of the box and cover - you'll see the changes below)

Finished views:   I adhered an Idea-ology Ornate Plate to the front of the box - adding a stamped gold embossed BOSTON panel in the opening (since I live 12 miles north of Boston!)
I added metal hinges that I had in my stash rather than using the matboard die cut ones.
I attached a handle on each side of the 'trunk'.
I die cut 'wander' and 'travel' out of Black Paper Leather using Eileen's Journaling Words dies.
The tag was cut with Eileen's Credit Card Sleeves and Tag dies.
Here you see the paper I decided to use on the inside rather than what I started out with
(design is an ongoing process right?! and changes are made mid construction!)
My finished Treasure Box disguised as a Travel Trunk!
Please check out Eileen's blog all of January for more inspiration from Eileen's Inspiration Team using these fun new dies!

Stamps:  Karen Foster Snap Alphabet Stamps (retired)
Ink:  Versamark
Paper:  Matboard, Black Leather Paper - Sizzix, Kraft Metallic Paper, Paperstash Tidings and Etcetera - Tim Holtz/Idea-ology, True Black - PapertreyInk.
Accessories:  Treasure Box Die, Journal Words, Credit Card Sleeves and Tag - Eileen Hull/Sizzix, 3D Texture Fade Foundry Embossing Folder - Tim Holtz/Sizzix, hinges - Making Memories, Long Fasteners, Ornate Plates, Jute String - Idea-ology, Black Tobow Marker, Pale Sepia Copic YR24, Gold Embossing Powder - Ranger, water mister, Victoria Lace - SU, Tombow Glue, ScorTape, black/white Bakers Twine, foam dots.

Saturday, January 19, 2019

Twofer Birds

I'm trying once again, to join in on Darnell's Twofer Challenge -  these are SO challenging for me!
I participated today in the Splitcoaststampers Inspiration Challenge which was Etsy Birdhouses and created this card using a bird stencil inspired by this pillow.
So I said to myself - 'Self - this could be used for the Twofer challenge!  How can I use this in another design?"    
I got out different color inks and a different sentiment and created this card.
So I used the same bird stencil, the same dots stencil, the same frame die and the same sequins -  but used different colors, more than one stenciled bird and a sympathy sentiment instead of an encouragement sentiment.  I did not pop up the outside frame piece on foam, which I did on the first blue card.   And I only stenciled the dots on the inside piece of the frame die cut on my 2nd card - I stenciled the dots over the whole panel on the blue card.

So here they are -  my Twofer
Oh, and I also turned my stencil over so the birds were flying a different way!
Sympathy                                                            Encouragement

I'm also linking my cards to:
CAS Stencil - Sponging

There are just a few more days for you to link up to either of these challenges so get cracking!
Stamps:  Walk by Faith - PTI, Simply Said Sympathy - Jillian Vance Designs
Ink:  Ranger Distress Wilted Violet, Victorian Velvet, Seedless Presserves, Weathered Wood, True Black - PTI
Paper:  Water color paper - Canson, white - PTI
Accessories:  Birds Stencil - Dina Wakley, Lots of Dots stencil - Wendy Vecchi/Stampers Anonymous, Winter Blend Sequins - Avery Elle, Pierced Feature Frames - PTI

Friday, January 18, 2019

Mid Month Reminder! January CAS Stencil Card Challenge - Sponging.

I'm here posting my mid-month reminder of the January CAS Stencil Challenge!  You still have time to link up your card!   This month the challenge is to use sponging with your stencils.
This time I used two stencils meant to be layered over each other, Layered Dahlia A and Layered Dahlia B from Altenew.
I took a few photos as I was creating my card so you could see how the layering was created.  First, I laid the A stencil over a 6x6 panel of white cardstock and sponged over the stencil with Worn Lipstick Distress Oxide Ink.
Here's how it looked when I removed the stencil.
Then I placed Stencil B over the panel lining up the white lines on the image. and sponged over this stencil with Seedless Preserves Distress Oxide Ink.
And this beautiful dimensional panel was revealed when I lifted off the stencil!
I cut this panel into two smaller pieces 4 3/4" x 2 3/4" each and I created two CAS cards from them.
The sentiment is from Penned Elegance and I used the coordinating dies to cut them out. They are layered over the image with foam dots.


So if you haven't already joined in -  please do now!  Show us how you sponge up those stencils!  You'll find technique videos and beautiful samples by the Design Team over at the challenge blog here.  You have until January 24th to link up your CAS Sponged Stencil Cards!

I'm linking my card to:
The Card Concept
Pink Party - my card is CAS style

 Simon Says:
Clean and Simple Wednesday Challenge


Stamps:  Penned Elegance - PTI
Ink:  Ranger Distress Oxide Worn Lipstick and Seedless Preserves.
Paper:  White, Scarlet Jewel - PTI
Accessories:  Layered Dahlia A, Layered Dahlia B Stencils - Altenew, Penned Elegance Dies - PTI, foam dots.

Sunday, January 13, 2019

Blue and Silver Winter Wishes

Today I'm playing along with two of Loll and Bonnie's CAS Challenges.
 I believe I hit both challenges with one card!
I added silver Stickles to the tree (seen better on the photo below) and adhered the watercolor panel to a slightly larger metallic silver panel.  
The sentiment sticker (Metallic Stickers Holiday Talk/Idea-ology) is silver on black.
I placed my tree stamp (Christmas Glow from Penny Black - a purchase made after seeing Loll's beautiful card here) in my Tim Holtz Stamp Platform, inked it with Ranger Distress Salty Ocean, spritzed it with water and pressed it onto a panel of watercolor card.  I dried it with my heat tool and added dots of Silver Ice Stickles and the sentiment sticker.

This could be used for either a Christmas Card or a winter note - depending on what I stamp on the inside!

I love the watery look of inking the stamp this way - now I need to try it with just straight inking to see how much detail it shows!

Stamps:  Christmas Glow - Penny Black
Paper:  white - PTI, Pewter Mirror Paper - Michaels
Ink:  Ranger Distress Salty Ocean
Accessories:  Silver Ice Stickles, Metallic Stickers Holiday Talk - Idea-ology, water mister, stamp platform - Tim Holtz/Tonic.


Friday, January 4, 2019

The New CAS Stencil Card Challenge - Sponging

Today Loll is launching the newest CAS Card Challenge -  CAS Stencil!  And I'm on the design team! - having moved over from their CAS Mix Up Challenge Team.
Our fearless leader, Loll, is the host this month and her challenge is to sponge on our stencils.  There are several links to different stencil sponging techniques over at the blog - so be sure to check them out if you need some inspiration!

My card today is pretty straightforward.   I used a beautiful stencil from Stencil Girl called Eve: A Modern Woman.  The stencil is her full face - but to help keep my card CAS - I just sponged over half of her face onto a white panel using Wilted Violet Distress Oxide ink.  Then I stamped the sentiment from Penned Elegance by PTI in black and added some little flower sequins to her hair and the sentiment.


So get out all those stencils you have and create a CAS stenciled card!  You'll find inspirational samples by the Design Team and all the challenge details here.

Stamps:  Penned Elegance - PTI
Paper:  White - PTI
Ink:  Ranger Distress Oxide Wilted Violet, Hero Hues Black
Accessories:  Eve: A Modern Woman Stencil - Stencil Girl, flowers - Simon Says Stamp, Tombow Glue.

Wednesday, January 2, 2019

Bokeh Birthday

Happy New Year everyone!   I just checked out the January CAS Mix Up Challenge and it's BOKEH!
I've never done Bokeh before and it looked so fun - I just had to join in.  You may know that I was on the CAS Mix Up team -  but for 2019 I've moved to the NEW Stencil Challenge team
 (see more about that below!)
So I checked out the linked videos over at CAS Mix Up and got to work.
I sponged a 4"x 5 1/4" panel of Bristol Smooth White with Twisted Cintron and Mermaid Lagoon Distress Inks and let it dry.  Then I cut my own circles stencil using a piece of acetate and different size circle dies.  I sponged over the circles in a random pattern with Glacier White Pigment Ink, overlapping some and inking some more heavily so they look like they are closer.  
I cut my panel in two so I was able to make two cards.

So I used Bokeh, stamping, die cuts and sequins.
The scallop border is from PTI, the die cut birthday is from WPlus9, the HAPPY above is from PTI and the happy below is from a Dec Freebie set from PTI.

You'll find the CAS Mix Up Challenge here.

And I'd love for you to check out the new CAS Stencil challenge Loll is launching on Jan 4th!  You will find the CAS Stencil Challenge here.  A great opportunity to use all those stencils laying around in your craft room!!  Hope to see you there!


Stamps:  Never Enough: Birthday, You're Beautiful Birthday set (freebie in Dec) - PTI
Paper:  Bristol Smooth Surface, white, Enchanted Evening, Vintage Jadeite - PTI
Ink:  Ranger Distress Twisted Cintron and Mermaid Lagoon, Glacier White Pigment Ink - Ranger, black - PTI
Accessories:  Happy Birthday Die - WPlus9, Scallop Stacker Medium die - PTI, hand made circles stencil (using acetate and Circle Nestabilities), sponges, Winter Blend Sequins - Avery Elle, foam dots.