Sunday, August 8, 2010

A Buckle and a Case

I have two cards to share today from the weekend challenges over at Split Coast.


I was thrilled to help Stephanie with the Inspiration Challenge on Saturday by making a sample card for her.

I was inspired by this Cherry Blossom buckle on the Web shop Frankie & Julie.

My stamps are all Waltzingmouse - Very Vintage Labels No. 2 and Asian Gardens.

Stamps: Waltzingmouse Stamps: Vintage Labels 2, Asian Gardens
Paper: White- PTI, Tempting Turquoise - SU
Ink: Ranger Distress Spun Sugar, Aged Mahogany, Tumpled Glass, Vintage Photo, Pumice Stone
Accessories: Black twill - Michaels, Pewter Pearls - Kaiser, Sponge and applicator - Ranger, Oval Nestabilities, Labels two Nestabilities, foam dimensionals, glue dot, Butterfly punch - Martha Stewart


My good blogging buddy Vicki Dutcher was the Featured Stamper on Split Coast. I CASED her pretty Inspired Late card. I used different stamps and slightly different colors.

Once again - my stamps are from Waltzingmouse - Very Vintage Labels No. 4 and Fancy Phrases.

Kent and I went to the Audubon Santuary in Ipswich today to do a little hiking on this gorgeous summer's day - here are a couple of pics from our outing!


Thanks so much for stopping by today! What did you do this weekend??

Stamps: Waltzingmouse - Very Vintage Labels No. 4, Fancy Phrases
Paper: vintage cream - PTI, blue bayou - SU, DP October afternoon/thrift shop-needs paint
Ink: ranger distress - tea dye & Stormy Sky
Accessories: sizzlets lots of tags label 1 - SU, glue dots, foam dimensionals, sponge & applicator Insentials/Ranger, martha stewart butterfly punch, Labels 4 and petite circles Nestabilities, adhesive paper ribbon - K&Co

Saturday, August 7, 2010

Waltzingmouse Sketch Challenge & Meet the Mischief Makers!

Please scroll down to the post below to see my card for this weeks Speedy the Cats' Friends Challenge!

Here's the super sketch challenge Claire has for us this week!


Here's my card for the sketch. Put your sun glasses on! It came out really bright!

I used several different WMS stamp sets on my card today - can you pick them out??! The graph background is from Off Beat Backgrounds, the cloud of circles is from Free Spirt - Boy, the sentiment from Free Spirit - Sentiments, the flowers I stamped over the circle cloud are from Rescue Remedies (some of them I cut out and popped up) and the label framing is from Very Vintage Labels No. 4 (and fits the Labels 4 Nestabilities - whoo hoo!)

AND we have some exciting news! We now have Mischief Makers making samples for the Sketch Challenge every week! Come see who they are and their beautiful cards over at the WMS Sketch Blog!

So - make your sketch card and post it on InLinkz by Thursday Aug 12th at 11:59 pm EST. Three entries will be chosen Top Mouse and will be announced next Saturday! Will it be you this week?!?

AND!!! in celebration of the new Mischief Makers this week, one lucky participant will win a WMS stamp set of choice!

If you post on Split Coast please use WMSC9 in your keywords!
Happy weekend everyone! I can't wait to see what you create with this fun sketch!

Stamps: Waltzingmouse - Off Beat Backgrounds, Free Spirit - Boy, Free Spirit - Sentiments, Rescue Remedies, Very Vintage Labels No. 4

Paper: White, Scarlet Jewell - PTI

Ink: Ranger Distress Mustard Seed & Aged Mahogany

Accessories: Foam Dimensionals, Ranger Sponge & Applicator, Labels 4 Nestabilities

Speedy the Cats' Friends Challenge #15 - Make Your Own Embellies!

This week's Speedy the Cats' challenge comes from Joanne and she has asked us to make our own embellishments!

I made my own flowers and leaves using mulberry paper (see my flower tutorial here), I used a Sizzix die to make my sentiment tag and Martha Stewart's lace edge punch to make my lacey panel. I sewed around the edges with my sewing machine (is that making my own embellie??!)

The stamps, the blue card stock, the ribbon and the Ranger ink are all from Marks' Finest Papers. The stamps are from a new set called Tweet Blessings that will be released on Aug 10th!

What kind of embellishments will you make this week!?! Come on over to Marks Finest Papers Blog and link your card there. You could win an MFP stamp set!!

If you load your card on Split Coast please use Speedys Friends in your keywords.

Thanks for coming by today! Hope you have a great weekend my friends!
Stamps: Marks Finest Papers - Tweet Blessings (to be released 8/10/10)
Paper: Blue - MFP, Kraft - PTI, Mulberry paper pack - AC Moore
Ink: Ranger Distress ink - stormy sky, whisper white craft - SU
Accessories: Ribbon - MFP, tag - sizzix die, sewing machine, distresser, Martha Stewart lacey punch, glue dots, white gel pen.

Friday, August 6, 2010

Bella & a Cup of Tea

Here's my little Bella with her rag doll - she's all dressed up in her ballerina petticoat for this weeks Tea Party over at Split Coast - we're even bringing some blooms and a little cup of tea! You can check out the Teapot Tuesday challenge here.

Bella is a digi image from Mo's Digital Pencil - I just love Mo's wonderful characters! My sentiment and tea cup are from Waltzingmouse Stamps


Be sure to stop by tomorrow for both the Waltzingmouse Sketch (we have a fun announcement to share with you!) and Speedy the Cat's Friends Challenge - lots going on here on Saturday!!


Stamps: Bella & rag doll - Mo's Digital Pencil, Sentiment - Waltzingmouse Afternoon Tea Sentiments, tea cup - Waltzingmouse Afternoon Tea
Paper: white - PTI, DP October Afternoon/Rain Boots, BoBunny/SeaFoam Dots
Ink: memento Tuxedo Black, Ranger Distress Ink-Victorian Velvet
Accessories: Koh-I-Nor colour pencils, gamsol, copics, fence punch Martha Stewart

Thursday, August 5, 2010

A Camera and a Wedding!

Alanna was the Featured Stamper over at Split Coast this week - I had not seen her gallery before so it was a pleasure to be introduced to it today. I actually chose 2 cards to CASE. For my first card - I was inspired by her camera card . I used a different camera stamp, used a coordinating DP for my background and added a punched fence.

Stamps: Imaginisce Snag Em Stamps - Scooters Vacation collection
Paper: rustic white - PTI, Riding hood red & black - SU, DP Imaginesce Scooters Vacation/click
Ink: Memento Tuxedo Black, Ranger Distress Tea Dye
Accessories: sponge and applicator - Ranger, copic R35, fence punch - Martha Stewart, small heart punch - McGill, foam dimensionals

My second card was inspired by Alanna's vintage wedding card

I've been wanting to use my new Kitchen Sink multi step Wedding couple so this was the perfect opportunity! I had to practice stamping it first to get it lined up correctly (there are 6 stamping steps with this set and multiple colors of ink to give it this great look). After I tried it the first time -the second time was easy - you just have to get used to the multi step technique which they explain on their web site.
I made my flower by punching a circle, cutting it into a swirl and rolling it up starting from the outside edge.

I just LOVE this wedding couple stamp don't you?!

Stamps: Kitchen Sink Stamps - Multi Step Wedding Couple
Paper: white - PTI, silver- Unknown, mulberry - unknown
Ink: Versafine Onyx blac, smokey grey, vintage sepia, Memento - Rhubarb stalk, cottage ivy,m angel pink, Brilliance perlescent beige, Versamagic - Wheat, pixie pink,, Ranger Distress tea dye
Accessories: Zva crystals, lace - from my stash, glue dot, sponge and applicator - Ranger

Tuesday, August 3, 2010

Silhouette Plaid & How to Dry Emboss a Frame

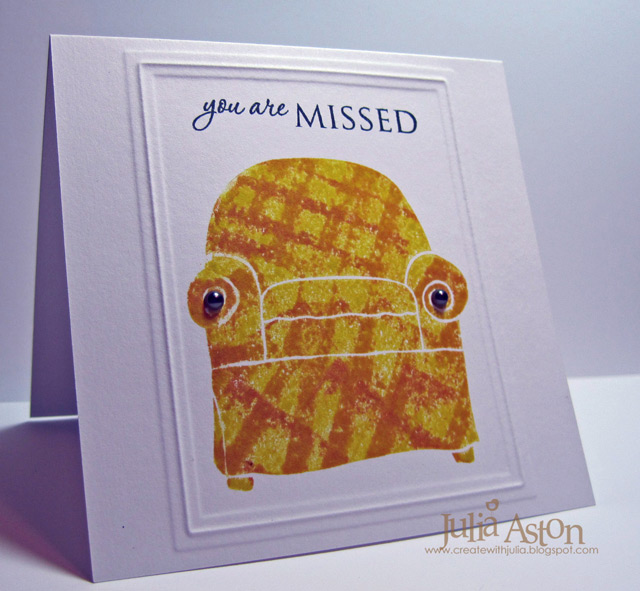
What a fun new technique challenge Joan had for us over on Split Coast this week! For all those large stamps that are hard to ink up and get good stamping coverage - Joan devised a way to ink it so it looks like plaid and the multicolored inking makes missed spots unnoticeable!

You can find Joan Ervin's tutorial for this plaid silhouette technique on her blog here.
The first time I 'plaid' inked my chair - just inking it from top to bottom- the chair details disappeared and all you could see was the plaid. So then I tried to 'selectively' ink the top, arms, cushions and bottom to give each section definition. I embossed a rectangle nestability first - then stamped the sofa and sentiment. Then I added two pewter pearls to the arms.
My stuffed sofa is from A Stamp in the Hand and my sentiment is from Waltzingmouse.
Several people have left me comments when I do embossed frames with my Nestibilities asking how I do it. So I took pictures as I made the frame for this card.
This is my 'sandwich' of layers from left to right - I'm using a Cuttlebug here.
1) First you have the A plate on the Cuttlebug.
2) Place a buffer (3 pieces of cardstock taped together) on top of the A Plate
3) put a B plate over the buffer
4) place the rubber mat on top of this B plate.

Then you take your card stock - Either a panel or the card itself depending on where you are embossing. If you are doing it directly on the card like I did - you want to fold your card - open it up and place the Nestability die on the inside of the card. This results in a raised frame.

If you emboss from the front of the card - the frame will be depressed. Try out each way to see which you prefer!

So - back to the embossing -

5) place your card stock with the Nestability (cut edge down) on top of the rubber mat
6) place another B plate over this being sure the Nestability is still placed exactly where you want it -
7) run it through the Cuttlebug.
Here's the sandwich being run through.
And, Voila! a beautiful embossed frame. I always emboss first and stamp after to be sure I get my image centered within the frame. I hope this is helpful to you - I'm sure there are other 'sandwiches' out there - but this is how I do mine! Practice with scraps to see how it comes out - you may need to adjust your # of pieces of card stock in your 'buffer' depending on how thick they are. It shouldn't be too hard to roll it through your Cuttlebug - but it can't be too easy either - then it doesn't emboss deeply!
And just a reminder about the Waltzingmouse Sketch Challenge here and the Friends of WMS blog waltz coming up here!
Stamps: Over stuffed sofa - A stamp in the Hand, Sentiment Waltzingmouse - Fancy Phrases
Paper: White - PTI
Ink: Ranger Distress - Mustard Seed, Wild Honey, Rusty Hinge, Memento Tuxedo Black
Accessories: Rectangle Nestabilities, Pewter Pearls - Kaiser

Monday, August 2, 2010

An Envelope Gift Bag

Two challenges for me today! Bev hosted the Free 4 all over at Split Coast and asked us to pay special attention to the sides of our cards/projects.


And Francie G is our Queen for the Day at SCS - Whoo Hoo!! I cased this lovely card of hers. I used a different Rubbernecker floral made a bag instead of a card and used the lacey punch on the top instead of the bottom!


I colored the stamp with SU markers, spritzed with water and stamped just like Fran did - I layered two flowers on top of the stamping and sponged over the floral with 2 colors of ink.


I made this little gift bag out of a 6x9 catalog envelope that I cut down to 5" height - I found the instructions over on Ellen Hutson's blog here

Well - I'm back to work after a wonderful week off - we went kayaking, hiking on a reserve, bike riding, visited friends in NH and generally relaxed! I'll share a few pics shortly. Now it's back to the grind so I can pay for my stamps! LOL!!


Stamps: Rubbernecker - Floral #496-11
Paper: White, Berry Sorbet - PTI, 6x9 catalog envelope cut down to 5" tall
Ink: Ranger Distress Spun Sugar & Tea Dye
Accessories: SU markers, water mister, sponge & applicator - Ranger, Curve punch - EK Success, Lacey punch & Butterfly punch - Martha Stewart, Labels 10 nestabilities, foam dimensionals