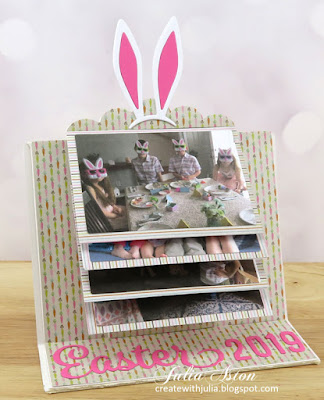
I'm back today with my tutorial for my Easter Photo Display that I first showed in Eileen Hull's Chapter 2 Design Team Blog hop last week.
These are the dies included in the Cards: Waterfall and Tags die set.
So here's a look at my completed project first. I used Eileen's waterfall dies as well as her older Display Stand die. The photos are from 2019 since we did not gather with my nieces and their children for 2020 or 2021 due to COVID!
This would be lovely with birthday, wedding, anniversary, or vacation photos as well!
Notice the cute carrot paper?! and fun bunny ears!
Here's how I made it:
First I found the photos I wanted on my computer and resized them to 3 1/4" wide x 2 1/4" high, printed them on Cover Stock paper from Staples (slightly heavier than computer paper). You could print them on photo paper as well. Then I used the die with the set to cut them out.
I die cut the Display stand out of matboard and folded it up to make the stand (this die is just one piece!).
I die cut the waterfall base pieces out of white card stock. I also cut a small scallop edge from Eileen's Gift Box Die out of matboard.
Because the 4 flips were a little too tall to fit on the panel of the Display Stand and still flip easily, I cut a piece of matboard 4 1/4" x 2 1/4" to put the waterfall on. I glued the scallop to the top edge of this matboard piece and then adhered the edges of the waterfall onto the panel, putting the first flip at the top and butting up each piece below the flap of the one above.
I cut pieces of patterned paper to cover the front and base of the stand as well as the waterfall pages and scallop, paying attention to any pattern that was directional. I didn't have enough of the striped paper to go in the same direction, so two are horizontal and two are vertical but they are under the photos so you don't see much of it, and they are the same color so it's all matchy matchy.
Here are the completed pieces ready to put together
I added ScorTape to the back of the panel.
And pressed it onto the Display Stand.
I added die cut scallops from the Waterfall die set above each photo to fill in the white space. I die cut the Easter (Waltzingmouse/retired) and 2019 (Alphanumeric/Sizzix) out of the same paper and adhered them along the bottom of the stand.
Such a fun way to remember and display a special day with just a few photos!
Eileen will have posts every Wednesday this month on her blog with projects by the Inspiration Team using her new Chapter 2 dies. Be sure to check it out!
Easter Waterfall Photo Display Stand
Paper: Little Sizzles Matboard - Sizzix, White, Hibiscus Burst - Papertrey Ink, DP Cottontail 6x6 Pad - Authentique.
Accessories: Card: Waterfall and Tags die, Display Stand Die, Gift Box Scalloped Edge Die- Eileen Hull/Sizzix, Easter die - Waltzingmouse (retired), Alphanumeric Dies - Tim Holtz/Sizzix, Bunny Ears Die - Impression Obsession, ScorTape


8 comments:
Fun, fabulous, creative and so unique. Great personalisation and an amazing project. Thankyou for the step by steps x.
A beautiful construction Julia, with wonderful photos to remember a lovely time. I love how you combined the die sets and the little pink trim you added is a really nice touch. Hugs, Anne xx
It may be easy, but it doesn't look like it, Julia! What a fun project! Love the papers and bunny ears! A wonderful way to share Easter memories. I'm sure the children loved seeing this!
fun photo display Julia, that would make such a great gift at any time of the year :)
I still adore your ABS projects! This one is really fun!
This is so adorable. What a special keepsake. I love the sweet carrot paper and the bunny ears decorating the lovely stand for your photos. I bet the kids had so much fun. Hopefully they will be able to get together next Easter! xx
such a great idea Julia!
This was such a clever idea and your execution of it is just darling! Love the mini prints you used.
Post a Comment