Thursday, July 30, 2020

July - A Vintage Journey Tag Friday

This month there are 5 Fridays - and when this happens - we have a Tag Friday over at A Vintage Journey!  Any tag will do as long as it's in the vintage, shabby, mixed media, rustic style and everyone is welcome to join in and link up their tag to share with us!

I used Gertrude front and center on my tag today!   She's having a snack of leaves and standing in a bed of flowers!


I had the background of the tag already done. I had made it after watching a Saturday blog post that Tim Holtz did using Ranger Distress Resist Spray.  I put Tim's Heart Struck Stencil over the 3 1/8' x 6 1/4" manila tag and then sprayed through the stencil with the Distress Resist Spray.  I washed the stencil immediately and let the tag dry.
I rubbed Distress Oxide Inks in Seedless Preserves, Candied Apple, Squeezed Lemonade and Spiced Marmalade onto my craft mat, spritzed with water and smooshed the tag into the colors, one at a time, drying between colors. (Sorry - no photos of this process!)

I thought it would make a great background for Gertrude!  
Die cutting all the various pieces for Gertrude out of specific colors seemed rather tedious to me.
(although the pieces are conveniently marked on the back saying what color to cut them in if you are following the photo on the packaging!) 

So I thought I'd ink up an 8 1/2" x 11" piece of watercolor paper using 4 brownish Distress Oxide Inks - Antique Linen, Frayed Burlap, Vintage Photo, and Walnut Stain -  light to dark - and use that sheet for all the pieces.

The first layer was Antique Linen DOX. 
I used the same method with each color,  rubbing the ink on my glass platform,
(yes, I finally cracked and bought one!)
spritzing with water and then smooshing the paper on to the color. 
When I had the coverage and look I wanted, I dried the panel with my heat tool and went on to the next color.
Second layer of color was Frayed Burlap DOX.
Third layer of color was Vintage Photo DOX.
Fourth and last layer of color was Walnut Stain.
Then I die cut all the pieces from the panel.  My only design thought was to have the largest piece and the giraffe dots piece be from the darker areas.  I then glued Gertrude together, following both the picture and the score marks on some of the pieces. 
I did cut the mouth, eyebrows, lashes and hooves out of black card.
I wanted her to be eating some leaves off a tall tree and to also be standing in greenery and flowers so I got out the Funky Foliage die set
I actually missed putting on the second layer of two of the legs and a base layer over the ears (you can see those pieces in the top right corner!)  but it was too late to put them on - and luckily Gertrude looks fine -  next time I'll know better!  
DOX inks are kind of dull when they dry - so I rubbed over Gertrude with Distress Glaze and then buffed it with a paper towel - to seal the ink as well as to brighten the color a little bit.
I love long tall Gertrude, and I think using the one sheet of mixed colors worked out well!
So please check out the rest of the Creative Guides inspiring tags.  We hope you'll link up a tag that you have made to share with us!

Here's the link to A Vintage Journey Tag Friday!


Stamps:  What's Up - Avery Elle
Paper:  Water Color Paper - Canson, True Black - PTI, Manila Tag - Ranger, green, tan, red, Kraft Core Core-dinations.
Ink:  Obsidian - Altenew, Ranger Distress Oxide Antique Linen, Frayed Burlap, Vintage Photo, Walnut Stain, Seedless Preserves, Candied Apple, Squeezed Lemonade, Spiced Marmelade.
Accessories:  Gertrude Colorize Die, Funky Foliage Dies - Tim Holtz/Sizzix, Distress Glaze, Distress Resist Spray - Ranger, Linen Ribbon - Idea-ology, water mister.

Tuesday, July 28, 2020

Sometimes You Gotta Roll With It

Today I created a card to play along with 3 challenges out there in Blogland and I was excited to get out and use some new-to-me stamps and dies! 
The stamps and dies I used are from two sets by Avery Elle - Peek A Boo: Coaster and Peek a Boo Pals Camp Wanna Stamp.I colored the pieces with Copics.  The roller coaster cars are popped up on foam dots.

I'm linking my card to:
The inspiration for my carnival theme

for colors

I used the sketch

Stamps:  Peek a Boo Coaster, Peek a Boo Pals: Camp Wanna Stamp - Avery Elle
Paper:  White - PTI, Strathmore Bristol Smooth Surface, DP Spring Fling 6"x6" paper pad - Lawn Fawn
Ink:  Obsidian - Altenew
Accessories:  Peek a Boo Coaster die set, Peek a Boo Pals Camp Wanna Stamp die set - Avery Elle, Copics, Sentiment Strip die - Neat and Tangled, foam dots.

Monday, July 27, 2020

Eileen Hull's New Snowman Box Die - On a Notebook Journal!

For the month of July, Eileen Hull's Inspiration Team has been sharing their creations using Eileen's newly released dies - Snowman Box and Mitten Box.
Today I'm using the Snowman Box - but not the box part!  I'm using him on the cover of my journal - made using Eileen's Notebook Die and some fun Belagio Cork Fabric.
Here's a view of the back cover.
I adhered sheets of ScorTape to the black chipboard and then adhered the golden cork fabric to the matboard.  I die cut the Notebook cover from this piece.
I added the double sided adhesive to another piece of black matboard and adhered a piece of Belagio black and silver Cork Fabric to it , die cutting the Snowman pieces out of this piece.
You can see that the the scored binding goes through both the matboard and the cork fabric and it bends easily.
I put the snowman together, cutting his nose from the Snowman die and two of a little flower die from Eileen's Floral Arch and Words thinlits Die out of the gold Cork Fabric - using the flowers on his hat and scarf.
I die cut 12 pieces of winter patterned paper using Eileen's Credit Card Sleeve and Tags Thinlits Die set to use on the pages of my journal.
To make the pages in my journal, I cut 6 pieces of watercolor paper 7" x 4 3/4", scored at 3 1/2" on the 7" side making 2 signatures of 6 pages.
I stamped different snow/winter sentiments on each page.


Below is the middle of the first signature and you can see the purple elastic cord I used to hold the signatures in.  I wrapped it around to the outside of the binding and tied a knot.


Below is the center of the 2nd signature and you see the 2nd binding cord.


I added two Hitch Fasteners to the front and back covers for the closure, punching a hole with my Cropadile and makiing a loop with a small piece of the purple elastic cord.   I put the back loop under the fastener base as I screwed it in, to hold the knotted loop on the back cover.
I painted a metal Snowflake Adornment with Patina Blue Fluorite from Ranger and tied it to a knot on the outside binding with a piece of thick black thread.
This little notebook measures 5"x 3.5"
For more inspiration using Eileen's fun new winter dies - please check out her blog every Wednesday where she gather's the projects from her Inspiration Team.

You can also join Eileen on her twice weekly Facebook Live shows at Eileen Hull Designs – Tuesdays at 6:00 pm EST and Thursdays at 4:00 pm EST. Become a member of the Eileen Hull Fan Club-  a friendly, talented and encouraging community of crafty folks.  You can also find Eileen on FacebookInstagram and Pinterest.

I'm linking my Notebook to:


Stamps:  In the Meadow, Wonderful Words: Snow Stamp Set - Papertrey Ink, Winter Alison Bomber EAB05 - PaperArtsy, Nature's Wonder - Tim Holtz/Stampers Anonymous.
Ink:  Enchanted Evening, True Black - PTI, Hero Hues Black.
Paper:  Black Little Sizzles Matboard - Sizzix, Water color paper - Canson,  North Wind 6"x6" Paper Pad - Craft and You.
Accessories: Snowman Box Die, Notebook Die, Floral Arch and Words Thinlit dies, Credit Card Sleeve and Tags Thinlits dies - Eileen Hull/Sizzix, Belagio Cork Fabric - Amazon,  Cropadile, black half pearls, purple elastic cord, Snowflake Adornments, Hitch Fasteners - Tim Holtz/Idea-ology, ScorTape 6" x 6" double sided adhesive sheets, Patina Blue Fluorite Paint - Ranger.

Wednesday, July 22, 2020

Let's Celebrate

Playing around today with some products, inspired by Tim Holtz recent Saturday videos.


The base of my panel is Matte Black Alcohol Ink Card Stock (which I've had for ages and never tried using it!).   The pattern was made using Ranger Distress Oxide Spray in Mermaid Lagoon and Fossilized Amber and Dylusion White Linen Ink Spray.

I poured (not sprayed) some of each of the sprays onto my craft mat close to each other but not mixing. Then  I smooshed the black AI cardstock onto the colors.   I lifted up the card to see how it looked and then smooshed some areas that hadn't gotten covered into the sprays on the mat again.

The cardstock was twice the size as this panel - so I got two cards (both slightly different looking!) from the one smoosh.   Obviously every time you do this it will come out differently!

The sentiment is Metallic Sticker/Quotations from Idea-ology.

I'm linking my card to:


 Country View Challenges - Do What Makes You Happy
Using products I've had sitting in my craft room untouched makes me happy!


Paper:  Matte Black Alcohol Ink Card Stock - Ranger, white - PTI
Accessories:  Ranger Distress Oxide Sprays Mermaid Lagoon, Fossilized Amber, Dylusion White Linen Ink Spray, craft mat, Metallic Stickers/Quotations - Tim Holtz/Idea-ology.

Wednesday, July 15, 2020

Mid-Month Reminder - July CAS Christmas Card Challenge - Nativity

Hi everyone -  happy summer!  We're halfway through July and I'm here to remind you to stay cool by making a Christmas Card for the CAS Christmas Card Challenge!   
This month the theme is Nativity.

I again used white and metallic gold as I did on my first challenge card but this one is even more CAS.  I die cut the Holy Family and stable shape using the Nativity Die from Sizzix out of white card.  I pushed out the white halos and die cut them again out of metallic gold and inserted the gold halos into the white die cut.  I layered it over the stable die cut and layered that to a metallic gold stitched circle which is one of the dies in the Noted: Scalloped Square die from PTI which is what I used to cut my card base.
This card measures 3 3/4" x 3 3/4"

Inside I gold embossed a sentiment from the PTI set O Holy Night.
You have until 7/24 to link up your Nativity CAS Christmas Card -  check out all the inspiration over at the CAS Christmas Blog!   You know you want to get your cards done before December right??!  Here's your chance to start!


Stamps:  O Holy Night - PTI
Paper:  White - PTI, Kraft Stock Metallic - Tim Holtz/Idea-olgy.
Ink:  Versamark
Accessories:  Nativity Dies - Sizzix, Noted: Scalloped Square Die - PTI, Gold Embossing Powder - Ranger, heat tool, Tombow Glue.

Monday, July 6, 2020

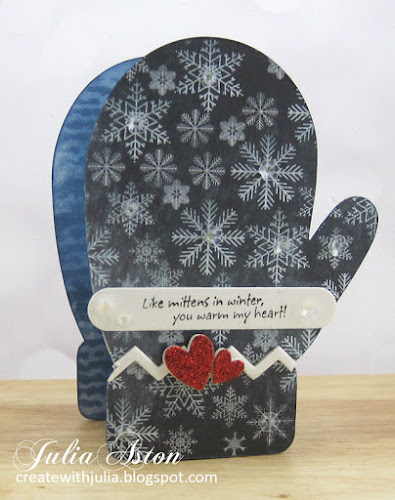
Like Mittens in Winter - Eileen Hull's new Mitten Box Die!

Welcome to the hot summer to those living in the Northern Hemisphere!  To help us keep cool this month, Eileen Hull has just released two fun box dies for winter!   Mitten Box and Snowman Box.
Today I'm sharing my Mitten Box!
I die cut all of the pieces for the mitten box out of white matboard.  Then I die cut a second mitten out of matboard. I die cut two mittens and the box piece out of designer paper.  The second mitten has to be cut with designer paper turned to the other side so that the thumb is facing the same way as the first cut.   I glued the designer paper die cuts to the matboard die cuts. 
I die cut the hearts and zig zag piece out of white matboard.  Then I die cut the hearts again out of red Glitter Cardstock from Michaels and glued them to the matboard hearts.
Before adhering the pieces together, I sponged the insides of both mittens with Ranger Distress Faded Jeans onk.  Then I laid a knit/pearl stencil over the mitten and sponged again through the stencil using the same ink.

I folded the tabs on the box piece and adhered it to the inside bottom of the mittens using ScorTape.  I went over the white edges of the mitten and box with a blue Copic.

  I left the inside of the box white since I'd be filling it with a treat.

This fun winter treat box will hold about 6 Hershey Kisses depending on how high you pile them!  You could put the treats in a clear bag and place that in the mitten box.  That way you could include more goodies!
The mittens are 5" tall x 3 1/2" wide (to the thumb!)  the treat box measures 2" x 1 1/4".
I added clear flower sequins to the center of many of the snowflakes on the mittens for a little dimension and sparkle!
I had the perfect sentiment stamp for my Mitten Box! 
Stamped on a sentiment strip and adhered on the front mitten.
Every Wednesday for the month of July, both Eileen's Inspiration Team and Education Team will be posting creative boxes using both the Mitten Box and the Snowman Box - so please be sure to check out Eileen's blog!

Join Eileen on her twice weekly Facebook Live shows at Eileen Hull Designs – Tuesdays at 6:00 pm EST and Thursdays at 4:00 pm EST. Become a member of the Eileen Hull Fan Club-  a friendly, talented and encouraging community of crafty folks that you will want to meet. Additionally, you can also find Eileen on FacebookInstagram and Pinterest.


Stamps: Like Mittens in Winter - My Sentiments Exactly (red rubber wooden stamp)
Paper:  White Little Sizzles Matboard - Sizzix, North Wind 6x6 Paper Pad - Craft and You, red glitter card stock - Michaels.
Ink:  Hero Hues Black, Ranger Distress Faded Jeans.
Accessories:  Mitten Box Die - Eileen Hull/Sizzix.  Copic B37, Frosted Flower Sequins - Honey Bee Stamps, Tombow Glue, ScorTape, Knit/Pearl Stencil M206 - Stencil Girl, Sentiment Strip Die - MFT.