Thursday, August 30, 2018

A Vintage Journey - August Tag Friday

August is a month with 5 Fridays in it - and so it is also Tag Friday over at A Vintage Journey!  I signed up to make a tag this month and here is what I created.
I have sadly neglected both my Funky Floral #1 Dies and Village Fixer Upper dies so I pulled them out to make my little garden scene!
First I die cut several of the leaves and flowers from Funky Floral out of 4 colors of Coredinations Distress Collection papers and the roof, trim and window frames from Village Fixer Upper out of brown Coredinations Distress .  I die cut a piece of cardboard with Tim's Tag and Bookplate die, tore off some of the top layer to expose the corrugation and brushed over it with white acrylic paint.
I stamped the Monet quote from our Alison's PaperArtsy stamp set EAB01 onto a strip of watercolor paper.
I wanted the garden to be the focus and the house to be just a suggestion - so there is just the roof trim and 3 haphazardly placed window frames.  I used another piece of die cut trim to ground the bottom of the tag.
I just noticed a stray flower center between the pink and orange flowers above!  
I wondered where that went!!  Those little pieces fly away so easily!
  I cut a piece of Honey Nut card stock slightly larger than my tag as a base to make it a little more sturdy and to define the edge.  I looped a piece of vintage lace through the hole at the top of the tag.
 This pretty summer garden makes me happy when I look at it. I love when my own garden is full of blooms!
Please check out all the lovely tags designed by this month's contributing Creative Guides over at A Vintage Journey!

Stamps:  Alison Bomber EAB01 set - PaperArtsy
Paper:  Coredinations Distress Collection - Tim Holtz/Ranger, Honey Nut - PTI, watercolor paper - Canson,  piece of corrugated card board from packaging.
Ink:  Hero Hues Black
Accessories:   White acrylic paint, Tag & Bookplate Die, Funky Floral #1 Dies, Village Fixer Upper dies - Tim Holtz/Sizzix, antique lace, Tombow Glue, Tiny Twinkles

Monday, August 27, 2018

Another Eileen Hull Journal Purse!

As I mentioned in last weeks leather 'purse post'! -  I made a second one to share today - and this time I attached a leather cording loop to it so it could be carried on the wrist - or through a belt loop.
 I used Eileen's Sizzix Wrapped Journal Die for the purse and die cut the flowers using her Flower Heart and Soul die.  I used brown, grey and burgundy colors of leather that I purchased on Amazon.
 In the same fashion as  my first purse -  after folding up the bottom half of the journal die cut - I sewed around all the edges on my sewing machine with a 1/4" seam allowance.
  I hand sewed a large snap onto the flap and the body of the purse for the closure. This brown leather is softer and thinner than the gray I used last week - and it was much easier to get the needle through to sew on the snap!
I glued the layers of flowers together with Beacon 3 In 1 Advanced Craft Glue and then put a brad through the center hole.  I glued the flower to the front of the purse over the stitching that showed from attaching the snap.
 To add the handle, I punched a hole with my Cropadile on the top fold of the purse about 1/2" in from the edge.
 When I bought the scraps of leather - I also bought a package of leather cording.  

 I cut a piece about 12" long, folded it in half and pushed the two ends through the hole on the purse.
I pushed a threaded needle through the soft parts of the leather cording and wrapped the thread around the pieces a few times - then knotted the thread.
I laid the end flat and put a big dab of glue under it.
 It seems to be holding on quite well so far!  I've been walking around the house with it dangling from my wrist!  And you can't really put a ton of stuff in the purse that would make it super heavy!
The closed purse measures about 4 1/2" x 5".
All this month, members of Eileen's Inspiration Team are making projects using some of their favorite Eileen/Sizzix dies.  Please check out her blog where Eileen is gathering all of the projects!


Accessories:  Wrapped Journal Die, Flower Heart and Soul die - Eileen Hull/Sizzix,  leather scraps and leather cording - Amazon, Urban Prairie Glazed Brad - Basic Grey, Sew On Snap Size 10 - Joann, strong black thread, sewing needle, sewing machine, Cropadile, Beacon 3 in 1 Advanced Craft Glue - Walmart.   

Monday, August 20, 2018

When is an Eileen Hull Sizzix Journal not a Journal?!

This month Eileen Hull's Inspiration Team is making projects using some of their favorite Eileen Hull/Sizzix dies.  She is gathering all the projects and will have weekly posts on her blog in August.

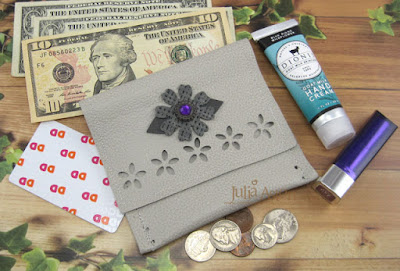
Today I have a project using her wonderful Wrapped Journal Die - but I didn't make a journal -  I made a purse/wallet!  I also used her Flower Heart and Soul die and her Movers and Shapers Floral Cut outs die.
As you can see - you can pack a lot of 'necessaries' in this little purse that measures about 5" x 4 1/2" when closed up.
I  die cut the journal out of some beautiful grey, wonderfully supple, leather.  (more on that below).  I placed the rough side of the leather against my die to cut it.  There are score lines created with the die - and they might cut through the leather if you put the 'good' side down on the die.  You can see the score lines created in the photo above. 
(They are there so the journal will bend when cut from matboard)
I laid the Floral Cut out die inside the space on the journal die to get this lovely floral edge.  Some of the petals didn't quite cut through and I left them on at first, liking the dimension added, but ended up snipping them off as they probably would have torn off when tucking the purse into a pocket book or carrying it around.
There are 4 holes in the middle of the die on each edge, that are used to tie the pages into the journal - I made the bottom fold of the purse where those dots are, matching up the top and bottom dots, and held the fold with clothespins until I sewed the edges.

I don't usually work with leather so I was winging the techniques a bit -  I did put a heavy duty needle in my sewing machine and used a heavy duty thread.  I sewed up from the bottom fold about 1/4" seam allowance.  I had to pull the leather forward as it stitched a bit where it's doubled (maybe there's a thickness adjustment on my Singer - but I didn't think to check that out!) - and I sewed from the bottom up along the side, across the single layer top and back down to the bottom on the other side. 
I think stitching will help keep the leather from stretching out of shape (?)
I die cut one of the flowers from Flower Heart and Soul for the front as a decoration and also to hide the stitching from attaching the large snap I used for the closure.  I used another piece of leather for the flower - this one has texture and a molded design on it - I added a purple gem brad to the center.
I stitched the top of the snap on the inside of the purse and the stitches show on the outside, of course, but will be covered with the flower.
I stitched the other side of the snap on the bottom as shown.  It was a little tough getting the needle through the leather -  perhaps there are better tools if you work with leather a lot?  But I did get it secured.  I double stitched through each hole in the snap to be sure it won't pull away with a lot of opening and closing.
I used a strong craft adhesive to apply the flower and leaves to the front - over the stitches.  Beacon 3 In 1 Advanced Craft Glue I found it at Walmart on line.
(I learned about this adhesive when checking out another sewing project where they were adhering a metal closure to a purse so thought it would be good for this application - so far everything glued is still attached quite soundly!)
So I got my leather pieces from Amazon -  I got two packages of scraps - looking for descriptions that said the package included some larger pieces - hoping they would be large enough for a journal!(these are just some of the larger pieces left)
I purchased two packages - and so far have had enough large pieces to cut out 7 wrapped journals.
I'll be posting my second journal/purse next week so please check back!  I added a little loop strap to that one!
One of the packages included 4 small pieces of snake skin!  Not sure what I'll use that for, but it looks pretty cool -  it's thin, of course, and apparently real!!
I hope you like my little journal purse!  And that you will think outside the box about some of your dies too!!
Please check out Eileen's blog this month to see what favorite dies the rest of the Inspiration Team is creating with!
Accessories:  Wrapped Journal Die, Movers and Shapers Floral Cut Outs die, Flower Heart and Soul die - Eileen Hull/Sizzix,  grey leather scraps - Amazon, Sew On Snaps Size 10 - Joann, strong black thread, needle, sewing machine,  strong white thread, Vintage Brad - Creative Charms, Beacon 3 in 1 Advanced Craft Glue - Walmart. 

Saturday, August 18, 2018

Two Cards from the Sea

I have two cards to share today -  both made with backgrounds created using the Oxidized Shaving Cream technique - discovered by Lydia over at Splitcoaststampers.  She used it as the technique for the Mix Ability challenge on Friday.  You will find her YouTube video here

So here's the first card I made for Lydia's challenge.  I kind of covered up my lovely shaving cream background by stenciling this wonderful sea turtle from Stencil Girls over it using black embossing paste - but he looks perfect swimming in the ocean I created - along with 3 little schools of fish (the Friday Free 4 All challenge at SCS was back to school!)   The fish and sentiment are from S'Whale stamps and die sets from Ellen Hutson.
I'm linking my Sea Turtle card to:

Sun Sea and Sand

Back to School


 So then today's Inspiration Challenge at Splitcoaststampers was a nail polish website, OPI - and I chose this Marbled Waves manicure for my inspiration.  
I had made several backgrounds from the shaving cream technique so I used another one on this card!  You get to see more of the lovely background since I just did some stamping over it - the hilarious sentiment is from Impression Obsession and the mermaid tail is from Inner Mermaid from Ellen Hutson.  I die cut the panel with Pierced Feature Frames die from PTI (my favorite framing dies at the moment!)
 Hope you are all having a lovely weekend -  we are having intermittent sun and showers at the moment - but it's a hot summer's day!

Tortoise card
Stamps:  S'Whale - Ellen Hutson
Paper: white - PTI
Ink:  Hero Hues Black, Ranger Distress Peacock Feather, Ranger Distress Reinkers Peacock Feathers, Bundled Sage, Tumbled Glass, Shabby Shutters
Accessories:  Turtle stencil #S417 Daley - Stencil Girl, Black Embossing Paste - Wendy Vecchi, shaving cream, paper plate, foam dots, S'Whale Dies - Ellen Hutson

Mermaid card
Stamps:  If your thighs touch - Impression Obession, Inner Mermaid - Ellen Hutson
Paper:  white - PTI
Ink:  Hero Hues Black, Ranger Distress Reinkers Peacock Feathers, Bundled Sage, Tumbled Glass, Shabby Shutters
Accessories:  Pierced Feature Frames Die - PTI, shaving cream, paper plate, Tiny Twinkles - Taylored Expressions

Friday, August 17, 2018

White Christmas Tree

I've got another card made for my Christmas Box!
Clean and simple - just some layered die cuts out of water color paper (it gives a subtle texture to a card!)  The base dies are Noted: Scalloped Square from PTI and the lovely layered tree is Snow Covered Stacker Tree by Dee's Distinctively (this may be retired but I found it here on Amazon.)  It's a small card measuring 3 3/4" square.

I've left it plain on the outside and stamped a Christmas sentiment inside.

I'm linking my card to:

Anything Goes
Anything Goes
Paper:  Water color paper - Canson
Accessories:  Noted: Scalloped Square Dies - PTI, Snow Covered Stacker Tree Die - Dee's Distinctively, foam dots.

Thursday, August 16, 2018

A Birthday Sunflower

Today I have a summer birthday card with a lovely watercolored sunflower to share.
I embossed the image with Tree Branch Embossing Powder to give it a subtle outline for my watercoloring.  I watercolored with Ranger Distress Inks, rubbing each ink on my craft mat and dipping a wet brush into the color.  I used Spiced Marmalade, Wild Honey, Scattered Straw for the flower and background and Twisted Cintron for the leaves.  I used just a spot of Walnut Stain to color the center where the seeds would be!   I also embossed the sentiment with the same Tree Branch EP.

I'm linking my card to the following challenges:


One Layer Card


Stamps:  Botanical Blocks - PTI
Ink:  Versamark, Ranger Distress Spiced Marmalade, wild Honey, Scattered Straw, Twisted Cintron, Walnut Stain.
Paper:  Water Color Paper - Canson
Accessories:  Craft Mat, brush, water, heat tool, Wendy Vecchi/Ranger Tree Branch Embossing Powder.