Saturday, February 10, 2024

Inkspirational #309 - With All My Heart

 Today, I'm posting my DT card for Inkspirational #309 Challenge -  It's a Word Prompt and the word is HEARTS.  

I made a Valentine but it could also be for an Anniversary.

I used stamps and dies from The Greetery for my HEART card today -  using a heart shaped wreath, heart patterned paper and white and black Tuxedo Hearts!

We hope you'll join us and link up your HEART cards over at the Inkspirational Blog!   You'll also find lovely inspiration from the rest of the talented DT.

You have until Feb 23 to join in!


Also linking my card to:

inspired by the white, pinks and reds
ends 2/14

Heartfelt
ends 2/18

Clean and Layered, inspired by colors, hearts and houses (door)
ends 2/12


Stamps: Mini Boxwood Heart - The Greetery. 
Paper: White, Pure Poppy - Papertrey Ink, DP Valentines Day Paper Pad - Recollections (Michaels)
Ink: Pink Pearl, Ruby Red - Altenew
Accessories: Mini Boxwood Heart Die, Elegant Entrance Arches Die, A2 Arches die - The Greetery, Tuxedo Hearts - Honey Bee Stamps, Oval Punch - Stampin Up, Foam dots.

Thursday, February 8, 2024

Every Day Should be a Chocolate Day

 Today I'm joining in with the Inspired by Challenge.

I really want to sip on one of these pink hot chocolates!! 

I was inspired by the frothy white and pinks along with the strawberries.  Instead of a drink - mine is a heart shaped frosted cookie!

My card front is a Quick Card Fronts: Chocolate Sweetheart from Whimsy Stamps that I recently purchased.  I love how you can make a WOW card so quickly with them!  

I used a Nestability Heart die that just fit this heart (!) to cut it out and pop it up.  I also added 3 white tuxedo hearts and a sentiment strip also popped up on foam. 

I stamped Happy Valentine's Day inside!


I'm also linking my card to:


First time using the card fronts!


Paper:  white card base - PTI
Accessories:  Quick Card Fronts: Chocolate Sweetheart - Whimsy Stamps, heart die - Nestability,  Tuxedo Hearts - Honey Bee, foam dots.

Friday, February 2, 2024

Jan 2024 Card Chain Challenge Reveal - Bird on a Fence

 Today's the day for the January Card Chain Challenge Reveal -  when we see all the cards sent and received for the challenge in January.   I sent my card to Linda in Minnesota and I received a card from Joanne in Connecticut.

Each month we have the options of using a sketch, colors, themes and/or product/techniques.

I used two of  the theme options - birds and friendship

Here's the card I created for Linda.  The fence and bird are up on foam dots.


Instead of making a card that opens -  I decided to put a small die cut easel on the back of the panel.

You'll find all of the cards exchanged and see who sent to who - over at The Card Chain Challenge.

You can also sign up to send/receive a card for February here.  You have until Feb 6th to sign up!


I'm linking my card to:
This Makes Me Happy - Birds


Paper: White Wood Grain Card - Memory Box, White, Enchanged Evening, True Black, Blueberry Sky - Papertrey Ink, DP Festival of Colors 6"x6" paperpad - Rubbernecker.
Ink: Cocoa Bean - Papertrey Ink
Accessories: Hello Friend Posh Script Die - Memory Box, Featherd Friends 6 Die, Picket Fence Die - Papertrey Ink, foam strips, small easel die - Sizzix.

Sunday, January 28, 2024

January Group of Seven Cardmakers - Alcohol Inks with Gilding Flakes

 It's time for the January post by the Group of Seven Cardmakers!   This month we are playing with Alcohol Inks and Gilding Flakes!

I used an 8"x10" piece of Yupo for the technique and so was able to cut 4 card panels 4"x5" to make my 4 cards below.


Here are a few photos of how I created my panel.

Supplies:  8"x10" Yupo Cardstock, Alcohol Inks: Latte, Pistachio, Sail Boat Blue, 91% Rubbing Alcohol, Ranger Ink Blower, heat tool that has a low or cool setting, gilding flakes
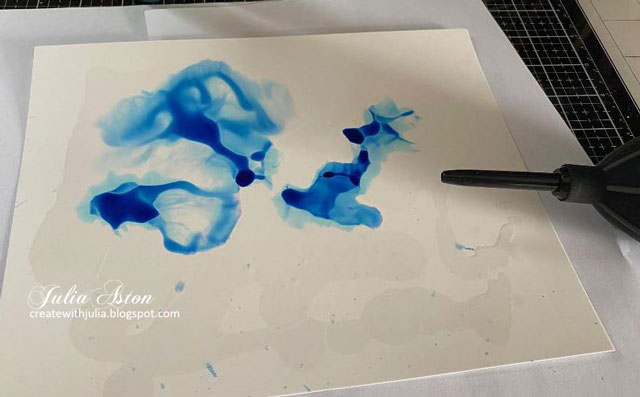
I applied quite a bit of 91% rubbing alcohol all over the Yupo Sheet.  Then I dropped Sailboat Blue AI into the alcohol and blew it around with the Ink Blower.
I added some more rubbing alcohol and dropped Pistachio AI onto the panel and blew the ink around again with the blower.  
(I wish I had stopped with this result below!)
I repeated the same steps adding Latte Alcohol Ink.  
I kept blowing the ink around, adding rubbing alcohol and more ink until I felt I was done.  Then I dried the panel with a cool setting on my heat tool.  You want to dry the AI but not where the colors have pooled because you want the Gilding Flakes to stick to those edges.
Then I spread Red Blaze Cosmic Shimmer Gilding Flakes over the panel of Yupo and pressed it down onto the sheet with my fingers.   Then I let it sit for 20 minutes or so.  Then I brushed it off the panel with my fingers.
The Gilding Flakes didn't end up sticking to too many places  - but there is some on each of the panels I cut for cards.

Sorry, my post is going to be a bit longer!

I decided to make another panel using different Alcohol Inks - Stone Washed and Citrus and the gluing technique for the gilding flakes on the 2nd video.  
I dribbled the rubbing alcohol over the panel of Yupo and added one row of color and moved it around with the bulb, then added a row of the 2nd color and moved it around - alternating the 2 colors until I filled the panel.  I didn't drop more rubbing alcohol over the ink, just on empty areas as I moved along as I didn't want all the circles I created on the panel above.

I like the results of smoother swirls of color below. 
 (This photo was taken when the inks were still wet - some of the mixed colors are turning yellow
and check out how more pink showed up when it was dry on the third photo down!) 
I dried the panel with my heat tool (not too hot!) Then I added little beads of glue along some of the edges of colors and pressed some larger pieces of gilding flakes over the glue and let it sit overnight.
The next day, I rubbed over the flakes to get all the loose bits off - and I like the results.  I had more gilding flakes stuck on the panel using this technique than my first one above.
Notice how the blue and citrus created some areas of pink and yellow as it dried?
I cut the panel into 4 pieces.  Here is a card I've made with one of the panels so far. 
I just purchased the wonderful hot air balloon and clouds dies from Magnolia.
Below you can see the shiny look of the gilding flakes a little better.

Final impression:  Alcohol ink backgrounds are beautiful - the gilding flakes are really messy and it's a little hit or miss with them sticking - using glue seems to work better than trying to get it to stick to wet AI.  When it sticks - it looks wonderful!

Here are the two videos from the GO7 blog.  

Alcohol Inks + Gilding Flakes by Neat and Tangled (11:03)

So please check out the Group of Seven Cardmakers blog and see how the rest of the Group of 7 created using this technique! 
 
And we hope you'll try this out yourself - we'd love to see how the techniques work for you!  You can link up your creations over at the blog so we all can see them!


I'm linking my hot air balloon card to:

Never before Used Stuff
first time using the beautiful hot air balloon die.
ends 1/31

First time using hot air balloon die


Hello Friend 
Paper:  Yupo - Ranger, White, Tropical Teal - PTI, metallic brass from stash.
Ink:  Alcohol Inks Sail Boat Blue, Pistachio, Latte - Ranger
Accessories:  Ink Blower - Ranger, 91% Rubbing Alcohol - CVS, heat tool, Red Blaze Cosmic Shimmer Gilding Flakes - Creative Expressions, Hello Friend Posh Script die - Memory Box, Simple Stacks frame die - Penny Black, foam dots.

Happy Birthday
Paper:  Yupo - Ranger, White, True Black - PTI, metallic brass from stash.
Ink:  Alcohol Inks Sail Boat Blue, Pistachio, Latte - Ranger
Accessories:  Ink Blower - Ranger, 91% Rubbing Alcohol - CVS, heat tool, Red Blaze Cosmic Shimmer Gilding Flakes - Creative Expressions, printed sentiment, Celebration Words Script die - Tim Holtz/Sizzix, Nested Rectangle with Square Holes die - Rubbernecker, foam dots

Feel Better Soon
Paper:  Yupo - Ranger, White, Tropical Teal - PTI, metallic brass from stash.
Ink:  Alcohol Inks Sail Boat Blue, Pistachio, Latte - Ranger
Accessories:  Ink Blower - Ranger, 91% Rubbing Alcohol - CVS, heat tool, Red Blaze Cosmic Shimmer Gilding Flakes - Creative Expressions, Mid Century Frame Die - Altenew, Nested Rectangle with Square Holes die - Rubbernecker, enamel dots - Altenew, printed sentiment, foam dots.

With Sympathy
Paper:  Yupo - Ranger, Hammered White - Amazon, metallic brass from stash.
Ink:  Alcohol Inks Sail Boat Blue, Pistachio, Latte - Ranger
Accessories:  Ink Blower - Ranger, 91% Rubbing Alcohol - CVS, heat tool, Red Blaze Cosmic Shimmer Gilding Flakes - Creative Expressions, With Sympathy die - Simon Says Stamp, enamel dots - Altenew, Lacey Frame - Gina Marie Designs, foam dots.

Be Fearless
Paper:  Yupo - Ranger, Hammered White - Amazon.
Ink:  Alcohol Inks Citrus and Stone Washed , Ranger Distress Oxide - Old Paper, Gold Pigment Ink - Color Box.
Accessories:  Ink Blower - Ranger, 91% Rubbing Alcohol - CVS, heat tool, Gilding Flakes from stash, Le Balloon and Basket Die, Le Balloon Clouds and Flowers Die - Magnolia Ink (UK), Small Talk Sticker - Tim Holtz/Idea-ology, foam dots..

Saturday, January 27, 2024

Inkspirational #308 - Let Go

 Here's my DT card for the new challenge up over at Inkspirational -  the challenge is Designers Choice - and Marina is asking us to use Paper Piecing.

Here's my card.

I stamped the girl and the balloon on the white card panel and on a piece of patterned paper.  I fussy cut the dress, shoes and the balloon out of the patterned paper and adhered them over the image stamped on the white panel. I lightly stenciled around the images and sentiment using the Heart Struck Stencil from Tim Holtz/Stampers Anonymous and yellow ink.

I colored her hair, skin areas and ground with Copics and added three Tuxedo Hearts.  I inked around the edges of the panel with Gold Pigment ink for definition.

I haven't done any paper piecing for years - it was fun to try it out again!

We hope you'll join us over at Inkspirational, doing some paper piecing on your stamped images!  You'll find beautiful DT inspiration and Mr. Linky over at the blog.

You have through 2/9 to link up!

Also linking my card to:

New (first time I've used this stamp set)
ends 1/31
Any stenciling
ends Feb 3

First time using stamp set


Stamps:  Let Go - Unity Stamps
Paper:  White - PTI, DP Fine and Sunny - Kaiser Craft
Ink:  Nocturn - Versafine Clair, Buttercream - Altenew, Gold Pigment Ink - Color Box.
Accessories:  Heart Struck Stencil - Tim Holtz/Stampers Anonymous, Tuxedo Hearts - Honey Bee Stamps, blending Brush,  Copics R20, E13.

Saturday, January 13, 2024

Inkspirational #307 - Layered Tulips

 Happy New Year everyone!  It's time for the next Inkspirational Challenge which is Stencils with the option of using more than one stencil or layering stencils!


I knew I was going to use my beautiful tulip layering stencil from Unity Stamps.  I also purchased the die that goes with the stencils (there's a stamp set also if you don't want to stencil but I didn't purchase that.)  
My card is a slimline size - 3 1/2" x 8". 
I used a Gold Gelly Roll Pen to outline all the edges and rubbed a Gold Pigment ink on the edges of the die cut and background piece of DP for a little glimmer in the light.


So please get out those stencils and show us some pretty cards over at Inkspirational!
You'll find lots of DT inspiration as well as Mr. Linky here.

You have up to 1/26 to link up!

Also linking my card to:

Anything goes
ends 1/23

Anything goes
ends 1/31


Stamps: Mini Strips- Carried Away - Taylored Expressions.
Ink: Olive, Fresh Leaf, Maple Yellow, Orange Cream - Altenew, Gold Pigment Ink - Colorbox.
Paper: White - PTI, DP Modern Metallic 12x12 paper pad - DCWV.
Accessories: Layering Slimline Tulip Stencils, Tulip Die - Unity Stamps, blender brushes, Mini Strip Die - Taylored Expressions, Gold Gelly Roll Pen, foam dots.