Tuesday, January 4, 2022

Eileen Hull - Gel Press Collaboration - Calendars for 2022

Happy Healthy New Year everyone!  Wow - another year gone by - here's hoping 2022 goes a little better than 2021 did.

This month several of Eileen Hull's Inspiration Team is collaborating with Gel Press - using their products to create papers to use with any of Eileen's Sizzix Dies.

So, I have not created much with Gel Plates and the little I did try didn't work out too well.  So when I signed up for this collaboration - I did a deep dive into YouTube videos looking for techniques where I found lots of inspiration.  I wrote down the steps for the projects I liked and had the supplies for, and went up to my craft room with several sheets of technique instructions.  The trick is, to just play, don't think you'll have a finished project at first try (although maybe you will!)

I am very happy with what I finally ended up with after a couple of hours of playing, but I do have to say there was a lot of trial and error, trying colors that didn't work out together, trying stencils and die cuts that didn't give a good print - so I will tell you that if you are new to this like me -  just keep playing!! - trying different techniques and variations of inks, paints, papers etc.

Here is what I consider my first successful project using a 6" square Gel Plate, a 4" brayer, inks, a stencil listed below and Eileen's Display Stand Sizzix Die.

This wonderful Display Stand die can be held two ways so I made two calendars to show the two positions.

One of the videos I watched used Elements ink in Olive and Distress Ink in Ripe Persimmon so I got those out to try.  I recently purchased this wonderful stencil called Milky Way by A Colorful Life Designs and thought it might look interesting on a 'pull'. 
 
First I rolled the brayer over the Olive ink pad and then brayered over the Gel Plate to get even coverage - very little ink is needed.  Next, I laid the stencil over the inked Gel Plate and pressed over the stencil with my fingers to be sure it was flat against the gel plate.   Then I inked a foam make up sponge with Ripe Persimmon and pounced over the open areas of the stencil. 
And when I 'pulled' off the print - I had this beauty!
I decided to try other ink colors while I was playing. 
  
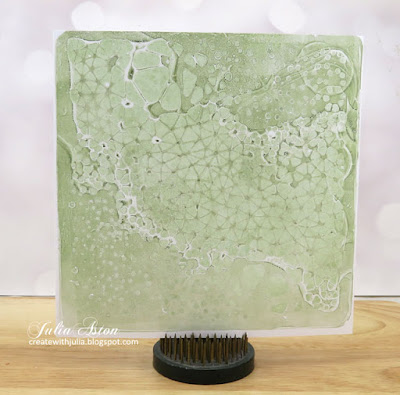
Below is the pull (print) using Olive Elements ink on the Gel Plate and Speckled Egg Distress Oxide ink sponged through the stencil.  The blue totally blended into the green looking more like a monoprint - but will make a nice background for something.
Below is Olive Elements Ink background with Seedless Preserves Distress Oxide ink sponged through the stencil.  I tried to use colors opposite each other on the Color Wheel.
Below is another one that came out a monoprint even though it's two different colors -  Henna Elements Ink background with Ripe Persimmon Distress Ink through the stencil. 
(the Persimmon blended totally with the Henna, you'd never know it was there)
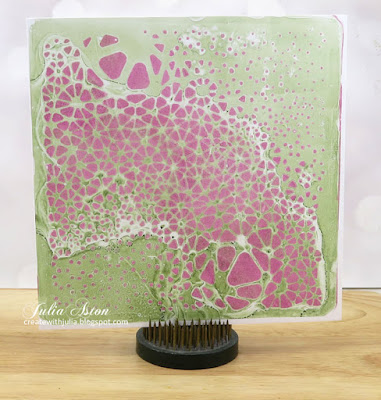
And this one below is Mermaid Lagoon Distress Oxide background with Ripe Persimmon Distress Ink through the stencil.  I used this pull for my 2nd calendar.
I cut my Gel Plate panels to fit the two panels I wanted to cover on the Display Stand die cut.  
I didn't want to cover up the beautiful print too much, so just added 3 strips of Little Gold Stars Washi tape from Alexandra Renke, the Mini Tear off Calendar from Taylored Expressions and a Metallic Sticker/Quotations from Tim Holtz/Idea-ology.
Look at the wonderful detail on this print! 
Here's the back of the Display stand - holding it this way.
Here is my 2nd Calendar holding the Display Stand the other way.
I used the pull that is Mermaid Lagoon Distress Oxide background and Ripe Persimmon Distress Ink through the stencil.  The sentiment is from Tiny Text by Tim Holtz/Stampers Anonymous, the Little Red Hearts Washi tape is Alexandra Renke and the clear red hearts are from Honey Bee Stamps.
I off-set the sentiment and calendar so I didn't hide the pretty 'flow' of the stenciling! 
(my husband hates when everything isn't lined up evenly!)
A close up of the detail on this pull. The Mermaid Lagoon ink printed much lighter than it actually is and didn't show the watery look the Olive Elements ink did on my first calendar.  I think DOX inks print lighter than Distress Inks? You never know what you will get until you try it! 

So I'm quite happy with the way my first Gel Press projects look and am eager to 'play' some more!  I'll be back next week with another collaboration post!

Have you done any Gel Plate projects?

Check out Eileen Hulls Blog every Wednesday this month to see what others on her Inspiration Team have done using Gel Press Supplies and Eileen's Sizzix dies!  

Stamps:  Tiny Text - Tim Holtz/Stampers Anonymous
Paper:  White, Terracotta Tile - Papertrey Ink, White Little Sizzles Matboard - Sizzix
Ink:  Olive Elements - Lavinia, Ranger Distress Ripe Persimmon, Ranger Distress Oxide Mermaid Lagoon, Obsidian - Altenew.
Accessories:  Display Stand Die - Eileen Hull/Sizzix, 6" square Gel Plate, 4" brayer - Gel Press, Milky Way Stencil - A Colorful Life Designs, 2022 Mini Tear Off Calendar - Taylored Expressions, Little Gold Stars Washi, Little Red Hearts Washi - Alexandra Renke, Red Hearts - Honey Bee Stamps, rubber make up sponge.

Monday, January 3, 2022

January CAS Christmas Card Challenge - Silver and Gold

 The CAS Christmas Card Challenge is back after a little break over December.  And I am hosting the January Challenge which is to use Silver and Gold!

My card today is truly CAS - just two die cuts on a 4 1/4" square card!  
I bought both of these dies last year but didn't use them until today!  I die cut The Angel Corner by Tutti Designs out of silver and the Alleluia die from Simon Says Stamp out of gold - the Alleluia die comes with a shadow die to put behind the cut word but I didn't use it today.  
I made 4 of these while I was at it as it was so simple!
So please join us and get a jump on your Christmas Cards right off the bat!  You'll find the challenge here.  You'll also find lots of inspiration from the rest of the DT as well as our wonderful Guest Designer this month - Lisa (My Paper Tales)


I'm also linking my sparkly silver and gold card to:
The Paper Players
It even looks rather like the bottom right photo!

NBUS Challenge

bought my dies last year but never used until today


Paper: White - PTI, Metallic Silver and Gold - Kraft Paper Pad Metallics - Tim Holtz/Idea-ology.
Accessories: Angel Corner Die - Tutti Designs, Alleluia Word and Shadow Die - Simon Says Stamp, Glue pen.

Wednesday, December 15, 2021

Winter Thank You Cards and Christmas Tags Using Eileen Hull's Sizzix Dies - Comfort and Joy

 Many of Eileen Hull's Design and Educational Team members are creating Comfort and Joy posts - quick projects for the holidays and beyond using Eileen's Sizzix dies.  All of the teams projects will be linked over at the Eileen Hull Fan Club FB.

I have created an easy to make winter Thank You Note using the snowflake die from Eileen's Wreath and Snowflake Thinlits die set.

I also made two tags, also using the lovely snowflake die along with the bird die from the Wreath and Snowflake set.  I die cut the tag using the largest tag die from her Waterfall and Tags Thinlits die set. By changing the sentiment these could be used on any winter gift!


Here is a brief tutorial on making the quilt background for the Thank You note.  
I found the tutorial for the 'Disappearing 9 Patch' in the Forum over at Splitcoaststampers.

First, I picked out 3 snowflake patterned papers from a 6x6 paper pad.  I cut a couple of 1" strips from each pattern and then cut the strips into 1" squares (so each strip gave me 6 one inch squares.)

I cut a 3" square out of white card stock and adhered a double sided adhesive sheet over the white panel (you could also just put glue on the squares to adhere them to the white panel)
I laid out the snowflake squares onto the white panel mixing the patterns 
(looking at the top row across below) - I did pattern 1, pattern 2, pattern 3  second row Pattern 2, 3, 1, then third row pattern 3,1, 2) 
You want to try and adhere the squares evenly with edges touching.
Next, I cut the square in half one way, then the other way as per below.
Then I laid the 4 quilt pieces on a 4"x4" black panel leaving 1/2" outer edge all around, turning each square to create a mixed up pattern. Once I was happy with the look of the pattern, I adhered the 4 pieces to the black panel.
I die cut the snowflake out of Disco Glitter Cardstock (Michaels) and put thin foam strips on the back as shown.
I adhered the snowflake with the foam strips, to the center of the quilt piece.  
My outside edges on this one didn't quite come out even (!?)  so I die cut a square frame using 3 1/4" and 2 3/4' Nestibilities and adhered it over the quilt square. (There's always a 'fix' right?!)
The frame makes the outside lines look crisp and clean.  
You could also just trim your quilt square outside edges to make them even, if you're trying to make a bunch of these as quickly as possible!
Another way to get these put together quicker is to just leave your 9 patch and don't cut it in quarters!  
It's still a lovely quilt look!  I lined up these pieces better and the edges were even so I didn't need a frame around it.
Below is the simpler finished card with the 9 patch and no framing.  I also just adhered the snowflake over the panel without foam so it lays flat.
Below is the Disappearing 9 Patch with the frame over it and the snowflake up on foam.
I adhered the black panel to a 4 1/4" square white card base.  I stamped the thank you, punched out the oval and adhered it to the corner of the frame.
Now on to the tags.   
You could use this tag for any winter gift giving with a different sentiment (Happy Birthday, Just for You, Congratulations)  It would look pretty on a bottle of wine, right?!

A simple how to for the tags.
I die cut snowflakes out of the Disco Glitter Cardstock. I cut the birds as well as the tags out of blue and red Glitter cardstock using Eileen's Wreath and Snowflake Thinlit dies.  I used the largest tag die from Water Fall and Tags Thinlit Dies.  
I stamped the sentiment on a strip of white card and adhered it as a grounding for the bird's feet.  I added tiny black gems for the eyes.
I hope I have inspired you to create some simple but impressive holiday/winter cards and tags!

All of the teams' Comfort and Joy projects are being shown on Eileen Hull's Fan Club Face Book page with links to our blog posts during the month of December.

Are you a member of the Eileen Hull Fan Club? Join over 5,ooo other members to share ideas, inspiration, sources, challenges and make some fabulous friends – make sure to answer the questions! Watch her Facebook Lives at Eileen Hull Designs on Tuesdays at 6:00 Eastern and Thursdays at 4:00 for project ideas, techniques, inspiration and creative community. Additionally, you can also find Eileen on FacebookInstagram and Pinterest.

Stamps:  Thank You from Vintage Roses Add On Stamp Set - Altenew, Merry Christmas from Silent Night - Papertrey Ink.
Ink:  Obsidian - Altenew
Paper:  White and True Black -Papertrey Ink, red and blue glitter paper, Disco Glitter Cardstock - Michaels, DP North Winkd 6x6 paper pad - Craft and You.
Accessories:  Wreath and Snowflake Thinlit Dies, Waterfall and Tags Thinlit Dies - Eileen Hull/Sizzix, 6x6 Adhesive Sheets - Sizzix, word window punch - Stampin' Up, black tiny twinkles - Taylored Expressions.

Monday, December 13, 2021

12 Tags of Christmas - Tag #12

 So here it is -  my 12th Tag of Christmas for Ellen Hutson's challenges found here!

The theme song for the final tag is Holly Jolly Christmas and, once again I had the perfect stamp for the challenge!

The sentiment stamp is from Festive Overlay by Tim Holtz/Stampers Anonymous,  the tag die is Papertrey, the holly die is Impression Obsession and the DP is Lawn Fawn.  I added some Clear Glitter Wink of Stella to the holly so it sparkles in the light.  
I also added 3 white glitter paper dots at the bottom, that were in my 'bin of bits' on my work table holding bits left over from prior projects!

I'll miss making a new tag every day but will now use them on Christmas gifts to  friends and family and can also relax and enjoy the final weeks before Christmas!
Stamps:  Festive Overlay - Tim Holtz/Stampers Anonymous
Paper:  white, Pure Poppy, New Leaf - PTI, DP Snowy Day Remix - Lawn Fawn
Ink:  Obsidian - Altenew
Accessories:  Tag Sale #10 die - PTI, Patchwork Holly die - Impression Obsession, Clear Glitter Wink of Stella, red/white bakers twine.

Sunday, December 12, 2021

12 Tags of Christmas - Tag #11

 Only one more tag left after today's #11 tag - the theme song is "Oh, Christmas Tree" and you can see I had the perfect sentiment!   Check out this fun challenge over at Ellen Hutson's blog here.

The sample tag by Carissa Riley had a pink tree on it so that inspired me to make a pink tree too!
I die cut the tree pieces twice - from a light and a dark pink glitter cardstock.  Then made my two trees alternating the two colors.  I cut the tags out of white card and cut designer papers for the top and inside panels.  I stamped the sentiment and punched it out with a word window punch and looped a piece of pink bakers twine through the top.  I really love these trees in pink! 


Stamps:  Rubber Soul
Ink:  Obsidian - Altenew
Paper:  White - PTI, glitter card - Michaels, SP Craft Papers Ink Drops Earth and In Drops Dusk - Craft Consortium.
Accessories:  Folded Tags die 0 PTI, Snow covered stacker tree die - Dees Distinctively, Word Window Punch - SU, foam dots, pink bakers twine.

Saturday, December 11, 2021

12 Tags of Christmas - Tag #10

Tag 10 of the 12 Tags of Christmas featured today!   Playing along with Ellen Hutson's Challenge seen here.   

Every day for 12 days there is a song theme for a tag with 2 designers posting samples to inspire us!

Tag 10's theme song is The 12 Days of Christmas.   

My tag features 4 calling birds (3 are on the DP)!  I used two different tags, layering the smaller one from Poppy Stamps over the larger one from Lil Inker Designs so I could feature the fun 'calling bird' from the 12 Days set  (on sale now!) on the smaller and patterned paper with birds on it on the larger tag.   

I colored the bird with Copics to match those on the patterned paper and drew a matching leafy vine for her to stand on while she's calling on the phone (!).  The sentiment is an Occasions Sticker.

Just a two more tags to go!


Paper: White - PTI, DP free with a crafts magazine.
Ink: True Black - PTI
Accessories: Copics 100, R27, YG03, E33, YO6, Taglet and Bow die - Poppy Stamps, Heart Embossed edge tag - Lil Inker Designs, red/white bakers twine, Occasions Stickers - Tim Holtz/Idea-ology.