Monday, January 10, 2022

2nd Project - January Collaboration with Eileen Hull/Sizzix and Gel Press

Today I'm sharing my 2nd project for Eileen Hull's Inspiration Team's January collaboration with Gel Press.  We are using Gel Press products with Eileen's Sizzix Dies.  Check out Eileen's blog all this month for a gathering of the teams projects!

 This time I made a journal using Eileen's Full Size Journal Sizzix Bigz Die. I created  Gel Plate prints for the covers and pages of my journal. 
(See my first project here if you missed it!)
 
First, I'll show you my finished journal.
Then, I'll share photos of how I created the Gel Plate prints.
WARNING: PHOTO OVERLOAD!

The stamp used on the cover of my journal is from Eileen's Button Cards and More Set.

 
I covered the binding of the journal with a piece of  Cork Roll from Sizzix.
I  tied black elastic cord around the binding to add the pages.  I made 2 signatures - 6 pages each.


 To create the Gel Plate print for my covers, I laid a piece of 8 1/2" x 11" card stock on my worktable and laid the 12"x12" Gel Plate over it.  I made prints on 8 1/2"x11" white card so having a piece under the 12" plate showed me the area to ink over.

I used different combination of 3 Distress Oxide Inks for all my Gel Press prints for this journal -  DOX Spiced Marmalade, DOX Speckled Egg and Dox Seedless Preserves.

For the covers I made 2 similar prints.  I dragged the ink pads across the Gel Plate using DOX Speckled Egg and DOX Spiced Marmalade, trying not to overlap the colors and contaminate the ink pads. You can hardly see the Speckled Egg but it's there!  I used a 6" brayer over the Gel Plate to blend the lines a bit.  I flicked some water over the Gel Plate to create some water marks.

 I laid my 8 1/2" x 11 piece of white card over the Gel Plate and pressed evenly over the paper and pulled this print off.
I repeated the process to get a 2nd similar print.

I wanted to add some patterns to my prints so I got out Tim Holtz/Sizzix Bubbling Cover Plate die and die cut it out of white card.  I laid the die cut over the clean Gel Plate and brayered DOX Speckled Egg ink over the die cut.  I repeated this in the other 3 corners and removed the die cut.  

I laid my inked print (above) over the Gel Plate and pressed over the paper.  I repeated the process with my second cover print.

Here are the final 2 cover prints.

I then die cut these panels with Eileen's Sizzix Full Size Journal Die, just cutting the cover piece and the two pieces for the closure.  I adhered these to the mat board journal die cut pieces.

Then I set out to create the pages for the journal - playing with  different Gel Plate techniques I'd seen on YouTube videos.  I wanted to make pages that were interesting but not too bright so I could journal on them or add photos etc. I did Gel Prints on both sides of the 8 1/2"x11"white card stock I used for the pages.   After printing, I folded each piece in half to create two pages from each print.

The first two were made simply swiping the pads across the Gel Plate.  On this one, I brayered over the inks on the Gel Plate to blend the edges. Then I flicked a little water over the inked plate,  laid the white card over the Gel Plate, pressed all over the surface of the paper and pulled the print.

This page below was made the same as above but I forgot to brayer over the Gel Plate to blend the ink so the lines between colors are more distinct and there is some white between the colors.  I also flicked this one with water before pulling the print.
I inked the plate again and then pulled a Gel Press Texture Comb over it randomly
The comb marks give added texture to this print.   I did not brayer the inks over the Gel Plate so the lines between colors are less blended.  See how dark the ink is on the print below?  but it looks so light above on the Gel Plate?  If I didn't have the white card under the Gel Plate I don't think I would have been able to see the ink at all.
 A print using the same inks, different Gel Press Texture Comb edge used, which I just pulled straight down the Gel Plate.

Same inks, using another edge of a Texture Comb in opposite directions over the inked Gel Plate.


 Then I made a print using the Gel Press Rose Mandala Impressables.  (You can ink over this design gel plate and 'stamp' the design or press it onto an inked Gel Plate for a negative print, or ink the raised design and pull a print off it). I rubbed DOX Speckled Egg Ink over the 12"x12" Gel Plate, then I pressed the Rose Mandala Gel Plate into the ink on the plate and then pulled the print

I love how this print came out! It's not centered  but perfect for a page background!

 For this print, I rubbed DOX Spiced Marmalade ink over the Gel Plate, blended the ink with the brayer and then pressed  the butterfly, leaf and diamond shaped Sweet Nature Petites onto the Gel Plate.  I flicked water over the Gel Plate, pressed the paper onto the plate and pulled the print.


 Rather abstract shapes achieved (obviously didn't use equal pressure!?!) - but it makes a lovely background for a page!  
I had to get used to the fact that with Gel prints it doesn't have to be perfect!?!

 For my next print, I rubbed the DOX Seedless Preserves over the Gel Plate and blended it with the brayer.  Then I put Eileen's Heart Mandala die onto the Gel Plate - cut edges down - and pressed over the die with my fingers.  I repeated that in the opposite corner and then dragged a Gel Press Texture Comb edge across the open space where I hadn't pressed the die.

I love the light print the die makes (I saw this technique on YouTube as well)
I used the die again on my next print.  This time I dragged the Dox Speckled Egg Ink over the Gel Plate and brayered over the ink.  Then I pressed Eileen's Heart Mandala die onto the plate cut edge down in 3 places.  I hadn't thought to clean off the die and apparently there was still Dox Seedless Preserves ink on the die from the prior print I made. There was enough ink on the die to show up like this on the print!  
Happy accidents!
For my final two pages I wanted to try using stamps on the inked Gel Plate. I dragged the Dox Speckled Egg and Dox Seedless Preserves over the Gel Plate.  After blending with the brayer it looked mostly like Seedless preserves on the plate. 
(I blended it a bit too much?! or I should have cleaned my brayer?)  
I took Eileen's Vintage Damask Maker Forte Stamp and just pressed it, un-inked, onto the Gel Plate moving and pressing down on the stamp until it covered the whole area.  This is the resulting print!  
For my next print, I cleaned off my Gel Plate and rubbed DOX Speckled Egg over it. I brayered the ink to blend the edges and then stamped with the un-inked stamp over the whole area. 
(it doesn't look like there's any ink on the Gel Plate but there is!)
This print came out much lighter than the one using Seedless Preserves but I love the beautiful subtle look, perfect as background for a page! Next time I might ink the Gel Plate a little more.
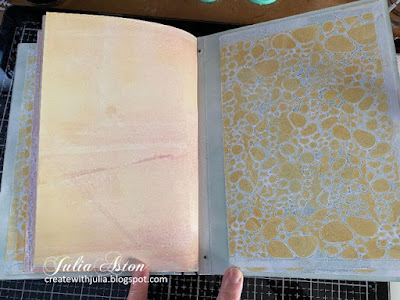
I realized I needed to make another print to cover the brad tabs on the inside of the covers of my journal.  I inked the Gel Plate with DOX Speckled Egg.

I laid the Pebbles Stencil from Lavina over the top half and sponged DOX Spiced Marmalade over the openings of the stencil.
I moved the stencil to the bottom half and sponged again.
Here's the gorgeous print that this made!
and a close up  - so cool right? It looks like corpuscles swimming in an artery or vein?!
I cut the print in half and it wasn't quite large enough to cover the inside of the covers, so I inked around the edges of the covers and then adhered the pieces.


So here are all the pages as you see them in the journal.


Thank you for sticking with me to the very end!
 
I enjoyed learning a few tricks for creating Gel Plate prints and I know there is so much more that can be done!  I have tried using acrylic paints but haven't gotten the hang of 'a little goes a long way' yet, so for this journal I just used the Distress Oxide Inks!  Maybe next time??!


Tuesday, January 4, 2022

Eileen Hull - Gel Press Collaboration - Calendars for 2022

Happy Healthy New Year everyone!  Wow - another year gone by - here's hoping 2022 goes a little better than 2021 did.

This month several of Eileen Hull's Inspiration Team is collaborating with Gel Press - using their products to create papers to use with any of Eileen's Sizzix Dies.

So, I have not created much with Gel Plates and the little I did try didn't work out too well.  So when I signed up for this collaboration - I did a deep dive into YouTube videos looking for techniques where I found lots of inspiration.  I wrote down the steps for the projects I liked and had the supplies for, and went up to my craft room with several sheets of technique instructions.  The trick is, to just play, don't think you'll have a finished project at first try (although maybe you will!)

I am very happy with what I finally ended up with after a couple of hours of playing, but I do have to say there was a lot of trial and error, trying colors that didn't work out together, trying stencils and die cuts that didn't give a good print - so I will tell you that if you are new to this like me -  just keep playing!! - trying different techniques and variations of inks, paints, papers etc.

Here is what I consider my first successful project using a 6" square Gel Plate, a 4" brayer, inks, a stencil listed below and Eileen's Display Stand Sizzix Die.

This wonderful Display Stand die can be held two ways so I made two calendars to show the two positions.

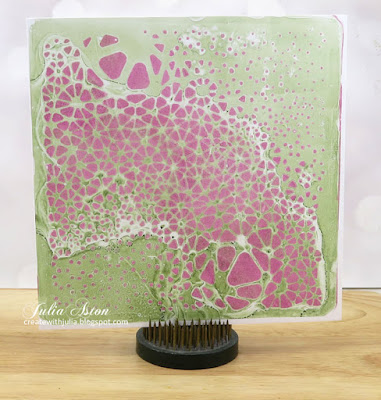
One of the videos I watched used Elements ink in Olive and Distress Ink in Ripe Persimmon so I got those out to try.  I recently purchased this wonderful stencil called Milky Way by A Colorful Life Designs and thought it might look interesting on a 'pull'. 
 
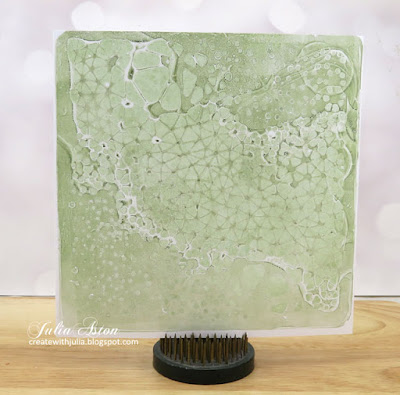
First I rolled the brayer over the Olive ink pad and then brayered over the Gel Plate to get even coverage - very little ink is needed.  Next, I laid the stencil over the inked Gel Plate and pressed over the stencil with my fingers to be sure it was flat against the gel plate.   Then I inked a foam make up sponge with Ripe Persimmon and pounced over the open areas of the stencil. 
And when I 'pulled' off the print - I had this beauty!
I decided to try other ink colors while I was playing. 
  
Below is the pull (print) using Olive Elements ink on the Gel Plate and Speckled Egg Distress Oxide ink sponged through the stencil.  The blue totally blended into the green looking more like a monoprint - but will make a nice background for something.
Below is Olive Elements Ink background with Seedless Preserves Distress Oxide ink sponged through the stencil.  I tried to use colors opposite each other on the Color Wheel.
Below is another one that came out a monoprint even though it's two different colors -  Henna Elements Ink background with Ripe Persimmon Distress Ink through the stencil. 
(the Persimmon blended totally with the Henna, you'd never know it was there)
And this one below is Mermaid Lagoon Distress Oxide background with Ripe Persimmon Distress Ink through the stencil.  I used this pull for my 2nd calendar.
I cut my Gel Plate panels to fit the two panels I wanted to cover on the Display Stand die cut.  
I didn't want to cover up the beautiful print too much, so just added 3 strips of Little Gold Stars Washi tape from Alexandra Renke, the Mini Tear off Calendar from Taylored Expressions and a Metallic Sticker/Quotations from Tim Holtz/Idea-ology.
Look at the wonderful detail on this print! 
Here's the back of the Display stand - holding it this way.
Here is my 2nd Calendar holding the Display Stand the other way.
I used the pull that is Mermaid Lagoon Distress Oxide background and Ripe Persimmon Distress Ink through the stencil.  The sentiment is from Tiny Text by Tim Holtz/Stampers Anonymous, the Little Red Hearts Washi tape is Alexandra Renke and the clear red hearts are from Honey Bee Stamps.
I off-set the sentiment and calendar so I didn't hide the pretty 'flow' of the stenciling! 
(my husband hates when everything isn't lined up evenly!)
A close up of the detail on this pull. The Mermaid Lagoon ink printed much lighter than it actually is and didn't show the watery look the Olive Elements ink did on my first calendar.  I think DOX inks print lighter than Distress Inks? You never know what you will get until you try it! 

So I'm quite happy with the way my first Gel Press projects look and am eager to 'play' some more!  I'll be back next week with another collaboration post!

Have you done any Gel Plate projects?

Check out Eileen Hulls Blog every Wednesday this month to see what others on her Inspiration Team have done using Gel Press Supplies and Eileen's Sizzix dies!  

Stamps:  Tiny Text - Tim Holtz/Stampers Anonymous
Paper:  White, Terracotta Tile - Papertrey Ink, White Little Sizzles Matboard - Sizzix
Ink:  Olive Elements - Lavinia, Ranger Distress Ripe Persimmon, Ranger Distress Oxide Mermaid Lagoon, Obsidian - Altenew.
Accessories:  Display Stand Die - Eileen Hull/Sizzix, 6" square Gel Plate, 4" brayer - Gel Press, Milky Way Stencil - A Colorful Life Designs, 2022 Mini Tear Off Calendar - Taylored Expressions, Little Gold Stars Washi, Little Red Hearts Washi - Alexandra Renke, Red Hearts - Honey Bee Stamps, rubber make up sponge.

Monday, January 3, 2022

January CAS Christmas Card Challenge - Silver and Gold

 The CAS Christmas Card Challenge is back after a little break over December.  And I am hosting the January Challenge which is to use Silver and Gold!

My card today is truly CAS - just two die cuts on a 4 1/4" square card!  
I bought both of these dies last year but didn't use them until today!  I die cut The Angel Corner by Tutti Designs out of silver and the Alleluia die from Simon Says Stamp out of gold - the Alleluia die comes with a shadow die to put behind the cut word but I didn't use it today.  
I made 4 of these while I was at it as it was so simple!
So please join us and get a jump on your Christmas Cards right off the bat!  You'll find the challenge here.  You'll also find lots of inspiration from the rest of the DT as well as our wonderful Guest Designer this month - Lisa (My Paper Tales)


I'm also linking my sparkly silver and gold card to:
The Paper Players
It even looks rather like the bottom right photo!

NBUS Challenge

bought my dies last year but never used until today


Paper: White - PTI, Metallic Silver and Gold - Kraft Paper Pad Metallics - Tim Holtz/Idea-ology.
Accessories: Angel Corner Die - Tutti Designs, Alleluia Word and Shadow Die - Simon Says Stamp, Glue pen.