Friday, August 17, 2018

White Christmas Tree

I've got another card made for my Christmas Box!
Clean and simple - just some layered die cuts out of water color paper (it gives a subtle texture to a card!)  The base dies are Noted: Scalloped Square from PTI and the lovely layered tree is Snow Covered Stacker Tree by Dee's Distinctively (this may be retired but I found it here on Amazon.)  It's a small card measuring 3 3/4" square.

I've left it plain on the outside and stamped a Christmas sentiment inside.

I'm linking my card to:

Anything Goes
Anything Goes
Paper:  Water color paper - Canson
Accessories:  Noted: Scalloped Square Dies - PTI, Snow Covered Stacker Tree Die - Dee's Distinctively, foam dots.

Thursday, August 16, 2018

A Birthday Sunflower

Today I have a summer birthday card with a lovely watercolored sunflower to share.
I embossed the image with Tree Branch Embossing Powder to give it a subtle outline for my watercoloring.  I watercolored with Ranger Distress Inks, rubbing each ink on my craft mat and dipping a wet brush into the color.  I used Spiced Marmalade, Wild Honey, Scattered Straw for the flower and background and Twisted Cintron for the leaves.  I used just a spot of Walnut Stain to color the center where the seeds would be!   I also embossed the sentiment with the same Tree Branch EP.

I'm linking my card to the following challenges:


One Layer Card


Stamps:  Botanical Blocks - PTI
Ink:  Versamark, Ranger Distress Spiced Marmalade, wild Honey, Scattered Straw, Twisted Cintron, Walnut Stain.
Paper:  Water Color Paper - Canson
Accessories:  Craft Mat, brush, water, heat tool, Wendy Vecchi/Ranger Tree Branch Embossing Powder.

Wednesday, August 15, 2018

Mid-month Reminder - August CAS Mix Up - Stencil Monoprint

Today I'm here with a mid-month reminder of the August CAS Mix Up Card Challenge, Nancy is our hostess and her challenge is Stencil Monoprint.
Here's my card using Stencil Monoprint with Brushos, sponging with Tea Dye Distress Ink, stamping and enamel dots.
The photo below shows how I used Leaf Green and Turquoise Brushos through a stencil on the left panel spritzing with water to activate the Brushos, then made a negative print by pressing another panel over the stencil that had the watery Brushos on it, and then laid the stencil over that print and sponged Tea Dye Distress Ink over the stencil.
I used the techniques on this video: Color Burst and Stencils: by Shelby Thomas

You'll find lots of inspiration from the Design Team, and Guest Designer:  Cathy (Cathy's Card Spot) as well as links to technique videos, and challenge rules over at the CAS Mix Up blog!  You have until 8/24 to link up your cards!

I'm also linking my card to:
Inkspirational
my colors are like some of the green popsicles!

The Craft Stamper Magazine
Take it Make It Challenge


Stamps:  Ways to Say: Get Well Soon - PTI
Paper:  Water color paper - Canson, white - PTI
Ink:  True Black - PTI, Ranger Distress Ink - Tea Dye.
Accessories:  stem stencil - Ali Express,  Leaf Green and Turquoise Brushos, water mister, Enamel Dots - Stamplorations.

Tuesday, August 14, 2018

Good Fortune

Today I have a card that I made for my son's girlfriend who was laid off a month or so ago - but has already found a wonderful job as a job placement counselor at a college in West Virginia.  She is a go-getter who never lets bad things get her down and I wanted to let her know how proud I am of her.
I love these fun Fortune Cookie dies and Good Fortune sentiment stamps from Ellen Hutson and they were perfect for me to get all these messages to Sunny in one card!   I copied the college logo from her FB page that she had posted when she got the job.

I'm linking my card to:

Stamps:  Good Fortune - Ellen Hutson
Paper:  Rustic Cream - PTI, Origami Paper
Ink:  True Black - PTI, Ranger Distress Tea Dye Ink
Accessories:  Fortune Cookie Dies - Ellen Hutson, Pierced Feature Frames Die - PTI, foam dots,  printed logo from Valley College.

Monday, August 13, 2018

Seas the Day

Another ocean themed card - using these most wonderful dies from PTI - Reef Builder Die set and the Shape Shifter - Oval 2 Die set. 
(the reef set is presently sold out but you can click on 'notify me' and they will e-mail you when they are back in stock - that's how I got mine as it sold out within minutes on it's release day!)
I'm linking my card to:
Toppings Water

It was also made for one of the week long Dare To Get Dirty challenges over on Splitcoaststampers last week.  The theme was under the sea and you had to use a pearl.


Stamps:  Salty Air Sentiments set - PTI
Paper:  White, Blueberry Sky, Dark Indigo, Spring Rain - PTI
Ink:  Dark Indigo - PTI
Accessories:   Pearls - Kaiser Craft, Reef Builder Die Set, Shape Shifter Oval Die - PTI, 1 1/4" circle punch, Word window Punch - SU, foam dots.

Sunday, August 12, 2018

Too Cool for School

I like to send my young grandnieces and nephews cards during the school year - and so I made these to be ready for when they go back in the fall!
I used this wonderful Swirly Waves Background stamp from Technique Junkies and the fun S'Whale stamps and die set from Ellen Hutson.  I used Ranger Distress Salty Ocean Ink for everything!
I'm linking my card to:

My theme was inspired by this card of Featured Stamper Beth over at Splitcoaststampers

Stamps:  Swirly Waves - Technique Junkies, S'whale - Ellen Hutson
Paper:  white - PTI
Ink:  Ranger Distress Salty Ocean
Accessories:  S'whale die set - Ellen Hutson, foam dots

Wednesday, August 1, 2018

August CAS Mix Up - Stencil Monoprint

Wow -  It's already August - halfway through the summer - and also time for a new CAS Mix Up challenge!
Nancy is our host this month and her challenge is Stencil Monoprint!   And if you don't quite know what that is -  check out the blog where there are several links to YouTube videos showing ways to use this technique!
I checked out this video by Shelby Thomas that is posted over at the CAS Mix Up blog and created my card in a similar fashion.  I ended up with red brick with grey grout using this technique!
I used Brushos on my Intersecting Bricks stencil twice - a postive and a negative print of the stencil - and before you get confused - I've got several photos to show you the process I used to end up with this monoprint!
So, oddly enough I started out with Grey Brusho, sprinkling it over the stencil onto the watercolor card panel under the stencil. 
I spritzed with water to activate the Brusho Powder.
Then I removed stencil and you see this result below.  
 (I will use this grey panel another day)
Put this panel safely aside as you move on to make a negative print.
 (dry the panel with your heat tool after you finish your negative print)
You'll see lots of watery paint on the stencil that you just used to make the grey print.
Quickly turn it over on top of a clean panel of water color paper and press over it with a paper towel.
Remove the stencil and you will find this negative print. Dry it with your heat tool.
So here is the beginning of the panel I used on my card! 
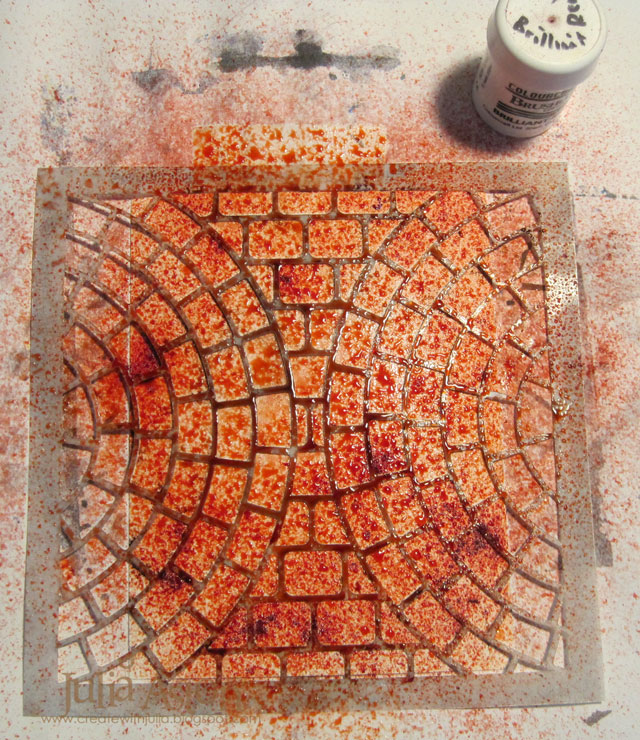
I then laid the stencil over this panel matching up the stencil with the lines on the panel.
Now it looks like there is just a clean sheet under your stencil.
Then I shook Brilliant Red Brushos over the stencil and activated it by spritzing with water.
I dried it with my heat tool - and finally - here is the panel I used on my card!
Red brick with grey grout!
Dry it with your heat tool.
So just to confuse you more!  Now you have a stencil with red Brushos on it - that you can flip over and make another negative print!
For this one - after I dried this print - I laid the stencil back over it and sponged over it with Distress Frayed Burlap
And ended up with this panel (tan brick with red grout!) that I will use on another day.
So here's my card again 
(SORRY!  it's been such a long post I'm sure you've forgotten what I made!!??
And since I had cut my panel in half to make this a CAS design - I made a 2nd card and left off the flower die cut to make it masculine.
I hope I haven't scared you away - this is really simple - it just takes lots of words to explain! And I'm sure you'll grab all your stencils to see how each one works with this technique! 

You'll find lots of inspiration from the rest of the Design Team as well as our August Guest Designer:  Cathy (Cathy's Card Spot)  along with links to several technique videos, over at  The CAS Mix Up Blog.

You have until August 24th to link up your CAS Stencil Monoprint card - and I can't wait to see what you do!!

I'm linking my card to:
Happy Little Stampers

Simon Says Stamp
Make Your Own Background


Stamps:Sentiment Staples - PTI
Paper:  Watercolor paper - Canson, Soft Stone and White - PTI
Ink: Hero Hues Black
Accessories: Intersecting Brick Circles Stencil - Stencil Girls, Flower Die - Ali Express, Brushos - Gray and Brilliant Red, foam dots, Tombow Glue, water mister.